How to remove a screw from a hard drive? Option No1. Phillips slot
When some hardware problems appear with a hard drive, if you have the proper experience, it makes sense to inspect the device yourself, without resorting to the help of specialists. Also, those people who just want to gain knowledge related to assembly and the general view from the inside resort to disassembling disks on their own. Typically, non-working or unnecessary HDDs are used for this purpose.
First, I would like to warn beginners who want to try to fix the hard drive themselves if any problems arise, for example, a knock under the cover. Incorrect and careless actions can easily damage the drive and lead to permanent damage and loss of all data stored on it. Therefore, you should not take risks, wanting to save money on the services of professionals. If possible, make backup copies of all important information.
Do not allow debris to get on the hard drive plate. Even a small speck of dust is larger than the flight height of the disk head. Dust, hair, fingerprints or other obstacles to the movement of the read head on the plate can damage the device, and your data will be lost beyond recovery. Perform the analysis in a clean and sterile environment, wearing special gloves.
A standard hard drive from a computer or laptop looks like this:

The back is usually the back of the controller that is held on by torx screws. These same screws are also on the front of the case. In some cases, an additional screw may be hidden under the factory sticker, so after unscrewing the visible screws, open the cover very smoothly, without sudden movements.
Under the cover there will be those components of the hard drive that are responsible for writing and reading data: the head and the disk platters themselves.

Depending on the volume of the device and its price category, there may be several disks and heads: from one to four. Each such plate is put on the motor spindle, arranged according to the “storey” principle and separated from the other plate by a sleeve and a bulkhead. There can be twice as many heads as disks because each platter has both sides for writing and reading.

The disks rotate due to the operation of the motor, which is controlled by the controller through a loop. The principle of operation of the head is simple: it rotates along the disk without touching it and reads the magnetized areas. Accordingly, all interaction of these parts of the disk is based on the principle of an electromagnet.
The head has a coil on the back where the current flows. This coil is located in the middle of two permanent magnets. The strength of the electric current affects the strength of the electromagnetic field, as a result of which the bar chooses one or another angle of inclination. This design depends on a separate controller.

The controller contains the following elements:

In this article we told you how to disassemble a hard drive and what parts it consists of. This information will help you understand the principle of operation of the HDD, as well as possible problems that arise during operation of the device. We remind you once again that the information is for informational purposes only and shows how to disassemble an unusable drive. If your disk is functioning normally, then you cannot disassemble it yourself - there is a high risk of damaging it.
External hard drives from any manufacturer, including Western Digital, are convenient due to their mobility. If you purchased the hard drive and the case for it separately, then you should not have any questions during assembly and disassembly. However, in the case of “ready-made” external hard drives from the manufacturer, the case often lacks the necessary bolts and fasteners, therefore, the case cannot be disassembled.
You will need
- - screwdriver.
Instructions
Carefully inspect the hard case disk. Remove the protective rubber bands, if any. Prepare a couple of plastic cards (that are not afraid to break) and a flat-head screwdriver. As a rule, hard drive models may differ slightly in assembly, so prepare a couple of screwdrivers of different diameters.
Carefully insert the corner of the plastic card into the slot on the case. Move the card slightly until the entire edge of the card fits into the slot. Now press lightly on the card to widen the gap. Repeat this procedure for the other side of the case. If necessary, insert two cards at the same time to loosen the fastening on opposite sides.
Expand the gap until you hear a slight click - at this moment the internal latches hidden in the case will open. Unlock the latches on all sides. Now you can remove the plastic cards. Try to perform these procedures carefully, as you can damage the entire body, as well as the insides.
Open the housing using a screwdriver. Remove the hard drive after first disconnecting the fan (if equipped) and the controller connectors. If you didn't break the latches, then the hard drive can be easily put back together.
Proceed with caution as any sign of damage to the external hard case disk, even a small scratch will constitute mechanical damage and you will void the warranty on the device. You should not disassemble the external hard drive unless absolutely necessary. As practice shows, most disassembled hard drives do not work when reassembled, because various dust gets inside, or the bolts are simply not tightened correctly. Try to use unnecessary parts for disassembly.
Having dared to repair a hard disk, many novice users do not understand what they can do with the disk if they open it at home. When assembling a hard disk During production, a vacuum is created inside the box, which allows it to work for a long time. The hard drive becomes unusable after a few seconds of exposure to air. Experienced personal computer users disassemble the hard drive case disk only with full confidence in the non-working state of the hard disk.

You will need
- Hard drive, screwdriver “+”, hexagon.
Instructions
Hard disassembly disk start by dismantling the control board. The control board is a regular circuit board onto which a set of parts is soldered, including modern memory chips. Depending on the type of hard disk, for dismantling you will need either a screwdriver or a hexagon. Remove the 3 main screws, then remove the hard drive control board. disk.
Under the control board there is a cover for the hard drive. disk, under which the entire hard drive device is located disk, which you've probably seen many times in photos taken by other users of broken hard drives. Remove the 7 screws, then remove the hard drive cover disk. The main task of dismantling the hard disk finished. If you are disassembling a hard drive for the parts that are inside, then proceed further.
All other parts: filter, heads and disks can be disassembled with a screwdriver. Be careful when disassembling the rigid head mechanism disk– they are equipped with powerful magnets, you can get your finger pinched. After you remove the “pancakes” of the hard disk, you can make sure that their surface is easily scratched by any object. The number of heads in a hard drive is twice as large as the number of “pancakes”. Therefore, if your hard drive had 4 “pancakes”, therefore, the number of heads will be equal to 8.
If your hard drive fails, you can disassemble it into parts. But such a procedure requires certain skills. To properly disassemble a hard drive, it is important to know a few useful rules.
If you want to repair your hard drive, then know that you cannot open it at home. During assembly of the hard drive, a vacuum is specially created inside the box, thanks to which the device can operate for a long time. If you pull out a hard drive, it will become unusable after a few seconds of exposure to air. Therefore, you can disassemble the device only if you are completely sure that it is faulty. Before removing the hard drive, turn off the computer and unplug the wire from the outlet. If you are using a desktop computer, remove the side panels from the system unit. There are six bolts on the back of the cover. Unscrew them to remove the hard drive without unnecessary obstacles. Disconnect all wires and cables that are connected to the hard drive. Do this very carefully so as not to damage the wires. After this, you can begin to unscrew the hard drive mounting bolts. If you want to remove the hard drive that is in the laptop, first completely disconnect it from the power supply, close the lid and turn it over. Remove the battery from the computer. There is a special latch on the laptop body. Grab it with one hand, and with the other, press up on the back of the computer. Proceed carefully - to ensure that nothing breaks, apply even force. Then the cover will give way and you can remove it from the body.


Now you know how to disassemble a hard drive into small parts. Try to act slowly and carefully - then you will not damage anything and remove the necessary elements safe and sound.
1. Assign a drive letter, the system will not see a drive without a letter.
2. A program like Acronis will help you.
3. You can find the boot partition magic, and use it to work with partitions.
It’s easier to “password” user accounts of the operating system (but keep in mind that in Windows OS you can simply “reset” it). And a password for the entire disk can be set using special. software for data encryption (DriveCrypt, for example).
I don’t know what it is, but go to the root of this disk with a “third-party file manager” that shows hidden and system files, Far for example, and delete everything there, or at least look at what files are there. and best of all, copy everything you need from there and format it.
Mmmmmm, let me see...
I have 80 (at work) and it’s calling
and at home the note is from 60, that’s also enough
PySy It’s not good to brag. Didn't your mom teach you? :)
What do jumpers have to do with it if the disk doesn’t even “buzz”? That is, the plates do not spin. And this cannot be cured with jumpers.
Or the disk is completely dead. Or, if you’re sooooo lucky, the power protection worked. And this can be cured in the workshop.
http://shmizok.times.lv
when China recovered after that tsunami (((
Until it is possible... when formatting, you select which of the disks you want to Format...
If you look on the Internet, there are a lot of programs that can solve this problem. Most of them are paid (shareware in native language), but this does not mean that even a paid program will not harm the performance of your unit. It is highly not recommended to use programs of this type, they do not provide any guarantee, especially those that will install protection at the level of the boot sector of the hard drive - you will also lose the primary one (supposedly)...
If your hard drive fails, you can disassemble it into parts. But such a procedure requires certain skills. To properly disassemble a hard drive, it is important to know a few useful rules.
If you want to repair your hard drive, then know that you cannot open it at home. During assembly of the hard drive, a vacuum is specially created inside the box, thanks to which the device can operate for a long time. If you pull out a hard drive, it will become unusable after a few seconds of exposure to air. Therefore, you can disassemble the device only if you are completely sure that it is faulty.
Before removing the hard drive, turn off the computer and unplug the wire from the outlet. If you are using a desktop computer, remove the side panels from the system unit. There are six bolts on the back of the cover. Unscrew them to remove the hard drive without unnecessary obstacles. Disconnect all wires and cables that are connected to the hard drive. Do this very carefully so as not to damage the wires. After this, you can begin to unscrew the hard drive mounting bolts.

If you want to remove the hard drive that is in the laptop, first completely disconnect it from the power supply, close the lid and turn it over. Remove the battery from the computer. There is a special latch on the laptop body. Grab it with one hand, and with the other, press up on the back of the computer. Proceed carefully - to ensure that nothing breaks, apply even force. Then the cover will give way - and you can remove it from the body.

Some devices are not marked. If it is not there, you will have to open all the covers on the back panel one by one. The hard drive is located under a black film. There is a protrusion on the plug of its cable. Disconnect the cable from the connector. Then remove the securing screws. There is a protrusion on the hard drive case - pull it and carefully remove the device.

Prepare a box for small parts, a hard drive, a set of thin screwdrivers and a knife. Wipe the work surface from dust with a dry, clean cloth. Remove the motherboard, which contains resistors, transistors, small circuits, etc. Unscrew the three main screws and carefully remove it. Under the board is the hard drive cover with all the details.

Unscrew the seven screws and remove the cover. Then remove the magnetic head unit. To do this, unscrew the two screws on both sides of the hard drive. Another screw is located in the center - unscrew that too. Be careful - the recording heads have powerful magnets, so you risk getting your fingers pinched. After this, unscrew the four screws and remove the discs from the engine.

The engine base is held in place by three screws. Unscrew them. There are coils located inside the engine. They rotate thanks to a glued magnet. Carefully remove all coils and magnet from the mount. After this you will be left with an empty screw. This completes the disassembly procedure.

Now you know how to disassemble a hard drive into small parts. Try to act slowly and carefully - then you will not damage anything and remove the necessary elements safe and sound.
SovetClub.ru
How to disassemble a laptop hard drive - tools and simple techniques
Sometimes the user needs to disassemble the HDD drive of his laptop:  for example, for repairs, “donation” of spare parts, or for the purpose of turning a non-working device into some kind of decorative element. We will now tell you more about the analysis process in an accessible way and in Russian. Before you disassemble the hard drive from your laptop, you need to remove it. To do this, you need to remove the back cover of the portable personal computer, unscrew the screws holding the device at the ends, and carefully pull out the drive so as to disconnect the connectors. Only after completing these operations can you remove the HDD.
What tools should you stock up on before disassembling your hard drive?
Before disassembling a laptop hard drive, you need to acquire the appropriate set of tools. To determine its composition, you need to carefully examine the drive itself. Different HDD manufacturers use screws with different slot shapes on the head, so there is no universal solution. As a rule, to disassemble a laptop hard drive, you need a small (“clockwise”) Phillips screwdriver and a key, the cross-section of which has the shape of a 6-pointed star (the so-called Torx). The dimensions of the screwdriver and key, however, must be selected individually for a specific drive model. The design of some HDDs does not contain fasteners with a slot for Phillips screwdrivers - in this case, only a key will be enough. It is also useful to have special flat levers that can be easily replaced with a regular stationery knife.
Preparing the hard drive for disassembly
Also, before disassembling the hard drive, you need to determine where the screws are located. The difficulty is that very often manufacturers place them under various stickers. In addition, stickers also act as seals: the product warranty becomes void if they are removed. Therefore, it is not recommended to disassemble the laptop hard drive yourself before the warranty period expires.
Disassembling a laptop hard drive
So, you have removed the drive from the computer, acquired the necessary tools, and located all the screws. How to disassemble a laptop hard drive? This operation must begin by removing the controller. A controller is an element in a drive that controls the drive and transfers data. Technically, the controller is implemented in the form of a printed circuit board, which is connected via a cable to the mechanical part of the HDD. Unscrew the screws holding the controller to the case, then carefully - so as not to damage the cable - turn it over. After this, you can disconnect the cable from the board. On modern devices, very often the cable is adjacent to the board using contact pads, i.e. not attached to it. However, it is not recommended to abruptly remove the controller to avoid damage to the cable.
The next step is to disassemble the actual mechanical part of the laptop HDD. It should begin by unscrewing the screws holding the cover. Sometimes, in addition to them, manufacturers resort to various latches - this is where a stationery knife may be needed.
After removing the casing, you gain access to the internal mechanisms of the drive. The next step is to unscrew the screw holding the plates (“pancakes”) on the spindle. By removing them, you can also easily remove other structural elements: magnets, a parking space for the head, a block that moves the reading head. All these elements are secured with screws. It is worth noting that the magnets of the linear motor, which ensure the movement of the head, have extremely high induction - because of this, they are extremely difficult to separate from the body, even in the absence of any additional fasteners.
Disassembling a laptop drive should not cause any difficulties, provided that you have the appropriate tools and are careful when disassembling it. The main rule when working with such equipment is attentiveness. Do not make sudden movements or use excessive force: if you cannot detach a part, make sure that you have unscrewed all the screws, that the element is not held in place by a latch, and so on.
ruinfocomp.ru
How to disassemble a seagate hard drive
Perhaps every computer user has encountered one or another problem during his time working with a PC. Perhaps these were software errors, perhaps problems associated with the operation of the equipment. One of the most common and yet unwanted problems is hard drive (hdd) failures. Despite the fact that the average service life of a hard drive ranges from 5-10 years, due to unforeseen situations, problems in the operation of the hdd are possible even at an earlier period of operation. One of the possible solutions to problems with the hard drive may be to disassemble it and further clean or repair it. It should be noted that at the moment one of the most well-known manufacturers of hard drives is the American company Seagate, and it is on the example of one of these drives that we will consider disassembling the hdd.

How to disassemble hdd seagate?
So, how do you disassemble a Seagate hard drive?
First of all, it should be noted that it is not recommended to disassemble the computer hard drive yourself, since there is an extremely high probability of causing irreparable damage to the hard drive and breaking it through unprofessional actions. It is also recommended (if possible) to back up important data from the disk to another third-party media before disassembling.
First, let's characterize the main elements that make up Seagate hard drives:
Integrated circuit (controls the operation of the hdd and synchronizes with the operation of the PC) - spindle (electric motor responsible for rotating the disk) - rocker arm (responsible for reading / writing data) - the hard drive itself, the storage medium
The housing in which all other elements are assembled and is responsible for their protection from the external environment
Also, for external hard drives that are popular today, it is typical to use an additional case (the so-called “pocket”) in which the hard drive itself is stored. The pocket is designed for more reliable protection, ease of carrying and operating an external hard drive, and may also have additional connectors or cords.
In terms of assembly or disassembly, an external hdd is not much different from an ordinary internal hard drive. In fact, if the question arises “how to disassemble a Seagate external hard drive?”, the procedure will be similar to disassembling the internal hdd, the only difference is that you must first disassemble and remove the pocket of the portable hard drive. However, this is usually not difficult, since most often the outer case is secured with several small screws or latches.
Instructions on how to disassemble a hdd in Russian
When starting to disassemble a Seagate hard drive (or, indeed, any other manufacturer), you first need to remove the cover. Typically, this is as easy as loosening a few screws or loosening latches. However, if after such actions the cover does not come off, you need to additionally check all the stickers on the case; perhaps the manufacturer has hidden additional fasteners under them.
After removing the housing, you need to disconnect the integrated circuit (controller). As a rule, it is also attached with screws and can be easily removed. There is a thin foam pad underneath the controller that provides additional protection for the circuitry. This gasket can be removed using a knife (to slightly pry up the foam).
The next step in solving the problem of “how to disassemble a Seagate hdd” will be removing the top cover from the hard drive. This cover is also held on by several screws that are easily accessible. After removing the top cover, the “internal” elements of the hdd become accessible - the hard drive itself, the spindle, the magnetic head unit and the rocker arm. These elements are also attached to the case with screws, which can be unscrewed one by one to remove all parts of the hard drive.
Thus, when disassembling a Seagate hard drive, no particularly complex manipulations or tools are required; most often, only a suitable screwdriver is sufficient to remove the mounting screws. A knife can also be useful if you need to remove the controller gasket or it is not clear how to disassemble a Seagate portable hard drive, the outer case of which does not have screws visible.
ruinfocomp.ru
How to disassemble a hard drive yourself

When some hardware problems appear with a hard drive, if you have the proper experience, it makes sense to inspect the device yourself, without resorting to the help of specialists. Also, those people who just want to gain knowledge related to assembly and the general view from the inside resort to disassembling disks on their own. Typically, non-working or unnecessary HDDs are used for this purpose.
Self-disassembly of the hard drive
First, I would like to warn beginners who want to try to fix the hard drive themselves if any problems arise, for example, a knock under the cover. Incorrect and careless actions can easily damage the drive and lead to permanent damage and loss of all data stored on it. Therefore, you should not take risks, wanting to save money on the services of professionals. If possible, make backup copies of all important information.
Do not allow debris to get on the hard drive plate. Even a small speck of dust is larger than the flight height of the disk head. Dust, hair, fingerprints or other obstacles to the movement of the read head on the plate can damage the device, and your data will be lost beyond recovery. Perform the analysis in a clean and sterile environment, wearing special gloves.
A standard hard drive from a computer or laptop looks like this:

The back is usually the back of the controller that is held on by torx screws. These same screws are also on the front of the case. In some cases, an additional screw may be hidden under the factory sticker, so after unscrewing the visible screws, open the cover very smoothly, without sudden movements.
Under the cover there will be those components of the hard drive that are responsible for writing and reading data: the head and the disk platters themselves.

Depending on the volume of the device and its price category, there may be several disks and heads: from one to four. Each such plate is put on the motor spindle, arranged according to the “storey” principle and separated from the other plate by a sleeve and a bulkhead. There can be twice as many heads as disks because each platter has both sides for writing and reading.

The disks rotate due to the operation of the motor, which is controlled by the controller through a loop. The principle of operation of the head is simple: it rotates along the disk without touching it and reads the magnetized areas. Accordingly, all interaction of these parts of the disk is based on the principle of an electromagnet.
The head has a coil on the back where the current flows. This coil is located in the middle of two permanent magnets. The strength of the electric current affects the strength of the electromagnetic field, as a result of which the bar chooses one or another angle of inclination. This design depends on a separate controller.

The controller contains the following elements:

In this article we told you how to disassemble a hard drive and what parts it consists of. This information will help you understand the principle of operation of the HDD, as well as possible problems that arise during operation of the device. We remind you once again that the information is for informational purposes only and shows how to disassemble an unusable drive. If your disk is functioning normally, then you cannot disassemble it yourself - there is a high risk of damaging it.
We are glad that we were able to help you solve the problem.
Poll: did this article help you?
Not reallylumpics.ru
Disassembling the HP pd500a external hard drive
Disassembling an external hard drive, the process in most cases is not complicated and quick. But as it turned out, this does not happen with all disks. Once I got my hands on the HP pd500a external hard drive, everything was a little more complicated. After the fall, the disk did not want to be detected through the USB port and nothing could be reached. Having decided to disassemble and try a direct connection to the computer via a SATA cable, to extract at least some files.
With most drives, you simply pull out the top and we get to the hard drive itself. In this case, it was not so simple. After several attempts, the case did not give in and in order not to break anything, I looked for information on how to disassemble an external hard drive on the Internet, but apart from instructions for connecting to a computer, I did not find anything else. Therefore, I decided to write a small guide, maybe someone will find it useful. Looking ahead, I want to say that the hard drive does not have the ability to connect standard SATA, USB is soldered onto the board itself.
It was immediately clear that the case is held on by plastic latches. Having taken the pick for disassembly, I began to look for where to hook in order to disconnect the body.
Disassembling the HP external hard drive pocket
At first glance, a simple and convenient case with nothing superfluous.

As I already said, not seeing any cover or part that could be easily and effortlessly removed, I began to look for where the picks would catch. After turning it in my hands for a few minutes, I saw two slightly visible holes on the top of the case.
 Folder Access Denied - what to do?
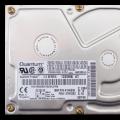 How to remove a screw from a hard drive?
 How to bypass a hardware ban in Warface - available ways to ban hardware in Warface