Is there a driver for hp lj 1000. Specifications and consumer reviews
Briefly:Driver for desktop laser monochrome printer Hewlett-Packard models LaserJet 1000 for MS Windows systems.
More details:HP LaserJet 1000 Printer Driver - this is the final official version drivers for the LaserJet 1000 model. This driver can only work on Windows operating systems versions 2000, XP and Server 2003. It will not function correctly on other versions of the Win system, so to avoid serious problems, do not try to install it on them. HP LaserJet 1000 Printer obsolete, no longer produced by the manufacturer and therefore no longer supported by them.A printer driver is required to enable communication between the computer and the printer, as well as to access all of its manufacturer-provided features.
Driver installation process
To update an old driver or install a new one, follow these steps:- first turn on the printer, then the computer;
- close all unnecessary programs and disable your antivirus just in case;
- download the HP LaserJet 1000 driver from the link below;
- run the downloaded file, it will begin unpacking;
- remember the folder where you unpacked the driver (by default it is called "C:lj1000hb");
- make sure the printer is connected to the computer and turned on;
- click the "Start" button on the Windows panel;
- go to the "Settings" menu, select "Printers and Faxes";
- to install a new driver, click the "Install a new printer" link and follow the wizard's instructions until you are asked to specify the location of the new driver;
- to update the old one, right-click on the printer icon;
- in the menu, click "Properties";
- on the main tab, select "New driver";
- go to the place where you need to specify the location of the driver;
- indicate the path where the driver was unpacked;
- select a file ending with the extension .inf;
- click the "Open" - "Ok" buttons and the installation will begin;
- Once completed, reboot.
LaserJet 1000 Series Features
Monochrome desktop lasers HP LaserJet 1000 printers have a classic, unremarkable design and serve for quite a long time, provided that the load on the printer does not exceed 7 thousand A4 pages per month. The printing noise level is 52dB, which is quite loud. The interface for connecting to a computer is a standard USB port (the parallel interface is not supported). The printer has toner save and power save modes. You will not find a single button on its body; all printer functions are controlled exclusively using software. Considering the class of this model, the printer has quite good capabilities - the print quality is very decent: high detail text is provided and good reproduction of gradient fills of halftone graphics.HP LaserJet 1000
Manufacturers from HP hardly expected that the HP LaserJet 1000 printer would be so high quality and reliable. Released almost 20 years ago, each individual model, even with a significant number of repairs, continues to serve. And here’s what’s funny - the printer is working, but “morally outdated”. Therefore, drivers for this printer are no longer available. And to install it on Windows 7 you need to look for “workarounds”. Let's consider these very paths. Below we will describe in detail how to connect this device to a computer running Windows XP/7/8/10. But you will need to use the program to work in new versions of Windows - 8-10.
Windows XP
Size: 4.2 MB
Bit depth: 32/64
Preparing for installation on Windows 7 x32

Go to the “Compatibility” tab and specify the parameters - “Windows XP (Service Pack 3)” and click “OK”.

Windows 7 – when x32 is not bad
Run the file you downloaded, click “Next” and then “Finish”.
A full installation will not occur. It will be interrupted at the beginning of the process itself. But we are interested in the unpacked files. Therefore, go to the “Devices and Printers” section and click “Add a Printer” (at the top).
- Select "Install a local printer".
- We leave the port unchanged.
- We select the HP manufacturer and look for the desired printer. If you are lucky, you will be able to find an HP LJ1000 and just click “Next”.
- Otherwise, click “Have from disk.”
- We move along the path that we remembered before. You need to go to the folder with the unpacked files.
- Select HPLJ1000.inf
- Click “next” and select “for local access”.
- Now you need to click “done”.
The installation is complete and the printer is ready to use. We just start using it after connecting it.
Windows 7 x64 andWindows 8 – virtual machine
If for a 32-bit system the solution is quite simple, then for a 64-bit system the installation is a problem. Unfortunately, the driver does not work. Therefore, you will need to set up a virtual machine with a 32-bit system and print from it. The video will help you understand all the intricacies. The complete instructions take up too much space and are quite difficult to describe. Therefore, it is worth familiarizing yourself with:
Setting up printing via Virtual Box
Setting up printing via XP mode
A driver is essentially a link between the operating system, that is, software and hardware, that is, physical devices such as video cards, printers, processors, etc. The operating system may contain basic drivers for the most necessary devices - mouse, keyboard, but everything else will require fresh drivers.
How to install the driver?
1. The easiest way, if there is an installation file, then you just need to run it and follow the installer’s instructions.2.If there is no installer available, and there are only files with the extensions *.inf, *.dll, *.vxt, *.sys, *.drv., then the algorithm of actions should be approximately as follows:
a) First you need to select the icon ( My computer) and right-click on it, select ( Properties).
b) Now go to the tab ( Equipment) and presses the button ( device Manager).

c) Now you need to select the device for which the driver will be installed/updated. On the line with the device, you need to right-click and select ( Properties), or you can simply double-click on it to go to the desired settings. 
d) Go to the tab ( Driver), select the button ( Update).

e) In the dialog box that appears, select the item ( No, not this time) and go to ( Further).
f) At this stage there are two options. You can try to install drivers automatically, then the OS itself will try to find drivers suitable for the device and install them, for this we select ( Automatic installation (recommended)) , if the attempt fails, then you need to move on to the second point ( Installation from a specified location) and select ( Further).

g) This menu item implies a choice between searching for a driver on removable media and the option to specify the folder with the driver yourself. Therefore, if you have a disk with drivers, you need to insert the disk into the CD-rom and select the option ( Search on removable media (floppy disks, CDs...)) and go ( Further).
If the driver is found and downloaded on the Internet yourself, then you need to manually specify the path to the folder in which the installation data for the driver is located as follows. Select the item ( Include the following search location:) and go to ( Review), now select the folder with the driver from the list and click on the button ( OK). Now we boldly move on ( Further), if everything is done correctly, the installation of the necessary driver will begin. 
There is no doubt that HP has made a wonderful printer that has a long lifespan. But time passes, new operating systems appear and driver problems keep pace. With the development of Windows 7, users were faced with a lack of necessary drivers for this printer model. This article will describe how to install and configure the required set of drivers for 64-bit Windows 7.
So how do you configure the right driver?
- The first thing to do is for WindowsXP. You can find it on the website.
- Select the “Driver” tab and download the HP LaserJet 1000 Host Based Driver.

- After the file has downloaded, open it. The main thing is to remember where the driver was installed; this knowledge will come in handy later. Click next and the file is installed.

- Next, you need to open the device manager. All gadgets connected to the computer are located there. If you don’t know how, then right-click on the “My Computer” folder and select “Properties”, you will see the device manager on the left.
- In the window that appears, we find the printer, as in the previous step, press the right button and click on “Properties”.
- The next step is to select the “Driver”, “Update” tab and search for drivers on the computer. At this point we find the directory in which the driver was previously installed. After a short wait, a message will appear indicating that the drivers have been installed successfully. Complete the procedure by restarting your computer.
So, with a little time and simple manipulations, you can get rid of the need to buy a new printer.
A driver is a connecting component between a computer and a printer. This program provides the ability to transfer data from a PC to peripheral devices. Without installing such software, the operation of the printer and any other peripheral device is impossible. You can download the driver for the printer on our website.
Why are drivers needed?
All external devices and internal PC components require special software. The functions of printer management utilities are:
- Processing read-write data and queuing requests.
- Checking print parameters and processing them for errors.
- Checking the status of printers and initializing devices in the system.
- Energy consumption management.
- Registration and accounting of printer print files.
- Issuing commands to control the printer.
- Checking the status of operations and their completion.
If you purchased a printer, it usually comes with a software disc. But over time, this disk is lost, and the programs recorded on it become outdated. Do you want to install the latest printer driver? Use this directory.
Our site managers daily post the latest versions of drivers for all popular models of printing devices.
Why do you need to update your drivers to the latest versions?
Using the latest version of such software provides the following advantages:
- Stability. Unlike outdated drivers, new versions of such computer programs are more stable. Using them, you will have fewer problems with your computer and printer.
- Improved printer performance. The latest version of free printer drivers collected on this site have the best functionality and have various improvements. Developers can include improved energy saving, increased data processing speed, etc. in the new version of the software.
- Performance. Each subsequent driver version has better performance. This is the first parameter that developers pay attention to when creating a new version of such a program.
- Safety. Some hackers use drivers to gain access to their victims' computers. When creating new versions of such programs, developers add protection and increase the security of their utilities.
Printing errors are not always related to the printer. They can also occur when outdated drivers malfunction.
When do you need to update drivers?
It is necessary to update printer drivers if a problem occurs in the operation of the device. Such problems can manifest themselves in different ways. For example, the printer completely refuses to print or the operating system “refuses to see it.”
Before downloading files, compare the version of your driver with the current version on our website. If they match, then there is no point in updating the program.
The driver needs to be updated after reinstalling Windows. Your installation disk may not have the latest version of the printer control utility. Therefore, after installing and configuring the operating system, you need to go to our website and download drivers for printers on Windows 7, 8, 10. Choose the version of this computer program that is suitable specifically for your OS version.
How to install drivers?
To install or update control utilities for printers, you must be able to work with drivers. To do this, you need to call the “Control Panel”. You can do this using the "Start" button. In the menu that appears, click on the required line.
In the Control Panel, find the printer you need. Using the right mouse button, bring up the context menu and click the “Update driver” button. After that, tell the system the location of the downloaded file.
You can also update the printer control utility manually. To do this, extract the files from the downloaded archive and run the installation file. In a few minutes, the driver will be installed and you will be able to take advantage of its functionality.
Possible driver problems
A driver is an important and integral part of a computer system. A failure in such a computer program could cause the device controlled by the driver to stop responding to requests from the operating system and crash.
Another problem that a computer owner may encounter is a driver conflict. This can affect the operation of not only the printer, but also the PC. Everyone knows about the Blue Screen of Death. One of the reasons causing this problem is driver conflict. You can solve this by rolling back the driver to the latest stable version. On our website you can download proven printer drivers that will help improve the performance of your devices for printing documents.
 Odnoklassniki - social network: registering a new user using login and password: registration rules
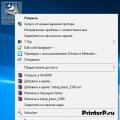 Specifications and consumer reviews
 How to determine a hidden number?