How to increase FPS in World of Tanks. detailed instructions
Most people who play World of Tanks do not have the most powerful computers. For this reason, the question of how to increase FPS in World of Tanks is especially acute, but is there really nothing that can be done?
Of course, you shouldn’t despair, because even on a frankly weak computer or laptop you can take certain actions that will increase FPS and give the owner a little more freedom, the main thing is to know certain tricks and subtleties, which we will talk about now.
And remember, the minimum acceptable FPS value in the game is 30 or more (the higher this number, the better). If the number of frames per second drops below thirty, get ready for lags, freezes, image jerks, and so on.
Client Graphics Settings
The very first step to how to increase FPS in world of tanks is setting up the client, namely its graphic section. It’s funny, but many people don’t even try to check the characteristics of the game settings, but here you can move the sliders, uncheck a few boxes, and the effect will be very impressive.
To change the settings, you need to click on the gear in the upper left corner of the screen and select “Settings”. Next, go to the “Graphics” tab and look. First of all, make sure that you are playing in full screen mode and not in windowed mode, this greatly affects the CPU load.
Now set the graphics quality to “Low” (maybe “minimum” or “medium”, depending on your computer), uncheck “Dynamic resize” and try reducing the resolution of the 3D render by pulling the slider to the left. This way you will reduce the load on your video card and increase FPS in world of tanks. It is also worth disabling the color filter and anti-aliasing if you have them enabled (the described changes are shown in the screenshot).

The first stage of settings is completed and you can safely move on to the second. Click the “Advanced” button in the same settings section, and you will see an extensive list of configurations for more complete changes. Here we check the box next to the “Graphics - standard” item and set the sliders as follows:
· Texture quality is low;
· Lighting quality - off;
· Shadow quality - off;
· The quality of additional effects is low;
· Add. effects in sniper mode - low;
· Turn off the amount of vegetation and post-processing.
· Uncheck “Grass in sniper mode” and “Effects from under caterpillars”.
So, you can manually adjust the quality of graphics and visualization of effects so that everything matches your hardware as closely as possible. The points described above apply to fairly weak vehicles, so you may need to play with the settings and test the changes in battle in order to find the best option. As a result, the overall picture should look as shown in the screenshot.

Next, go all the way down and make the final changes:
· The quality of the landscape is low;
· Water quality is low;
· Turn off decal quality;
· Object detailing is low;
· Tree detailing is low;
· Drawing distance - it is better to set it to “medium”, since this indicator greatly affects the drawing of rocks, houses and other objects at a distance. If you reduce this scale to a minimum, there is a chance that a piece of rock will not be drawn, and you will shoot at it, trying to target the enemy peeking out from behind it.
· Motion blur quality is low;
· Dynamic change in the quality of effects - it is better to leave the checkbox;
· Turn off the foliage transparency and caterpillar tracks checkboxes.
After all these adjustments (screenshot below), click the “Apply” button, restart the game client and go ahead into battle to see how the FPS has changed in World of Tanks.

Mods to increase FPS in World of Tanks
If changing the graphics in the game client settings did not have enough effect, there is another simple way to lower FPS. You can install mods to reduce the load on your computer's video card and processor.
One of these mods, the most significant and famous, is WoT Tweaker. This modification is good because after running it, you can disable those graphic effects that are not displayed in the client menu, simply by checking a few boxes. This is smoke from the exhaust pipe, clouds, gunshot effects, etc. This script looks very simple, and all the changes subject to it can be seen in the screenshot. By the way, in almost every popular World of Tanks game that is on our website, you can find a built-in tweaker as well.

Installing compressed textures
Another very effective method of increasing FPS in World of Tanks is installing compressed textures in the game. What does it mean? To put it simply, all textures in the game, for example, images of tanks and so on, are standardly at a certain level of quality and are archived in the root folder of the game. And subsequently, when you play, the game accesses these textures, loading them into the computer's RAM and video card.
If we change standard textures, tanks, terrain, trees, turn off various smokes, clouds, and other beauties of the game, we thereby reduce the load on RAM and processor time for generating the game landscape and other textures. Thus, if translated into ballroom language, we increase FPS in World of tanks.
Download the WoT Tweaker Plus mod on our website in the fashion section for World of Tanks, the settings, as shown in the screenshot, are simple and intuitive. The extended version of the tweaker has the ability to compress textures, and it looks like this.

Driver Update
Another method to increase FPS in world of tanks, which sometimes bears fruit, is updating your video card drivers to the latest version. The fact is that the creators of video cards sometimes optimize their performance by releasing new drivers, and installing them can give good results. Although this procedure is unlikely to help much, it is still worth a try.
To update, knowledgeable people can go to the official website of the creator of the video card, Nvidia or AMD, and download the driver for their video card there. For those who do not know how this is done, it is recommended to download and install a special utility - Driver Puck Solution. With its help, in the driver menu, you can find the necessary update or even several, if any.
To use this program correctly, in the settings you need to check the box next to “Expert Mode” and start the search. After that, select the required driver and click the “Install” button; how to do this is shown in the screenshot. Next, just restart your computer and you're done.

As you can see, using fairly simple tools and knowing some of the subtleties of setting up the game, you can easily increase FPS even on a weak computer. As a result, you will be able to install several mods and play comfortably, and the number of frames per second will not drop below 30, causing hated lags and image jerks.
FPS (frames per second) - number of frames per second, i.e. frame rate.
In other words, this is how often the game's image is updated. The higher this value, the more comfortable the game.
The number of frames per second in battle is displayed in the lower right corner. You can disable this function in the section Graphic arts game settings.
There is an opinion that the value of the number of frames per second depends on the Internet speed or server load. This opinion is erroneous, since this indicator depends mainly on the performance of the computer.
If you have low FPS, follow the instructions below.
Laptop with two graphics adapters
Many modern laptops have two video adapters on board - integrated and discrete. By default, graphics are always processed on a low-performance integrated graphics core, so by correctly switching processing to a discrete adapter, you can significantly increase FPS and even image quality.
If you have an NVIDIA video card:
1. Open NVIDIA Control Panel. This can be done by right-clicking on the Desktop and selecting the appropriate item from the drop-down menu:
2. Select Manage 3D Settings.
3. Go to the "Program Settings" tab.
4. In step 1 “Select a program to configure”, add the program you use for the game (browser, Standalone Flash Player, client). Note: For Firefox you need to add plugin_container.exe instead of firefox.exe. It is located in the Firefox installation folder (by default C:\Program Files (x86)\Mozilla Firefox\) .
5. In step 2 “Select the preferred graphics processor for this program”, select “NVIDIA High-Performance Processor” from the drop-down list.
6. Click the Apply button and close the control panel.

If you have an ATI/AMD video card:
1. Open Catalyst Control Center. You can do this by right-clicking on the Desktop and selecting one of the items in the drop-down menu:
2. On the Power tab, select Global Switchable Graphics Options.
3. From the drop-down list under the selected power supply method, select “Maximum performance”:

Setting up the video card driver
For video cards NVIDIA: Right-click on the desktop → “NVIDIA Control Panel” → “3D Settings” → “Adjust image settings with preview”. Set the slider to "Custom Settings" with an emphasis on Performance. Click Apply → OK.
For video cards ATI/AMD: Right-click on the desktop → AMD Catalyst Control Center → “Standard Settings” → “Apply Custom Settings.” In the window, set the slider to “Performance”. Then select the Multiple Display Detail Level tab → slider left → Performance. Click Apply → OK.
Vertical Sync
Disabling vertical synchronization in the video card settings can lead to a decrease in input lag. To do this, follow these steps:
- Go to your video card's control panel (see instructions above).
- Find the 3D Graphics Settings menu (may also be called Graphics Options, 3D Application Options, or similar).
- In the list of settings, find the item corresponding to the synchronization: “Vertical sync” / “Vertical sync pulse” / “Synchronization”.
- Disable vertical sync.
Please be aware that turning off Vsync will affect the graphics settings of all your games running on that operating system. All of them will run without vertical sync.
Triple buffering- a method of displaying images in computer graphics that avoids or reduces the number of artifacts. Triple buffering allows for faster image output compared to double buffering.
However, it is worth noting that both of these options should be enabled if you have a sufficiently powerful video card. Do your own tests and you will understand. I for example in all my tests I left vertical sync and triple buffer enabled- this is how my FPS increased, sometimes very significantly (depending on the location).
System and environment
For a comfortable game, it is very important that the game has enough RAM. If you have 2 gigs of RAM or less, I strongly recommend closing ALL programs you don’t need, such as ICQ, Skype, background defragmenters, desktop widgets, players (especially iTunes) and other unnecessary software.
Also, some antiviruses and firewalls have a “Game” mode, in which the operation of the system will be optimized so that the antivirus does not slow it down.
In general, the goal is to free up as much RAM as possible. You can also enter the task manager using the combination CTRL+Shift+ESC(simultaneously) and see which processes are consuming more RAM and CPU resources. Just please do not close processes whose purpose you are not sure of! This may cause the system to crash.
How I conducted FPS tests in World of Tanks
I ran a series of tests, measuring FPS with different graphics settings. In addition to the settings of the game itself, I edited the file preferences.xml, and also changed the settings of the video card, which we have already discussed above.
Purpose of the test- set the optimal settings to get maximum FPS in the World of Tanks game. You can also do these tests yourself to set the highest possible graphics settings for a comfortable game, so the article will be very detailed. I strongly recommend that everyone do these same tests, since everyone has different hardware and the same game settings may not work the same on different computers.
To take FPS readings I used the program Fraps(fraps.com), which, by the way, can also record video, but we don’t need this function for our tasks. You can, of course, be guided by the frames per second counter built into the game, but Fraps has one undeniable advantage.
We are talking about recording the FPS indicator in a log file, which is very convenient for my test, since it clearly demonstrates the FPS statistics. Logging is done by pressing the hotkey (by default F11), optionally the log can be kept for a limited period of time - I set it to 100 seconds, this is quite enough. In 100 seconds you can drive a tank to your heart's content, move the camera around, get involved in battle, and, in general, do a stress test for the video card. The log is written to two files:
- text, indicating the average, minimum and maximum FPS values;
- a table in csv (Excel) format in which FPS is displayed per second.
Below in the screenshot you will see the Fraps program and its interface. The free version has all the features we need.

To collect FPS statistics, we are specifically interested in this tab shown in the picture. Let's figure out what it all means there.
- Line Folder to save benchmarks in- path to the folder where the FPS log (log files) will be saved. For my convenience, I defined a folder on my desktop to make it easier to find.
- Benchmark hotkey- a key that, when pressed, starts recording FPS readings to a log file.
- Benchmark Settings - data that will be written to the log. A tick on FPS is enough for us.
- Stop benchmark after- if the checkbox is checked, logging will be stopped after the specified period of time after pressing the hotkey.
I didn't touch the rest of the settings. If you don’t want to conduct tests yourself, then you don’t need to download Fraps, you can read the article to the end and make the indicated changes in the game and computer settings.
Looking ahead, I want to say that the number of frames per second may vary not only because of the graphics settings, but also because of the map to which the great random sent you. Thus, FPS on desert maps is usually higher than on city maps. This is explained by the fact that the city has more different objects, such as houses, bridges and other buildings, the rendering of which requires much more video card resources than desert landscapes. Therefore, I tested the same settings several times on different gaming cards.
FPS testing in World of Tanks
The first test, let's call it "FPS 1".
So, Fraps is installed and running, it's time to log into World of Tanks and measure FPS. For the first test I chose Auto detection in the graphics settings in the game. The game engine, having requested data on the system characteristics, concluded that my laptop could handle:
- improved graphics
- lighting, shadows, average detail, as well as average water quality.
Well, it’s debatable, of course, but let’s try to play like this. The battle has started, I wait for the 30 second countdown and press F11 to start recording FPS in the log. I skated several battles with these settings and you will see the average test results below:
- Avg: 26.84
- Min: 9
- Max: 43
Avg - average FPS value; min and max I think are clear. It was not very comfortable to play - frequent FPS drops and stuttering. Because of this, several unpleasant leaks occurred.
Test two, FPS 2
For this test, I decided to independently determine the graphics settings in the game. I set everything to minimum except the draw distance. I won’t dwell on this point for long, just take my word for it - Draw distance did not affect FPS at all, so leave it at maximum.
For this test I set:
- standard graphics;
- everything else is set to minimum or disabled, except for the drawing distance - it is set to maximum.
Test result:
- Avg: 35.1
- Min: 18
- Max: 62
Well, that's not bad! There is an increase, the minimum drawdown has doubled, which was reflected in the gameplay in the fact that there were no strong brakes. The average FPS level increased by 8.26 units, which in principle is also not bad, but there was no desire to stop there.
Test three, FPS 3
This test turned out to be a little different from the others and you will soon understand why. Firstly, I left all the settings as in the second test, but changed the graphics from standard to enhanced. And what do you think? FPS became a little better than in the second test (literally by a few units). But, as I already said, I didn’t want to stop there. Still, the developers were right about the new render;)
To further increase game performance, I overclocked my video card. This is also called overclocking. I was very pleased with the result.
Overclocking video cards
Attention! You do all the following actions solely at your own peril and risk!
"Well, it's very difficult!" - you say and you will Not are right. Today, overclocking a video card is very simple and with a head with brains, and not a hole into which you eat, it is also safe. Before overclocking your video card, you need to prepare your computer.
The most important thing in overclocking a video card is its proper cooling. To measure the temperature of a video card, install some widget on your desktop, for example GPU Meter. In the passive state, the temperature of the video card should be in the range of 50-60 degrees Celsius, and in the active state (in the game) no more than 85-90; if higher, you have problems with its cooling.
To cool the video card, you can install an additional cooler if your system unit can accommodate it, or, if you have a laptop, you can buy a special stand for it with additional cooling fans. If it overheats, it certainly won’t melt, but only if your PC has an emergency shutdown (almost all laptops have such a feature).
It would also be a good idea to replace the thermal paste on the video card board and other places if you have never done this before and you have had your computer for a long time. You can again find out how to apply thermal paste on Google; there are even a lot of videos about this on YouTube.
As for me, I completely disassembled my laptop in order to clean all the dust from all the boards and replace the thermal paste. Real hardcore, but unfortunately that’s not what the article is about. By the way, after assembly it works great, I write from it. Maybe open your own workshop?
Let's assume that you now have everything in order with temperature and cooling, so how to overclock? To do this, you don’t need to disassemble anything, just download and install one of the utilities listed below:
- Riva Tuner is a utility for overclocking Nvidia-based cards. More suitable for professionals, as it has a huge number of settings. You can easily get confused if you don't know what's what.
- - a very easy-to-learn utility that supports Nvidia and AMD cards, so it’s suitable for almost everyone. You can read about the capabilities and see the list of supported cards, and download the program itself from here (links to the official website of the program).
Let's launch the program. In it you can control the power of your video card, as well as the frequency of its processor + several other functions. It looks like this:

Unfortunately (or fortunately) on my laptop you cannot control the power of the video card, as well as the rotation speed of its cooler (because it does not have a separate cooler), but you can change the frequency of the processor and memory. Let's not go too deep into the intricacies, if you're interested, google all the concepts, but at the initial stage I recommend the following (it's safer):
- increase values only Core Clock And Memory Clock;
- increase NECESSARILY gradually, about 5-10% and constantly monitor the temperature of the video card!
- DO NOT SET THE MAXIMUM VALUES IMMEDIATELY! Burn your card, then don’t come to me with complaints.
On the right side, the program shows all the necessary statistics of the video card. What is indicated on the graphs is signed in the program itself, you’ll figure it out. After setting the new Core and Memory clock values, you must press the button Apply for the changes to take effect. There is no need to restart your computer, changes happen instantly.
Before running to measure FPS in the game, I carefully adjusted the overclocking of the card, choosing a mode in which the card did not heat up above 85 degrees at maximum load. For this purpose the program 3D Mark was used. Again, I won’t go too deep into this issue; I’ll just show the results of my tests:
- without overclocking: 6371 points
- with overclocking: 7454 points
Now let's return to World of Tanks, test three, aka FPS 3
Having selected the optimal overclocking mode for the video card, I launched WOT and logged the FPS readings in several battles. Here are the averages:
- Avg: 39.90
- Min: 11
- Max: 82
For the first time in the history of the game in World of Tanks, I saw an FPS value greater than 80! Despite the smallest drops of the three tests - 11 FPS, the game was much more comfortable. The tanks started flying!
Comparative analysis
I ended up running three different graphics settings tests on my computer. In each test, I skated at least 10 battles in various locations, and then averaged the data and this is what happened:
FPS test 1: Auto-detection of graphics settings - improved graphics, lighting, shadows, average detail, as well as average quality of water and effects.
FPS 2 test: Custom setting - standard graphics, everything else is off or low except draw distance, which is at maximum.
FPS 3 test: custom setting - improved graphics, all other settings at the very minimum, or turned off completely (effects for example, lighting, shadows); drawing distance - maximum + overclocking the video card using MSI Afterburner (you don’t have to overclock it, everything will still be ok).
All tests had grass and track tracks turned off.
Test results in graphs and figures
Graph of FPS changes per second (tests were carried out for 100 seconds). Y axis - FPS, x axis - time:

Average FPS values for three tests:

As a result, I managed to increase the average FPS from 26 to 40 (rounded), which was an increase of approximately 1.5 times! And the peak value increased from 43 to 82, which is already twice as good.
In custody
If the advice in this article did not help you, then three conclusions follow:
- You did something wrong, you made a mistake somewhere.
- Nothing will help you anymore due to the fact that the computer is very weak to begin with. It is necessary to upgrade (first of all the processor).
- Windows is completely screwed up and needs to be reinstalled. I noticed that over time, these tips in the article began to help less, even to me, the author of the article. And I have already stopped seeing the target 80 FPS. The solution was to reinstall the system and voila - everything works like a clock again!
Did this article help you? Leave the answer to this question in the comments. If it helps, give the link to your tanker friends and clan members.
Thank you all very much for your attention, you can also leave your tips for increasing FPS in World of Tanks in the comments.
I love to solve the problems-mysteries that life throws up in IT. This time trouble happened in my favorite toy World of Tanks, where I'm trying to become a nerd extra. The game has long been causing complaints from players in terms of performance, since competent multi-threading has not yet been implemented so that multi-core processors begin to justify their purchase. But it's worth saying Thank you game developers that in the latest patch 9.14 they introduced a new sound engine, which not only added new sounds to the game, but also runs on a separate CPU core, which has a beneficial effect on the overall performance when playing on powerful computers. It would seem that fps should increase a little, but my problem did not look like low Frames per Second in general, but fps drop in WoT after a while.
Since absolutely all available parameters are set to the minimum position, at first I sinned on modifications (mods) that extend the standard game client in Python. There are a couple of mods that are officially recognized by everyone as “fps lowerers”:
- legendary eXtended Visualization Mod (XVM, olemeter)
- mod Horizontal angles (UGN)
- a mod that reflects latency to Wargaming.net servers directly in battle.
OK! Let's remove the mods, but that didn't help. Thanks to a video from a well-known professional player and author of modpack ProTanki, I knew about the serious impact of poor Internet (high latency when delivering network packets) on FPS. Many people do not understand how it can be connected net And video card. The fact is that the video card processes a lot of frames into a buffer for you and imagine a situation where, due to large delays, information comes from the server that your tank or the tanks of your allies/enemies are now not at this point, but at another, so called the "teleportation effect". The video card is “forced” to throw out the previously done work and start calculating everything again. If the video card is not top-end, then it turns out that poor Internet adds to its workload.
But logically, poor Internet not-at-my-home should keep fps low throughout the entire battle. And the problem with enviable consistency looked like a drop in fps after a couple of minutes of battle. I started looking at which settings are dynamic in nature. I won’t bore you, the setting is called dynamic change of 3D rendering. I also set the 3D rendering parameter to a satisfactory 95%, which allowed small details to disappear and seriously simplify the silhouettes of tanks in the distance, which will make the work of the video card easier. That's it! Drops from 120 fps to 40 fps disappeared like a bad dream. Stay random, VasiliscCom is going into battle!
In this article we will try to look in detail at how you can increase the frame rate (or FPS) in the World of Tanks game.
The method is universal and is suitable not only for WoT, but also for other games.
You're probably wondering: how to get rid of lags in simple ways that work?
We will need CCleaner for this. We will change other settings within the Windows 7 system.
- Let's start improving performance through power.
Go to “Control Panel” – “Power Options”. As a rule, the power supply settings are set to “Balanced”. Typically, this item is set by default and is designed for laptops to balance power between high consumption and performance.
Our stationary PC has no need for this, so we can safely switch to the “High performance” item (all pictures are clickable).
- We are done with the power supply, go to the Desktop, press “Start + R”.
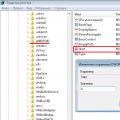
The Run window will pop up. Type “msconfig” in the field and click “OK”. A new System Configuration window will appear. Go to the “Download” tab. In this tab we find “Advanced options”.
In the “Number of processors” item, check the box and select the maximum number of processors that are on your computer.
Go to the “Maximum memory” item, set the maximum amount of RAM that you have. In our case, we have a maximum of 4 GB (4096). After setting the parameters to maximum, uncheck the memory and processor boxes. Click "OK".
Go to the “Services” tab. In this tab, we first check the “Do not display Microsoft services” checkbox, then remove the services that are unnecessary for us. We have unchecked the “Google Update Services” checkbox. After that, click “Apply”.
The next tab is “Startup”. We remove programs that we do not need: “Amigo”, “MailRu Update”, “Kometa”, “uTorrent”, “Steam” and other services that we do not need in startup. These are all programs that start when Windows starts. Click “Apply” – “OK”.
- Now we need to change the theme design style.
Windows spends quite a lot of resources on visual effects. Right-click on the “My Computer” icon and select “Properties” – “Advanced system settings”.
The System Properties window appears. We are interested in the “Advanced” tab – “Performance” – “Options”. Click on “Options”.
Visual effects are set to "Provide the best look." We need the item “Ensure the best performance.” As soon as you select this item, all checkmarks will disappear. But we will need to leave the only checkbox “Use display styles for windows and buttons.” Click “Apply” – “OK”.
- Optimizing your computer's hard drive.
Right-click on the local drive (C:), go to “Properties”. We need the "Service" tab. Next, we will need the “Check Disk” and “Disk Defragmentation” items.
Click on “Run scan”, select both “Automatically correct system errors” and “Scan and repair bad sectors”. Next, click “Launch”. Let us immediately warn you that the check will take a long time, it is better to run the check overnight so that it is completed in the morning.
After that, go to the “Disk Defragmentation” item. We are interested in all local disks of the computer. Select “Analyze disk” one by one, and after analysis – “Disk defragmentation”.
- Cleaning junk using CCleaner
We are interested in the “Cleaning” item. Click “Analysis”, when it is finished – “Cleaning”.
After that, go to “Register” – “Search for problems” – “Fix”.
The above procedures will help increase the FPS on your computer by 10-20 frames per second.
Especially for World of Tanks we will need the MultiPack package from PRO Tanki.
The package installer will prompt you to choose mods. Specifically for WoT, we need to select the “Custom selection of mods” item, uncheck all the boxes and click “Next”.
Again you will need to remove all checkmarks from all items, click “Next”.
We get to the “Select visual effects settings” menu.
Check the boxes for “Set game priority in Windows” and “I have a weak computer and I want to increase FPS.” You'll end up with a bunch of checkmarks. Click “Install”.
In general, the measures taken should give a good increase in FPS for games.
Write in the comments if this method helped you increase FPS in World of Tanks.
 USB 3.0 in BIOS. How to disconnect USB ports from connecting a flash drive. Prevent users from connecting USB storage devices using a Microsoft app
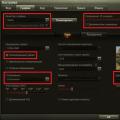 How to increase FPS in World of Tanks
 Troubleshooting Mouse Problems