How to make a transparent background in the picture. How to make a background transparent (Photoshop)
It happens a very suitable picture for your post and everything would be fine ... But the background of the picture is not suitable under the blog background or block with text. Obviously, none of me is such a problem and the background is not the white background, which would be suitable in most cases. I need transparent background!
I did not find normal ideas on the Internet how to make transparent background For the finished picture, so I began to experiment yourself and found a less suitable solution!
How to make transparent background pictures
We take in an example one simple picture in format.jpg (generally not important format):
There is a white background from which I want to get rid of and instead to make a transparent background. In this, PIXLR will help us - the online semblance of photoshop.
![]()
Load our image. On the right in the "layers" window will appear the "background" layer on which the lock (does not allow to remove the background image).
![]()
When clicking on the left mouse button on this lock, you can remove the blocking from the background. Instead of the lock, a check mark will appear.
![]()
Now we take a magic wand (toolbar, right column second button from above), indicate the following parameters: tolerance \u003d 21, checkboxes stand on smoothing and continuity (Usually such parameters are standing according to the standard), although you can experiment with the parameters; And click on the background pictures (in our case, on a white background).
![]()
Now delete the background by pressing the "Delete" button and get the image you need with a transparent background.
![]()
![]()
As a result, at the output we get the same image with a transparent background.
![]()
The only minus pixlr. - You can not save an image to format.gif, which also saves a transparent background, but much easier than format.png. But if there is no other way out, why not take advantage of this?
thanks Natalia Petrova
2 votesGood day, dear readers. The ability to make pictures with a transparent background is incredibly needed to every novice developer of sites, designer and even an ordinary person.
This is the most popular feature in pHOTOSHOP programAnd therefore I decided to tell you as much as possible not only about the process itself, but also how to save a picture in Photoshop without a background.
It turns out that many have difficulties with this, but there are no publications on the Internet on the Internet at all. Only a few topics on the forums. But, I take the mission to correct this injustice ...

So, now I am dealt on myself knightly armor and dispel all fears, doubts, misunderstanding and turn the difficulty of the art of photoshop into a frequency everyday life. I also told about all the intricacies of skill. Get ready. "Went" I will be very simple languageSo that it became clear to everyone, so I apologize to readers who are confused by such subsidism and they themselves know everything perfectly well.
More patient I thank you for understanding. Let's proceed.
What you need to achieve that the photo is really transparent
Transparency in the picture is usually displayed here such a checker. If you see it in Google, then it means the image can be swap without problems and when you apply this object to another background, the color will not change.
As you can see, such a checker is not displayed if the image is described through the thumbnail. Need to click on the picture and additional Information Open.

Look, I copied this drawing and put it on the photo photo. I won't go go how exactly I did it, now it does not matter. The most important thing you see all parts of the field, cubes seemed to be carved and superimposed on the picture.

If I did not find a photo with a checker in search, the illustration looked very differently. The background would be white and rectangular.
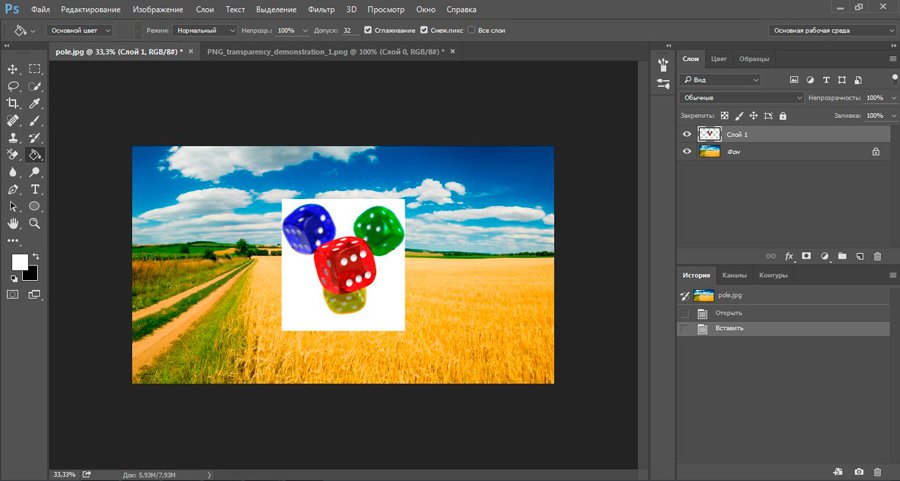
Why is that? This checkene is a generally accepted sign, if you see it, then there is no color in this part of the color, and when you embed you will see low part drawing. Similarly, transparency is displayed. If you need to remove the background from the photo, then you need to ensure that instead of color, you were able to see this cherished pattern. Checker.

How to store transparent pictures
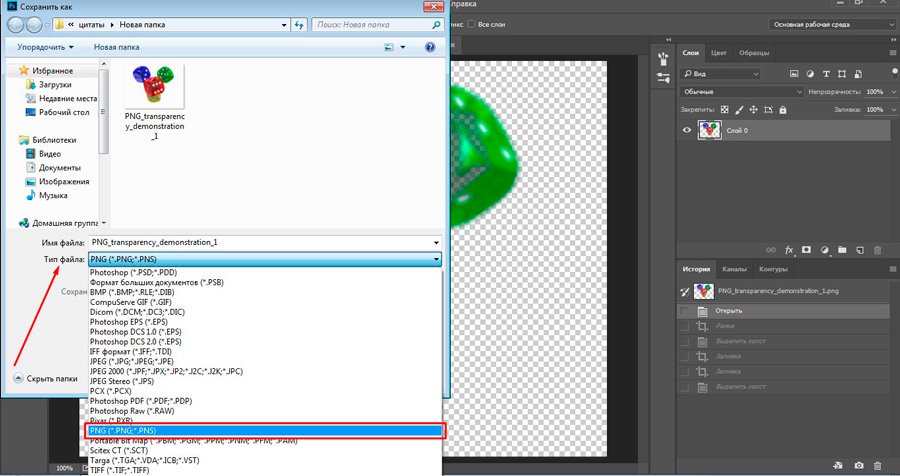
We are all accustomed to such a format of photos like JPEG. Some people do not even know about the existence of others. However, he does not understand what transparency is. In order to download and store on your computer "Right" photos, you will need to understand and remember the new format - PNG.
You see, in addition to checkers, in Google, almost always together with the desired pictures you can see this combination of letters.


Then select the desired file type, PNG and ready. It is in any version. If you do not see - look careful. Without him. Trust me.
Why did you need to invent another format? The thing is that popular JPEG does not understand what transparency is. He changes her to the usual white.
How to get rid of the background: a simple and fairly fast way without unnecessary troubles
In my blog you can find an article in which I show 4 tools and bring a video in which you can find 3 ways to get rid of the background in the picture (). You can read it if you are interested. Now I would like to show you another reception, as I think that without this article would not be complete. Little, someone does not want to climb on my blog. And here everything is in one place.
So, open a picture.

We find the tool "background eraser". If you can not find it, then hold the mouse for a few seconds with the left-click key on the conventional gesture. The desired tool will open. You can add it by clicking on it.
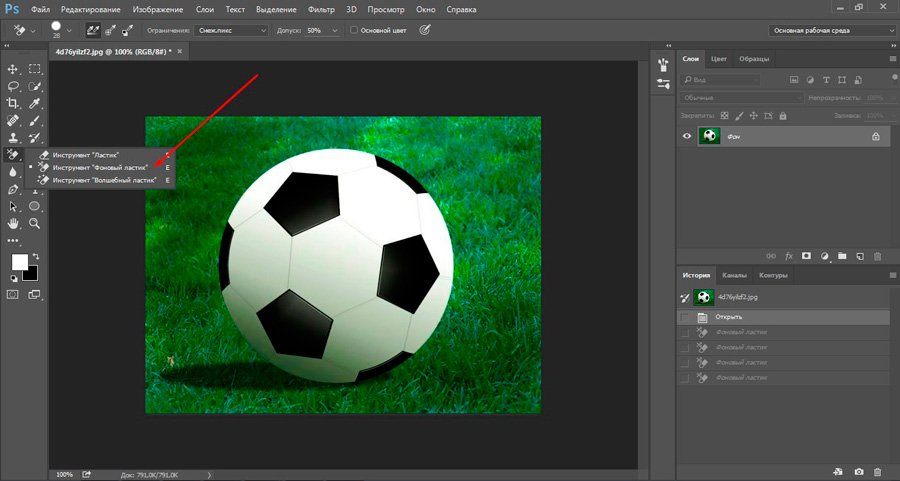
You can increase the diameter of the eraser to wash it is more convenient.

Now we are taped on unnecessary items in the picture. You will see how the checker begins to manifest, and the color to disappear!

I hope that after you finish, you will not have a question in which format to save the processed pattern. Of course PNG.
This method of erasure can not call the best and incredibly comfortable. Therefore, I recommend that you still pay attention to my previous article, fully dedicated to this topic.
And if you are interested in working in Photoshop, I advise you to start earning on it! Demand is. You can easily try, process pictures, and do a lot of interesting things. Believe me, it really needs. You can see by opening several sites for freelancers.
Do you think that you will not succeed or are you too old for this shit? Lack of time? Believe me, it's all ridiculous excuses. I am a lawyer and earn enough, but ... do you have a hobby, favorite hobby? Do you live a full life? Are you really boring?
Whatever you know and whatever they interest. The Internet opens a lot of new features. Let changes in your life. If money is not interested - it's even better. It gives more chances to your project to become expensive, steep and successful. All famous people do not work for their profits, they work, because they like what they do. Rarely, which of them calls it "work."
Time passed when the main time a person spent at a computer or TV. Now everything is developing, improving some of their skills and share with people what they know. Essentially it was always, only the scale increased.

By the way, not so long ago read the secrets of longevity of the Caucasian Highlanders. One of the principles is that a young generation is constantly walking towards them to consult on some important issue. Old people feel necessary, and therefore there are no negative emotions regarding old age. In the Caucasus, not afraid to become old.
By the way, a positive attitude is another secret. Elders argue that with evil, irritated and boring people who have no interesting hobbies, no one wants to communicate, and therefore such a way of life is extremely unprofitable, especially in old age.
Do something new. If you like Photoshop - pay attention to the course of Zinaida Lukyanova - " Photoshop from scratch "And master them perfectly. Very quickly, you will have a profitable hobby. Are not so passionate about the design? Please note that create your projects.

If you like this article, and I at least a little interested you - subscribe to the newsletter. Let not now, but give yourself a chance to do something new. I will send you my publications about how you can make money on the Internet.
Perhaps one of them inspires you for something new and is still unknown. You will realize that it is interesting and want to try yourself, and then ... who knows what will happen then?
Whether the hobby will turn into something more or you just show the result of your works to friends in order to get them praise and admiration? Unlike many you will set out from the sofa and make what you will withdraw you beyond the usual. You will try to change your life. It is very commendable.
I sincerely wish you success in your endeavors and hope that this our meeting will not be the last.
How to make transparent background picturesThe lesson is very simple and not complicated!Try and everything will turn out! Take an example one simple picture There is a white background from which I want to get rid of Load our image. On the right in the "layers" window will appear the "background" layer on which the lock (does not allow to remove the background image).
When you click on the left mouse button on this lock,
Now we take a magic wand (toolbar, right column second button from above), indicate the following parameters: tolerance \u003d 21, checkboxes stand on smoothing and continuity (Usually such parameters are standing according to the standard), although you can experiment with the parameters; And click on the background pictures (in our case, on a white background).
Now delete the background by pressing the "Delete" button and get the image you need with a transparent background.
As a result, at the output we get the same image with a transparent background.
The only negative PIXLR - |
http://blogs.mail.ru/mail/nilllok/43bd7728f4ad505d.html
Many sites that we accustomed to enjoy over time become paid, and we have to look for something else, similar. It happened with the Clipping Magic site, a detailed lesson for which. There is a similar site, to work with one pleasure. The only minus of this site is Mandatory registration.
Otherwise, the result is not saved. 

Removing the back background with a photo of the task is not so simple, as it may seem at first glance. Even having such a powerful graphics editor, like Photoshop, you can spend not one hour of work.
And the site background Burner does a lot automatically. It remains only to correct the result.
The main thing when working to remove the background - This is a quality photo. It is necessary that the object and the surroundings are well contrasted in relation to each other and had fewer points of the fusion of close colors as possible.
Going to the site Ait Background Burner, choose a photo, or a picture with which we want to remove the rear background. To do this, click on the button Select a photo.
The photo booted, and immediately automatically started to process it. 
We offer several options for the already processed photo or pictures. We choose the most accurately processed. This is usually the first option. But I specifically took a complex photo, with a background that practically merging with the dress. But the program quite coped, albeit with flaws.
If you take a picture with a contrast background, there is nothing to correct there, everything will do everything.
Click on the selected option. 
We see that the photo happened Not perfect. Therefore, apply it manually. Click down at the bottom of the latest button to cut off. (The site is translated so that the buttons are clearer). 
Take Red brush(the size of the brush can be changed by arrows to the right), she removes unnecessary backgroundwho could not delete the program and carry out the places that we want to remove. In the original original, you will immediately see all changes.
Taking a green brush, (it can also be changed in the same way) Restore unnecessary details
i.e Red- What needs to be removed (ie, background).
Green- What should remain (i.e., the library object.) 
When the result is arranged, then press the button FINISH .
You can save the result on a white background and on transparent, but only after you Register Online.
It is not necessary to scare this, everything is absolutely free, but many functions will be available immediately.
ATTENTION - When saving the picture, be sure to define in what format you save it. That used the picture was without a background Select PNG format.

From the carved photo you can make any collage, substituting your background and frame. To do this, under the finished photo we click the middle button Replace background
You can take a background of the already ready (suggested system backgrounds), and you can choose your background you need. 
Edit the received collage. We take your photo with a mouse, and drag to the right place. Runner at the bottom increase it, or reduce. 
When the result satisfies Keep the photo itself the first button.
Get your collage. 
Having obtained purified from the background photo I inserted it into the frame, in photoshop of the online Editor, laying my background. Who does not know how to do it
For those who are not yet familiar with all the secrets of graphics, design and photoshop - simple solutions Sophisticated I. uncomplicated tasks Always a saving circle, with which you can cope with the task yourself. Although it is always better to turn to professionals. But there are minor questions that you need to learn to perform without the help of a designer, such as the title of this article - "How to remove the background from the picture, or how to make a picture of transparent pictures."
I really want to learn how to work in Photoshop, but the time seen has not come yet - the student is not ready. Therefore, we develop a little on the little online photoshop PixLR - not quite understandable, but a convenient tool. Go on the link, because now there will be a practical lesson.
The picture without a background is often needed in order to get an image cropped along the contour. For example, or swung on the manufacture of the site caps. In all cases, when loading the resulting image on the site, the background will be absent. See the resulting result at the end of the article.
So we are already on the desired page PIXLR, and select "Upload an image" in the center appeared on the center.
We download the picture from the computer, I will have this:

Now we find a small sign with a lock on the right side.

Select the middle plate "Layers" and click two times the lock on the lock. Instead of a lock, a check mark should appear.

Now go to the right side of the online photoshop, select the tool and click the Edit tab.

We choose the value of tolerance, as shown in the picture "21" and click the magic wand on the background of our picture.

Then press again "Edit" and choose "Clear".
This feature can be pressed several times if the result is not satisfied with the first time. We save a picture on a computer in a format that supports the background transparency - PNG. This is what should happen in the end:

In my opinion, the result was excellent. I know that there are plenty of other ways that remove the back background pictures, by the way, you can see one of them right now:
Great way! Perhaps someone will like it more! Yes, and the backgrounds in the pictures are different, just like the pictures themselves. Therefore, you need to figure out how to remove the background with pictureswhere a person with developing hair is depicted - it is probably a jewelry job.
However, working in the online editor PIXRL, just a few minutes you can edit the photo to the desired format. Know that such photos of images without a background very in large quantities We need online stores. Now I understand that this is a very big job - editing pictures and images.
P.S. By the way, if you dream of becoming a professional design, then this can be learned in the school of design of Julia Perhevin. Even if you are not a designer at all and do not know how to draw, but there is a great desire to get a highly paid online profession, you can sign up here:
I hope that another advice will be useful to many of my readers. I wish you success!
In the old days, the transparency of the picture or its background was more fad than the usual phenomenon. Those who remember times Internet Explorer. 6, I know about it not by the hears. Today, it is enough to open any site to notice the opposite. Various icons on gradient fills. Images obtained by gluing layers. Colorful areas of regions. And much more. When you have all the necessary sizes and species of pictures, which can only be useful, then you just have to take a suitable image and use it. But, most often it is not. Images can be too saturated and therefore, before using the picture, it is necessary to make transparent. Of course, for one picture you can simply use the "Brightness and Contrast" tool, but when the picture is one of the layers to be applied to another image, then this tool will no longer help. You can only have files in jPG format Without a transparent background, so you have to cut the desired part of the picture. However, such an operation is often accompanied by the emergence of various kinds of small defects that are visible to the naked eye (especially if you are superimposed on the background with a very different color).
On the Internet you can find a lot of articles on how you can cope with these problems with the help of complex graphics. However, it is easy to solve most of these tasks and eliminate defects with any medium graphic editor or online service. And here are some simple tricks and tricks that everyone can master and which are performed very quickly (from 10 seconds to 1 minute).
Note: Remember that images with alpha channel (transparency) must be saved to appropriate formats, such as PNG and GIF.
How to make a picture transparent?
In fact, make a picture transparent very simple. All you need is to open any editor that supports layers. And then in the layer settings, specify the necessary transparency. And here is an example:
Of course, if you just need to make a picture more faded, then you can use more simple tools, such as "brightness and contrast". However, if you plan to use a picture in one of the layers, for example, in order to impose a layer well, this trick will be very useful.
How to make a transparent background with pictures?
Make a transparent background from the picture simultaneously simple and difficult. It all depends on what effects are used in the picture itself, and on how clear the boundary of the background and the desired part is divided. For example, if the main part of the picture has clear boundaries and does not contain effects on the borders with a background, such as, for example, a soft shade, then to make a transparent background very simple. To do this, you open a picture in the editor. Choose a tool called "Magic Wand". Configure sensitivity, for example, by 22% and click on the background. After that, the selected area is simply delete. And this is what it looks like:

However, most often it is not so, so after removing the background there will be defects that can be eliminated using the following tricks.
How to make a transparent image background and eliminate defect due to resizing?
If the picture does not have clear boundaries with a background, such as, for example, in the case of soft shadows or smooth transitions of the contour of the picture, then make the background of the image transparent no longer get in one step. An additional step is needed to eliminate defects by reducing the size of the picture. The essence of the method is that you take a larger picture. After that, cut the background, and then reduce the picture to the desired size. The trick is that when the sizes decrease, the editors smooth the colors and their transitions, so small defects simply will disappear. Here is an example:

As you can see, the defects that were obtained after removing the background on the source picture are completely unclear. However, it is not always at your hand there may be pictures of large sizes, and then you can use the next trick.
How to make a transparent background from pictures and eliminate defect due to an increase in image size?
When you have only one picture, which in addition includes various effects and has fuzzy boundaries, the previous trick to create a transparent background is no longer suitable. And it is necessary to eliminate defects in another way. Usually, in such a situation, you can start trying to remove small defects manually. To wash small pixels. Manually highlight the edges of the picture and try to apply tools to them, by type "Blur". Etc. But, there is a way much easier and faster. The essence of the method partly is a continuation of the previous one, but still it is characterized by order. You take a picture and increase it at least 2 times. Using a magic wand, remove the background. And then reduce the image to the opposite size. Thus, most small defects will leave the previous tricks, and the image quality will remain about the same. Here is an example.
 Firmware for HTC One SV from flash drive
 Why is the laptop heats and what to do about it?
 Reset to factory SAMSUNG smartphones