How to remove the modular grid in Photoshop. Installation and removal of the grid in Adobe Photoshop
05.02.2017 28.01.2018
Hello all site visitors site
The Photoshop program has an excellent tool that helps with an accuracy of the pixel to arrange objects, draw objects of the specified size, and the like. This is called this grid tool. It is often used by web designers, but this tool is so useful that everyone needs to know about him. If you still did not know what Grid in photoshop how to enable it and how to use - This lesson will be quite by the way.
It should be noted that the grid is not visible when the image is saved in JPG, PNG, GIF formats. Also the grid "Invisible" when printing. The grid is visible only in the program itself Photoshop or if you save the image in PSD or TIFF format. If you save the image in PSD or TIFF format and transfer the file to another person, he, opening the file on your computer, can see the grid you created.
How to enable / disable the grid (grid)
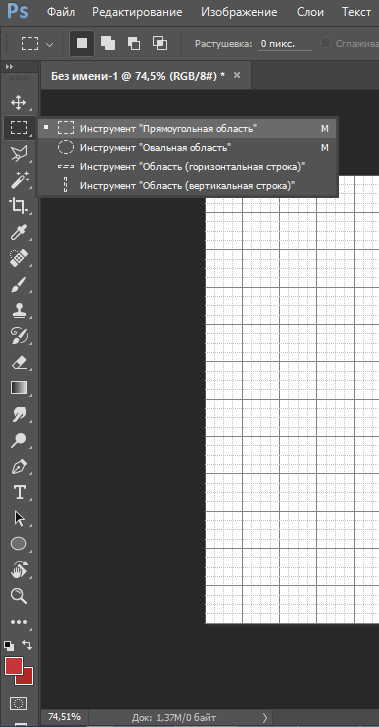
For starters, as always, create new document In Photoshop (Ctrl + N) with an arbitrary size, I have 800x600 pixels:
By default, the tab with a new document will look like this:

In order to turn on the grid, you need to go to the menu View - Show - Mesh (View - Show - Grid) or press the key combination Ctrl + "("E" in the Russian keyboard layout):

The grid appeared:

By the way, in order to turn off the grid, you need to do the same actions - go to the View menu and remove the checkbox from the "Grid" or re-clamp Ctrl + ".
How to set up a grid
By default, the grid is divided by bold lines, the distance between which 2 cm, in turn these blocks are separated by dotted lines to 4 parts.
Change these settings to your needs perhaps by clicking on the menu Editing - Settings - Guides, grid and fragments ( Edit - Preferences - Guides, Grid & Slices) either by pressing the key combination Ctrl + K. and Ctrl + 8..

The following window will open in which you can change the color settings, units of measurement of the grid, etc.

How to use the grid
Suppose we need to cut a rectangle on the layer to make a frame, leaving 50 pixels across the edges.
Change centimeters on pixels and set a step in 50 pixels:

Activate the tool Rectangular selection (RECTANGULAR MARQUEE.), Hot Tool Call Key - M..
A small tip for the use of the grid in Photoshop:
When working with a grid, as well as with guides and layers, it is desirable to enable the function Binding. When this feature is active, created objects No matter how "sticking" to the grid lines (in our case). To make sure the function is enabled, go to the menu View - show (View - Show.). If the checkbox does not enable, click on this item to deliver it.


If they have a different view, activate the item you need to click on it or click on the item "All", in the second case, the binding will turn on immediately by all available items:

Return to the lesson
Create a selection using the tool Rectangular selection, retreating on 50 pixels from the edges of the image. The parties of the created rectangle "stick" to the grid lines and do not allow us to climb over the borders.
There is a tool with which to edit graphics will be much easier. This is a grid. It helps when creating images and folding collages. It can be estimated by the size and distance, estimate how objects will be located relative to each other, make markup. Navigate where to place one or another picture. This is a useful tool if you can use them. Learn how to enable the grid in Photoshop, how to configure its attributes and how to remove it.
The grid helps you more accurately and symmetrically arrange elements in the composition
In essence, these are guide lines. Smooth table. It is superimposed on top of the image, but does not overlap it. It is easier to calculate the proportions with it, see the symmetry, correctly put individual elements.
As an analogy, we give the school notebook into the cage. It was built graphics and painted geometric shapes. On such a sheet, it was possible to draw a straight cut without a ruler, set an angle of 45 or 90 degrees without using the transport. It was determined on it, which length of the side of the rectangle, and how many cells make up its area. In Photoshop, the table is about the same functions.
It can only be seen in the program. It will not be displayed when printing. In the digital version of the drawing of the cells will not be either. This is not part of the image, but an editing tool.
Do not confuse it and pixel grid. The latter is to split the picture on the point. It is useful for detailed editing. It can also be enabled and configured.
Even if you do not need these options, it will still be useful to know about them. For example, to remove the table if it is accidentally activated.

How to turn it on?
- Open any graphic file or create a new one.
- In the menu bar, click on the "View" button ("View"). It is usually located between "3D" and "Window".
- Mouse over to "Show" ("Show").
- In the drop-down menu, click on the "Grid" ("Grid"). It will appear on the layer.
- You can also click ctrl keys+ '(In the Russian layout Ctrl + E).
How to setup?
You can make another cell size (for example, so that they visually designate a segment of 1 centimeter long), select the type or color of the lines.
- Open the Editing menu on the top panel.
- Hover the mouse to the Installation Point. He is at the bottom of the list.
- Click on "Guides, Mesh and Fragments".
- In the window that opens, set the desired cell size. This can be done in the "line through every ..." field. Available different units Measurements: inches, millimeters, items and so on.
- In the "Style" section, specify how the mesh should be displayed: a solid strip, dotted or dots. This is not so important, since the markup will be visible only when editing the pattern.
- In the "Color" paragraph, select Pouring. The setting can be used when the table merges with the background.
How to remove?
You can get rid of the cells in the same menu through which they were added. Here is how to remove the grid in Photoshop:
- Go to View - show.
- Remove the checkbox from the corresponding item.
- Or use the Ctrl + e key combination.
Pixel grid
Pixel grid is noticeable only near. To see it, you need to enlarge the picture and change the scale. But when working with graphics, it can interfere. Here's how to insert it or remove it:
- Open the View menu - show.
- Click on the "pixel grid".
Rulers
Another measurement method in photoshop - ruler. They are outside the drawing. With this tool, you can estimate the length and width of objects and the image as a whole. You can activate the line in the View menu. To select their parameters, go to edit - Settings - Units of measurement and ruler.

The table is useful when drawing schemes. Or for any other work in which accuracy is required. But this tool will come in handy and outside the professional sphere. After all, during drawing a lot of "pretending to the eye." If you turn on the markup, it will be possible to navigate it. And in the end, it turns out the verified, worked and beautiful drawing.
AutoCAD is an advanced system modeling program. It employs specialists from various levels: from students to world-scale designers. In fact, the functions and the possibilities of this environment are almost endless. it convenient programwhich provides 2D and 3D modeling objects. For novice users, it may be difficult to independently study this product, since the functions are much and understanding in all difficult.
One of the questions that start-up users often define: how to remove the grid in "AutoCAD" from the screen? Its image can sometimes interfere with the visual perception of the designer. Therefore, this article will be useful for beginners.
AutoCAD program
This is an application for two-dimensional and three-dimensional design. The program was developed by Autodesk. The most first product of the company became AutoCAD - 86, released in 1982. The program instantly became popular and unique in its kind. Now the company annually releases an updated version of its product.
The list of program functions includes the preparation of project documentation. The arsenal of this application has various tools for creating 2D and 3D models. Library "Autocada" has a huge number of elements that can help when working with the program.
How to remove the grid in "AutoCAD"
When you start the program, everyone noticed the grid, which consists of vertical and horizontal strips. Every five lines a line is formed two times the thicker of the previous ones - thus, there is a breakdown in square sectors. Before removing the grid in the "AutoCAD", you need to figure out what it is here. For many, luminous lines - according to which you can determine the relative scale and the distance between the items.
The grid has some properties: it has an infinite dimension (that is, the scale can be changed as much as you like, but the dimension field of the grid will never interrupt), when transferred from the model tab to the leaf, the grid is not saved and not printed together with the image. It can be said that the grid is a certain auxiliary tool that removes the visual load from the image.

So, knowing how to remove the grid in "AutoCAD" will allow the user to activate and deactivate this feature.
Setting up visual instrument is on the panel quick access At the bottom of the screen. This is the very first pictogram by clicking on which, you can turn off the grid parameter. Re-pressing will return the grid back. You can resort to K. hot key F7 for more comfortable switching item.
Mesh on the screen sheet
If when switching to the "Sheet" tab in the view screen, the user observes intersecting lines (even if it turned off their early in the model's work environment), then you can remove them in the same way as in the tab before. It is worth dealing with how to remove the grid from the sheet in the "AutoCAD":

- Click twice to view screen.To make it active.
- Then, using the F7 key or on the quick access panel, we turn off the grid.
- For changes to be preserved, you must click twice beyond the viewport.
 Doesn't Diablo III start?
 How to check the computer to spyware
 Spyware on the computer