Super-fast start with Arduino: take and do. We load the first sketch in Arduino
In this project, I want to show how to fill the sketch in Arduino using an ordinary device based on operating room android systems. This device can be useful for stationary installed Arduino boards, for example, such as lighting controllers ...
Step 1: Materials and Tools

Materials:
USB-A cable - USB-B
USB-HOST cable (OTG cable)
Arduino.
1 LED (for testing)
Android device, version of Android 4.0.0+ OS (or with Host mode support)
Software:
Arduinodroid or Arduinocommander, which can be downloaded from Google Play
Step 2: USB HOST Cable
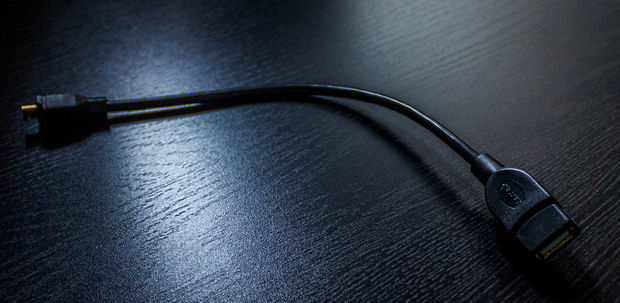
USB-HOST cable is basically similar uSB cableBut other resistors are installed in Micro USB connector. Internal resistors allow an Android device to activate USB-Host mode. In this mode, you can also use USB flash drives or other devices with USB interface support. This is very useful featureAnd now you can connect even a USB printer.
The problem is that after uSB connections Devices, it will receive power from the master (HOST) device, thereby discharged its battery.
Step 3: Connections
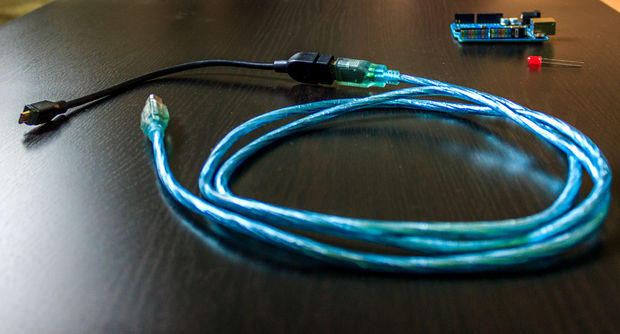

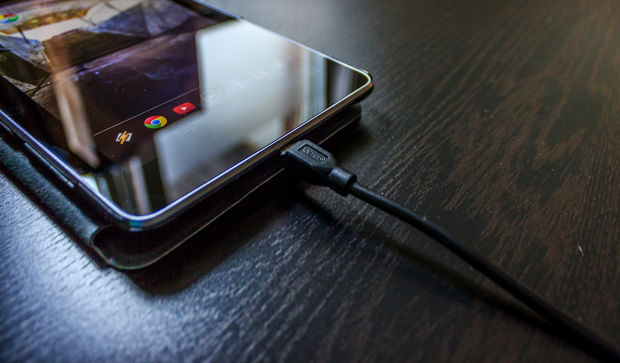
This very simple step and does not require special attention. Simply insert the USB-A cable - USB-B to USB connector type Mom Host cable. Then insert the USB-B connector in Arduino, and Micro USB. In Android device.
Step 4: Enable Arduino
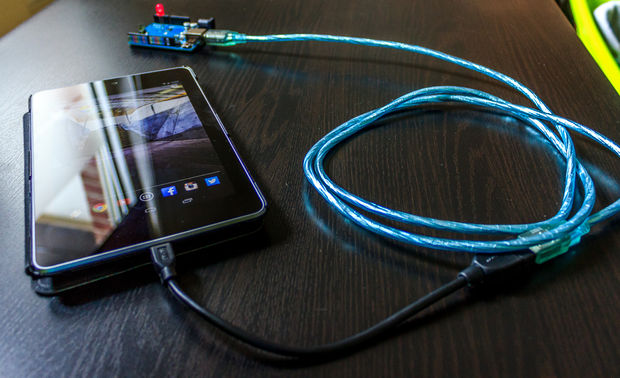
All connections must be performed as in the photo. Next, you can enable your Arduino and download the last downloaded code into it. On my Arduino, I used Blink Skatch. If Arduino does not start, then check the correctness of the connections.
Step 5: Applications

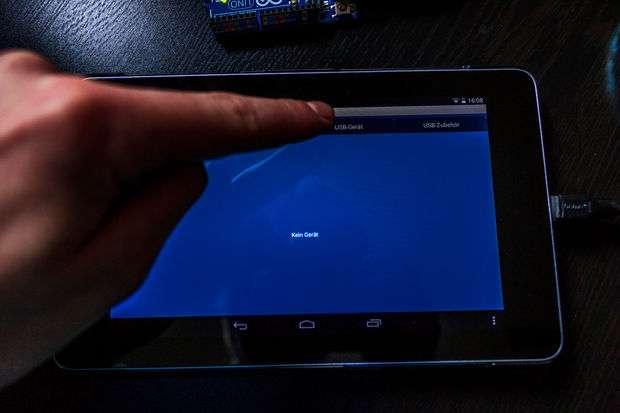
Now Arduino is ready to download the code, but your Android device is not yet ...
Let's change this situation!
At the moment there are two applications that allow you to work with our Arduino via Host mode.
To download them, go to the site Play Store., then enter "Arduino" in the search string. Next click on "Apps", then applications will be displayed. We need two applications: "Arduinodroid" and "Arduinocommander". Install them, then run "Arduinodroid". This application must update the IDE, which will take some time. The ARDUINOCOMMMANDER application will be needed further.
Note: Both applications use at the same time optional, I just want to show the work of both!
Step 6: Arduinocommander, author of Anton Smirnov
Well, let's start with the ARDUINOCOMMANDER application. He was developed by Anton Smirnov for AndorID 2.2 or higher.
This application is designed to work with Arduino with using Android Devices. With it, you can easily change the output status (directly install a high or low state), download the sketches or read the readings on the analog outputs in the oscilloscope mode.
This application is easy to figure out, even if the control is non-standard. It automatically detects Arduino and functions very stable.
However, some functions do not work. I hope in further versions of the application, these bugs will be corrected. Loading Sketch has passed successfully!
Stand this application 4.0 out of 5 stars.
Now let's briefly consider the connection to Arduino.
Step 7: Part 1
Other options include:
Ethernet
Bluetooth
USB Extras.
Step 8: Part 2

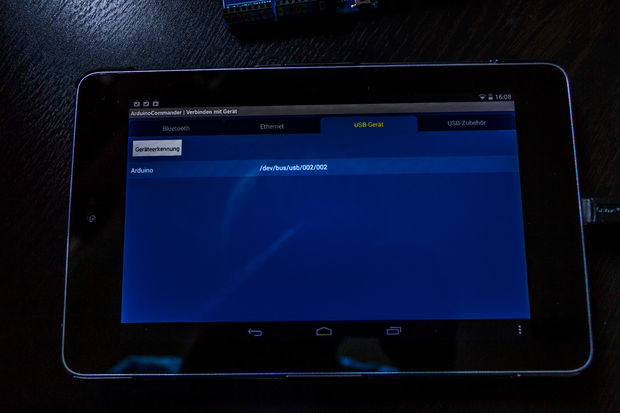
Now click on "Autodetect". Android device will start automatic search Arduino, then will show it on the screen. And now you will choose our Arduino (just click on it).
Step 9: Part 3
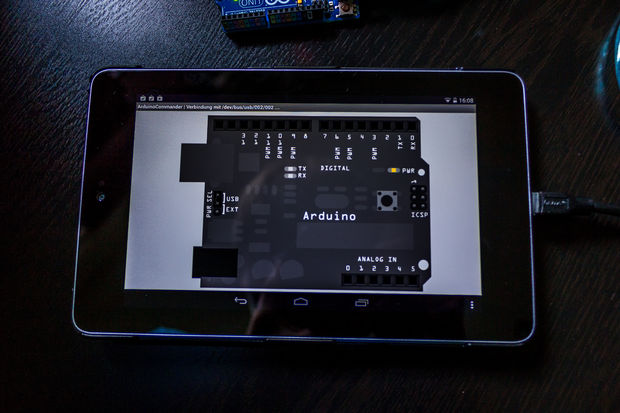
After executing the previous step, our Arduino will be shown on the screen. It is usually displayed in color, and you can click on the conclusions to change their mode. However, my choice of regimes did not work, and I could not have been eliminated this problem; Perhaps you will all work without failures. When you click in the lower right corner, you will go to the menu with which you can download your sketches from the SD card. This feature works very well.
Step 10: Arduinodroid
We now turn to the consideration of another application that allows you to download the sketches in your Arduino. This application is called "Arduinodroid" and works for android version 4.2.2 or higher. The author of this application is also Anton Smirnov!
Introduction
Greetings, readers of our resource. Today we will talk about one controller from the Arduino series, namely Arduino Pro mini.. This is a small, compact controller having all the advantages of Arduino, but at the same time very compact, you can say the smallest of all existing Arduino controllers at the moment. Many also attracts the price of his Chinese copies, and they cost from one to two dollars per piece (places and that less), which also makes him think about his acquisition. But there is one problem, it is not so easy to flash, especially Chinese copieswhich are equipped with the ATMEL ATMEGA168P processor, which once did not have the official ARDUINO PRO mini controllers and, as a result, Arduino IDE refuses to flash them, reporting on the wrong processor signature.
Here we will talk about this today. How to flash what is needed for this, well, how to force Arduino IDE to work with Chinese copies.
What is needed for this?
Arduino Pro mini is very compact, and compactness requires victims and sacrifice it - USB interface which completely twisted in this controller i.e. You cannot connect Pro Mini to a computer directly and, as a result, you will need either a special USB adapter in TTL or another Arduino controller.
- The first way. We flash through the USB adapter in TTL - the adapter itself is needed in the amount of one thing.
- The second way. We stick through Arduino Uno - you need Arduino Uno, but not simple, but in classic execution, this is the Arduino, in which the processor is made in the DIP case and inserted into the black connector.
- Third way. We flash through the SPI interface - you need any Arduino: Uno, Nano, Mega, Leonardo - No matter, the main thing is to be a USB connector for connecting to a PC.
The first way. We flash through the USB adapter in TTL
First and most simple way Download your Skitch in Arduino Pro Mini is to purchase a special USB adapter in TTL or as it is called the UART adapter. As a rule, this adapter is that part that was cut from Arduino Nano, turning it into Arduino Pro mini. The cost of such adapters is kopecking, but the choice and more. The Chinese have found them so much that the eyes scatter which one to choose. At the same time, the price of this device is not more than one ever green. After you connect Pro mini and UART to the adapter with wires or loop, it remains only to stick it (adapter) in the PC, install the driver (not for all adapters they are required) and everything is actually all. Your PC will determine the adapter as another COM port, which appears when connecting any Arduino to PC. Choose it, a fee with which you will work (Arduino Pro mini) and quietly load your sketch.
The only nuance in these adapters is the presence or absence of RST or DTR contacts. I recommend buying adapters on which these contacts are. They greatly simplify life and make the firmware firmware process. If you have already bought an adapter on which there are no such contacts, then with each loading of the Sketch in Arduino you will have to press the RESET button, which is not always done on time, and it contributes its inconvenience.
Connect Adapter You can view the table below:

The second way. We flash through Arduino Uno
For this method, we need classic Arduino Uno. The classic is the one in which the chip housing is made in the DIP case and is inserted into a special connector. Here this chip we need to carefully pushing a screwdriver. It is important not to break the processor, upset carefully, without changing the legs.
 Arduino Uno. The processor is made in the DIP case.
 Carefully refress and pull out the processor with a screwdriver.
After we pulled out the processor from Arduino Uno, we essentially got the same USB adapter in TTL, it remains only to connect our wires new adapter and Arduino Pro Mini according to the following scheme:

| Arduino Uno (without processor) | Arduino Pro mini. |
|---|---|
| RX. | RX. |
| TX. | TX. |
| GND. | GND. |
| 5V | VCC. |
| RST | RST |
After you have connected two Arduino together, you can proceed to the ARDUINO PRO MINI firmware. We connect ARDUINO UNO via USB to PC. Select the COM port in the Arduino IDE settings, indicate that we are now working with Arduino Uno, but with Arduino Pro mini and all, pour our sketches. The method is quite interesting if you are not afraid to ruin Arduino and there was no USB adapter in TTL.
Third way. We flash through the SPI interface
 The third and most inconvenient way to upload your sketch in Arduino Pro mini is to flash it using an ICSP interface. This interface is present on most Arduino boards. Main contacts this interface Released on ports from 10 to 13, as well as taken separately as a six pin pad with ICSP signature. There is a block, as a rule, in the central right of Arduino.
ARDUINO PRO MINI firmware in this case to share for two stages:
- Arduino board firmware as an ISP programmer.
First of all, we must prepare our future programmer. Take for example the whole tighten Arduino Uno. Next step by step:
- Run Arduino IDE.
- File - examples - 11.Rarduinoisp - Arduinoisp.
- Tools - fee - Arduino Uno.
- Tools - Port - Select COM port.
- Complete and fill in Arduino Uno.
| Arduino Uno (ISP) | Arduino Pro mini. |
|---|---|
| 5V | VCC. |
| GND. | GND. |
| 10 | RST |
| 11 (MOSI) | 11 (MOSI) |
| 12 (MISO) | 12 (MISO) |
| 13 (SCK) | 13 (SCK) |
Now again open Arduino IDE. Open the sketch in it which you want to fill in Pro mini and perform the following actions:
2. Tools - Plata - Arduino Pro or Pro Mini
3. Tools - Processor - ATMEGA168 (5V, 16 MHz)
4. Tools - port - choose port
5. Tools - Programmer - Arduino AS ISP
6. Sketch - download via programmer
As you can see to load the Sketch in this mode, it is necessary through a special menu "Download through the programmer", and not through the "Download" button on the main form of Arduino IDE. This is connected all inconvenience. If you click the "Download" button as usual usually, then you will board the Skatch in Arduino Uno, and not Arduino Pro Mini, which will shout there. Also in this mode, the Serial class is unavailable, that is, to debug your sketch by exchanging messages over the COM port you will not succeed. Well, another spoonful spoon is that after this flashing, in most cases, reflash Arduino Pro mini through the adapter, you will also do no longer. This is corrected by the fill of the new bootloader, and through the "Tools" menu - "burn the bootloader".
Add Chinese Pro Mini in Arduino IDE
As I said in this article, Chinese clones sometimes equipped with processors that did not equip official versions Arduino Pro Mini And as a result, when you firmware, you can see the next or similar error.
AVRDEDE: Expected Signature for ATMEGA168 IS 1E 94 06 Double Check Chip, Or Use -f to Override This Check. Wrong microcontroller found. You specified the right board in the Tools menu -\u003e Plata?
It is easily corrected:
- First you need to open the folder in which Arduino IDE is located.
- Then go to the next folder "Folder with Arduino IDE \\ Hardware \\ Arduino \\ AVR \\".
- We are looking for a file "boards.txt" and open it in a text editor.
- We are looking for the following line in the file "pro.Menu.cpu.16mhzatmega168.build.mcu \u003d ATMEGA168".
- And replace it with "pro.Menu.cpu.16mhzatmega168.build.mcu \u003d ATMEGA168P".
- Restart Arduino IDE and that's all.
- If you have a 328 processor for example, we do the same, just looking for a string with numbers 328.
Conclusion
In this article, I led already three options for downloading Sketches in Arduino Pro Mini. Personally, I use the second. I like it more.
What you will use you - choose to you. Leave in the comment. What option do you prefer.
Successes to you and good luck.
Please enable JavaScript to work comments.Loading the first sketch, this state of delight does not leave for a long time. Describe what you feel at the time of good luck is very difficult, especially if you have not previously dealt with programmable electronics. Thought, ideas are spinning in my head, and I want to find out how else this piece of textolite and a set of radio components can be able to learn more. If you passed the Arduino Uno R3 CH340G stage connection and configuration. To the computer, we can proceed with the following actions.
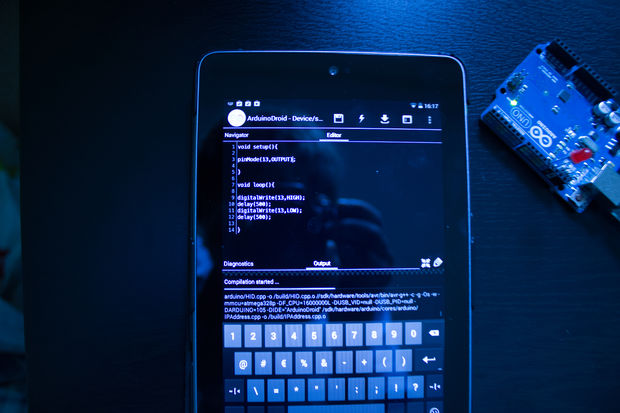
The first sketch is not at all necessary to search on the Internet or write it yourself. Arduino IDE has a set of pre-installed libraries and examples that you can use in your projects with further operation with the controller. To begin with, open Arduino IDE and go to the File tab in the top menu of the window, then you will carry the mouse pointer to the example examples. There are many sketchy examples, but I propose to stop the choice on the BLINK Sketch in the Basics examples category. Skatch is very simple and does not require any additional elements for its demonstration.
Semit this example We offer a new Arduino development environment with ready to download the controller firmware code. It looks like this.

Let's look a little that carries this sketch. From 1 to 23, we see the text of gray. This text is informative and describes the user some parameters of this Sketch, also the author of this sketch may leave contact information about himself. These lines are commented and when the controller is firmware, they are not loaded into it. Committed text in two ways. The first way will be convenient if you need to hide several lines from the bootloader, then the / * sign is used at the beginning of comments, * / at the end of the comments, as in the first and twenty-third row. The second method is more suitable for describing the part of the code or any function, for this, it is used // Text or code hitting a double layer // within one line will be hidden from loading into the controller, which we can observe the rest of the code. By the way, if you are planning to write sketches in the future, it is considered a good tone to leave a description of the work parameters of the sketch and comments to the functions. From the description that the author left us it is clear the following that this sketch causes the LED built-in controller and tied to 13 digital pine, blinking with a frequency of 1000 milliseconds.
I feel that you will not wait to quickly download something to your Arduryo. To do this, at the top of the window we find 5 buttons and click the Download button.

After pressing the button begins the process of compiling code and checking it for errors. If the code load is successfully, then this is informed by the load status bar.

And on the controller, we can observe how the LED marked with the Latin letter L begins to blink with a given frequency.

For greater understanding of the work of this Sketch, let's develop a little code and see what has changed. Go to 34 code string and change the time of the pause, delay (1000); Change on delay (10,000);.

As a result of these manipulations, the program of work of our controller has changed. And now the LED on the controller lights up not for 1 second as it was when loading source code, and for 10 seconds. Now we programmatically indicated in 33 lines to turn on the LED and this LED will burn until the other command does not receive relatively. Therefore, in 34 lines we put a pause of 10 seconds and in 35 lines Gasim LED. It should turn out something like the below the image represented.

As it seems to me that the information provided is enough to start working with the controller and I can only wish you success and huge results in your endeavors.
Sketch - This is a program written for the Arduino platform and having a specific structure.
To begin with, consider in a simple, abstract manner how your fee is working from a software point of view. ARDUINO, in fact, is a pinout (wiring of a microcontroller's legs on convenient inputs / outputs - Pins) ATMEGA microcontroller. As you notice, different boards contain various controllers and, accordingly, have different configuration of pins. The manufacturer sets on arduino fee HEX-firmware (bootloader), which starts when turned on and transfers the control of the Sketch, written and infant by the user.
Structure of Sketch:
Skatch necessarily contains 2 functions: function setup.and function loop..
Arduino Firmware When enabled calls the Setup function. The SETUP function is called only once, each time the board starts. This place is ideal for initialization (tasks of initial values) of variables, sets of pins modes (input / output), setting the conformity of connected sensors / servos / other people with pins. After executing the SETUP function, the loop function is cyclic (i.e., immediately after exiting the SETUP function, the LOOP function is performed, after exiting it, it is called again. The process continues until the power will not be disabled.)
For consolidation, consider the simplest spell on the flashing LED (seeing classic Hello World for Arduino). The Void word before the name of the function, tells us that the function does not return any values \u200b\u200b(returns "void" - "emptiness"). The structure, concept and purpose of functions, we consider in subsequent articles.
Void. setup. () { // Install 13-pin as the conclusion Pinmode (13, Output); ) Void loop. () (DigitalWrite (13, High); // Light LED Delay (1000); // We are waiting for a second DigitalWrite (13, Low); // Turn off the LED Delay (1000); // We are waiting for a second)As it should be clear, when the board is turned on, the Setup function will be caused, in which 13 IDUs will be set as output. Next, the Loop function will be called cyclically.
Consider the process of fill the sketch on Arduino. All process Consider for Arduino IDE environments. In other environments, steps are similar, and we do not consider that they require separate consideration. To begin with, open the environment and copy our sketch.

Press the "Pour" button

As we see, there is a compilation of our program. Compilation is the process of converting the program code from the language top level, in binary codewhich will perform a microcontroller. If the sketch is written without syntactic errorsIt will successfully compiled and flooded on Arduino.
We often ask a question whether it is necessary to somehow clean, wash the old sketches before the fill of new ones. There is no need. When pouring a new sketch from the old one, there is no trace;)

 Doesn't Diablo III start?
 How to check the computer to spyware
 Spyware on the computer