Windows 10 delete temporary files manually. Delete temporary files in Windows
Temporary files are generally referred to as those files that applications store on your computer to temporarily store information. However, there are many other temporary file types in Windows 10, including those left behind after installing a new version, update logs, error reports, temporary Windows setup files, and more.
Typically, these files don't cause any problems, but they can grow quickly, using up valuable hard drive space, which could be the reason why you're preventing a new version of Windows 10 from installing, or the reason you're out of space.
Luckily, Windows 10 offers several ways to safely delete temporary files on your computer using the Settings app and the Disk Cleanup tool.
In this guide, you'll learn how to quickly delete temporary files in Windows 10 to free up space, or free up space after installing a feature update such as Windows 10 version 1903.
How to delete temporary files using settings
On Windows 10, you can use the Settings app to delete temporary files manually or automatically, but the steps will be slightly different depending on the version you're using.
Deleting temporary files in Windows 10 version 1903 or later
Use these steps to delete temporary files using the Settings app in Windows 10 version 1903 May 2019 Update or later:
After completing these steps, unnecessary files will be removed from your computer, freeing up space for more important files.
Deleting temporary files in Windows 10 version 1809 or earlier
Follow these steps to manually delete temporary files using the Settings app in Windows 10 version 1809, October 2018 Update, or earlier releases:

After completing these steps, the files you have selected will be permanently deleted from your computer, freeing up space for more valuable files.
If you are uninstalling a previous version of Windows 10, please note that you will not be able to roll back to an earlier version without these files. However, after installing a feature update on your computer, the operating system automatically deletes these files anyway after 10 days.
Automatically delete temporary files in Windows 10 version 1903 or later
Alternatively, you can use "Storage sense" to automatically free up space by deleting these temporary files and contents from the Trash.
Use these steps to automatically delete files wasting space using Storage Sense in Windows 10 version 1903 or later:

After you complete these steps, "Storage sense" will delete most temporary files, as well as those files that have been in the trash for more than 30 days.
In addition, you can always click the Configure Storage Sense button or launch it now to configure your cleanup options or launch Storage Sense on demand.

Automatically delete temporary files in Windows 10 version 1809 or earlier
Use these steps to automatically delete space-wasting files using Storage Sense on Windows 10 version 1809 or earlier:

After completing these steps, Windows 10 will automatically delete temporary files and those files that have been in the Recycle Bin for more than 30 days.

How to delete temporary files with Disk Cleanup
If you are getting a message that your device is low on space, you can also use the Disk Cleanup tool to remove temporary files to free up space on your computer.
To remove temporary files from Windows 10 using Disk Cleanup, follow these steps:

After you complete these steps, the files will be permanently removed from your computer, making room for new files.
After using the computer for a long time, temporary files accumulate over time that the user simply does not need and simply take up space on the computer. The latest operating system updates have introduced new Windows 10 temporary file cleaners. We have already used some of them for.
This article will tell you how to clear Windows 10 temporary files. Most users do not even know where temporary files are stored, let alone which files can be considered temporary. The latest operating system updates not only gave the user new opportunities to optimize the system as a whole, but also were able to expand the concept of temporary files.
The updated system settings indicate that temporary files include data in the download folder, non-critical files used by Windows Defender Antivirus, Delivery Optimization files, update log files, and temporary Internet files themselves. This list can really go on for a very long time.
If we talk about temporary application files, then their path has not changed at all. The user can also manually clear them, if necessary, if the application does not do this automatically. Below is the folder that contains the desktop application temporary files:
- C:\ Users\ Username\ AppData\ Local\ Temp
Often, to go to the folder with temporary files, it is enough for the user to execute the command %Temp% in the window Win+R. Actually, after executing this command, the above location will open.
And also see the instructions for more details about the current location. Please note that the current folder is hidden from the eyes of an inexperienced user by default.
Options
Disk Cleanup

Conclusion
A large number of temporary files are stored on the user's computer, which simply take up disk space. If you have little free memory on the system drive, then you just need to not only clear temporary files, but also enable the memory control function in Windows 10.
One of the reasons why a computer slows down is its full system memory. To solve the problem, first of all, it is recommended to clear the disk of temporary files.
What are temporary files for?
Temporary files are data that are created both by the OS itself and by utilities installed on the computer. It is unprofitable for applications to store a large amount of information in the PC's RAM. Moreover, the latter may have a small volume. In this regard, the data that applications need to perform current tasks is stored in a separate system folder for temporary files.
Backup copies of documents that are created by editors from the Microsoft Office package are temporary files. If the system crashes or the computer suddenly shuts down, you can continue editing the document from where you left off without losing any data.
Do I need to delete temporary files
Temporary files should disappear automatically after the application terminates. However, this feature does not always work. Therefore, a large number of temporary objects accumulate in the computer's memory over time, which slows down the PC. You can safely get rid of them: there will be no consequences in the form of failures in the system.
Manual cleaning of the system from temporary files is even necessary to free the computer from dead weight. It must be carried out in the following situations:
- folders in Windows Explorer and programs open slowly;
- when you close the browser or other utility, a message appears at the top of the window stating that the application is not responding;
- the computer does not respond as quickly to mouse clicks and keystrokes.
How to Properly and Safely Delete Temporary Files in Windows 10
There are several ways to get rid of temporary files in Windows 10. Let's consider each of them.
Through the Options window
Windows 10 has a new feature to scan the contents of hard drives and then clean up individual files and partitions. You can use it in the Options window:
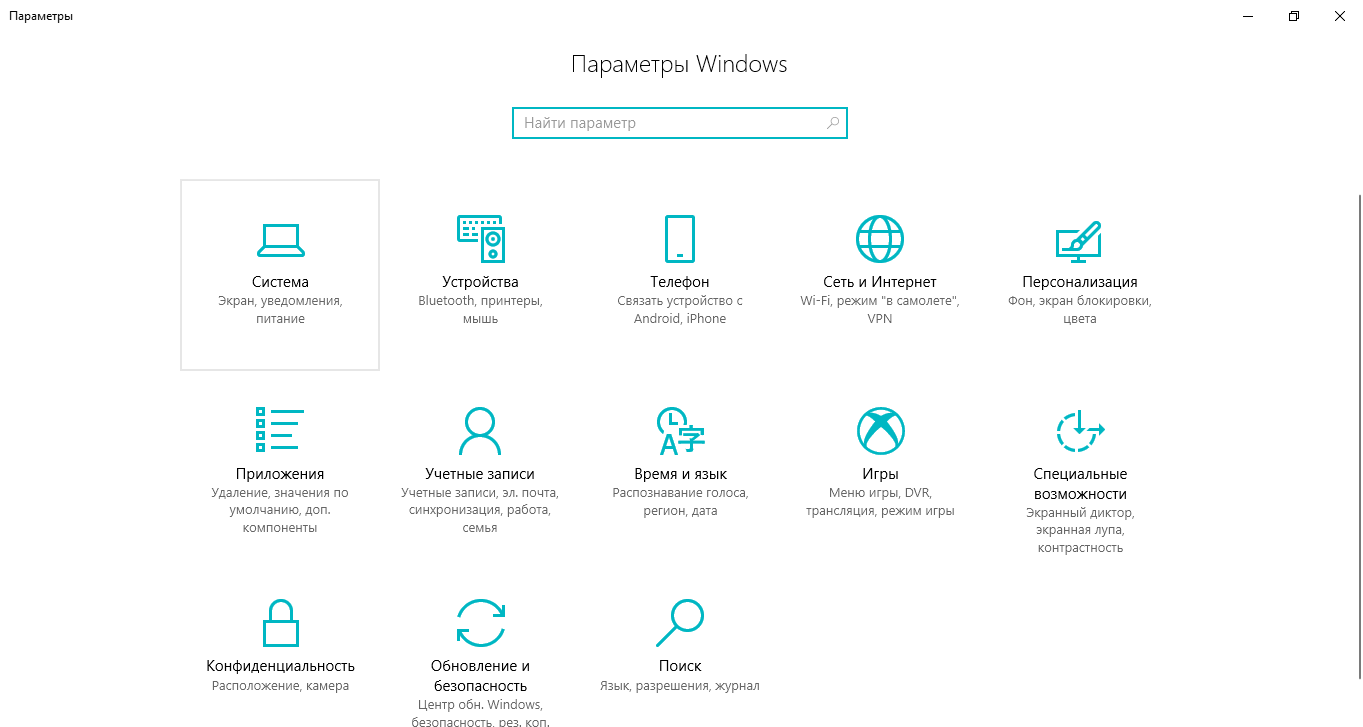
- Click on the gear icon in the start menu. It is located above the off button. The second way to launch is simpler: you need to press the key combination Win + I. Click on the gear to open the "Options" window
- Select the System tile.
 Open the first "System" section in the "Windows Settings" window
 - Switch to the "Storage" block.
 Launch the system disk in the "Storage" tab
 - Since temporary files are located on the system drive, select it by clicking once with the left mouse button.
- The system will start analyzing the data located on the system drive. Wait a while.
 Wait until the analysis of the contents of the system disk is completed
 - As a result, the system will show how much space a particular partition of the hard disk occupies. We are interested in "Temporary files". Let's open this block.
 Open the "Temporary files" section to delete objects
 - Place a check mark next to all three items. Now just click on "Delete Files". We are waiting for the cleaning process to finish.
 Select all three items and click on "Delete Files"
Video: how to delete temporary files through the "Options" window
Using special disk cleaning utilities
Third-party utilities designed to clean systems of junk files can also permanently erase temporary files. One of the most famous is CCleaner, developed by Pirifrom. It can be used for free. The interface is translated into Russian and is intuitive.
To delete temporary files with CCleaner:
- We launch the official website of the developer of the CCleaner utility. Click on the green Download Free Version button.
 Click on the Download Free Version button
 - Open the downloaded file and follow the simple step by step instructions to install the cleaning app. Do not forget to uncheck the boxes about installing additional software if you do not need it.
- Using the CCleaner icon on the "Desktop" launch the utility. You will immediately find yourself in the desired section "Cleaning". In a large list of items, check the boxes to the left of those that need to be cleared. Make sure "Temporary Files" is checked in the "System" section. In the "Applications" tab, you can optionally delete browsing logs, browser cookies and other information.
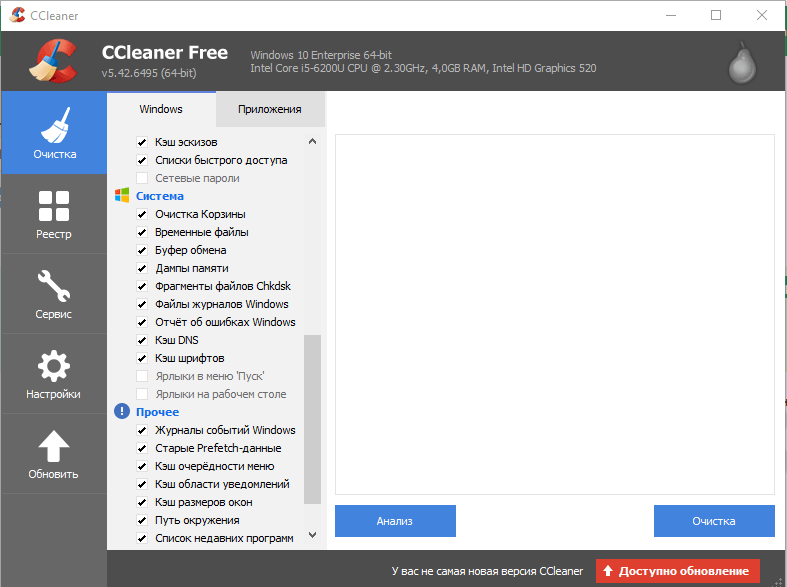 Check the items that should be cleared, including the "Temporary files" object
 - Click on "Analysis".
- When it finishes, the window will display a list of items to delete further, as well as the total amount of memory they occupy.
 After analysis, a list of files for subsequent deletion will appear in the window
Click on "Cleanup". Confirm your action by clicking on "Continue".
 Click on "Continue" to confirm the cleanup
Waiting for it to end. After completion, the window will display information about the amount of memory that was freed during cleaning.
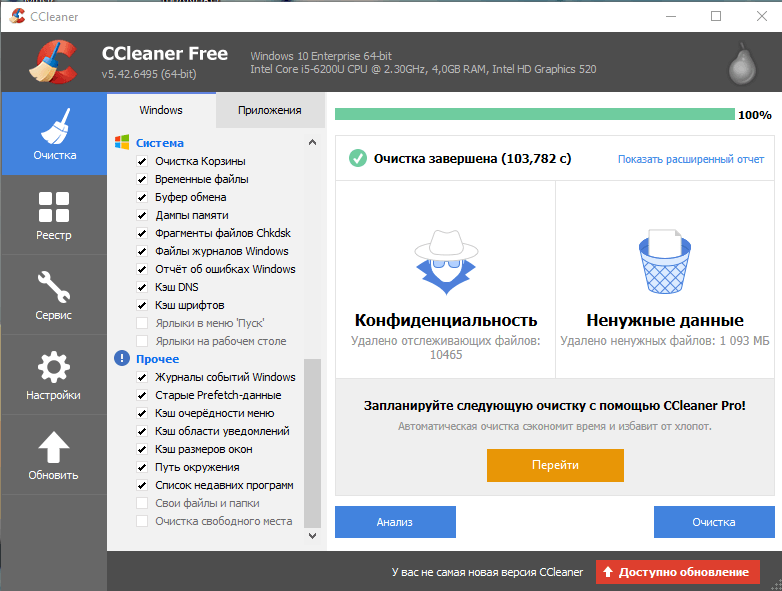 After cleaning, a message will appear in the window about the successful completion of the procedure.
In addition to CCleaner, you can use programs such as Advanced Systemcare, Reg Organizer, and others to clean up temporary system files.
Video: how to clear the system of temporary files using CCleaner
Due to the built-in Disk Cleanup service
In the tenth version, a built-in utility for removing junk files called "Disk Cleanup" remained available. It will help you find and erase temporary files that were not deleted in the Options window.
- Hold down the Win and R keys. In the "Open" field, type the cleanmgr command. Click on "OK" or press Enter.
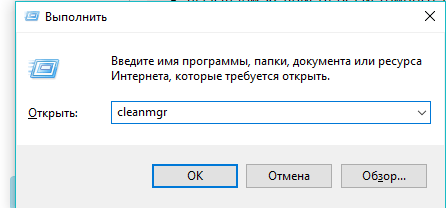 Enter the cleanmgr command in the "Open" field
 - In the next gray window, select drive C from the drop-down menu. We click on "OK".
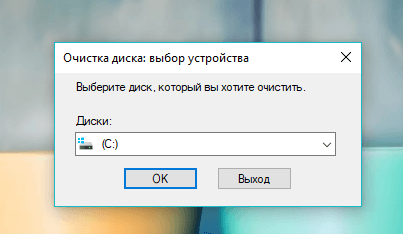 Select your system drive from the drop down menu
 - As a result, a special window "Disk Cleanup" will appear on the screen, where the amount of data that can be deleted from the PC's memory will be immediately indicated.
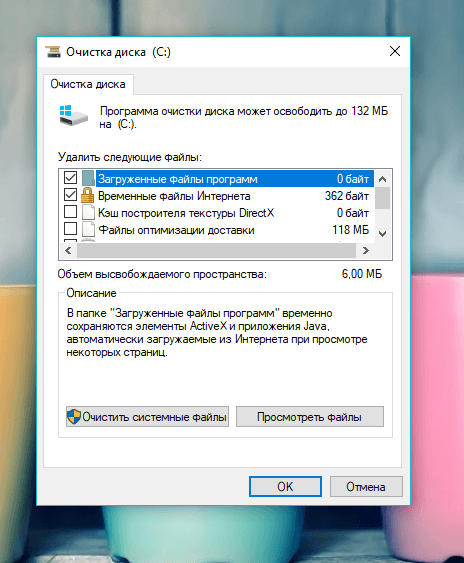 The Disk Cleanup window immediately shows the amount of memory that can be freed.
 - The same window can be launched in another way. Open "Windows Explorer" via the "This PC" icon on the "Desktop". Right-click on the system drive and select "Properties".
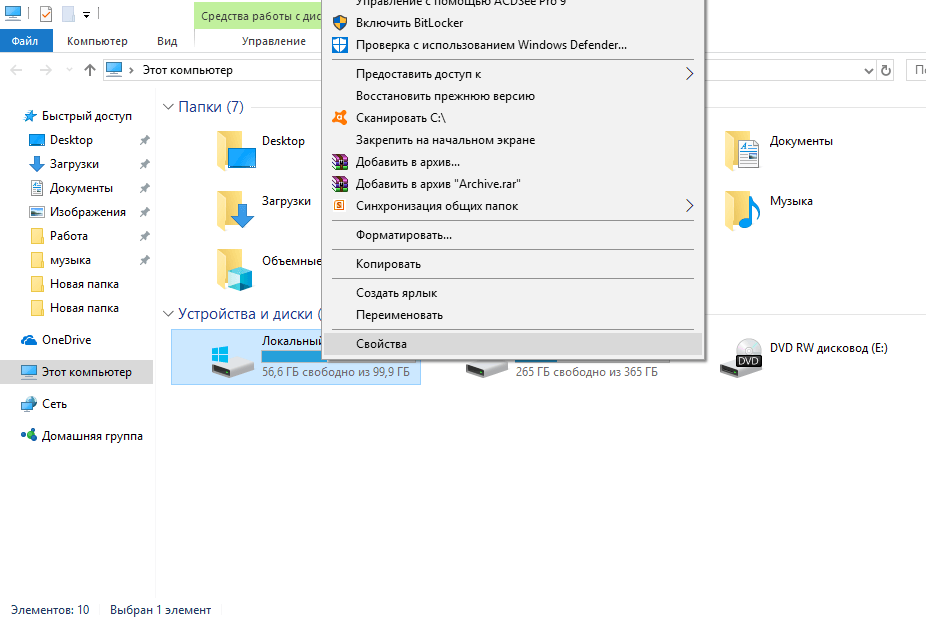 Select the last item "Properties" in the context menu
 - Under the disk visualization there will be a Disk Cleanup button. We click on it.
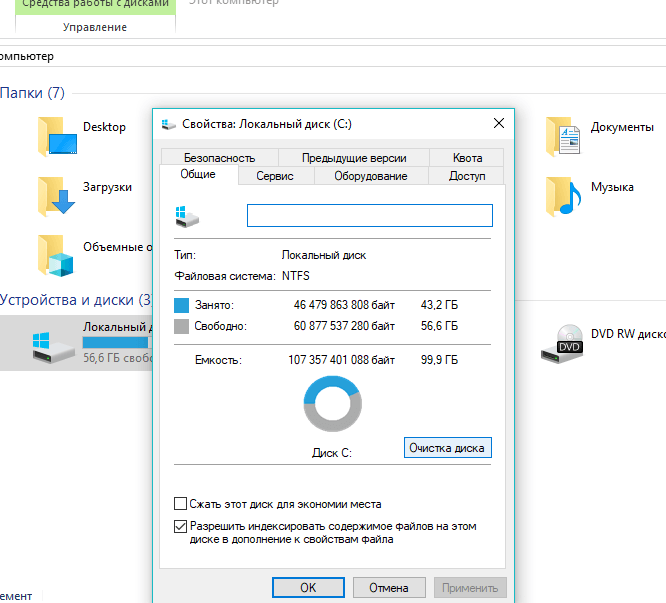 Click on the "Disk Cleanup" button below the disk image
 - You can safely check the boxes next to all the items on the list. The sections "Temporary files" and "Temporary Internet files" must be checked. Now click on "OK".
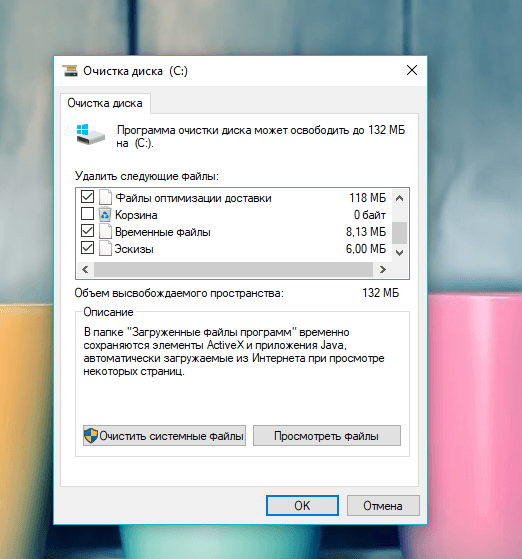 Make sure to check "Temporary files" and click on "OK"
 - Click on "Delete Files" to confirm the cleanup.
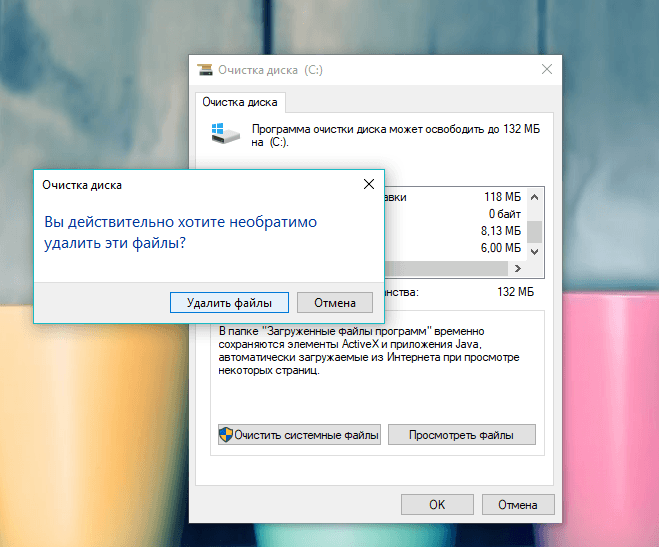 Click on "Delete Files"
 - We are waiting for the process to complete.
 Wait until the process of cleaning the system from junk files is over.
Video: How to Delete Temporary Files with Disk Cleanup
Manual cleaning of system folders with temporary files
Partitions with temporary files created by utilities and the OS are stored on the system drive. Every Windows 10 user can open these folders and remove files from there. However, you should do this after you finish working in applications and before turning off the computer.
- Call up the Windows Explorer window using the This PC icon located on the Desktop.
- Open the system drive by double-clicking.
 Open the system drive in Windows Explorer
 - Follow the path: "Users" - "Folder with the name of your account" - AppData - Local - Temp.
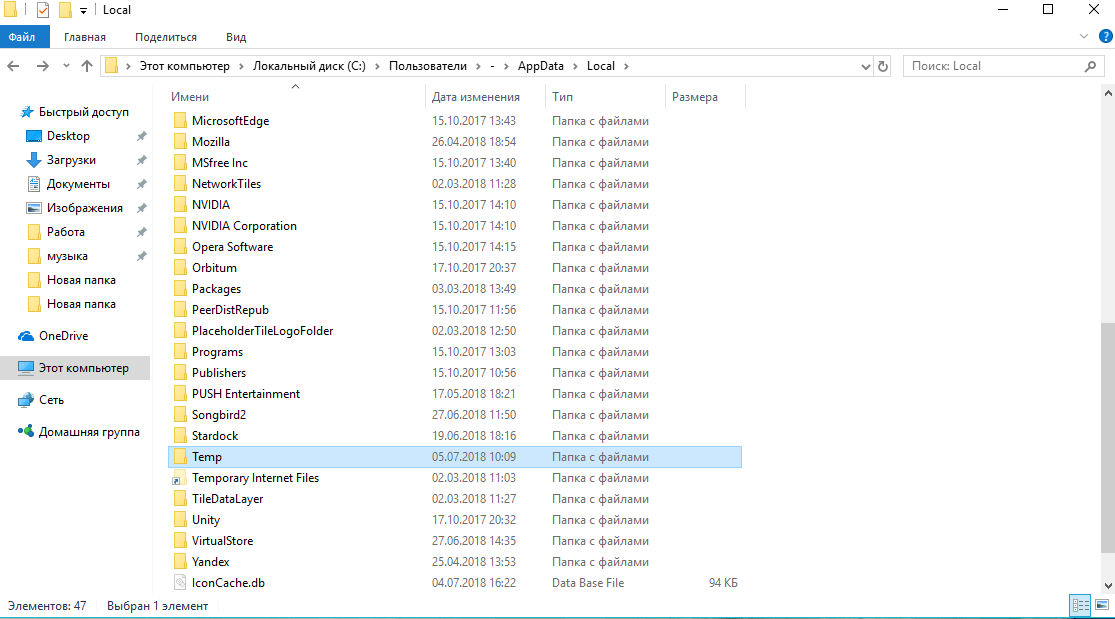 Open the Temp folder on the system drive
 - In the last folder, you need to select all the files with the mouse pointer and right-click on them. Select "Delete" from the list of options. After that, we confirm that we want to permanently delete the objects.
 Click "Yes" to remove files from the Temp folder
 - We return to the system disk. Now you need to go to another Temp folder. Open the Windows partition first, and then Temp. The temporary files of the operating system are already here. We remove objects from the folder in the same way as in the previous steps of this instruction.
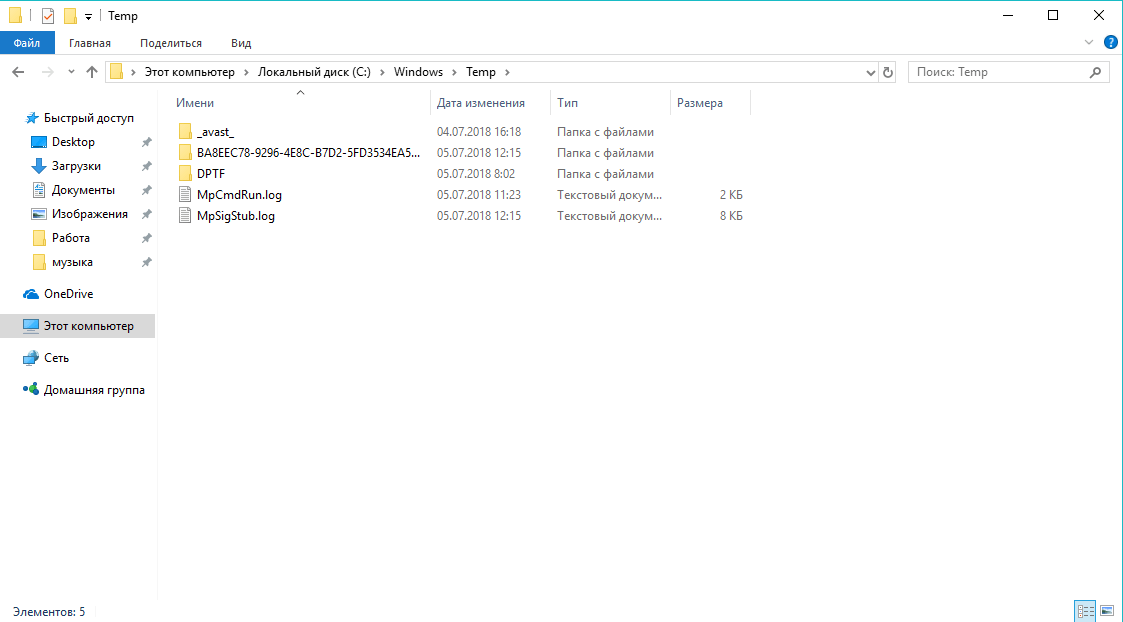 Delete the contents of the Temp folder in the Windows partition on the system drive
 - We restart the device.
Video: How to Erase Files in Temp Folders
You can erase temporary objects of applications and OS without any consequences in the form of crashes and slow launch of programs. The procedure will only speed up the computer. To remove it, you can use both built-in Windows services and third-party utilities, such as CCleaner or Advanced Systemcare.
The Temp folder in Windows 10 is designed to store temporary files that are necessary for the operation of the system or some application. Unfortunately, the contents of this folder are not always cleared automatically after a certain task is completed. Therefore, users often clear this folder manually. However, in order to remove unnecessary files from this folder, you need to know how to find the Temp folder in Windows 10.
How to get into the Temp folder on Windows 10?
There are several Temp folders in Windows 10. All of them are stored in different places, namely:
- c:\temp;
- C:\Windows\Temp;
- C:\Users\YOUR_USERNAME\AppData\Local\Temp\.
To get to these folders, you can manually go to the specified addresses or perform a few simple steps.
Method number 1. With the line Execute
- Press "Win + R" and enter "%TEMP%".
- A folder with temporary files will open.
Method number 2. Using the address bar of Explorer
In order to get to the Temp folder in Windows 10, you should open File Explorer and enter "%USERPROFILE%\AppData\Local\Temp" or "%TEMP%" (without quotes) in the address bar.

How to clear the Temp folder on Windows 10?
You have learned about where the Temp folder is located in Windows 10. Now you can clean it up. To do this, you should use the following recommendations.
Method number 1. Standard Cleaning Temp
- Open Explorer. Right-click on the C drive and select "Properties". A small window will open. Click "Disk Cleanup".

- Check the box next to "Temporary files" and click "Clear".

- We are waiting for the completion of cleaning the folder.
Method number 2. With a .bat file
To create a .bat file, you should do the following:
- Click "Start", select "Notepad".
- In Notepad, paste the line "rd % temp% / s / q md % temp%".

- Save the file as "%appdata%\microsoft\windows\start menu\programs\startup\cleantemp.bat". So you create a batch file, cleantemp.bat, in the Startup submenu of your Start Menu. The generated bat file will be loaded automatically.
Method number 3. Using Task Scheduler
- We launch the Task Scheduler. To do this, go to the "Control Panel", "Administration" and select "Task Scheduler".

- A new window will appear. Select "Create a simple task". We set any task name, and in the actions we specify “forfiles.exe /p "%TEMP%" /s /m * /d -3 /c "cmd /c del /F /Q /A @file"" and "forfiles. exe /p "%TEMP%" /s /m * /d -3 /c "cmd /c rd /S /Q @file"".
- Set the task execution time. The Tempo folder will be cleared automatically.
It is important to note that the last two methods are suitable for clearing a folder with temporary files for only one user. If your PC has several profiles, then cleaning must be done for each profile separately.
How to move the Temp folder in Windows 10?
In order not to go to the address: C:\Users\USER_NAME\AppData\Local\Temp\ every time, the folder with temporary files can be moved to the top-level directory, for example, to the C:\Temp folder. To do this, do the following:
- Calling the properties of the system. A new window will open. Select "Advanced system settings" from the menu on the left.

- A new window will open. Go to the "Advanced" tab and click on the "Environment Variables" button.

- A new window will open. You can see two variables in it: TEMP and TMP. For both variables, click "Change" and enter a new value for the variable: "C:\Temp".

- We save the result.
After completing the above steps, the location of the folder with temporary files will change.
Deleting temporary files is one of the best ways to free up a significant amount of free space on your Windows operating system.
Most Windows 10 users probably know how to manually delete temporary files without the help of third-party PC cleaning utilities such as CCleaner.
There is a simple and safe method to delete temporary files in Windows 10. You can use the Windows Settings app to safely delete all temporary files in Windows 10 without installing additional software. Here's how to use the Windows Settings app to securely delete temporary files in Windows 10.
Deleting temporary files in Windows 10
Step 1: Open the app Options, by clicking the gear icon in the Start menu bar or by pressing the keyboard shortcut Win + I
Step 2: On the home page of the app Options", click on the icon System".
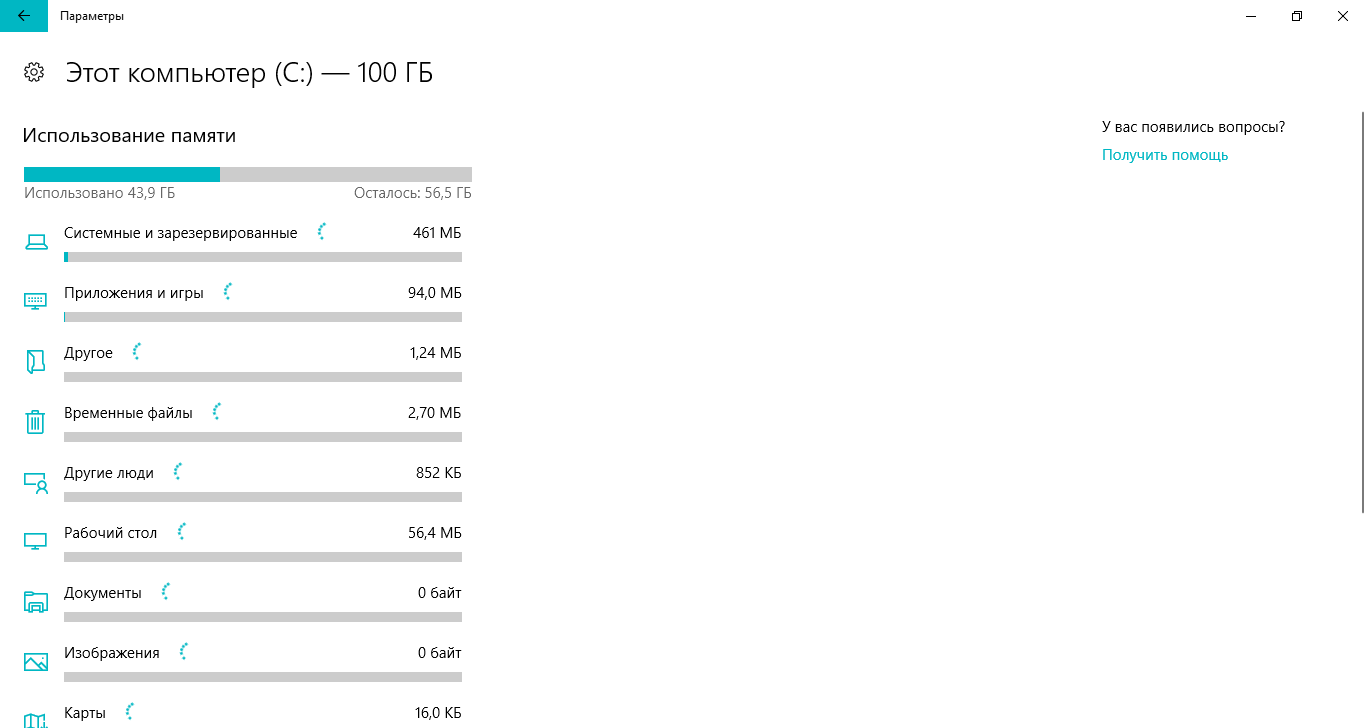
Step 3: Open section "Device Memory". On the right side of the window, click on the drive where Windows 10 is installed. For convenience, on the page, the system displays the Windows logo on the drive where the OS is installed.
Step 4: After clicking on the system drive (disc with Windows 10) you will see the Memory Usage page. The page displays disk space used by the system and backed up files, apps, games, documents, pictures, music, videos, email, desktop, maps, OneDrive, temporary files, and more.

Step 5: As you can see in the picture, opposite the inscription temporary files, the system displays the used disk space. On my computer, temporary files take up 17.8 GB. Notice how Windows 10 calculates this figure - the Downloads folder, Recycle Bin, Previous Versions of Windows (Windows.old folder), and temporary files.

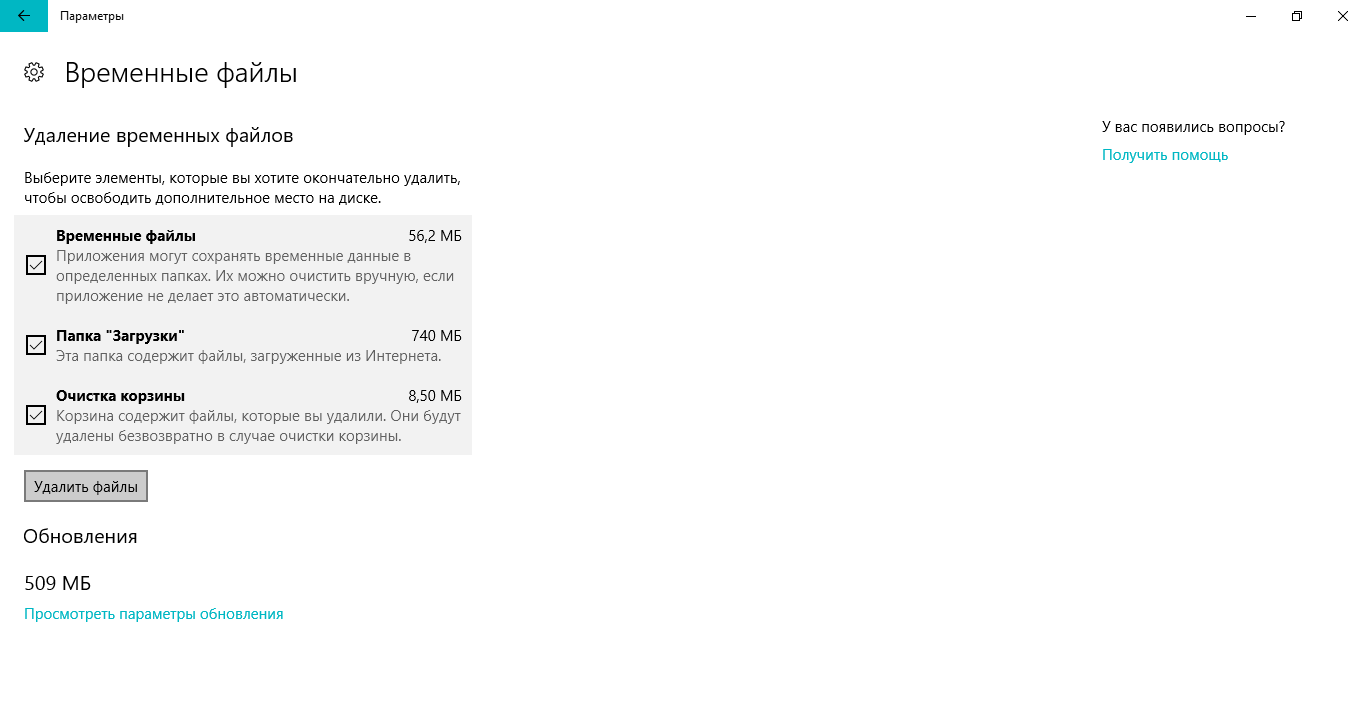
Step 6: Next, open the page "Temporary files", check the boxes for the items you want, and then click the " Delete files" to delete all temporary files in Windows 10. If you see a confirmation box, click " Yes" or button " OK" to start deleting files.

 Restoring windows 10 to a restore point
 Scan Documents and Photos with the Fax and Scan Tool Scan Documents in Windows 10
 Where is the Google Chrome folder on Windows, Linux, Mac OS X and Android?