How to enter 1C under the administrator. Adding a user to the information base
Software products based on 1C platform have many functions, both specialized and applied, that is administrative. Profile functionality (of course, depending on the purpose of the decision) concerns areas such as purchase of goods, their sale, warehouse, operational and management accounting, accounting, CRM, and in case of comprehensive solutions - and all together.
Naturally, one employee is not able to control all the business processes of the organization, let them even automate. Therefore, 1C administrators have to deal with dozens and hundreds of users working with a specific system functionality. Each of them have to configure special rights so that all of them are at the same time, and only they need documents, functions and reports. And here we begin to consider the applied or administrative functionality of 1C solutions, which is just the configuration of user access rights.
User Settings 1C 8.3
For user rights in 1C 8.3, special objects of the configuration structure are responsible - "Roles". Most typical configurations already have a specific list of created standard roles. They can use when creating accounts and setting access rights for them. If the standard set is not suitable for you, then it can be changed or add your roles.
Each user can be appointed several roles responsible for specific rights. In order to configure the rights of users 1C, you need to know what roles they have now. This information can be obtained in two ways:
- Through the configurator. This option Suitable for any configurations;
- In some configurations through the "Enterprise" mode.
Launch your 1C database configurator under username with full rights and open the Administration menu -\u003e "Users". To learn the rights from a particular user, you must click on the line with his last name with a double click and go to the Other tab. Talk will be marked with the roles that are available to the user. To add a specific role or remove it, change the mark and click OK.


If, after analysis, you realized that standard roles would not be able to fully meet the requirements for the delimitation of rights, then it is necessary to change them. To do this, find the right role in the configuration tree and open it double-clicking. In the left side of the window that opens, you will see a list of all configuration objects. In the right-hand side, the values \u200b\u200bare noted by those actions, the rights to which are laid in this role, in relation to the selected object on the left.

You can not only give and remove permissions for certain actions with configuration objects, setting and removing daws. In addition to the 1c platform, a very convenient mechanism is embedded, which is responsible for limiting the rights of users at the entry level - RLS. It allows you to specify a condition, only when executing which the user will see the information base data. Using RLS user rights in 1C 8.3 can be configured so that, for example, each specific storekeeper will see information only in its warehouse.
Another way to add rights to any object to the user without changing standard roles is to create a new role. To do this, click on the "Add" button while in the "Role" configuration branch, and name the new object. In the opening window that opens, find the desired configuration objects, and on the right to install the right and limitations. After saving the new role, you must update the configuration, go to the list of users and add a new role to specific users.
The creation of users and distribution of rights is the responsibility of the administrator of the information base of 1C is not limited. Employees may change, the duties are redistributed, and administrators must respond to all these changes. If an employee who performs certain functions in 1C, quit, then you need to turn off the user 1C so that former colleagues do not use accounting. This will help us with a list of users that can be opened in the Configurator in the Administration menu.

Opening the 1C user settings, you must remove the check boxes that are responsible for finding the employee name in the selection list and authentication. Thus, you forbid you to enter the last name of the past employee and save the access rights settings, in case the employee returns. Also, these settings will be useful if all powers are transmitted by a new employee - you do not have to re-configure roles.
Fully deleting the user is not recommended also due to the fact that there are links to a responsible user in various documents. If you delete a record, then broken links will appear and misunderstanding who created specific documents that can lead to confusion. Much more efficiently disable the user 1C from logging into the system, and in some cases remove completely rights (roles). Also in some companies there is a practice to march active users A specific icon in the "Name" field, for example: "* Ivanothp".
In some cases, the 1C administrator may need to urgently "throw out" users from the 1C base. This can be done in two ways:
- Through the "Enterprise" mode from the user with administrative rights. Not supported by all configurations;
- Through the application server using the 1C server cluster console.
To take advantage of the first option, you need to go to "NSI and administration", open "service" and run the form "Active Users". We will see a list of active users and from above the "Complete" button, clicking on which will allow forcibly completing users' sessions. In addition, in this list you can see the name of the computer and the start time of work, which will help track the hanging sessions.

The second option of disconnecting active users requires more attention and responsibilities, since most often the cluster console is placed on the application server. If you have access to this server control panel, you can complete the user's session as follows:
- Open the cluster console;
- We go to the list of information databases and open sessions we need;
- Find in the list necessary user;
- Call context menuBy pressing the right mouse button, there will be a function - "Delete".

In the 1C platform, the developers laid a convenient mechanism for configuring rights and manage users. Therefore, the described capabilities are available to the owners of all configurations, even written on their own. Another advantage is the inconspiciency in the presence of deep knowledge of the 1C system. Any responsible and attentive administrator is able to cope with these operations.
By default, when creating a base on the cloud from the template, you must select the user to enter the program. Administrator, with empty passwords.
Use accounting This account for everyday work is not recommended.
To delimit access rights and improve the level of security, it is recommended to create accounts for users and specify certain permissions to work with the database.
Creating users for database 1C 8.2
To create a list of users, open the database Configurator.
Go to the "Administration / Users" menu. To manage the list of users, you need to have full rights in the database. 
Click the "Add" button. 
In the window that opens, fill in the fields:
Name- The name that will be displayed in the user selection list.
Full name -
the name that will appear in the database when performing operations.
flag Authentication 1C: Enterprises - Allows you to set a password under which the user will enter this database.
flag Shift - Allows you to hide or show the user in the startup window. If the user is hidden in the selection list, then you can enter your data and password directly. 
flag Authentication operating system
Allows you to associate an account for 42 clouds with an account in the 1C database.
When installing this option, you will need to select from the list your login on site 42 clouds (Tip: Start enter your login to search by list). 
On the "Other" tab, you must specify the roles of the roles they can perform in the database.
List of roles depends on user duties.
Note! To start the base on the cloud, place the Flags "Start a Tolstick Client" and "Run thin client". 
After specifying the necessary settings, click OK. Now the user created can work in the database.
Creating users for databases 1C 8.3
Creating new users in configurations such as Trade Management 11.1, the company's accounting (Edition 3.0) occurs in the database mode, users' reference books. The configurator created users will fall automatically after creation. 
Go to the "Administration / Users and Right / Users" menu. Click the Add button. To manage the list of users, you need to have full rights in the database.

Enter a name, give permission to access the database (Check box) and select the authorization method (or input login and password, or input to 1C under a domain account). Fields "Individual" "Division" are optional, used for analytics.

To work with the database, you need to add the user to the user in the section: "Access Rights". A group set can be changed and edited in the User Group Profiles directory.

Turning off access to the database
To disable the 1C user database access, it is enough to remove the "Access to the information database" flag or change the password.
When setting up the user via the configurator (for database 1C 8.2), it is enough to delete the user from the list.
Creating users for database 1C 8.3 (Taxi Interface)
To configure the access rights, go to the database in 1c. Enterprise on behalf of the administrator and go to the User Settings and Right / Access Group profiles section, click Create a group.
Enter the name of the group and check the roles available to users of this group. Example group that will allow users to use external processing Includes the following roles:
- Interactive opening external reports and processing
- Using additional reports and processing
Click Record and Close

Return to the menu Usersand select from the list of employees, click Access rights. In the list of profiles, mark the earlier profile. Click Write.
Creating a user. Setting up user roles
Fill a list of users of the information base. To do this, let's go to the menu item "Service - user management and access - a list of users." Add a new user by the Add button.
Fill a brief name. Choose an employee from the list. Let us turn to the "Settings" tab, fill the "Main Organization" field and note the checkboxes if you need certain settings. Next, we need to click on the "Editing User Settings" button on top of the window.
The program will offer us to record an item, will reply affirmatively. Next, the program will propose to automatically create a database user, agreed. We will open the user settings editing window.

Set the password by filling out the 1C: Enterprise Authentication block field. Below we can choose the main database user interface. On the right we need to set the roles of the user. For fine setting right certain user We can mark the roles that will be available to it. If the fine tuning is not needed, you can note "full rights". Save our user by the "OK" button. Now, when entering the system, the program will request to select a user.
Work in the program 1C allows different users to assign functional access to documents and reference books. For example:
- If the user works as an accountant, then in 1s it is assigned a corresponding role that allows you to add, modify, delete documents and reference books on economic activity.
- If the user 1C works only with the reports and views the database data, let's say, then it is given to reading data.
- A user who can work with all the 1C-Administrator program objects has full rights and receives unlimited access to 1C database.
Access rights can only be configured Administrator - User 1C, which is assigned complete rights.
Setting access rights in 1C 8.3 Accounting 3.0
In 1C: Accounting 8 Ed. 3.0 4 main profiles are highlighted for working with the program:
- Administrator;
- Accountant;
- Chief Accountant;
- Synchronization with other programs;
- Only reading.
To understand the principle of task of rights in 1C, refer to the configurator. When analyzing configuration objects we will see a special branch Rolewhere all the possible access to the data provided by the developers 1C is listed:
Each role corresponds to a set of features for working with configuration objects, it is
- Reading;
- Adding;
- Carrying out;
- Cancellation;
- Editing;
- Removal.
If you open a specified role, then for each object you can view - what can be done with each configuration object:

It is important to know that the 1C user can be assigned any set of roles from the list developers. At the same time, if the object cannot be changed in some role, and in another, the role added to this user can, then the resulting user will be "change". Roles mutually complement each other. In order for the object to be able to be changed by the user, in any of the roles given to him should not stand "Change".
Setting the access rights in 1C 8.3 Accounting
Setting the access rights in 1C 8.3 is carried out in the Administration section - User Settings and Rights:

User settings and rights window opens:

Consider the options for setting up 1C access.
How to create a new user in 1C 8.3

By default, the program 1C exhibits The program is allowed, Shift and the entrance to the program based on 1C login and password. Password can be set independently, but you can suggest to ask it program. As a rule, password, specified program 1C, meets a more serious level of checking and choose such a password when the system hacking is more difficult.
Password needs to remember! If the password is lost, then only the administrator can reboot it again. If passwords are lost and not enter into the database, you will have to "crack" the entrance to the database.
Specialists use a hex editor for this and in the right places change the information responsible for working with users. It is possible to make it possible, but not desirable.
How to configure access rights based on standard profiles in 1C 8.3
Each user (administration - user settings and rights users) assign access rights from the list of profiles, which is in the configuration. For example, for accountant Petrova S.B. We assign a profile accountant:

Here we can transfer the settings to the new user from the user already operating in 1C: setting up functionality, internal report settings, etc., so as not to spend time and not dial everything manually:

We note the settings for transferring a new user Petrova Accountant from the user Administrator:

Transfer Personal Settings, Print Settings and Favorites:

Press KN. Select and in the form of selection of settings "Copy and Close". All settings for the new user from the user administrator are transferred.
Setting access rights with adding new profiles in 1C 8.3
Create new profile from limited access to reference books and documents. Access Group Profiles - Create:

A new profile is conveniently created by 1C subsystems. For example, for the calculation rights, we can note the following functionality:
- Reflection of salary in accounting;
- Reading taxes and contributions;
- Mutual settlements with employees;
- Personalized accounting;
- Salary accounting:
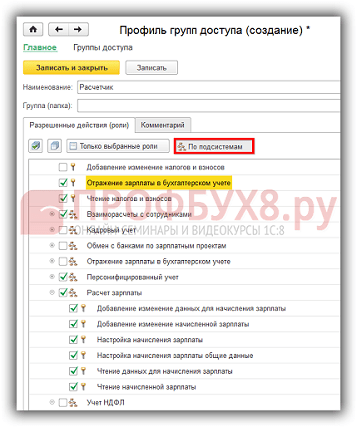
On kN. Only selected roles The list of selected user roles is shown. Personnel records can be set separately for the personnel profile.
How to set up additional access rights to the already available profiles in 1C 8.3
A specific 1C user with the selected profile can be added functionality. For example, for Petrov's user, in the accountant profile, the team is not available. All functionsbut we can add it this user. We go to administration - user settings and rights - access group profiles. Kn. Create - Mode All Functions - add rights "All Functions" mode:

Add a new profile by Petrova Petrova S.B.:

Configure additional access rights to individual documents and reference books in 1C 8.3
This setting provides for working with the configuration extension. Suppose you need to configure access to the user 1C to an arbitrary set of documents and reference books. A set of these documents and directories may be different - the developers of 1c cannot provide all options for suitable roles that may be required by users in practice. Moreover, data access requests may be completely extraordinary.
In 1C 8.2, we had to remove the editing of the configuration and add a new role in the role objects, assigning access to the necessary reference books and documents, and, accordingly, there were difficulties with the subsequent update of 1C. Automatically such configurations are no longer updated, so only users of organizations that have in the state of programmers 1C could allow themselves.
In 1C 8.3, in connection with the appearance of a new opportunity to work with configuration applications, we can implement your task to delimit the rights of users without removing the prohibition of editing from the main configuration and leaving it completely typical. How to do it - now and consider:
- For reference book Users We introduce additional details of "access_tovarov", which will take "yes" or "no".
We go to administration - General settings - Additional details and information. Include the ability to work with "details and information with a common list of values":

- Open hyperlink Additional details.
In the left column of the lists of the configuration objects we find Users And click on the book. Add. Opening form fill as shown below. The new props will have two meanings: "Yes" and "no". Combine values \u200b\u200bin the "Access" group. Fill the bookmark Main:

Fill out the value tab:

- Now fill this props for our users.
"Accountant Petrov" - no:

"Administrator" - yes:

All necessary actions in the 1C 8.3 database are made, now we will work with configuration extension.
- We enter the database configurator: Configuration - Configuration Extensions:

Add a new configuration of the CN. +:

We agree with the default expansion data selected or specify their own:

Open the CN expansion configuration. :

Now we will transfer data to work from the main configuration. The created extension of the "Extension 1" configuration is still empty:

In the main configuration, we find in the documents - the implementation of goods and services, and we carry the form with which we will work. For example, add "formadocumentes" to the expansion of the configuration, putting on the name of the form and clicking on it the right kN. Mouse. From the drop-down menu, select the "Add to Extension" command:

We open the form in the configuration expansion and create an event processing Oppose. When creating an event handler, the 1C 8.3 program will ask you to specify where to create a program code. Select: Create on the client and procedure on the server without context:

When creating an event, we will see in an empty sequence of events "overgo" designated by the program 1C 8.3 Event Processing Procedure: "RASCH1_PERNEPIST":

Go to the module of the form and insert the following program code:

We update the changes and run the database in user mode to check the changes made. We enter the user Accountant Petrov and edit a document of the implementation of goods and services, press the KN. Record:

For the administrator, the editing of the document will be held without problems.
The given program code can be put in the 1C 8.3 configuration extension for any document and reference book and this will allow you to not change the typical configuration, but at the same time solve the problem of access to the base objects for different users.
How to provide access to a report with individual settings for other users in 1C 8.3 ZUP Look in our video:
Here will be told how to add a new user to work in the 1C system: Enterprise 7.7.
1. Adding a user in the configurator
Users in System 1C: Enterprise 7.7 Defined separately for each information base. To add a new user, you must run 1C in mode configuratorBy selecting the desired database.

In the configurator opened, go to " Administration» — « Users» .

A list of users registered in the current database opens. To add a new, go to the menu " Actions» — « New» .

Window opens Properties of users" On the tab " Attributes"Fill:

Now go to the tab " Role"Where choose Set of rights and Interface from the drop-down menu and click " OK» .

Further, we need to do, it is to create a password to log in. To do this, highlight the added user in the list and go to the menu " Actions» — « Change Password" After that, we enter the password twice.

This is completed on this. It remains only to save all changes by selecting " File» — « Save» .

Edit user properties similarly to creating, in the same list.
2. Settings by default values \u200b\u200b(for the configuration "Trade and Warehouse")
If the "Trade and Warehouse" configuration is used, it is possible to determine the default values \u200b\u200bfor the new user.
At the user login, 1C: the company is looking for in the reference book " Users»Element with name, similar to the name of the user specified in the configurator. For example, if the username in the configurator is specified as "onyanov", the element of the reference book must have exactly the same name (including spaces). If the item is not found (for example, when you first log in the system), you create a new position with the same name. And in the message window you can see the appropriate inscription:

In this directory, the default settings are stored, which will be used when entering new documents, opening reports, etc. Throughout the session. To install these values, open the reference book " Users"(In the standard overall interface" Directories» — « The structure of the company» — « Users") And we find in it the necessary element. Or you can click the button with a picture sitting at a computer from under the session of this user:

On the tab " Default valuesYou can actually choose these values.

Or by going to the tab " Maintenance"It is possible to choose the user from which the default values \u200b\u200bwill be inherited.

Select the necessary parameters, click " OK»To save results.
Will this article help you?
 Firmware for HTC One SV from flash drive
 Why is the laptop heats and what to do about it?
 Reset to factory SAMSUNG smartphones