System rollback and recovery. How to create a restore point in Windows and perform a system rollback How to roll back a Windows 7 program
So, you bought a computer and decided to immediately try it out. But then suddenly some kind of problem occurs and the system stops starting. This is where the question comes to mind: “How to do it on Windows 7?” The answer is quite simple. But first, let's talk about when it's actually necessary to perform and why it might be required.
Why does this happen?
In general, there are many reasons for all kinds of failures that may require a rollback of Windows 7. Let's look at the most common of them.
The first is the user's "crookedness". Particularly curious people love to dig into the Windows folder, which stores system data. If you remove them or somehow fix them, then the first time you reboot the computer will stop working.
The second is viruses. They, as a rule, are the main reason for the question: “Windows 7?” Various Trojans and worms penetrate your operating system and “clean up” the Windows folder. Therefore, you need to be careful when working with the Internet.
System Tools
The first way to answer the question: “How to roll back the system to Windows 7?” - This is recovery using system means. Typically, this method works well when viruses have not damaged important system files.
Before you roll back Windows 7, check your computer for viruses. If there are any, it is best to clean the system and only then get down to business. When the process is complete, recovery can be carried out.
To answer the question of how to perform a system rollback in Windows 7, go to the Start menu. There, find "Standards". Go to the "Service" tab. All you need to do next is select Windows 7." Now a window should pop up in which you will need to select the date to which you want to rollback. Click "Next" and wait until the computer reboots.
In order for you to complete this process, you need to ensure that your system creates a feature that is enabled by default. You can use special programs that allow you to make these points yourself.
Discs
In order to fully understand how to roll back the system to Windows 7, let's continue our study. Sometimes there are cases when system tools turn out to be useless. More precisely, the computer does not even log into the OS. Then special resuscitation disks come to the rescue.
If you cannot log into the system, then you will need any LIVE CD or a so-called resuscitator. Turn on your computer and insert the media. In the BIOS, set the boot priority to “reading CD-Rom”. Next, it will be easy for you to figure out how to roll back the system to Windows 7.
You will just need to follow the instructions that appear after launch. You will see a window in which you will be given a choice of the date to which the “OS” will be rolled back. Once the day is selected, just wait for the process to complete. You can use your computer again.

Installation
So, if you are still wondering how to roll back the system to Windows 7, you can try one more method. To do this, you will need an installation disk with the operating system.
Insert the disc and run the usual installation. Once you see the welcome window, pay attention to the inscriptions in the lower left corner. There is a small line there that you will need. It's called "System Restore".
Click on the inscription and a long menu will open in front of you. It will offer you different methods of rollbacks. In order to successfully complete the case, you will need to "Restore using previous system states." Click on the "Next" button. A window will appear in which, as usual, you need to select the date to which the OS will roll back. The computer may restart several times. Eventually, you will be able to use your computer again.
Stalemate
But there is also an extreme method of dealing with computer failures. The fact is that all recovery tools work properly until something really serious happens to your system. In case of major damage or viruses, only extreme methods will help. This is a system reinstallation.

In order to reinstall the operating system, first of all, get the installation disk. You can download it or buy it in the store. After this, you need to set the BIOS to boot from disk. Insert the media into your computer and then reboot.
Wait for the initial window to load. Here you can select "Recovery" and "Reinstallation". If the first option does not help, choose the second. Next, select the “construction” method: clean installation and over the old system. It is best to choose a clean one. It will help save space and remove viruses. Next, select the disk where the OS will be installed and start the installation. Wait for it to finish. Attention, the computer will reboot about 3 times during the process!
When working with a computer, failures often occur. Some of them can lead to bad consequences, even complete system failure. To fix this problem you need to perform a system rollback. In this article we will tell you how to roll back a Windows 7 system to a specific date. It is quite possible to perform such actions and there is nothing extra natural about it.
Reasons There are many reasons for this. First of all, this is the incompetence of the user himself. Knowledge about the computer and working with it is not enough, but the desire to delve into the folder called windows, where all the information about this system is stored, takes over. Situations arise when, due to inexperience or carelessness, necessary data is deleted and, starting from the first reboot, the computer stops working.
The second reason is viruses. The computer is constantly exposed to a significant number of virus attacks, and viruses can easily penetrate the system. This should never be forgotten, especially when working with the Internet.
Restoring using system tools It is quite possible to restore the system using a standard program, if the cause is not viral damage to the operating system. Before you roll back, you need to check your computer for virus infection. If this occurs, then the system simply needs to be cleaned. After completely removing all virus programs, you can begin to roll back the system.
Actions begin by going to the Start menu. Next you need to click on the line “All programs” and find the “Standard” section. Having opened the section, click on the “Service” folder. In the menu you need to select the “Windows 7 System Restore” section. After this, the system will scan your computer within a few minutes and open a system recovery program. In the pop-up window, select the date you want to rollback to. Then click Next and wait until your computer restarts.
It is worth noting that a system rollback cannot be performed for a specific time, since this requires creating restore points. To successfully complete the process, you must ensure that the computer system itself has the ability to create restore points. Typically, this feature is enabled by default in the factory settings of the computer. In addition, there are programs that allow you to create such points yourself.
Rollback using disks This method is used in cases where an attempt to rollback using system tools was unsuccessful. To do this you will need a resuscitator disk. After turning on the computer, you need to insert the media and load the first stage. Next, you just need to sequentially carry out the commands according to the instructions that appear on the screen. That's it, the system rollback is complete!
Conclusion Now you know how to roll back a Windows 7 system to a specific date. It is advisable to create a restore point yourself before installing each program or check whether there is one at all. Thus, you can avoid serious consequences by maintaining the same settings and programs installed earlier.
noblefox.ru
How to perform a system rollback on Windows 7
Each of us, while using a computer, encounters various problems; this simply cannot be avoided. Someone catches a virus, someone has a program failure, or even a system failure; the problems can be described for a long time. Everyone copes differently, some call specialists, others look for a suitable antivirus, or reinstall something. But the easiest way is to roll back the system to a date before the problems.
A system rollback will restore system files to the date when the restore point was created, and programs installed after will be removed from the system. Documents, files, music, movies will not be affected. Therefore, I recommend creating them manually from time to time. The operating system itself creates them once at a certain time and before installing programs that may affect system files.
And so press start - all programs - standard - utilities - system restore
The System Restore program will launch, click Next

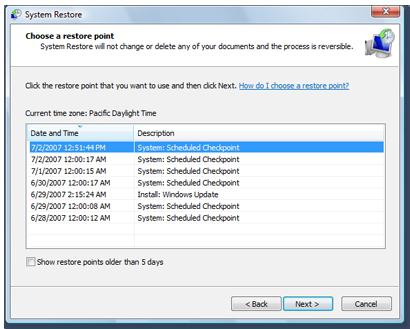
In the next step you will see all the current recovery points; if you need all of them, including old ones, then check the box next to “Show other recovery points”. Then select the desired restore point and click next. Please note that each recovery point has a description, sometimes it is very useful. (for example, “The point was created before such and such a program was installed”)

In the next step, confirm your decision by clicking on the “DONE” button

ya-computer.ru
How to restore the system to an earlier date?
 In this article I will talk about how to restore the operating system to a working state if any problems occur in the system.
Sometimes it happens that after installing a program unknown to you or updating a driver, the system begins to work incorrectly or stops starting altogether.
In most cases, such problems are resolved by restoring the system to an earlier date.
That is, before installing some programs or drivers, a recovery point is created or updated on the system partition of the hard drive. This is done so that you can roll back the system in case of problems.
If suddenly the system starts to work incorrectly, then first you should use the last known good configuration or safe mode. Here's how to do it.
If the first method does not help, then you need to perform a system restore.
How to restore the system?
After installing the operating system, recovery is enabled by default. It is highly not recommended to turn it off, since if there are no restore points, you will have to reinstall the OS in case of malfunctions...
In order to enter the system recovery menu, you first need to open the control panel and select Recovery. If you have Windows 7, then System Restore is located both in the Control Panel and in the Start/All Programs/Accessories/System menu.
The following window will appear:
 System recovery menu
 Creating a recovery disk - recording the operating state of the operating system on a flash drive or DVD. A useful thing that will help restore stable operation of the system even if it is impossible to start. Recovery is performed using a bootable image.
Running a system restore - undoes all actions performed on the system and restores the last working state before the OS was affected by any application or user action.
At startup, a window will appear with a selection of previous dates and times when the system was working normally. In order to restore, select the date you need and follow the path - further. You will have to wait a little while for the system to roll back.

Also, you can see which programs may be affected after recovery.
System Recovery Settings
In the settings, you can select on which partitions recovery points will be created, the amount of disk space for creating points, and directly creating a point right now.
 Protecting the system from unwanted changes
 When you click the Configure button, you will be given a choice between enabling or disabling recovery (of course, it is recommended to enable it), as well as choosing a disk space.
 Recovery Settings
 You can leave the size as default or select a larger one (for better effect). After that, space will be reserved on the C:/ drive and will be filled as required.
You can also see the space occupied by the restore point.
If it is not possible to load the operating system, then insert the installation disk with the OS and pre-boot it (it must be set in the BIOS in the BOOT CD-DVD ROM section first in the list, otherwise the disk will not boot, but the OS will load. The first in the list should stand an optical drive or flash drive, and the second is a hard drive (HDD)). After loading the disk, in the initial installation window there will be a “System Restore” option at the bottom. This menu will be similar to the one described above.
pc-optimize.ru
How to create a restore point in Windows and perform a system rollback
Working regularly with a computer, there is a high probability of “catching” a virus that will affect the stability of the operating system. If removing all threats with an antivirus program and uninstalling recently installed programs and drivers does not help, you will have to use a Windows 7 system rollback.
Today I will tell you several ways to do this. Don't think it's difficult. Any novice user can handle it.
What is a rollback point?
A rollback point (TO) or a recovery point (RT) is a version of the Windows OS hidden in an archive (What is data archiving). It can be used in the future to get computers working again. TO is created either automatically by the system (after each installation of new software or drivers), or independently by the user. This process cannot be performed without a Windows restore point.

We create maintenance for our own safety
If you do not want to worry about the safety of your own data, create a TV before installing new programs and drivers and if you plan to make changes to the registry or BIOS configuration. To create a backup archive, you need to follow a few simple steps. This is done in a few minutes.
Click the “Start” button (located at the bottom left of the screen) and follow the path: “Computer - Properties - System Protection”. The following should open:

Through this window, not only the creation of TO occurs, but also the direct restoration of the operating system. Before you begin, make sure that protection is activated on the system drive. If it is not there, click the “Configure” button. A window will open in which you need to select the desired partition and the amount of memory that will be allocated for backup copies (3-5 GB is enough).
Now let's move on to the process of creating a recovery point. As many of you have already guessed, it starts by clicking the “Create” button.

Enter a description in the field of the window that opens. For example, if you plan to install the “Example” program, you can specify its name. If it comes to a rollback, this will make it easier to navigate. It is worth noting that TO can be stored in a computer from several weeks to several months. Therefore, if you created it a few days ago, you can easily use this point.
We roll back through “Start” and “Run”
If your computer has stopped working stably, but starts, then you can restore it directly from the Windows interface. First you need to open the system utility. There are two ways to do this.
The first is to go to “Start” and type “restore...” in the search bar. A message will appear where you need to select the “System Restore” application. The second is through the command line. To open it, press the Win key combination (located between CTRL and ALT) + R. In the line, type “rstrui.exe” (without quotes). When using any method, the desired program will open, which looks like this:

A list of available restore points will appear on the next page. Select the one you need (based on the description and creation date).

At the final stage, you need to select the system drive and click the “Finish” button. Another window will appear. Click “Yes” there. The rollback will take place over the next few minutes. It will end after the system is rebooted. Information about the completion of returning the previous settings should appear on the desktop that opens. If no changes occur, try repeating the process, but with an earlier TV.
Using the last known good configuration
If the malfunction is so critical that the operating system does not start, you will have to use this method. In fact, it is the simplest. You need to take a minimum of steps to get your PC back up and running.
Restart the PC and, after loading the BIOS (when the start screen image ends), press the F8 key several times (located at the top of the keyboard above the standard numbers). This will open a page for selecting additional OS startup options. Here you should select the “Last Known Good Configuration” option.

If everything is fine, then stable operation will be resumed. When you restart your computer again after selecting the above item and returning to the previous black screen, you must use the method that I will describe below.
Activate "Safe Mode" to roll back Windows
If the methods described earlier did not help, try this. Reboot again and press the F8 key several times after activating the BIOS. You will see the already familiar section with a black background, where you need to select “Safe Mode”:

The system will start, but with serious restrictions. I’ll say right away that you won’t be able to interact with many applications, since this mode is intended for system actions (in particular, rollback). Run the System Restore utility as we did in the first method. Only here in the first step you need to select the TO manually:

Then the algorithm of actions is already familiar: select the desired point and system disk and agree to all subsequent conditions. After a reboot, correct operation of the Windows OS should resume. But provided that you created a backup copy before the problem occurred.
We roll back the system with the installation disk and to factory settings
Go to this method if the previous ones did not help. To use it, you must have a flash drive or disk with Windows of the required version in your hands; I have already told you how to burn a boot disk image. That is, if you have a “seven” and a disk with a “ten”, then you won’t be able to roll back from 10 to 7. To get started, insert the disk or flash drive and restart your computer. After activating the BIOS, press F9 or F11 several times.
The Windows OS installation program should start. On the start page, click on the “System Restore” button.


A well-known utility will launch, where you need to select a restore point, system drive and agree to all subsequent warnings. It is possible to roll back to factory settings. But this depends on the characteristics of the PC and the installer. This can be done at the stage of selecting a recovery tool (see screenshot above):

In the next step, select the first item:

Once the process is completed, the computer will reboot and you will have to re-specify the system configurations. It is worth noting the main disadvantage of this method - after it all files on the hard drive will be deleted. Don't forget to save them to the cloud.
Of course, it’s better to never encounter something like this, but no one is immune from the activities of modern hackers. If you want to protect yourself from modern threats, use the Dr.Web Security Space 11 antivirus program. You can purchase it from the large online software store AllSoft.

Now you know where the tools necessary to roll back Windows 7 are located. With this knowledge, you can easily restore the correct operation of your computer if any problems arise. My article today is coming to an end.
Hello, dear guests and readers of the blog site. Today we will talk about how to do a system rollbackWindows 7 . The meaning of this action is so that in case of system failures and for a number of other reasons, it is possible to restore the system to the moment when everything was in order. There is nothing complicated about this, everything is very similar to system recovery function in Windows XP, but there are some changes and improvements.
Why do you need to do a system restore?
In fact, there are many reasons why a system restore may be required. For example, as I already mentioned, when the system starts to malfunction, or after some drivers are installed incorrectly. And also to restore the system from changes made by some virus and so on.
How to perform a system rollback on Windows 7?
So, how can you roll back a Windows 7 system without using or installing a special program for copying and restoring the system? The answer to this question is simple, use the built-in Windows System Restore feature.
In order to launch the Windows 7 System Restore Wizard and restore the system to an earlier state, open the Start Menu, expand the All Programs list. After that, expand the folder "Standard", then go to the "Service" folder and select the command "System Restore".

A System Restore Wizard window will open in front of you. Click Next.

After which, a window will open for the recovery points created earlier. These restore points are created automatically by the Restore Wizard. In order to perform a Windows 7 system rollback, select the required Windows 7 restore point and click the “Next” button.

In the next window, click on the “Done” button.

After this, a dialog box will open warning that the system recovery process cannot be stopped, agree and click on the “Yes” button. Immediately after this, the Windows 7 system rollback will begin; during the system recovery process, the computer will reboot.
Attention! If, after running the System Restore Wizard, a similar window appears notifying you that you do not have checkpoints. This means that you will not be able to roll back your Windows 7 system because the automatic creation of system restore points is disabled.

To change recovery options and enable automatic creation of restore points, open the Start menu, go to "Control Panel". Start configuring system parameters by clicking on “System”.

Then go to "System protection".

And click on the “Configure” button. A dialog box will open in which you can set system recovery options.

If I missed something, I would be grateful if you supplement my article with your comments!
Has your computer or laptop started to glitch badly? Or does it not turn on at all? First of all, try restoring the Windows 7 OS system. The operation takes 10-15 minutes, but it can really help. Indeed, in this case, the Windows 7 system is rolled back to a couple of days ago, when the PC or laptop was still working perfectly.
What is a Windows 7 rollback?
This is an operation during which all settings and system files are restored from a backup created by Windows. That is, if you accidentally deleted important files or changed settings (for example, installed a new driver), and after that the computer began to slow down (or did not turn on at all), then this can be corrected. It's at least worth a try.
Restoring to a previous version of Windows is carried out using checkpoints that are created every week, as well as after making any changes (installing or removing programs). Typically, this feature is enabled automatically. Plus you can create control points manually.
There are at least 3 ways:
- Windows means;
- via safe mode;
- using a flash drive with Windows 7.
Let's look at each of them in more detail.
When you downgrade Windows 7, all your personal files will remain in place. Therefore, you don’t have to worry about this.
But there is one nuance here. During recovery, files recorded between today and the day to which you decide to roll back may be lost. Therefore, if you recently (today, yesterday, the day before yesterday, etc.) downloaded important documents onto your PC, it is better to save them to a flash drive. Just in case.
How to return the system back using Windows 7?
The first way to roll back Windows 7 is through the OS itself. But it is only suitable if your PC or laptop turns on. It doesn’t matter if it glitches or freezes, the main thing is that you can load the desktop.
So, do the following:
- Open Start – Control Panel – Recovery.
- In the new window, select “Start recovery system”.

- Click “Next”.

- Then select the control point to which you want to rollback. If there are too few of them, check the “Show other points” box - perhaps a few more will appear. Select the one you need and click “Next”.

- There is also a button “Search for affected programs”. Click it if you want to know which programs will be removed as a result of this operation.
 For example, in my case it's Google Chrome and Skype (since I updated them recently) plus a few drivers. In principle, it’s fixable - I can install 2 programs again. If only the computer worked properly.
- Check that you have selected the desired point and click the “Finish” button.

- A small warning will appear, agree by clicking “Yes”.

After this, the Windows 7 system rollback will begin. When the operation is completed, the computer or laptop will reboot and you will see a message that everything was successful.
If this doesn't help, try enabling Windows 7 recovery by selecting a different checkpoint. But in this case, you will need to check the “Select another point” checkbox and click “Next”. And after that, the familiar window from step 4 will open.

Restoring the OS through Safe Mode
If your PC or laptop does not turn on at all, then you can try restoring Windows 7 startup in safe mode. To do this, when turning on (or restarting) the PC, press the F8 key repeatedly until the menu appears. Next, select “Safe Mode” and click Enter.
However, there are some nuances associated with different versions of Windows. Therefore, to avoid any difficulties, I recommend that you read –?
You wait until the computer or laptop turns on, and after that you perform all the same steps as in the previous option. That is, to roll back the Windows 7 system, follow steps 1 to 7 described above.
And the third method: recovery from a flash drive (or disk) with installation files
The disadvantage of this option is that you need to write it to a Windows flash drive, which is on your computer or laptop. And the plus is that in this way you can try to return the Windows 7 system, even when the PC does not turn on and safe mode does not start. That is, this is your last chance.
If you did everything correctly, the Windows 7 installation window will open.


Wait until the procedure is completed and click on “Reboot”. Then immediately remove the flash drive from the connector (or the disk from the drive), after which the PC should turn on in the usual way.
By the way, restoring Windows on a laptop and computer is the same. So you can try any method you choose.
That's all. Now you know how to roll back a Windows 7 system. I hope one of the 3 methods will work and you will be able to restore the functionality of your PC or laptop.
– Igor (Administrator)Sometimes, installing programs or drivers, and in some cases simply using them, can lead to problems in Windows 7. System slowdown, inability to start normally, glitches, etc. Microsoft is also well aware of this, so it is not surprising that the Windows 7 operating system contains a very useful System Restore tool. Using the latter, you can restore successful configurations and settings without the need for reinstallation, provided that this function was enabled (enabled by default). And in this article I will tell you how to roll back system Windows 7 and I will give some tips and warnings.
Note: Remember that you can often get rid of errors, problems and glitches by simply cleaning the Windows 7 registry, so this operation should be performed periodically and without any special reason.
But, before I tell you the instructions, I would like to warn you that restoring the Windows 7 system may lead to the loss of data that was entered after creating a restore point. So before following these instructions, it is recommended that you take care of creating a backup copy of your files.
So, here are the instructions on how to restore a Windows 7 system:
1. First, we need to open the System Restore tool itself. To do this, open the Start menu and type "recovery" in the search bar, and then select the appropriate tool from the list of programs, as shown below.

2. The "Restore system files and settings" wizard will open. Its first screen is a regular splash screen, so you just need to click the “Next” button.

3. Now, you need to select a restore point to which you want to roll back the Windows 7 system. I advise you to roll back to the last known good configuration, since some of the data is lost during a rollback. Once you have selected the desired point, click the "Next" button.

4. The final confirmation screen of the wizard appears, showing general information about the point. To start the process, click the "Finish" button.

5. A warning window will appear indicating that this operation cannot be interrupted. Confirm the restoration.
6. Wait for the process to complete. After this, the computer will restart.
Now, you know how to roll back the system in Windows 7. Please note that while the recovery process is running, you cannot restart the computer, turn off anything, or perform other actions. Otherwise, the system may be damaged and this may even lead to the need to reinstall Windows 7. And I remind you once again that all important data should be saved to another disk just in case. For example, specialized directories such as "My Documents" can be changed. The measure may seem cumbersome, but it is better to spend 10 minutes copying data now than to be surprised later by the absence of important documents.
By the way, you can also restore the Windows 7 system in safe mode, so if the operating system does not boot, then you need to go into Windows 7 safe mode and perform all the same steps that were described in the instructions.
 What to do if your iPhone falls into water?
 How to Quickly Insert a Face into Another Photo in Photoshop
 Scan to HP LaserJet M1132