Does not allow you to remove the flash drive. How to properly remove a flash drive from a computer or extend the life of your flash drive
Most computer and laptop users know that a USB drive must not only be pulled out of the port to end its use in the system, but also a special procedure called safe removal must be launched. If a flash drive is removed without safe removal, the consequences can be catastrophic (data loss, file system errors, and even failure of the device itself). Let's consider several simple methods that allow you to carry out such a procedure, as well as restore such a Windows tool if for some reason it disappeared or became inaccessible.
Safely removing a flash drive: why is this necessary?
When removing a USB drive from the corresponding slot on a computer terminal, it is important to understand one thing. Safely removing a USB flash drive in Windos 10 or any other system is akin to the standard procedure for shutting down the computer itself.
In this case, all processes associated with the device are terminated and power is cut off. In this way, the drive can be protected from many problems. An analogue could be turning off a running computer from the network. Many people have noticed that after this the system recovery begins. It’s the same here, but you’ll have to do it manually, which can be much more complicated than automated processes in Windows.
Basic Methods for Safely Removing USB Devices
So, you can safely remove a flash drive using several of the simplest methods that are provided in Windows systems.

The easiest way is to left-click on the USB icon in the system tray and select the corresponding line. If the icon is not displayed for some reason, you need to click on the up arrow to show hidden icons.

The second method that allows you to safely remove a flash drive is to use “Explorer” or double-click on the computer icon where the USB device is selected, and right-click to select the extraction option in the menu. Most people have no questions about this.
Safely removing a flash drive: USB Safely Remove program
In some cases, if someone does not like the standard method, you can use a small program called USB Safely Remove (this can be useful in cases where the system reports that access to the device cannot be terminated, or the device icon is missing in the tray) .

After installation, the program creates its own tray icon in the form of clicking on which, you can see all the USB devices currently connected to the computer system. There is also a section for hidden devices (USB camera, external network cards, disks, etc.). Just select your drive and indicate how to safely remove the flash drive.
Terminating processes using the drive
Sometimes, however, the system produces an error. In this case, you should close all files open from the device and applications that are currently using the drive, go to the “Task Manager” and forcefully terminate all USB-related processes.

In this case, you should first use displaying all user processes, then hiding Microsoft services. After this, the extraction can be repeated.
What should I do if I no longer have access to Safe Retrieval?
Now let's see what to do if it is no longer possible to safely remove the flash drive both from the system tray and from the device properties in the computer or Explorer section.

In the simplest case, you need to open the properties of the drive in any of the above sections or in the corresponding manager and go to the hardware tab. In the window, you need to select your device and click on the properties button located below. Next, click the change properties button and go to the policy tab, where you can see a hyperlink to safe extraction. Click on it, and the flash drive can be removed. At the same time, by the way, the operation of the drive will also speed up.
Alternative technique for restoring safe extraction
There is another way that allows you to restore the original settings so that you can then safely remove the flash drive.
This option is somewhat more complicated, but it provides an almost one hundred percent guarantee of restoring access to the procedure. To do this, use the “Run” console call with administrator rights.

It needs to include the following:
- (necessarily exactly as specified in the original command given).
After executing the command, a new dialog box will appear in which you must first select the device you are looking for, and then click the “Stop” button at the bottom.
Instead of a total
In principle, these are the main methods that allow you to safely remove any USB device from the corresponding port, as well as eliminate some possible problems associated with the inability to perform such a procedure due to lack of access. In the simplest case, you can simply remove the device from the port and reinsert it. Perhaps the system will see it.
However, such methods are only suitable for standard situations and are the simplest for users. If the drive initially has physical damage or file system failures, you will have to use completely different methods related to restoring the functionality of the drive, the information stored on it, or even re-flashing its microcontroller. But this is a separate topic.
A situation often occurs when it is not possible to disconnect a flash drive from a computer in safe mode. When disconnected, a window appears with information that the device is still in use. You can disconnect the flash drive only after closing all programs that use your flash drive.
How can you find programs that prevent the flash drive from being safely removed? At my previous job, I often had cases where I seemed to have finished working with a flash drive, closed all the files, and when I disconnected it, it still wrote that the device was still in use. I didn’t have enough nerves and I simply disconnected the flash drive from the USB port. But having destroyed several flash drives in this way, I decided to think about how to figure out what exactly the flash drive was doing at the time of shutdown.
This is actually the message that appears when you want to disconnect a flash drive that is being used by some program, or a file is opened from it
The device is still in use. Quit all programs and close any windows that may be using this device, and then try again.
Fortunately, kind programmers have written a special program with which you can figure out what kind of process or file is “holding” the flash drive and does not allow it to be turned off.
This program is called Dev Eject. Its essence is to find the process that is currently occupying your flash drive; you can disable this process from the program and then safely remove the flash drive.
After installation, run the program and select your flash drive
 Now click “ Eject” to safely disconnect the flash drive, if the flash drive is occupied by some program, a window like this will appear:
 As you can see, this window shows the process that is currently using the flash drive. In my case it is an image viewer. I forgot to close the picture, which is on the flash drive. In order not to look for where you have this picture open, just right-click on the process and select “ Kill process”
In fact, I always remove the flash drive or external drive anyway, through safe removal of devices, but the standard program infuriates me with its sluggishness... And this program will also prevent autorun from getting in...
Why do you need to safely remove devices?
In fact, the topic is quite popular, both among beginners and among professionals... There is a lot of controversy, but now I will tell you the theory and practice.
1. What people say The flash drive may burn out, this is not entirely realistic, because the voltage supplied is small, but still I burned the flash drive when I pulled it out when booting the computer, but I guess it was a defect, it didn’t last that long... But now I always remove it safely, or wait until the computer turns off. It’s not up to me to decide what to do, my job is to advise... But haste does not lead to anything good, and the majority will agree with this.
2. Now more about the real thing. Data may be lost. This is a fact, since before writing, the data is transferred to the cache and then to the flash drive. It’s one thing that something won’t be copied, or even by accident something might get damaged.
Here are two main reasons why you should remove external media.
All do not like safely remove devices just because it's long. I agree, the standard program infuriates me and that’s why we’ll get rid of this torment :)
The program is provided free of charge, only some of its functions are paid, but we will not need them...
Download a free program for safely removing devices here:
Interface Antirun programs simple to the point of madness. The program for safely removing devices is also located in the panel next to the clock.
When a new device appears on the computer, the program will prompt you to perform an action.
 This is done so that a virus does not get into the computer, also for convenience, you can immediately see how much free space is on the flash drive or how much it is occupied.
In the list you can open the drive, protect it from viruses(this is a paid service), well, it is not necessary if you have already chosen for yourself.
Well, either you changed your mind about opening the device or made a mistake, you can immediately safely remove the device.
Program settings for safely removing devices
Right-click on the program and select settings.
Now let's set up the program for even greater comfort.
Although there are not many settings in the program for safely removing devices, there are still some that will add convenience to you. 
The settings include:
Autorun— if you like the program, check the box, it will launch when loading.
Don't show dialog if autorun is not detected— if there is no autorun.ini file on the flash drive, then you don’t have to show the dialog. We install it if you want to constantly access my computer.
Close the dialog after selecting an action— put a checkmark so that after you click on the program, the selection dialog disappears.
Disable startup of all devices— if you don’t need it or you constantly have viruses on your media, check the box.
Notify about beta versions— the program will notify you about program updates that may still have errors.
AND Interface language- I think it’s clear)
Safely Removing Devices
 Left-click on the icon and select the device that needs to be removed. That's it, you have successfully mastered program for safely removing devices 🙂
Now we’ll figure out how to safely remove a memory card (flash drive) on Android in two ways. This will extend the life of the memory card, and will also not lead to malfunction of the phone and the information stored on the storage medium.
Depending on the phone/tablet model, the memory card can be:
- hidden under the battery, i.e. you will have to remove the back cover;
- located on the side panel of the case and nothing blocks access to it.
This article is suitable for all brands that produce phones on Android 9/8/7/6: Samsung, HTC, Lenovo, LG, Sony, ZTE, Huawei, Meizu, Fly, Alcatel, Xiaomi, Nokia and others. We are not responsible for your actions.
Attention! You can ask your question to a specialist at the end of the article.
Safe (correct) removal of a flash drive
If the memory card in your model is located under the battery, then you must be sure to turn it off phone and only then remove the flash drive from its slot.
You can carefully pry the flash drive with a needle or something sharp to pull it out of the slot. This is the case if it sits very tightly and you can’t reach it with your fingers.
Tckb, your memory card is located in the side panel of the phone (outside), then before removing it, you need to disable it in the system.
- Settings
- System
- Memory
- Selecting a memory card (Portable media)
- Disable
All. Now you can take the flash drive out of the slot and not be afraid of the consequences.
 Unlimited viewing of Russian Pinterest without registration Briefly about the new social project
 How to move user folders to another local drive in Windows?
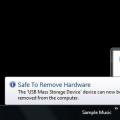 How to properly remove a flash drive from a computer or extend the life of your flash drive