Mail for valentines of the box. Master class on the manufacture of a mailbox for Valentines
Box-Valentine will bring Pleasure not only for children, but also adults! Believe me, tested on your own experience.
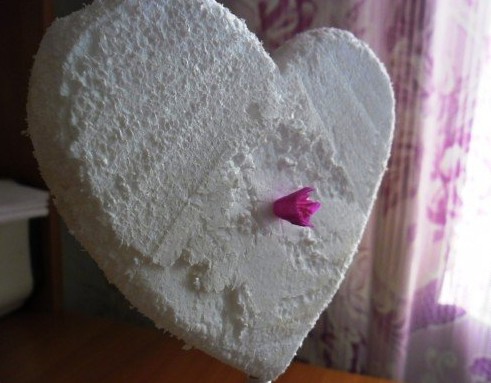
The side and the bottom of the heart box are made of colored cardboard, and the cover from the top is from the wrapping paper.
Inside should be good. Small candy or lollipops, at your discretion.
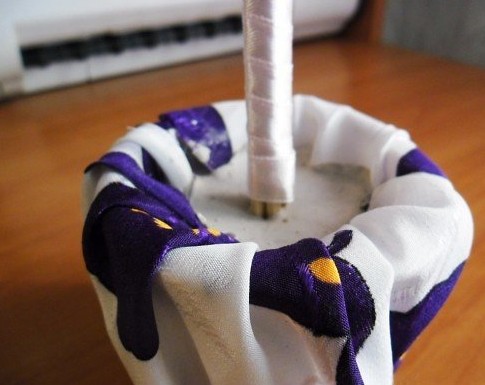
Charm of this valentine It is that it is necessary to pierce the heart arrow to see a gift! In the literal sense, it is required to "break the heart!". And this the only way, Find sweets inside.
Make Gift Heart Boxes Different size and color, and you will have something nice to surprise your loved one.

For the manufacture of Valentine boxes, we will need:
- color cardboard;
- packing paper or papyrus color or corrugated paper;
- scissors are ordinary and curly zigzag;
- ruler and pencil;
- double-sided tape or PVA glue and 2 paper clips;
- napkin color, or confetti or ribbon (for filling the box);
- sweets (Skitch, Lollipops, Marmalacks and TP);
- slippers for canopas (arrows of Amur);
- ribbons or twine for risks;
- card or postcard with wish

- Step 1

- Step 2.

- Step 3.

- Step 4.

- Step 5.

- Step 6.


- Step 7.


- Step 8.


- Step 9.


- Step 10.


- Step 11.


Good afternoon, in this article I collected the most interestingways to make Valentine do it yourself. Heart crafts you can give your favorite and close people for Valentine's Day. After all, how nice to receive gifts made by your own hands. To each craft, I will try to make a drawing (if there are no ready-made templates) and explain in detail what and how to do step by step. We will cut valentines from paper, from cardboard, fold in the form of boxes, and making Valentine envelopes and other crafts on Valentines day. Here the very interesting ideas Make a paper heart in different volume techniques.
So let's start our heartfelt ...
Valentine paper
In carved techniques.
Here is the easiest handicraft. Which is even for children in kindergarten. The middle group or the eldest, when they are already quite well cut with scissors (without trembling hands and sweaty foreheads) easily make this valentine with their own hands.

Everything is simple here. We smooth down the sheet in half. We draw half a heart and horizontal lines on it. Cut the line and cut the heart itself. Deploy the heart and put it on the table the rebier of the fold is down. And then the most interesting for children. You need to pull up the strips with your fingers - but not all, but after one - one leave, I pull out the second, we skip one, the second stretch up (changing the fold on the opposite). We get a ribbed heart. Here, we see a visual blank template for this paper craft. Simple and fast Valentine's hands for children in kindergarten.

Many other ideas of ordinary children's crafts - Valentines can be found in a special review article.
And here is another beautiful handicraft for children - in the form of puff Valentine. Where the heart layers are located in different planes.
Bend leaf in half. Draw on a sheet of heart contours. And highlighting bold lines, the places where you can cut with scissors, and dashed weak lines of space that do not need to be cut. We explain to children which lines to do.
And then with your fingers felt the inner heart forward the rebnce of the fold, and the outer heart of the edge of the central fold back, and the postcard itself becomes the edge of the bend. It turns out both in the photo below. Fast Valentine's paper - just in 20 minutes of classes in kindergarten.

This idea is not necessarily copying exactly in-point. It can be changed, play. For example, change the zone of the outbreak and the bend zone on the same confers (as the drawing above).
That is, to change the bend zone of such a heart circuit (the zone that in the diagram is indicated by the dotted line) and get a new bulk sample card, where the heart is already torn on the other side.

Look more carefully in the photo above. On this Valentine, a big heart is held at the expense of an unrealined bottom contour. And the inner little heart holds at the expense unprinted top and tip on two sides of the axial line. That's how these changes look like in the diagram.

The most interesting is that you yourself can continue experiments in this technique. Do gests in the shape of a heart, or a semidder and bend them in different directions. And one day you will get a cool author's craft.
For example, if the semidzer is located in a circle - then cut forward the contours of the semidder and bend these contests - then we will get such an interesting round crawler heartbell dance.

This is how the conceived drawing looks like - the drawing receipt, in a circle.

Such an openwork puff applique can be pasted on a postcard for Valentine's Day. It turns out a beautiful Valentine's designer card with their own hands.
Even more ideas on greeting cards For the day of lovers you will find in our special article
Valentine's hands
With notebooks.
On the day of all lovers, we are talking to our halves of warm words. Recognition in love can be said not in words (after all, in a solemn moment, all the most tender phrases can fly out of the head of the head). Therefore, their own mur-Moore phrase can be written on the notes - Split these notes into rollers and hide in paper roses in the buds on this craft-valentine below.
See how beautiful - each twisted paper bud contains a small white scruit note.Such a handicraft with notes for Valentine's day is easy and easy to make it yourself. How quickly and conveniently checked such work with your own hands now I will tell ...

We take a piece of dense cardboard (for example, a cover from the box with a pizza, it is just big). In stationery buying packaging of red office paper (She just double-sided and dense - what you need).
Paper cut on wide strips. Each strip is folded popolas along (So \u200b\u200bthat she was dweller - so rosette is thicker and more magnificent). And then this dual strip is tightened with a roll (around a pencil). We remove the twist from the pencil, weakened slightly, we give a bit to unleash her and fix the tail of the twist glue (so as not to hang out).
We make such paper twists-roses for a lot - so that they all tightly filled our cardboard heart. And then they attach them to the cardboard basis - it is possible to glue. BUT better for bilateral scotch - It holds great - the entire surface of the cardboard heart is covered with scotch strips, remove protective film And on this sticky base Pour our roses. Then in each bud we put a note with warm words, promises, recognition, hearts and intimate hints ...
Second hand with a note.
Heart with secrete.
And the love confession can be put inside a paper heart with a slit in the middle.

Here is a detailed master class on the manufacture of such valentine's seventh.
We take a square sheet of paper - and fold it in half - along and across. So that she dismissed in the colors - the cross on the cross (as on the first photo).
The lower edge of the Quadt fell up to the middle horizontal fold line (photo 2).
I turn over the sheet, down this fold (photo 3). Then the right and left corner flexing to the vertical middle line (photo 4).

I turn over the leaf with the other side up, the angle down (as in photo 5). And reject the upper corners to the middle vertical line (photo 6 and 7).
And again the same upper corners - once again bend to the middle vertical line (photo 8).

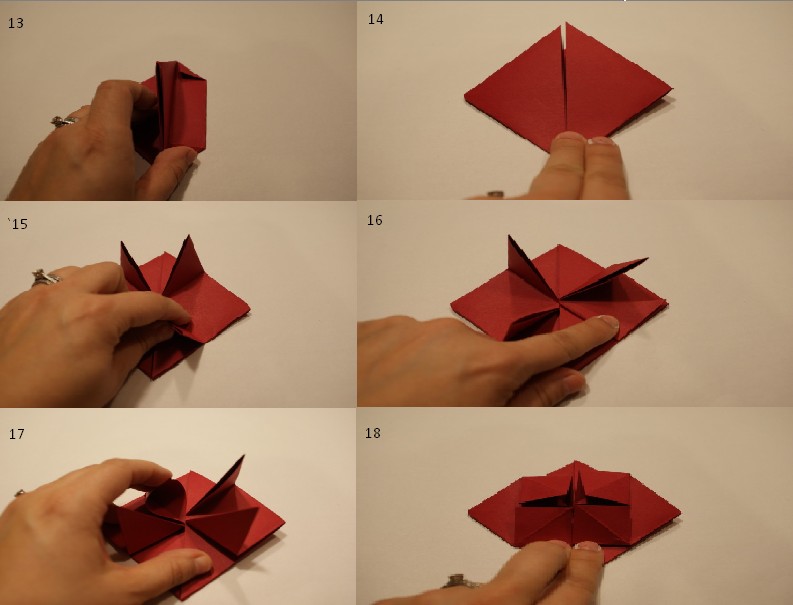
And now our module (which has a hexagon shape) bend in half. That is, the top angle of the hexagon is falling to the lower corner. And then the tops appear at the top (photo 9).
These protruding ends should be folded (as shown in 10 photos) - that is, we put a finger on the corner of the ear (the one where the angle of the bend) and press this edge of the bend to the edge line of the module. And as a result, our ear is flattened (as on 11 photos).

Now look at us the module has 2 layers - 2 triangular halves lying on one on one. We take the upper triangular half and put it in pockets on the bottom triangular half (there just there is such a wonderful pocket (photo 12, 13).

Little bar remained. Change the shape of the ears sticking at the top above the module - so that the ears have been similar to the rounded hills of the top of the heart.
First, bend the rectangular ends of the eats - so that the ears began to have a teruggolic shape (photo 14)
And now the ears have become triangular, you need to smooth the sharp corners of these triangles. That is, bend them down the book (as in photo 15). And all Valentine's hand is ready - we turn it onto the front side.

More techniques for folding hearts from paper you will find on our website in a special article.
And we continue ...
Valentine-envelci
Do it yourself from paper.
And here you will find ways to make an envelope in the form of a heart of thick paper or cardboard.
On the cardboard sheet, we draw a template of the future valentine, as in the photo below. You can copy the picture or draw the sample yourself. Dimensions can be any (under your task) - the main thing to comply with the proportion. That is, the width of the halves of the heart - should coincide with a half width of the central rectangle of the envelope itself. All other sizes can be any size of your letter.
In such an envelope Valentine, you can put a small gift - such as earrings. Small earrings on the cardboard in the form of a heart (for example, from velvet beautiful cardboard) - shift two holes and put the earrings in them. And put this velvet heart with earrings inside such an envelope. Great and beautiful.

You can make an envelope easier. This is. From cardboard or dense gift paper cut out the heart. Inside the heart draw a rectangle - so that the height rectangle and height zones over n.m were equal.
I.e it is not necessary to copy this pattern to exactly exactly - You can draw the heart of any size and shape yourself (thick or elongated - no matter). The main thing is that the height of the rectangle is equal to the height of the zone, which is over this rectangle. And everything else does not matter. You will have an envelope anyway.

And you can make a letter Valentine with your own hands inside the closed booms of paper. We fold a sheet of pink (or beige) paper in half. And we put the stencil of the palm so that the fold line comes from the back of the palm. We supply stencil - cut out two layers of paper on the contour at once, without turning. And when the silhouette is cut out, we break up the folded stencil, and we get two opened palms. And inside the paper heart stick (folded). On paper heart we write a love note or warm words near a man.

And when we want to make a gift for Valentine's Day - then the envelope will be already not enough. We need a whole box so that it can be put in the volume (souvenir or gift).
So let's see what simple valentine boxes can we cut and fold out of a sheet of cardboard or flat paper
Valentine-boxes
How to make it yourself
Boxes in the form of a heart.
Here is the first version of a simple heart-shaped box, which is easy to make with your hands from cardboard. Stencil patterns such a craft for Valentine's day you see in the diagram below.


And if the same pattern is slightly changed. Then you can make this valentine in the form of a box - with double attend one box to another. The stencil will be exactly the same - with a nuance one - in it the lower corner of the heart should be direct - that is, to have 90 degrees. And the intermediate walls (between the hearts) should not have a pointedness at the bottom - and instead they should have the same straight walls as from above). Now I will try to draw such a scheme for this template so that everything is easy and understandable.

So that everything was clear, I drew a scheme below. You see that the stencil differs little from the previous template - only the walls between the hearts are rectangular (and not triangular) and the hearts themselves have an angle of 90 degrees (so that they can close them, sticking together in his friend).


Therefore, go to this thematic article to learn how to quickly and just do such boxes with your own hands.
And since I started about the heart box, then you need to tell a little about what you can put in them. Here are the beautiful ideas of the original craft stuffs for these valentine boxes.
You can put in a curtain-toy heart box. For example, in the form of delicious chubby donuts, decorated with knitted icing and a sprinkle from beads. Such toys can be used as suspension on new Year tree - That is, they are a long faith and truth will serve your family in every New Year celebration.


You can bake real gingerbread hearts from the dough, cover them with jelly red icing and decorate with white glaze of egg squirrel and sugar powder

Any recipe for a gingerbread dough is suitable for such sweet valentines. Bake the gingerbread in the shape of a heart. Enjoy. In the saucepan wept red jelly azure. The gelatin of 40 grams soaked in cold water 100 grams, which threw 1 package of food dye. After swelling gelatin, the mixture is heated in the water bath, but not to a boil. Immersely in this glaze gingerbread whole, tweezers and lay out on the dish in the fridge for frozen.

And if you do not like the stove. You can buy in the store ready-made square cookies and decorate it with sweet mastic. Mastic dough is done in 1 minute - in the store We buy Marmelevos Marsfiers, heating them in the microwave - we get a sticky mass similar to plasticine. On the table, Sychable sugar powder - and in this powder (as if in the flour) wash our marshmallow dough. We get ready-made sweet mastic, from which you can cut the decor for cookies for Valentine's Day

We take a piece of the tight test and roll around the rolling pin - from the rolled sheet, cut the squares for the size of the cookies. Glue squares on cookies. Part of the dough riding thin sausages - it will be the seams of the envelope. And part of the test mix with a red food dye - they sculpt the hearts from it, decorated our sweet envelope. If there is no food dye - not trouble - Hearts can be cut from red marmalade.
Such sweet valentines can be made on the basis of waffles, cookies, cupcakes. We buy ready-made flour products and decorating their sweet mastic from molten in the microwave of the Mesophyro Marmelevos (our Soviet marshmallow is not suitable - only bourgeois rubber).
Valentine Pletrenka
Do it yourself.
But the classic school craft is paper from paper. Valentine's woven in the form of chess weaving strips, which have been produced alone through one.

This is how such a heart is being done. White sheet of paper fold in half - cut the scissors half an oval. We can't cut three or four or four, or five cuts - from the fold line and deep into the oval without entering the scissors to the zone of its round top. The same makes the same with a red sheet of paper. And then inwing two modules alternating his strips, as shown in the diagram below.

This simple classic craft found a lot of creative interpretations. Depending on the curvature of the band - we can get a different pattern of weaving ...

Let's see how it happens. If you modify the module for a braid like this with rounded strursions, then we will get a wicker heart with a pattern in the form of a plurality of small hearts.

If on four line of our module make recesses in the form of 2 round eaves on the left and 2 ears on the right. While the addition of Valentine's hands, we will get a flower with four petals in the center.

And if the tubercle is only alone - and only one way - then we will get the silhouette of the heart in the center (as in the photo below).

We can try to be a creator creator and draw at random the brackets lines. Collect Valentine's craft and see what an unexpected pattern will be released in the end.
Moreover, we can decorate not only a wicker part of such valentine's own hands - and the round ears of the heart themselves also decorate figure threads (as is done in the photo below).

Valentine's hands
Language abundance.
Here is a Valentine's work, which I really like. It looks very gorgeous and rich. And it is done very simple. Therefore, this Valentine may be the topic for classes in kindergarten or caretaker in school.


Below I show the module for valentine-Lanenka in three tiers.

We take a sheet of cardboard. And we fold it in three layers - that is, in a triple fold. Then we deploy this sheet. And cut it in half - diagonally. The angle of inclination may be Luyuby (on the essence of the crafts it will not affect). And then every such oblique strip we complement the cuts. In each of the three bending parts of the strip, we cut exactly in the center, reaching scissors somewhere until the middle of the strip thickness.
Cuts from strips are different - pay attention - at one strip cuts go with alternation at the bottom, at the top below. And the second strip on the contrary, cuts alternate so - at the top below, at the top.

Then our walls are dressed in each other in each other. And we get the founding of the backbone of the future Valentine's craft with their own hands. And on this woven base, we stick hearts, flowers, lace, rhinestones and another decor of paper and cardboard.
And it is not necessary to make three bends on this module. The walls of the harmonica can be as much as you like - 4, 5, 6. The greater the more tiers with the heart decor there will be such a craft-ladder.
Valentine's suspension
In the framework with your own hands.
You can make a very simple craft for Valentine's Day. White cardboard sheet bend in half as a postcard. In one half, cut the square window so that the halves become a frame for the future craft-valentine. And now inside such a vertically postcard, we hang a double cardboard heart.

From the cardboard, cut out two hearts and hang onto the thread, the one and the second heart is pierced with two stitches.

Valenets - Valentinki
From cardboard with paper flowers.
Here are the ideas for valentines with our own hands we have collected for you in this article. Have a good cottage, the path you will get original crafts.
Olga Klyashevsk, especially for the site
If you like this article
And you want to encourage our author, you can send any convenient amount to you.
on his personal wallet purse poison - 410012568032614
Gift for Valentine's Day from paper with your own hands
Box "Valentine". Master class with step-by-step photos
Galeta Natalia Sergeevna, teacher of additional education, Kungur, Perm region, municipal autonomous educational institution Additional education of children House of children's creativity "Dar"
Purpose: Development of creative abilities of children of senior pre-school and younger school age;
Tasks:
- develop interest in artistic creativity;
- learning to create beautiful crafts from paper;
- develop aesthetic feelings;
- Improve the skills and skills in appliqués;
- to bring up independence, accuracy in work;
Equipment and materials:
- Cardboard
- PVA glue
- scissors
- Pencil
- Colored paper
- Stapler
- Paper napkins
With the children of the second and third class in the class of the circle, I decided to make Valentine's Day in the form of a box. Work is simple and at the same time interesting. Children will cope with her for one occupation. The material will be useful to teachers of primary classes, technology teachers in primary grades, additional education teachers, as well as parents of younger students.
Progress:
1. The drawing of the box looks like this:

It is better to print it on the printer.
2. Cut out the workpiece and bending along all lines of bending. To better bend, you need to spend on all lines of scissors with the inside of the blank on the line. [

3. Internal lines bend harmonica.

4. We fold the box and glue the valves inside.


5. In the holes in the onset of the tape in this way:

6. Fasten the box and tie the ribbon. Box ready.

7. It remains to make decorations to your liking. For children, I suggest such an option:

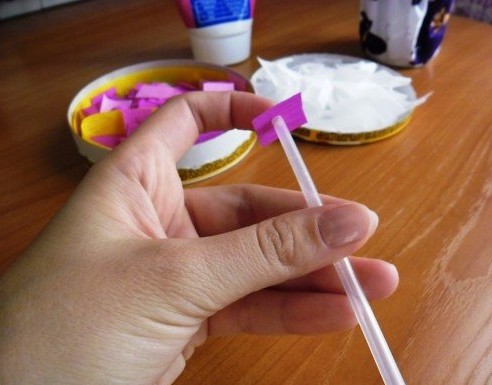
8. Cut the napkin into four parts.

9. The stapler put the bracket in the center of the one square.

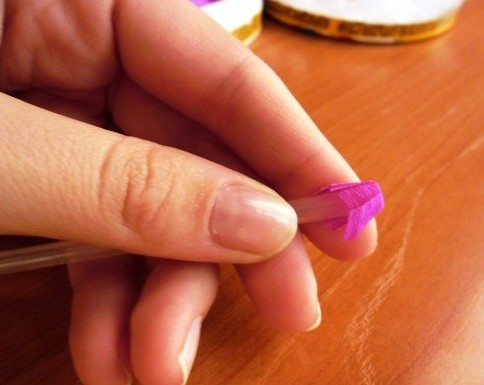
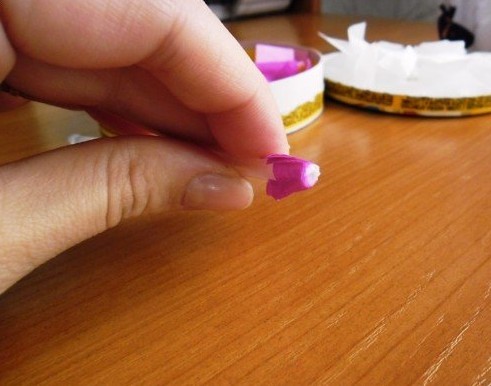
10. Cut the circle from the square. And we begin to collect all the layers of the napkins, each separately. Forming with your fingers so that they hold the form.


11. Cut the leaves and stick everything on the box.

13. A little different design option:

Box "Valentine" is ready.
Hello, dear friends, Readers, Guests Blog Home-ART! I am glad to meet a new meeting with you. Today I will have this, a rather narrow-controlled topic, but I really hope someone will come in handy (as I came in handy in my time). Today we will do mailbox For valentines, ❤.
Last year I had the honor of 🙂 to make such a box for a class in which the son learns. And even though the box was originally intended for Valentines, that is, I made all the lovers to the day, in the future it was successfully used for the game in the mail (and then modern children are generally very surprised by real paper letters ✉).
So, when a class teacher asked me to make such a mailbox, honestly, the first thought was "how and from what?". Revising on the Internet many different options, I realized that as always, you will have to invent something my own. Then the boxes were primitive, the base is a ready-made box, placed by something, then beautiful, but small (and we needed for a whole class!).
And in the end, by purchasing a couple of tight cardboard packs, I began to work. And now I will try to remember how it was.
For the manufacture of mailbox for Valentines, we will need 📫:
- white cardboard - 2 packs;
- white and pink pastel paper;
- glue stick;
- scissors;
- pencil;
- line;
- the stationery knife (and even better a delicate knife for cutting);
- board or Makeup Mat;
- cutout templates.
How to make a mailbox for valentines with their own hands
We start with sizes. The first thing we need is to understand how much we want to get our mailbox for valentines. I decided to make it with a square bottom and wall, slightly smaller than A4. In height on this box, the back is about 4-5 cm. Do not write the remaining dimensions thoroughly, because Everyone can have their own (cardboard, too, is different).
Foundation of the mailbox for valentines
So, cut out the square base of the drawer for valentines of about 18-19 cm on one side (we consider the thickness of the cardboard in this way, then you will see why). Of 4 sheets, cut out 4 identical details. From below each part at a distance of 4-5 cm from the edge, we cut at an angle of 45 °.

And we need 4 strips with a width of about 4 cm. The height of the bands must correspond to the height of the previous parts from the area of \u200b\u200bcutting the corner.

This will be the founding of our mailbox for Valentines. Now the prepared details need to be pregnant (that is, bend). Strips We divide in half in length using a line and a thin and dull object. Each part is cut off the corner (in the photo 👆 shows how the corners are cut only on the one hand, but in fact it is necessary to do it on the other side).
The large parts of the walls also need to bend over the line at a distance of 4-5 cm from the edge.

Now we start assembling the mailbox for valentines. We glue the wall details first to the square bottom. In the photo you see, for which it was necessary to cut at an angle. Please note: gluing tails should be located on the outside.

We glue the walls, for which we use the strips cut earlier. "Seams" also have the appearance of the box. Let it have not confuse you yet, then we will hide all this "beauty."

The base for the box is almost ready. But the fact is that the cardboard, when the product is quite large area, it looks like a rather harpko. Therefore, we cut another item, which will be 2 mm wider bottom details. We glue it from the bottom, with the outside of the box, rejusting well from all sides. So we will strengthen a little our design.
The base of the mailbox for Valentines Day is ready!
Thunderstand the decor of a large mailbox for Valentines
Now the most interesting begins. So as a result of bringing a mailbox for valentines in the appropriate look, it is time to think about the decor. And nothing that we only assemble him part. What will fit here? Gentle and smooth lines, flowers, hearts ... In general, it was decided to cut the main decor from the paper, and also a long time ago I looked at this technique)))
Part of the schemes were taken from the book "27 ways to confess love" From the blog cardno (for which I am prevented thanks to the whole team, which worked on this book). A large template for cutting, decorating two walls, I found on the Internet. The heart with a boy / girl is a template of Olga Kachurovskaya (also from the Internet), and the inscriptions were created in Photoshop, and I apparently removed them safely.

So, the next step towards creating our mailbox is a long and meditative pattern cutting patterns. Previously, you need to adjust the templates for the desired format (I use photoshop for these purposes) and print them on paper: a solid decor for two walls and a rectangle under a hole - on pink; The inscriptions "Love" and "Mail", heart, gentle rectangular decor - on white.
Tip: All images, including inscriptions, it is better to do in mirror reflection And print on the involving side so that the finished product does not see the black lines. I first did not pay attention to this, the result you can see in the photos below: the dark pieces of paint pieces for the printer are peeled.
So, cut out? Then begin to glue.
And where to glue when we have such a disgrace on the walls? Therefore, from white cardboard, cut out 4 parts with the side walls of the mailbox + 2 mm, which takes into account the thickness of the glued cardboard.
Two such details we stick our carved scenery.

And then fasten them on our drawer for valentines.

The other two walls will be white.
Frame with vintage hearts carefully cut out, and then glue on a pink substrate, which will already be 5 mm than the wall of the drawer (accordingly, the frame template is still 6-8 mm should be less).

Tip: If you cut, then do it very sharp, and better than a high-quality knife.
This beauty must be glued to a white cardboard billet. And then - to the mailbox for valentines on the third party.

From the fourth side, we simply stick the remaining cardboard part of the wall, pressed well.

Under the heart with a boy / girl cut out a pink substrate with curly scissors

In addition, we stick on a pink paper a white inscription "LOVE", we supply it with a pencil with an indent 3-4 mm and cut out

The inscription "Mail" also needs to be glued to the pink strip - a sign with beveled corners. We "nail this sign" with the help of grinding or semi-graysins (naturally, the grinding is wrapped only a pink strip).
Now we place the whole thing on the fourth side of the box closer to the bottom, because From above the plan should be put on the lid.

That lady! Bottom part Mailbox for Valentines day ready! And beautiful, and unique, and with a soul.
Mailbox cover for valentines
Another interesting point is to create a lid. And if you remember, we do not create a box, and the mailbox for Valentines day 📭. That is, in this product necessarily there must be some hole through which love letters, postcards and other messages will fall inside the secret mail.
In general, the technology of assembling the roof is the same as for the bottom. All difference in size.
The upper part is cut into account already taking into account the size of the finished lower part, and this is about 3 mm more on each side. Side parts of the lid (choose their height already at their discretion) can be stuck in the same way. In the photo, the adhesive sequence is slightly changed, because I had a cardboard in bulk. But do not essence.
First glue parts with tails on the outdoor side.

The next thing to do before gluing the rest of the parts is to cut another square, it is stuck to stick a pink rectangular decor on it, and all this is to attach to the top of the mailbox cover, thereby fracture the tails from gluing.

In the center cut the hole for letters.
And then collect our top box.

With the side decor, I did not bother and simply cut out 4 rectangles of pink paper slightly smaller than the sidewalks of the lid size. The lower part of them was treated with wavy curly scissors. These parts glued to 4 cardboard rectangles, which are further fixed on the lid on the sides.
That's all! Mailbox for Valentines Eve ready! You can use it for purpose: send secret messages and any other messages. After all, it's so cool - to get a present paper letter.
Some time (one or two in the evening) - and the accessory for the game is ready. Seeing this mailbox at school, some moms said that it was not worth it to mess around. It was necessary to take a simple box from under the shoes and enclosed. Well, maybe such a perfectionist nature, which at that time for 3 years already spinning in the field of needlework 😜. In general, you decide how to do. This is just one of the many possible options for mailboxes made by your own hands.
Article title
Mailbox for Valentines Cardboard
Description
In this master class, you will see how the mailbox is made for valentines from cardboard. Step-by-step photos I. detailed descriptions With cutting schemes are attached
Elena Goloshtenko
Hello everybody! I want to remind everyone that we will soon have to celebrate the next holiday called the day of all lovers, which is celebrated every year at the same time on February 14. What do you think in most cases give this day? Of course, small and cool Valentine's paper, which resemble postcards, but only they are made in the form of hearts and are decorated with love and care.
Nowadays, you can safely go to the store and buy such a beauty, but still there is nothing more wiven to make such original pictures and give your loved one.
Do you know where this holiday came to us, write your stories at the bottom under this note? I think that yes, so I will not stop over this question, but immediately start from the most important and main, we will teach you and show you a gradually different ideas of crafts on Valentine's day, let's proceed.
Of course you can associate such creations, or even sew, I have recently saw how you made a heart from beads and even from felt. By the way, those who are fond of felt toys I propose to look into this
Neither a secret for anyone that products from paper can even fulfill the child, because there is such a material in every home, the main thing in this case competently approach and do everything as the author recommends. Therefore, see this phased instruction and repeat, the result will be simply stunning and very beautiful.
I suggest to make the first option at once two halves, such as husband and wife and hang such a decoration over the bed.
We need:
- paper
- paints
- ribbon
- scissors
Stages of work:
1. How do you see everything pretty easily and quickly, dip your finger brushes into the paint, i.e. apply it to the surface of the palms, and then make a print that will resemble a heart symbol.
2. Cut with decorative scissors and grind a ribbon.

The next way to make Valentine is from what you have, so to speak from the girlfriend, so it takes the cardboard preferably pink or red and plus colored paper. Also need glue, pencil and scissors.
We need:
- cardboard Colored Red - 1 sheet
- sheet of pink colored paper - 1 pc.
- pencil
- scissors
Stages of work:
1. All extremely just roll in half a sheet of cardboard and cut the heart, then from the pink colored paper you have to make thin stripes that cut as if you make grass or something like that, every such strip twist on a pencil.

2. Stick on the flower layout and you can still decorate with sparkles and something else to your taste. It turns out slightly volumetric and at the same time an elegant handicraft that you can gladly give mom, sister and say how you love them.

And a similar idea that I also conquered me in it also uses interweaving paper strips:

But that's not all if you turn on your fantasy, you yourself can come up with your own patterns, because there is no hard enough, see what can happen. Well, if you think that you will not handle, then contact me and I will send you stencils for which you can make these adorable creatures.

I really liked these species, there are stencils in an enlarged form. By the way, such crafts are called twisted hearts from paper.

The simplest thing is that it is possible to make it a common heart to decorate any jewelry, letters, rhinestones, etc.

Master Class Paper Valentine For Children
Undoubtedly, there are still such a tradition in schools, how to put mailboxes and throw anonymous wishes there, which each receives each. You will agree that great and tempting, which makes this holiday unique for everyone.
Therefore, most schoolchildren, and just preschool children love to create excellent postcards, and then give them to all those whom they love and adore.
Therefore, if you have children, you can easily make such a gift with them.
For children of kindergarten and at home, by the way, you can use this type of work as a group to make such a drawing, from ordinary cubes from toilet paper to squeeze the shape of the heart, and then suck the paint and fill the entire Watman. I will cope with such a task even a child for 2-3 years.

And if you still have not learned to draw the heart, you can use this stencil.

After all, children can simply decorate with it with markers or pencils and draw their own patterns, or to use nothing else. Figure antistress, or as it is called coloring.

Different ideas can be found if you want a bunch, such anti-stresses, of course, this work is more addressed to high school students and schoolchildren. I have several coloring in my piggy bank, who is interested, write.

Or make a bookmark under this subject, cut on your own hearts from paper, and the child must stick them as an example, but something like this.

You can also make origami, because such activities will certainly please the kids. Make a boat with them, and instead of the sail, the symbol of lovers on a stick.


Original cardiac postcard on February 14 with a scheme
I found while I was preparing for this note. Several ways of how beautiful and suddenly do a surprise to your beloved or beloved. After all, this day I really want something like that, from what a head will come. For example, if your squeezed will give you a ring, but not just like that, but in a handbag. It will look worthily and at the same time romantic.
You will need to cut out of paper with the help of ordinary sharp scissors, two pieces are:
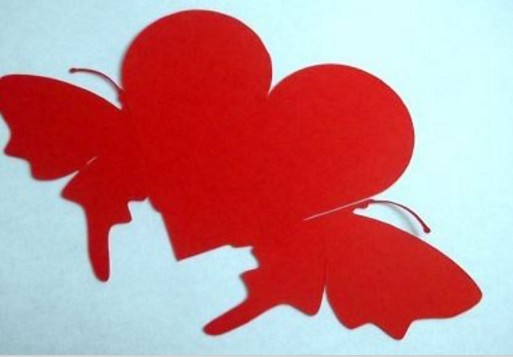
And then connect them to each other, but in advance you will need to fold them in half, where you see symmetry, make a small incision, where the mustache has a butterfly.

It turns out approximately the following:
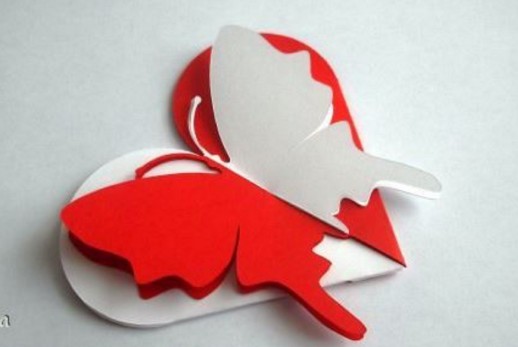
Now it remains to stick a ribbon or make it out of paper and put a cherished gift with wishes or bills.

It can be more difficult to offer such a craft, who is familiar with the machine cutting technique, it will be easy, it is the method of cutting with a special knife, as they say in the people of the outturist. You can get a stencil yourself completely free if you write down the comment below, I will definitely send it to you.

Also on an ambulance hand, you can build such a masterpiece using your palms. I think that the process of manufacturing such a product is so clear.


Looks gently and of course with love. Favorite will definitely be happy and smile and give you a kiss.

In America and other countries, it is very often given to their favorite paintings related to this theme, you can use newspaper publications, you do not need to be an artist to create such work, see yourself.

Well, another look is the outturned, they are also appropriate here. And I will write about them below yet. To be honest, such a souvenir can be attributed to the competition in kindergarten or school.

Here is its template, cut with a cutter or a special acute knife.

Making volumetric valentines at home
As for such large and seemingly volumetric figures to this holiday, I propose first to go the easiest way and make a heart contour from cardboard, and then with the help of woolen threads, you can take different colors, and you can one-time. Reinforcing, that is, wrap as shown in this photo.

In the first version, we made flowers and glued them to the workpiece, you can also do in this case.

You can also easily and quickly cut on such a finished pattern, and after gluing the sides, a cable.

And then decorate it with all sorts of decorations, such as sets for scrapbooking. I found a similar option in this roller, I share with you:
While he wrote this note to my mind, one idea came to mind, but she came to me not enough, my eldest son sat and collected a mosaic from puzzles, so that I came up with. How do you see?

Video about how to make a craft for the day of all lovers
Make such a romantic postcard in the form of your handles, here and without words everything will be understood.
Either make something more interesting:
Volume Valentine's Origami
On the Internet there are a lot of all sorts of crafts on Valentine's Day, especially using such famous techniques, as origami you can add up hundreds of various patterns.
You can make heart-origami themselves, using this phased scheme, follow her and everything will turn out. After all, it looks truly beautiful and original.

Actions as always simple, you just need to correctly exercise paper.

And after the result, it will not wait to wait, take it first on ordinary white paper to turn these adorable valentines, and then go to color.

Or use such work.

You can also bake very tasty, and after plugging special toppers on chopsticks. To do this, you just have to cut hearts from paper, and then roll them with the harmonica and glue the wand.

Catch these templates, you can copy them, and then easily distribute yourself on the printer.

It is now popular now enjoy 3D hearts, you can also do them if you look at this video from YouTube:
Stencil to this roller you can request me below in the comments, I will definitely send you.
And still very original and such super cool with flowers origami hearts that I liked very much.

Do you know how these are done? Now I will show you instructions, with which you can make this wonderful thing.

Repeat the entire sequence, the main thing is not rushing and be careful.

Then everything will fail.
Happened? Then go to the next steps))).

Sharch and make a handle. Voila, beauty.

Heart in a quilling technique
Do you know what this is unique and at first glance an interesting word, quilling? In fact, the technique that helps to be very funny to turn the paper in the form of small funny things. I think all those who love creativity and crafts, such a type of work is familiar or you ever seen such cute souvenirs.
If you know how to use and make such valentine please share with us your works, I can offer you only such ideas that I liked it.

I suggest you make a photo frame and something else, look and decide that you are closer to the soul.
Or from strips to make such a small one, but a pleasant thing:

We need:

Stages of work:
Take ready template Hearts or make it manually with a circulation, or something round. Then attach stencil to the thick cardboard, and cut out the workpiece. Next, attach the workpiece on the colored paper and make a certain reserve, as shown in the picture.

Stick this green cover. After cut the heart from red colored paper and stick it to the opposite side of the workpiece. On this side you can write a love note or poem.
After Make Figures for Qwill, screw the paper strips to the pencil, use a special line and toothpick.

When the washer succeeds, leave it in the circle of the same engineering line.
Take your love photo and circle it to the desired form, and then stick to double-sided tape or tape.
Now it remains to glue all the elements. And so as wonderful and magically looks it.

And you can still build such a red pendant, a symbol of love.


Card with roses from corrugated paper
Well now, I now offer another fairly widespread option from roses that are easy to twist if you take the desired type of paper, we are talking about corrugation.

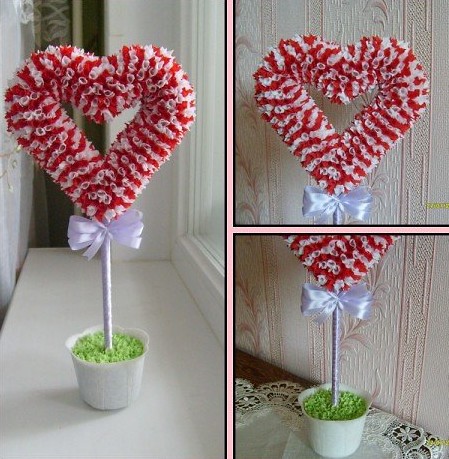
There is also a magnificent idea of \u200b\u200bvery large valentine, which is made in the style of toppiarry, looks great, at first glance, you might think that such a charming invention is not for you, but in fact, believe your eyes are afraid, and the hands do.

Now you will see the necessary basics and on the basis of this information you can easily build such a thing. And because it can be given not only on the day of love, but on March 8 or a birthday.
Stages of work:
1. Take the usual foam and cut out the love symbol from it, the thickness must be about 3 cm.
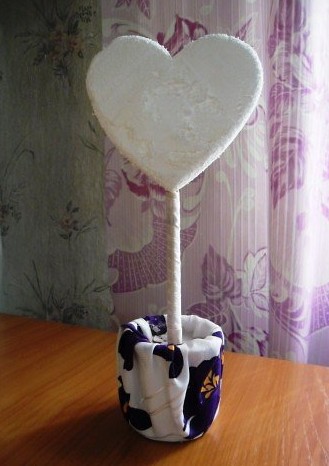
2. Next, take a wand or pencil, for this purpose, the sticks for kebabs are very well suited and stuck it in the heart. Hide wand using a decorative ribbon. After inserting a stick in a jar, you also need to decorate, wrap the dishes with a cloth or paper, in general, with girlfriends, even can use plasticine.
So that the wand does not fall in a pot, fill it all with plaster.
3. Now prepare the following materials for work, this glue, it is better to take something like liquid nails, it is more convenient to work. Then it will take paper corrugated or a crepe and rod from gel handle.

4. Now make a carriage. The word at first glance is not easy, but there is nothing hard.
5. Stick the rod in the rectangle center (paper cut into small pieces of the same size) and then crush.
6. Now melt right in the heart, glue the blank to the foam.
Remember that glue is better to apply on the paper blank itself.
With this method of a carriage, you can also make such a fluffy and volumetric card on cardboard.

Pictures and templates for printout
So I got to the most recent option, it will be unexpected, but also pleasant at the same time. I saw such a cool twirl novelty for the interior, the decor in the house in one journal.
I remember that the code came new Year Many of you asked me to send them templates on the window so that's why it is not to realize and here, decorate the window by February 14 by the desired symbols, it can be hearts, angels, pigeons, etc. How do you look at it, look as original To do.


I really like this embodiment, and you write your suggestions and reviews))).

And these images of the girl and the boy I honestly really liked. And you? There is still a Cupid and Fairy scheme, as in the photo on the window. There is a boy and a girl in my piggy bank kissing in a heart and much more.

Therefore, if you also want to decorate your apartment with the children, then all the schemes and patterns you can request completely free, I as always send everyone to email.
Well, and those who do not like this creation, I give you small billets that you can also print on the printer and give your beloved relatives and friends.


This is such a selection, I hope my finds will be useful to someone. Have a good day, good mood and positive! Until!
Sincerely, Catherine Manzurova
 State Services Personal Account
 State Supervisory Cabinet- Entrance on SNILS and Telephone
 Single telephone rescue service in the Russian Federation