Free Google Drive tools you may not be using. How to log into an account using application passwords How to password-protect the launch of a google drive
An app password is a 16-digit code that gives a third-party app or device access to your Google account. These passwords can only be used if 2-Step Verification is enabled.
When app passwords are needed
For security reasons, use the "Sign in with Google Account" option to connect apps to your account. If this option is not available, you can do the following:
- Connect to Google Account using app passwords.
- Use secure apps.
How to create and use app passwords
Note. After you turn on 2-Step Verification, when you try to sign in to your account in some applications, the message "Invalid password" may appear. You can fix the problem by creating an application password.
- Open the Google Account page.
- In the left navigation bar, select Security.
- In the "Sign in to your Google Account" section, click Application passwords... If there is no such option:
- 2-Step Verification is not configured for your account;
- 2-Step Verification is configured for electronic keys only;
- you are signed in to a work, school, or other corporate account;
- your account is using Advanced Protection.
- At the bottom of the page, click Application and select the option you want.
- Click on Device and specify the model.
- Please select Create.
- Follow the instructions to enter the app password (16-character code in the yellow line) on your device.
- Click on Ready.
As a rule, it is enough to enter such a password once, so it is not necessary to remember it.
It is possible that you will not be able to use application passwords in unsafe applications.
What are application passwords for?
After you turn on 2-Step Verification, some apps may not be able to access your Google Account. Application passwords solve this problem.
Note. If the app has a "Sign in with a Google account" option, always use it to connect to your account.
What to do if you forgot your app passwordEach such code is used only once. If an app or device asks for a password again, you can create one at any time.
What to do if you can't sign in to your accountCan't sign in to a third-party app? It may be using unsafe login technologies. Please update the app and use the "Sign in with Google Account" option. You can also use
In the world. Thanks to this program, the study of the Internet takes place in a comfortable and relatively safe environment. It is convenient to store numerous bookmarks in the browser, someone even trusts him with their passwords, and someone credit card details.
If you have ever thought about the security of your bookmarks and passwords, or simply would not like to show your personal information to family members or colleagues, then one of the obvious solutions is to put a password on Chrome.
Introduction
The author of these lines has been using Chrome for a long time. It is convenient to have all work bookmarks in your work account, and store all sorts of entertainment sites in bookmarks on your home profile. In this article, we'll look at how to quickly switch between the two profiles, and how to block a Chrome profile from colleagues or children.
I want to warn you right away - this method of blocking a profile is by no means a panacea. All of your data is still unencrypted on your hard drive and, if desired, can be taken over by intruders. Therefore, we strongly recommend that you do not store passwords for important services in your browser. But from a curious neighbor or a naughty child, again, it will work with a bang.
So, first, let's figure out how to create a new profile in the browser, tied to a new mailbox from Google.
How to create an account in the Google Chrome browser
Open the browser and immediately click on the tiny little man icon in the upper right corner, next to the minimize button. We are interested in the button Sign in to Chrome.
In the window that appears, you need to enter your email address. If we want to register a new mail together with an account, then it is worth clicking on the link Other options.
In the drop-down list, select Create a new account, and proceed to registration.
The next window will ask for information about age and gender. Whether to provide real information is up to you, if you do not like to share personal information on the Internet with anyone, you can come up with a pseudonym, it will remain on your conscience.
Next comes the most crucial and difficult step - to come up with an email address. The simpler and more concise the address, the easier it is to remember it. You are limited in the use of special characters and Russian letters, and short and meaningful addresses are already taken. However, if this is a work address, it makes sense to indicate a work phone number instead of letters, or add a few numbers to the last name for uniqueness.
If the selected e-mail is completely satisfactory, go to the password setting menu.
The password should be complex, consisting of letters, numbers and symbols, and it is desirable to store it in your head, or in a hard-to-reach place.
Having duplicated the password, thereby confirming it, click on the "Next" button and move on to the next item.
You have the opportunity to specify a phone number to restore access to your account or to confirm transactions. However, if you don't want to, you can skip this step.
Read the Terms of Use carefully and click the button Accept... Although who am I kidding.
Here's our new account!
As you can see, we have created an account along with the mailbox. This means, now you can proceed to the next step, setting a password.
How to set a password for an account in the Google Chrome browser
In order to protect your browser from strangers, it is enough to set a password. But for this you have to create a new user and restrict his rights. Well, let's get started!
As you can see, our account name appears instead of the little man icon. In this case, it is the name "Ivan". By clicking on the name, in the drop-down window, click on the item Manage users
A window of all your users will open. In this example, there is only one account. Click on the add user button.
Next, in the window that appears, indicate the desired name of the new account, put the icon as desired, uncheck the “Create shortcut ..” and put a checkmark in front of the item “Browse sites ..”. And if you have a child, then at the same time you can create a profile for him to keep track of what your child is watching on the Internet. We press to save.
In the next window, select OK, or whatever, it doesn't matter.
Hello friends! Cloud storage is very popular right now. Their main purpose is storage and access to information from any device at any time, as well as the ability to share this information with other people (documents, photographs, and other files). In addition, popular cloud services provide a number of useful functions for users - creating and working with documents online, sharing, and more.
On my blog, I have already posted instructions for two large cloud services - and. And I dedicate today's article to another one - Google Drive. Until recently, I did not use it so actively - I mainly relied on Yandex.Disk. But, in connection with the recent ones, I thought about fallbacks.
I propose to understand the interface and main functions of Google Drive. Let's talk about how to use it - upload and provide access to files and folders, perform other actions on files, work with documents and applications online.
If you prefer video format, then you can view my detailed tutorial below:
How do I sign in to Google Drive?
The drive is tied to your Google account, and in order to get inside the cloud, you need to log in to your account - enter your login (gmail mail) and password from it.
You can access Drive from this page www.google.com/intl/en/drive/

Or go from mail by clicking on the "Google Apps" icon at the top right.

How much disk space?
They provide 15 GB for free. This space is divided into files on the disk itself, files and letters in Gmail mail, as well as Google Photos. By the way, the latter automatically includes images that you upload to posts on the Google Plus social network. You can remove them from Google Photos so that they do not take up space, while they remain in posts.
If you need more space, money can purchase it. There are several plans with monthly or yearly bills up to 30TB of storage.
Also, you can have several Google accounts and each will have its own disk with free space.
Cloud storage interface
Let's go over the main sections, buttons and settings of Google Drive.
Through the "Create" button in the upper left corner, you can upload files and folders from your computer to your disk. And also create folders and documents directly in the cloud. You can create text documents, tables, presentations with slides, Google Forms (for surveys, questionnaires, skype consultations), drawings, maps and websites.

Below this button is located panel with the main sections of the Disk.

In the "My Drive" section contains all files and folders uploaded to the cloud, as well as documents and folders that you have created in the cloud.
By selecting this or that file / folder with the mouse, you can perform various actions on them, I will talk about this further. To select several files at once, hold down the Ctrl key on your keyboard and click on the files you need.
The display of files on the Disk can be sorted by name, by date of modification, by date of viewing.

In the section "Available to me" files from Google Drives of other users to which you have access are displayed - for example, you followed the link to this file, or you were sent an invitation with access. To open a file, double-click on it.
In the "Recent" section- files that you have recently worked with (opened, downloaded, edited, etc.) are displayed.
Section "Google Photos"- the images that you uploaded to the Google Photos app appear here. Also, pictures uploaded to posts in Google Plus are automatically saved here. You can get into the application itself by clicking on the Google application icon from disk, mail, the start page of the Google Chrome browser.

In the application settings, you can put a useful checkbox so that photos and videos do not take up extra storage space.
To do this, go to Google Photos, click on the three vertical bars at the top left, go to settings.
And check the appropriate box:

Section "Flagged"- files and folders that you mark as important to yourself go here. Marking is very simple - select the file, right-click, select "Add Mark" in the list that opens. To remove a file from "Marked" - again right-click and select "Unmark".

Basket- it contains files that you delete from your Google Drive. The trash can be emptied, then the files are permanently deleted. You can also restore any file from the trash can by selecting it with the mouse and clicking "Restore from Trash".

There are some other useful icons in the upper right corner of Google Drive.
You can customize the display of files in the cloud as a list or grid. By clicking on the letter "i" in the circle, you can view the history of your actions on the disk, as well as the properties of any file by selecting it with the mouse. Clicking on the gear will open an additional list of tabs.

In the "Settings" tab:
You can change the interface language.
Enable offline access (saving Google documents to your computer so that you can work with them without an Internet connection). On this issue, you can read a separate instruction.
Disable automatic uploading of photos from Google Photos to a folder on disk.
Choose the interface option - spacious, regular or compact.

There are also alert settings.

And the ability to connect different Google apps to your drive.

By clicking on the tab "Install disk on computer", you can download the application for PC, as well as for smartphones on Android or Iphone. Here, keep in mind that the PC application is synchronized with the cloud online and all files are on your computer, taking up space. Since this does not suit me, I prefer to use only the web interface. The only advantage of synchronization is the ability to quickly send a large file to the cloud or save all files from the cloud to a computer at once, and then turn off synchronization.
Actions on files and folders in Google Drive
To upload files and folders from your computer to the cloud the "Create" button is used. You click on it and select the appropriate menu item - a window for selecting files on your computer will open. To select multiple files at once, hold down the Ctrl key.


When the file is selected, click on the "Open" button, it will start downloading to Disk. Information about the process will appear in the lower right corner.
An alternative download option is to minimize the Google Drive tab into a smaller window and drag the files from your computer to the "My Drive" section with the mouse.
There are a number of things you can do with files, folders, and documents on disk. To do this, select the desired file (or several) with the mouse and press the right mouse button. A list of available actions will appear. The same actions are duplicated on the panel above.

The content of the file can be viewed by clicking "Preview". If you want to edit the document, then select "Open With". The disk will offer you an application through which you can open the file.
To open the contents of a folder- click on it 2 times. All the same actions can be performed on files and documents in a folder.
You can give access to any file, folder or document on the disk to another person. To set up sharing, click on the corresponding menu item.
In the window that opens, you need to enter the gmail-mail of the person you want to open access to. Click on the pencil icon to indicate the type of access. This can be - commenting, viewing and editing.

If you have provided access with the ability to comment or view, then the user can be prohibited from downloading, copying and printing the file. Just check the boxes you want. Remember to save your changes.

Then click "Submit". The user will receive an email stating that you have given him access to files. On his disk in the "Available to me" section, he will see this file.

To close access, you again need to right-click on this file, select "Share". In the window that opens, click on the username.


Access is denied, the user will see the following message:


You can also customize the access settings. The default is view. Also, using the link, the user can download the file or save it to his disk. In addition, you can enable commenting or editing.

If you click "More", you will see other settings. For example, you can enable access for absolutely any user on the Internet, that is, the file will be available through a search. Or you can disable access via the link and send an invitation for sharing to a specific user by email (we have discussed this process above).

The next item for actions on files - "Move"... With it, files can be moved to folders. This is useful if you have a lot of files and want to organize them. You can also move files by dragging them with the mouse.

Creating folders on disk is easy. Click on the button "Create" - "New folder".

By the way, you can change the color of the folders.

Paragraph "Add a mark" useful if you want to add your favorite files to the "Marked" section for quick access to them.
Paragraph "Rename" will allow you to change the name of a file or folder.

Paragraph "Show Properties"- to view the properties of the file and the history of actions on it.

Paragraph "Versions"- files that you upload to Disk have it.

Let's say you downloaded an archive with materials from your computer and shared a link to it with subscribers. Then you needed to make changes to this archive, you downloaded it to your computer again and edited it. Then we re-uploaded it to Disk with the same name so that the link to the archive would not change. By the way, when you download it again, you can choose how to save this file - separately (the link to it will change), or as a new version, which will replace the old one.

However, the previous version will not be deleted immediately (by default, it remains on disk for another 30 days). But, you can delete it manually or check the box so that older versions are not deleted. This is done, just through this item "Versions".

The remaining actions on the files: create a copy, download it to your computer and delete it to the trash. By the way, to delete the file into the trash can be dragged with the mouse to this section on Google Drive.
So, we figured out the main points of the Google Drive web interface. Now a few words, how to download or save to disk a file shared with you via a link from another Google Drive.
If you followed the link and are authorized in your Google account, then you will see the Google Drive icon at the top, by clicking on which you can save this file to your disk. Nearby is an arrow for downloading the file to your computer.
![]()
Well, I hope my Google Drive guide will help you navigate the settings and functionality of this cloud service. Well, if you still have questions, I will be happy to answer them in the comments.
Wish you success!
Best regards, Victoria Karpova
Hello dear visitors! If you went to this page, then most likely you are interested in the question of storing files in the cloud. I will now write and, as is already accepted on this site, I will show in pictures, how to install and configure Google Drive... But I think that it would not be superfluous to write a few words about what cloud storage is, why they are needed and tell a little about Google Drive, aka Google Drive.
In simple words, cloud storage is a service that provides you with a specific place on the Internet to store your files. One of these services is. Together with almost the same time he entered the market and began to provide his services. There are many more similar services, among which Dropbox is worth highlighting, perhaps there will be a separate article about it.
Why will I be writing about Google Drive today? As you probably already guessed, I myself use it now, and just yesterday I reinstalled the systems and I need to install this program on my computer again, I will just take screenshots :).
The convenience of such services, in particular Google Drive, is that you get such a "flash drive" on the Internet on which you can store information, and most importantly, have access to it from any place where there is Internet and the ability to go to service site. All you need is to know your username and password for access. Of course, Google has created apps for computers, tablets and smartphones across multiple platforms. All this is for the convenience of using the Google Drive service.
Immediately after registration, you will be provided with 5 GB of storage for free. For $ 2.50, you can expand it to 25 GB, and that's not a chapel.
I think that's enough of this unnecessary theory :), let's get down to business.
To use Google Drive, you need to create a Google account.
Of course, you need to register with Google in order to receive a username and password. You can read about how to create a Google account in the article. Or if you already use at least one of the Google services, for example Gmail, then you can use the login and password that you already have to enter Google Drive.
To register in Google Drive, or to learn more about its capabilities, go to the page. Click the button on the right "Go to Google Drive".


After registration, enter the site using your data.
How do I install Google Drive on my computer?
So we come to the most important part of this article, now we will install a program that will allow you to conveniently work with Google Drive.
We go back to. Go to the page.

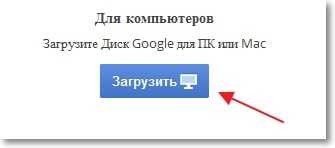
We select the version for computers and click “Download”.
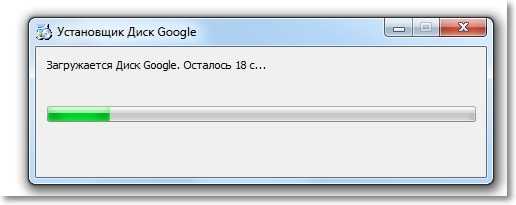
A window will appear in which just click "Accept the terms and install".

You will immediately see a message that Google Drive is loading. Then the installation will go.
When the installation is complete, click “Close”.

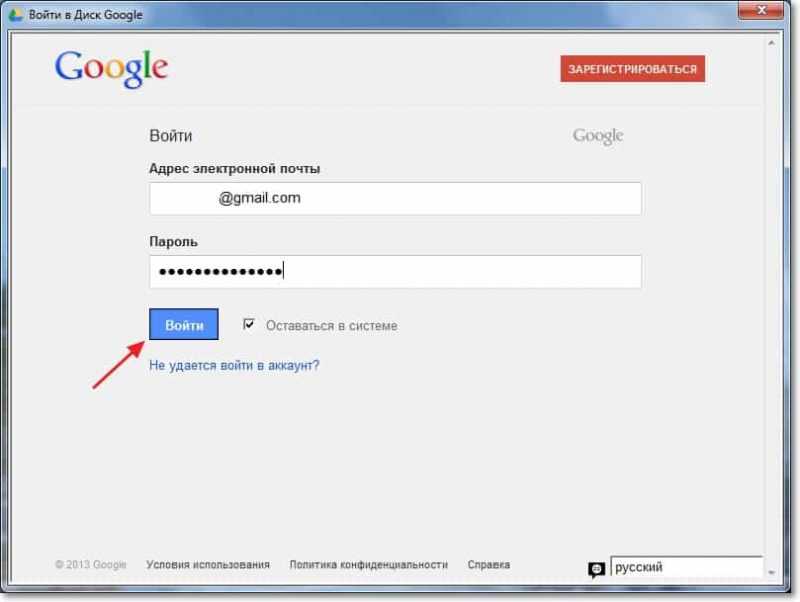
That's it, the installation is complete. The program will start by itself, press the "Login" button. Enter your email address and password, and click “Login” again.
A window will appear in which we press "Forward".
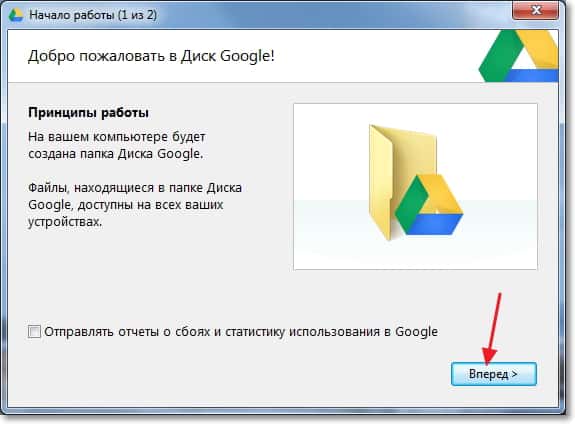
In the next window, the program will inform you that all files that are already on Google Drive will be synchronized with a specially created folder on your computer. For additional settings, click "Advanced settings", but there you will not see anything interesting, you can change the location of this very folder, and specify whether Google Drive can be launched when the computer is turned on, and in fact that's it. Click the button "Synchronize".

That's all.
How do I use Google Drive on my computer?
The Google Drive folder will appear on the desktop, and it will also be displayed in Explorer. By moving files to this folder, they will be automatically uploaded to the cloud and you can access them from any device. Or, when adding files from another device, say a tablet, they will automatically appear in this folder.
For example, when I need to transfer photos from my phone to my computer, I just upload them to Google Drive, then on my computer I go to the Google Drive folder and copy them from there. It's even faster than connecting your phone with a cable.
Also on the taskbar (in the tray), the program icon will appear by right-clicking on it, you can see how much free memory you still have on Google Drive, you can also go to the program settings.
Hello, Uv blog site readers Today I want to tell you how to put a password on a folder. What is it for? Read this article carefully and you may also want to use this trick. But I advise you to first calculate what it is.
Today it is impossible to imagine the life of a modern person without a computer. But we are not always the only users. Often several people use a computer. And I really want no one to view our data except us. And to do this, you just need to put a password on the pack. But how to do it?
How to put a password on a folder
Many users naively believe that to protect data, you can simply hide the folder, and not put a password on a folder... But this approach is not correct. The most secure way is to set a password. Next, we will analyze this process in detail.
This method can be used if you are working under a password-protected personal account. In this case, other users do not have access to this account. Another prerequisite is finding folders on the hard disk with the NTFS file system.
In order to set a password for a folder, right-click on it. In the menu that opens, select "Properties", then "Access". Stop sharing this folder. Check the box next to the "Password" field and enter it. Save your changes.

You can also set a password for the folder using the archiver. But every time you use such a folder, you will have to unzip it. In the absence of an archiver, you will need to download and install it.
The archiver is very easy to use. You simply select the desired folder, right-click on it and select the "Add to archive" item. A menu will appear on your screen. Go to the advanced tab and you can set a password.


There are a large number of both paid and free programs on the Internet that allow you to set a password for a folder. Paid products have much more options. So I advise you to buy something once and not know any problems.
In this article, you learned how to put a password on a folder. If you want to receive my new articles to your mail, then just enter your email in the window that is located under this article. And do not forget to unsubscribe in the comments, whether the article helped you or not. Good luck to everyone and all the best!
From Uv. Evgeny Kryzhanovsky
 How to log into an account using application passwords How to password-protect the launch of a google drive
 Blogging is a profession that you will enjoy
 Howard - for new mail notification