How to switch audio track. How to change the audio track How to change the audio track
Almost all films on this site have 2 audio tracks, English and Russian. If you're lucky, you can watch movies online on your gadget. There will be English and subtitles (worth the 1st track). In order to switch audio tracks, you need to download the movie to your PC. You can switch the audio track only for those video files that have these two tracks! Most popular players (except the standard Windows Media Player) make switching between tracks easy, in 2-3 clicks.
The logic is simple everywhere. It is necessary to find the item in the menu Sound (Audio) then choose, that is put a tick on the desired Track (Stream)... Be careful, if you select two tracks, it is possible that two channels of sound will be played back at once. You can download players anywhere. Most of them are free.
This is a standard player included in the Windows operating system. Very uncomfortable. I do not recommend watching video files in this player, in most cases the player is simply cannot switch audio tracks... You can try to do it as shown in the picture:
One of the best. Free for Russian-speaking users. It is only necessary to answer the riddle correctly when registering :).
Right-click and select the item in the menu that appears Sound -> Switch audio track.

Or below, right after "Volume" click sound icon and in the panel that appears, select the desired track.

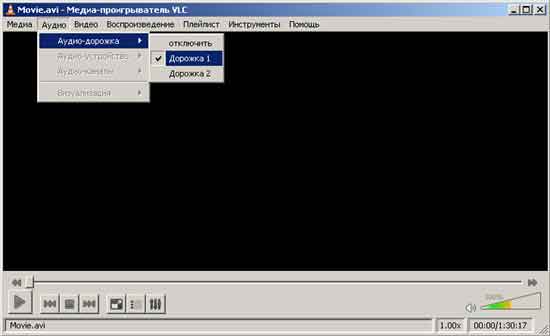
Go to the menu Play -> Audio ->

A full set of built-in codecs, convenient management and complete free of charge. If you need to change the audio track, click CTRL + X and the sound track will change.
Another way is to press right button and in the appeared select a soundtrack from the menu, as shown in the figure.

VLC Media PlayerVLC Media Player
Excellent and lightweight player. Can play streaming video. It is recommended for use in Sopcast. Go to the menu Audio -> Audio Track and select the audio track you want.
BSplayer
Right-click, in the menu that appears, select the item Audio -> Audio Streams and click on the audio track you need.
As you know, files with the extension mkv is a special multimedia container for storing video, audio paths and subtitles. She is Matryoshka. Below will be described how to work correctly with audio tracks.
It often happens that there are several audio paths and subtitles in a container, and some of them are not needed. For example, roads with an unfamiliar language or several Russians. Or another option, when the sound road has the format dts, which is not always reproduced by "iron" players. It can be recoded to ac3.
I will describe the most optimal, in my opinion, actions to accomplish these tasks.
You only need two programs.
The first one is Mkvtoolnix for working with mkv containers.
The second - Xilisoft Video Converter Ultimate... Besides coding dts v ac3 has many other useful features.
Take the once popular Slumdog Saints as an example.
Launch mkvmerge GUI from the kit Mkvtoolnix
Choosing a movie and getting something like this:

In addition to the video and subtitles, the container contains four more roads. English, two Russians and a road by Goblin. Here she is just needed. Remove the checkboxes from unnecessary elements, select the final path and the name of the reassembled container and click Start muxing.

After mixing is complete, the new container looks like this. Video and one audio track.

Now it can be recoded into ac3.
Launch Xilisoft Video Converter Ultimate... Add a file, in the Profiles tab, select ac3 and the path to save. Also on the right side of the program, you can change the settings for the encoded track.
We press the red button at the top and wait.

It turned out to be a separate track ac3... Now you need to replace the track with the extension with it. dts... To do this, open the mkvmerge GUI again, select the file mkv with one track dts and add the track with the add button ac3, while from the track dts respectively, uncheck the box.


You ask why all this was needed?
The original file with all tracks weighed 6.56 GB, the final file was 3.78 GB. In addition to the fact that it takes up less space, it can be copied relatively quickly to a USB flash drive and viewed from a device that does not support sound in the format dts(for example, SAMSUNG TVs of the sixth series of 2009, which even the new firmware did not help to learn to read dts).
It is not recommended to use mkvmerge versions higher than 4.0.0. This is especially true for owners of Samsung TVs of 2009 release. (2009 is the B in the model name. For example LE37 B*****) Most of the reassembled containers refuse to run on the built-in player of the above TVs.
UPDATE2:
And how to pull out separate subtitles or an audio track? It's simple. To do this, you need a program MKVExtractGUI... It must be placed in a folder with Mkvtoolnix.

Everything is intuitive here: select a file, an output folder and check the boxes to mark the files needed to extract from the container.
Some dvd or mpeg movies have multiple audio tracks. As a rule, this is the original voice acting and several dubbing options. And if, after starting the movie, you suddenly hear a foreign speech, do not panic: you just have the wrong audio track. The way to switch the audio track depends on which video player you are using.
Instructions
This video player is the most widely used because it is installed with Windows by default.
In order to switch the audio track in this player, hover the cursor over the player screen and right-click, then select the Playback item in the menu that appears, then Select the playback language.
If you have a different player installed, read below on how to select an audio track.
In the top menu of the player, select Play - Audio.
Right click on the screen, select Sound - Switch audio track from the menu.
Right-click on the screen, in the menu that appears, select Audio - Select Stream. You can also use the CTRL + X keyboard shortcut to switch the audio track.
In the top menu, select Audio - Audio Track.
Right-click on the screen, select Audio Track from the menu that appears.
Right click on the screen, select Audio - Audio Streams from the menu. Tip added on April 11, 2011 Tip 2: How to change the audio track We are all great experimenters. It would seem that everything is there, but we want to do something in our own way in order to see what will come of it. If you wanted to connect an audio file to a movie or clip, you shouldn't think that it is available only to professionals. Our step-by-step guide will show you how you can change any audio track yourself.
Instructions
movie rus dubbing.dts
- how to change music
The wonders of video editing are available to everyone today, and for this it is not at all necessary to go broke on expensive programs from Western developers. The Russian analogue of Pinnacle Studio makes it much easier to edit videos: its interface is clear for every user. A large number of lessons on the site makes it easier to master the editor, even for absolute beginners in editing.
If there are noises in the source material or the voice acting does not meet your wishes, the analogue of Pinnacle in Russian will allow you to replace the sound with video. This task is surprisingly simple and can be completed in a matter of minutes. Follow this instruction and in just a few steps you will get the desired result.
Step 1. Download Pinnacle and install it
From the main page of the site, go to the "Download" section, enter your e-mail and click the "Download now" button. In the letter that will come to the specified email address, click on the link to download the installation distribution. The trial version of the Russian version of Pinnacle Studio is 52 MB in size, and even at low Internet speeds, it downloads very quickly. After downloading, open the file and install the program on your hard drive, and then launch Pinnacle.
Step 2. Create a project

After starting the program, you will see the main menu. Here you can choose in which mode to work further. Since we are faced with the task of replacing the sound in the video, we select the top option "New Project". In the next dialog box, adjust the aspect ratio of the video - the easiest way is to select the "Set automatically" option. Click "Apply" and go to the next step.
Step 3. Add video to the project

At this step, you need to open the file with which you want to work next. It can be selected through the built-in file manager by dragging it from the folder to the temporary panel below, or by clicking directly on the "Add video" icon on the bottom panel of the program.

After the file is added, do not rush to move on. Pinnacle in Russian automatically adds transitions at the end - this makes it easier to work with editing, but when processing single videos, this function is not always needed. To disable it, right-click on it, and in the menu that opens, select "delete transition". After that, you can move on.
Step 4. Replace the audio track
There are two ways to replace sound in video with music or pre-recorded speech in this program. The first one involves working with added files and allows you to set the sound for each fragment separately. The second one adds voiceovers to the entire video. And since we are now considering replacing the sound on the same file, both methods will give the same result.
Method 1. Working with the file

Go to the "Edit" tab and select the "Replace Sound" option. By clicking on the "Add Audio" button, you can use one of the built-in tracks or select a file from your computer. Once added, you can trim it to fit the length of the video you are working with. To do this, click on the scissors icon and move the black markers to the desired positions. Remember to listen to the result to make sure you are not mistaken.
Method 2. Working with a complete project

Go to the "Music" tab and click on the "Add Music" button. The options for selecting and cutting the duration of the voiceover are completely similar to the previous method, with the exception of an important point. In order for the selected track to completely replace the standard audio track in the video, it is necessary to uncheck the "Add music to original video sound" option.
Step 5. Save the processed video

The final step is to save the work done. Go to the Create tab and select the appropriate save option. allows you to save video in any of the popular formats, burn it to DVD or optimize it for viewing on mobile gadgets or publishing on the Internet. After you decide on the choice, the Russian analogue Pinnacle will process and save the video, and you can enjoy the result.
This video editor has the broadest functionality that allows both beginners and experienced users to create their own masterpieces and share them with the whole world. And the section with lessons, located on our website, will help you to quickly master all the features of Pinnacle Studio in Russian.
In practice, many users are faced with the common problem of replacing the sound in a video clip. Most often, you need to replace the sound in a video when the original video has poor sound quality or simply does not suit you with the music. In order to replace the sound in the video, we will use the VideoMASTER program. It is not only a multifunctional video converter to any format, but also a useful utility for editing video fragments. How to work in the program?
Step 1. Download and install VideoMASTER.
In order to replace the sound in the video, first of all, it is necessary to install it. With an average speed of the Internet connection, downloading the distribution kit will take you no more than five minutes. When the download is complete, run the VideoMASTER.exe file. You can get detailed information on working with the program by opening the menu section Reference.

Step 2. Add video to the program.
Now you need to load those videos in which you want to replace the sound into the program. To do this, click the Add button located in the upper left corner of the program. Select the files you want, then click Open. After downloading video files, you can find out all the necessary data about them in the section Information.

Step 3. How to replace audio in a video?
In order to replace the sound in the video, select the menu section Select Sound> Replace Sound. In the window that opens, you can add one or more musical compositions, as well as evaluate the result by running a preview in the player. Any of the added tracks can be trimmed by clicking on the corresponding button opposite the selected file. Further, there are two possible ways to replace the sound.

1. You can press the key Replace now to apply the effect immediately without conversion. The format of the video will remain unchanged.
2. Another option to replace the sound in the video is by using the button Save changes. In this case, the sound will be replaced in the main program window after conversion. If necessary, you can set the desired video settings, select the format, and edit the video. Select a folder to save the video and click the button. Convert. In addition to the sound replacement function, the program also allows you to adjust the volume level when converting.
 How to log into an account using application passwords How to password-protect the launch of a google drive
 Blogging is a profession that you will enjoy
 Howard - for new mail notification