How to copy a WordPress theme. What is cloning and why is it needed
Very often, clients are also interested in ripping a site - in other words, copying a template of someone else's site. Well, and, more often than not, this very design needs to be integrated into wordpress.
This task is both complex and simple:
- Simplicity is that you don't need to make up the design from scratch
- Complexity - very often other people's sites can be kicked out. Or just do the fifth point. A table layout comes across, a layout with errors comes across. In short, there are enough problems.
If you do not have minimal knowledge in layout - save your time -. The cost of ripping a site is usually small and can vary from $ 15-20 depending on the requirements and functionality.
I provide a full range - from the simplest, to complete copying of a turnkey website with installation on your hosting.
How to copy a website design - rip a website
First, I copy the structure of the site. Fully. To do this, you can use a lot of different software, for example teleport pro or its free analogue HTTrack Website Copier. I use the first one, it has a handy feature, which I will talk about later.
I made a small GIF, according to the Teleport Pro settings for parsing the site, so that later it would be convenient to copy the site.
- Select wizard - project generator
- Create browsable copy of a website on my hard drive - save a copy of the site to my hard drive
- Enter the URL of the site whose design you want to copy and the crawl depth.
- Next> Next> Choose where to save your site copy
- Run the project
- Well, watch how the entire site is copied, all files - css styles, html pages, javascript scripts
When the site is downloaded, you will have a normal copy of the site - all files, styles, graphics - everything will be saved to your hard drive. But you don't need all this. Typically, when ripping a site, you only need to save the home page, category page, and internal page. Following this example, I will show you how to copy a website design and how to transfer it to WordPress.
Oh yes. I assume that you understand that ripping a site is a kind of intellectual theft. And stealing is bad. I warned you, and then it's up to you.
In the next article, I will show you how to select the necessary pages from the entire collection of files and save only the files necessary for the template. Well, how then is it all about integrating into the engine, in my case it's WordPress
2 votesGood day, readers of my blog. Andrey Zenkov is with you, and today I will tell you how to copy a website design. Before starting my story, I would like to say that I do not approve of such activities, as it is intellectual theft. Any theft is bad. I hope that you will use the information received for good purposes. Well, sit back, you can grab something to eat. And we start!
Today I will talk about the methods of creating a "mirror" of the site. How to put a template on your site is a separate and very specific topic. You can do this with your own hands, having a deep knowledge of HTML, CSS, PHP and JavaScript. If you do not possess such knowledge, then I recommend contacting specialists in this field.
I recommend using unique templates. They can be ordered from designers, or bought in a store. TemplateMonster ... It offers a large assortment at competitive prices.
 Website Templates and Website Design by TemplateMonster.
 1. The first method - do it yourself
The most traditional option is to do it yourself. No third-party tools, other than hands and, are needed. First, find the site you are interested in. I'll take my own blog as an example. I go to the main page. In any area I right-click. In the menu that opens, select the item "Save page as ...":

The saving process takes a few seconds. As a result, I get a file of the main page and a folder with all the constituent elements. There are images, JS files and styles. The file with permission can be opened with notepad to view the source code.
If you think that the saved files can be easily pulled onto your resource, then you are greatly mistaken. This is a very crude version. Rather, it is only useful for viewing the source code of the page, which can be done in a browser window without saving. I do not recommend using this method, since there is zero sense from it and no one will tell you how to transfer it to (for example) (there is simply no such possibility).
2. The second method is using online services
As you may recall, I am an advocate of using various tools to automate manual work. Even for such cases, an auxiliary software has been developed.
2.1. Xdan.Ru
Free, simple and affordable service. A copy of the site is created in two clicks. All I did was go to the main page, enter the address of my blog and click on the "Create a copy" button. After a few minutes, the process ended and I received an archive with a copy of the site. Here's what I got:

The files you are interested in (in the case of WP) are located in the wp-content folder. The folder "themes - img" contains all the necessary images from which you can rip the site. I did not find any files with styles, but it is easy to upload them through the browser. I go back to my blog page, right-click and select Explore Item from the menu.

I am interested in the Styles window. Then I just select all the styles, copy and paste them into the desired file with the css extension. The advantages of Xdan are obvious - a simple and free project that provides workable material. But, again, further actions will require knowledge or a specialist who possesses such. I have not found similar services on the Internet anymore.
2.2. Recopyrirght
The service is somewhat similar to the CLP. Allows you to rip a site of any complexity. When using for the first time, you can use a test attempt. On the main page in the field "Enter a site" I indicate a link to my blog. After that I press the button "Create a copy".

After the copying process of all files is complete, you can get a copy with most of the resource files. I waited about 15-20 minutes for the process to complete. Expectations were not met. The service gives out a crude version, from which it is difficult to rip and put on your own project. But if you try, you can do it. But whether the result justifies the time spent, if there are many other options, is a big question.
3. The third method is using programs
If online services do not suit you, you can use special software that is installed on your computer.
3.1. WinHTTrack Website Copier
Free utility with a minimum of settings. Allows you to create a complete copy of any site. You can set the copy depth. As a result, you get a local version of the resource, which can be used offline. In the resulting archive, you can find the template files.
3.2. Teleport Pro
Probably one of the best options for making a complete copy of any website. Teleport Pro downloads all directories and subdirectories where you can easily find the template you want. The only drawback is that the program is paid. A trial period of 30 days is given. The license costs $ 50. I recommend this product if you want quality results.
4. The fourth method - using a graphical editor
Namely - Photoshop. The most time consuming, but at the same time the most reliable way to make a copy of the design you like to your resource. Again, if you do not have the skills to work in this program, and also do not know how to typeset a ready-made template, then you cannot do without the help of a specialist.
Honestly, I don't even know how much such a service costs from a designer. You can find the exact price tag on some freelance exchange. Using this method, you can be sure that you will receive a high-quality copy, and it will not be difficult to put it on your site.
For self-study of Photoshop, I can recommend a wonderful course by Zinaida Lukyanova - "Photoshop from scratch in video format 3.0" .

The main advantage is that the project you like does not play a role here. The copied template can be installed on WP, DLE, and any other platforms.
5. What conclusions can be drawn?
Our article is coming to an end, so it's time to draw some small conclusions. First, I am against stealing other people's templates. Put yourself in the shoes of the people who worked to create an individual image, and you will understand everything.

Secondly, for me the best option is to create a copy in. This is the highest quality and most versatile option. I want to end today's story with the expression of Robert Anthony:
"If you do not have your own goal in life, then you will work for the one who has it."
If you want to gain independence, set yourself more and more new goals, and also do not forget to achieve them by any means (legal, of course).
On this positive and motivating note, I say goodbye to you. Don't forget to subscribe to my blog to keep up to date with all new articles in the future. Goodbye, Andrey Zenkov was with you.
In general, the practice of cloning is considered unethical. However, if you are thinking about cloning in the context of duplicating a WordPress site, then this is a completely different matter. In today's article, we will show you how to make a clone of a WordPress site in seven easy steps.
What is cloning and why is it needed?
The idea behind cloning a site is simple: you make an exact copy or duplicate of one WordPress site and apply it to another site. Are there real reasons for cloning? Of course!
One of the options could be your move to a new hosting or domain. Cloning a site will save you several hours of work.
Also, when developing a site for a client, after the end of the project, you can clone a test site to the client's site.
Finally, you can clone your running WordPress site to your local server for debugging and development purposes.
Cloning a site is not difficult at all, and here's how you can do it step by step.
Using BackupBuddy to Clone a WordPress Site

In this article, we will be using the BackupBuddy plugin. BackupBuddy is a WordPress backup plugin that not only allows you to create site backups, but also provides the ability to easily deploy your site from a backup. We will show you how to use this backup restore tool to clone any WordPress site.
1. Installing and configuring BackupBuddy
First thing you need to do is install and activate the BackupBuddy plugin. After activating the plugin add a new menu item called 'BackupBuddy' to your WordPress admin bar. Clicking on it will take you to the BackupBuddy setup wizard.

The setup wizard is not complicated. First, you need to provide an email address. Then you need to enter a password.
The password will be used to restore your site. The next option will be to choose a location for storing the backup. Finally, an option will be offered to configure automatic backups.
BackupBuddy can store your backups on cloud services such as Stash, Amazon, Rackspace, and Dropbox. You can also save backups on your server or send them to yourself by mail.
After finishing working with the wizard, click on the save changes button to continue working.
2. Backing up your WordPress site
BackupBuddy will automatically start the backup process as soon as you close the setup wizard. When finished, it will show you the options: download the backup or send it to the cloud.

You can create a fresh backup at any time by visiting the page BackupBuddy »Backup.

3. Preparing to clone your WordPress site
BackupBuddy offers a very simple site cloning / migration tool. Just go to the page BackupBuddy »Restore / Migrate to start the cloning process.
First, you need to download the importbuddy.php file to your computer.


4. Uploading backup and Importbuddy to the new site
Now you have a complete backup of the site in zip format and the file importbuddy.php, then you need to upload them to the new site.
The new location can be a live site, or a site on your local server. If the site is on local, then you just need to copy and paste these files into a subfolder inside your htdocs or www directory, like this:
C: \ wamp \ www \ mynewsite \
If the site is on the network, then you will need to upload these files to the root directory using an FTP client.
5. Run the import script
After downloading these two files, you need to navigate to the importbuddy.php file in your browser. It will be located at an address like:
Http://www.example.com/importbuddy.php
Change example.com to your domain name.

You will be asked for the password importbuddy. You created this password in step 1 or entered when downloading the importbuddy file in step 3.
After entering the password, you will see that importbuddy has already found your backup file in the zip. Now just click on the Next Step button to continue.

Importbuddy will extract your backup file, and after completing the process, you will need to click on the Next button.
You will find yourself in the settings section of the site address and database.

Importbuddy will automatically pull up your new address. It will also show you the previous one. Below you will need to specify the details of access to the new database. Enter the name of the new database, login and password.
If the database has not yet been created, you can log into the hosting control panel and create it. If you are transferring the site to a local server, then the database can be created using phpmyAdmin.
After specifying the details of access to the database, click on the button for testing the database settings. If the information was entered correctly, you will see the following result:

After exploring how easy or Mac is, some of our users asked how to move a functioning WordPress site to a local server. We have shown earlier how. This article is the complete opposite of this action. In this article, we will show you how to migrate a live WordPress site to a local server.
Why might there be a need to transfer a running WordPress site to a local server?
Most people create a copy of their working site on a local server to test new themes, plugins, and to implement various enhancements. This allows you to take the theme you are using with all the content and test any possibilities without fear of breaking your site. Many users copy their site to a local server to practice WordPress and improve their coding skills by working with live data.
Even considering the fact that you can do any testing using dummy content in WordPress, real data gives you a better idea of how any changes will affect your site.
Important note: whether you are moving your wordpress site to a new domain, or from wordpress.com to a separate hosting, or to your local server, always back up your site first. We recommend using BackupBuddy to create backups. You can also back up your site using BackWPUp, or create a manual backup.
Moving a WordPress site to a local server using a plugin
The first thing you need to do is install and activate the Duplicator plugin on your live site. The Duplicator plugin allows you to create a copy of your entire WordPress site. It can be used to move a WordPress site to a new location; it can also be used as a backup plugin. Upon activation, the plugin adds a new item Duplicator to the admin menu. Clicking on it will take you to the screen for creating archive copies of the site.
To create a new archive, you need to click on the "Create New Package" button. Duplicator will start creating an archive for your entire site. This may take a while, depending on how much data is present on your live site. Once the archive creation process is complete, you will be redirected to the archives screen, which displays the newly created archives with their installers. To move your site, you will need to download a zip file to your computer as well as an installer.

The site on your local server will need a new database, so you will need to create it with phpMyAdmin. Once you create the database, you will need to copy the archive and install the resulting file to an empty folder in the web directory of your local server. To run the installation script, you need to open the installer file in your web browser. For example, if you pasted both files into the / test-site / folder, you can run the installation script by navigating to the following URL: http: //localhost/test-site/install.php. You will see the Duplicator installation script, which will look like this:

On the screen shown, you must enter your local server database information. The Host field is usually localhost. If you did not create a new user for MySQL on your site, then in this case, enter username as root. If you are using a password for the root user, then enter this password, otherwise leave the field blank. Finally, we enter the name of the database.
The installer will extract your database and WP files from the zip archive and import them. This may take some time depending on the size of the archive. Once the installer extracts the files and imports the database, you will be taken to the update page.

On the update page, you need to specify the URL of your working site and the URL of the site on the local server. The plugin automatically detects these values. You just have to make sure that they were defined correctly, and then click on the Update button. The plugin will update the urls in your database.

Ready. You have moved your live site to a local server. The installer will show you a successful completion page. You will also need to update the permalinks on your local server and delete the installer file along with the archive.
Manually transferring a running WordPress site to a local server
In the event that the plugin does not suit you, you can use the manual transfer of the site to your local server. The first thing you will need to do is manually back up your site. We recommend using phpMyAdmin to export your database.
To export your live site's database, you have to log into the cPanel console and click on phpMyAdmin. In phpMyAdmin itself, you need to select the database you want to export, and then click on the export tab at the very top of the page.

phpMyAdmin will ask you which method you need - fast or arbitrary. We recommend using an arbitrary method and choosing zip as the compression type. Sometimes WP plugins can create their own tables inside the WordPress database. If you are no longer using this plugin, then an arbitrary method will allow you to exclude such tables. Leave the other options unchanged and then click the Go button to download the database backup in zip format.

Once you download the database backup, the next step is to download your WP files. To do this, you will need to connect to your WordPress site via an FTP client such as Filezilla. Upload all your WordPress files along with the folder to your computer. It may take some time for the files to download, depending on the amount of data on your site.

If you downloaded all the files, not just the wp-content folder, then just copy these files to the folder on your local server where you want to install WordPress.
On your local server, you will need to create a database for your WordPress site. To do this, you need to open http: // localhost / phpmyadmin / in your browser and create a new database. After creating the database, click on the Import tab at the very top of the page. On the next screen, you need to click on the Choose File button to select the exported WordPress database file and then click on the Go button. phpMyAdmin will import your database and show you a success message.

Now that your database is installed, you need to update the URLs within the database that link to your live site. You can do this by executing SQL queries in phpMyAdmin. Make sure to select your local site database and then click on SQL. In the SQL screen in phpMyAdmin, paste the following code. Make sure to replace example.com with your working site and localhost / test-site with your local server.
UPDATE wp_options SET option_value = replace (option_value, "http://www.example.com", "http: // localhost / test-site") WHERE option_name = "home" OR option_name = "siteurl"; UPDATE wp_posts SET post_content = replace (post_content, "http://www.example.com", "http: // localhost / test-site"); UPDATE wp_postmeta SET meta_value = replace (meta_value, "http://www.example.com", "http: // localhost / test-site");
Ready. Your website has been completely moved to your local server. Now you can test different possibilities.
This tutorial will show you how to copy a website WordPress from an online server to a local one.
After saving the backup files to your computer, launch the local server software (in our case, we use WAMP). Open up WAMP to run the program.
Then, open the folder wamp / www on the local server. Copy .zip site file from online server to folder www and unzip it.
Here you will see all the files.

You can give a specific name to this WordPress folder on your local server. We gave it a name wordpress in the strong> www folder.

Rename the file wp-config.php... You can also completely delete this file.

Create a database on your local server.
Open your browser. Enter localhost / phpmyadmin to the address bar.
Click on the tab Database(Databases).

Create a new database.
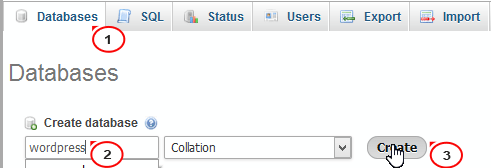
Click on this database to open it.
You will need to import the file .sql from the backup file to the new database.
Before that, you need to make changes to the file .sql to change an existing link to a link on the local server.
Open the file .sql in the code editor. Use the function replace(replace) code editor to change the link to the link on the local server.
In our case, these are: http: // localhost / wordpress.

Come back to phpmyadmin on the local server. Click on the button Import(Import).

Find file .sql to which you have made changes. Click on the button OK(Go) to import it.

You will see a message that the import was successful.

In the last step, we will connect the site files to the database.
Open a new tab in the browser, enter the link to the site on the local server in the address bar of the browser.

The installation page will open. Follow the steps on the screen to complete the installation.

Create a file wp-config.php which was previously deleted / renamed.

Add database details. The table prefix must be the one that you used for the site on the online server, this is - wp_.

Follow the steps shown on the installation screen. Log in using the same login details as for the online site.

The site has been successfully copied to the local server!

First, back up your local site. You can check out the tutorial on how to back up your WordPress site,.
Copy files from the online server to your local server.
You can also check out the detailed video tutorial below.
 How to log into an account using application passwords How to password-protect the launch of a google drive
 Blogging is a profession that you will enjoy
 Howard - for new mail notification