How to add a toolbar in a moss. Hidden Firefox settings: where to find them and how to enable them
Is the name of new versions of the browser, starting from 57.0, which introduced an updated interface and many other changes.
Unfortunately, with the introduction of a new one, some old functionality is sometimes changed or removed. This is what Mozilla did with the Download button on the Firefox toolbar.
We return the button "Download"
Previously, the Downloads button was always displayed in the toolbar, but now it only appears when the browser downloads something. Otherwise, it remains.
In fact, Mozilla has applied a new "Auto-Hide" attribute to the button to hide it until the user wants to load something using the browser.
To add the "Downloads" button back to the toolbar, you need to do some simple manipulation with the settings.
- Right click on the toolbar or tab bar and select the option “ Personalization". The toolbar customization window will open.
- The Downloads button is already present in the Firefox toolbar. Click on it with the left mouse button and you will see a pop-up menu “ Auto hide". The checkbox is on by default.
- Uncheck the Auto-Hide checkbox and click the Ready"To look like the screenshot above. That's all. The Downloads button will now always remain visible on the Firefox toolbar.


The FireFox toolbar provides easy and quick access to all sorts of typical browser functions. This is a very convenient panel, thanks to which the user can easily access this or that feature. Today we will talk about how to customize this toolbar in FireFox.
How to show or hide toolbars in FireFox browser
The vast majority of toolbars in FireFox can be either hidden or shown. What will be displayed and what will not be displayed is up to you. To hide or show the desired toolbar, right-click on the tab bar, in the context menu that appears, click on the desired toolbar, after which it will appear or hide.
There are 5 panels in total, namely:
- Menu bar - FireFox standard browser panel with standard functions such as File, Edit, Help, etc. This panel is hidden by default in Windows 7 and Windows Vista, as well as in Windows 8. In order to temporarily show it, if it is hidden, press Alt.
- Tab bar - A standard bar that cannot be hidden in any way, all your tabs are located here.
- Navigation bar - This bar contains navigation tools, namely Home, Back, Forward, Address bar, etc. This bar can be hidden at will, but it is turned on by default.
- Bookmarks Bar - A standard hidden bar that stores all your bookmarks.
- Add-ons panel - Located at the bottom of the browser, a standard hidden panel that stores the extensions installed and launched by you. It is this panel that provides access to running extensions.
How to customize toolbars
All toolbars are customizable, and to customize them, you need to open the toolbars settings window. To do this, right-click on the tab bar. In the context menu that appears, select the item " Settings“, After which a window for setting up toolbars will open.
By dragging the icons, you can place them where you want and how you want. This is done very easily. In the list of icons, select the one you need and drag it to the desired panel. Also, you can separate groups of icons using a special separator icon.
FireFox provides ample opportunities in terms of customizing icons and panels and it's just great.
The creators of the Mazil browser left for the user the right to customize the interface. Thanks to this feature, each user can make the toolbar exactly what he needs, customize the buttons and blocks he needs.
If you have not downloaded this browser yet, click and download it for free from our server!
In recent versions of the browser, the menu bar is hidden by default and the user can only see the tabs. To some extent, this is convenient, because we do not use the settings that often. However, the disappearance of this panel can be confusing for beginners, so let's figure out how to get everything back.
How to get the panel back in Mozilla Firefox
- If after starting the browser its windows are not displayed, then you have opened it in full screen mode. The F11 key on your keyboard can be used to exit this mode. Alternatively, you can move the cursor to the top of the screen, wait until the panel is lowered, then call the context menu with the right mouse button and select "Exit full screen mode".

- In order to customize the display of tools in Yandex.Bar, open its settings by clicking on the gear icon. In the dialog box that appears, on the "Buttons" tab, select the buttons that suit you from the left column, the buttons you have installed are also shown in the right column, you can delete unnecessary ones.
After all of the above actions, the panel with the browser tools menu will be constantly visible. If it is much more convenient for you to open many tabs in the browser at once, then the best option would be to arrange them in several rows.
Video: How to set up Yandex.Bar
It so happened that web developers prefer Firefox more than other browsers. A number of useful add-ons provide significant assistance to their work. In this article, we will look at those of them that, in our opinion, will certainly be necessary for you for successful web programming. In addition, we'll cover some of the most significant properties of these add-ons.
First of all, you need to install Firebug.
Firebug
Firebug is a must-have addon for any web developer. If you don't know where to find it, go to. You will probably have to restart your Firefox in order to activate Firebug.
After that, you can view Firebug in one of the following ways: in the menu Tools> Web Developers> Firebug or by right-clicking and choosing from the menu that appears Inspect Element with Firebug.
There is another option: find the Firebug icon in Firefox, click on it, and the add-on window will appear.
Firebug is very similar to the developer tools in Chrome. It has a panel for viewing HTML structure and styles, as well as a console panel for reviewing errors, warnings, and logs. But that's not all: we have a few more tips that we hope you find helpful.
Resizing a block
An HTML element is made from the CSS box model, which in turn consists of a border, padding, and padding. It happens that we need to change these indicators. In this case, you need to select the element that you want to change and go to the "Location" panel.
 Here you will find an illustration of the CSS box model, as well as its characteristics such as width and height. Although these two values are not listed in the CSS, this tool is smart enough to define them.

If you want to convert them, click on the value and use the up (to increase) and down (to decrease) arrows.
Computed Styles
You are probably wondering why certain styles are often not applicable. The easiest and quickest way to learn about this, especially if you have hundreds of styles, is to explore the Computed Style panel. In the example below, the text color anchor tag has been changed to the .button class, which in turn is changed to .button.add.

Exploring the Font Family (Easy Way)
You've probably come across a lot of cipher families in the font-family property in CSS. Unfortunately, this option does not help us find out which font the browser is using. To fix this problem, you can install a Firebug extension called.
When the installation is complete, load your webpage. Now you can clearly see which font is currently being applied. In our case it is Helvetica neue.

Analysis of work
It may seem trivial, but in. A site that loads faster is considered more intelligently designed and higher in terms of content. Thus, speed cannot be ignored.
Network panel
The first thing you need to check in order to evaluate the performance of a website is the network bar. It records the HTTP request for your site as it loads. The screenshot below shows a page that loads 42 requests and takes about 4.36 seconds to load.

Subsequently, you can categorize HTTP requests by their type (HTML, CSS and Images).
YSlow!
Alternatively, you can install the Yahoo! Firebug extension. After activating it, an additional panel will appear on the screen, which is called Yslow !.

Yslow !, like the web bar, will record the page's activity as it loads, then tell you why the site is slow and suggest solutions. In this example, we tested a web page and it scored 86, which corresponds to an “OK” rating.
Page Speed
You can also install a plugin. It is like Yslow !, which tests website loading speed, although the results may vary slightly. The example below shows how this same page scored just 82 points for Page Speed.

Web Developer Tools
Obviously, these are tools for web developers with a number of useful options. Next, we will tell you about one of those that we liked the most.
Viewing images
It happens that we need to get information about an image from a web page. Most often, netizens start digging into browser properties or right-click on an image and select "View Image Information":

But this method cannot be called effective if this procedure needs to be done with a number of images. In this case it is better to use the "Images" addon option. It can be easily accessed through the Image menu on the toolbar.

This example demonstrates how we display the image and file size at the same time:

Firefox built-in tools
Recent versions of Firefox have many more built-in properties for web developers, including:
Inspect Element
At first glance, it might seem that Inspect Element from Firefox is no different from Inspect Element in Firebug, but it is not.

We will not talk about the Inspect Element options as they are identical to the Firebug HTML and CSS panels and differ only in layout and design. The tool has one distinguishing feature that you should definitely try - 3D viewing. Using it, you can see all the details of the web page. To activate, click the "Firefox Native Inspect Element" button located in the lower right corner of the page. This is what the 3D view looks like:

Although I don't use this new Mozilla feature as often as everyone else, it can be very useful in some situations.
Web Design View
Due to the growing popularity of Responsive Web Design, Firefox has created an appropriate bookmark in its browser. Thanks to this tool, you can evaluate various parameters of a website without resizing the browser window.
Go to Tools> Web Developer> Web Design View. Here's what you'll see in the end:

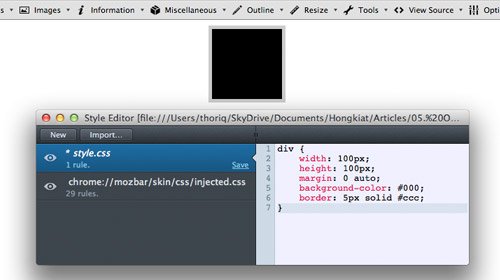
Style Editor
Finally, if you work with CSS a lot, then you will definitely love this property. In versions of Firefox 11 or later, the Style Editor became a built-in tool.
This property is just as valuable as the Web Design View. It allows you to edit CSS, see the result immediately in the browser, and save changes that propagate directly to the original CSS file.
The Style Editor is available in the following menu: Tools> Web Developer> Style Editor.
In conclusion
Firefox addons have a lot of options, and the ones we've covered today are just a few of them.
Firefox 10, the release of which took place on January 31 (the day of the release of the beta version of Firefox 11), finally collected all the accumulated developer tools and supplemented them with Page and Style Inspectors (page inspector and style inspector).
In some ways, these tools are similar to the Firebug tool, however, this does not prevent them from retaining the uniqueness that is characteristic of the tools from Mozilla. Rather than copying the Firebug or WebKit tools, Mozilla decided to keep only the most essential features. This was done to facilitate and simplify the Mozilla user experience.
Has the new approach turned out to be successful, or will the developers prefer Firebug? Let's explore.
You can call the Page Inspector by right-clicking on the web page and choosing “Inspect” (I have to inspect the element). (More recently, Firebug changed its context menu bar to ‛Inspect element with Firebug“ to distinguish it from other built-in developer tools). A purple line appears at the bottom of the screen containing a list of the parent and child of the selected item.

Parent and child elements can be selected by clicking on them with the mouse button. To see adjacent elements, right-click on the element. There are three buttons: ‛Inspect“, ‛HTML“ and ‛Style“. As you can see, this layout is much simpler than the sea of labels and buttons that Firebug has.
By clicking on the HTML button, we will see a panel that shows the hierarchy of HTML tags that make up your page. In this panel, you can expand and collapse tags, and edit their attributes. When you click on the "Inspect" button, you start hovering over the elements and thus you can select those elements that you want to inspect. When inspecting, the element you have selected is highlighted by Firefox, while the rest of the page, by contrast, is shaded.
To call the Style Inspector, click on the Style button. The Style Inspector shows the CSS rules that apply to the selected element. In the Style Inspector, you can switch from ‛Rules“ to ‛Properties“. The ‛Properties“ section shows the computed CSS property values of the selected element, along with links to Mozilla documentation for each property.

In fact, we've covered everything Page and Style Inspector "s do. There is no Web console and JavaScript editor introduced in earlier versions of Firefox, they have become separate tools. Also there is no network activity monitor, nor the‛ edit as property HTML ", no performance-testing tools, no new tags can be added to the page, no change in element state. There is also no layot panel for viewing width, padding and margins. element.
Despite these limitations, I continue to use the Page and Style Inspector "s. I love their user-friendly interface, great looks and thoughtful panel layout. They are fun to work with and can solve almost every problem I have.
Because of their simplicity, the inspector's interfaces stay relevant even when I reduce the size of the window to test the sensitivity of the design. When the inspectors can't help me, I switch back to using Firebug or the Web Developer Toolbar. - developer)

Mozilla tooling does not need to repeat the entire set of tool properties of its competitors, because specialized properties of these tools already exist in Firefox applications. This is where the Firefox developer tools are unique.
Firefox 11 version
New solutions and features can be expected in future Firefox releases. The developer tools in Firefox 11 can render a page as 3D tag stacks. Each time a tag is nested, the stack grows higher. This property is surprisingly useful, as you can tell at a glance whether an element is within the erroneous parent element. Being able to see how tags overlap will save new developers a lot of the problems associated with block elements.

Also in Firefox 11 there will be a style editor. With this editor, you can create new style sheets. This editor differs from text ones in that changes are applied instantly as soon as you finish typing.
It's nice to see that CSS editing can be done directly through the browser, rather than using programs like Espresso. New features are expected this year, including a "Application Performance Assistance Tool".
Despite all of the above about Firefox 11, comparing firefox11 developer tools to Firebug (or WebKit developer tools) is like comparing iOS to Android. So the toolkit from firefox 11 has a simple, intuitive interface, interesting innovative ideas are implemented in it, but the number of functions tailored for a professional is extremely small.
For example, firebug has all the functions you can think of, it can be configured as soon as you want, there is no need to talk about simplicity and intuitiveness. However, unlike iOS and Android, these tools can be used simultaneously. It's important to remember that Mozilla continues to support Firebug and has announced that it has a long way to go.
Which tool is right for you? It depends on which features you need and which not, and how you feel about finding additional extensions for your chosen tool. As much as you think about developer tools, this is an area where Firefox is hard to blame for copying WebKit.
 How to log into an account using application passwords How to password-protect the launch of a google drive
 Blogging is a profession that you will enjoy
 Howard - for new mail notification