How to take a screenshot of a page on a PC. How to take a screenshot on different devices
Screenshot (English screen - screen, shot - snapshot) is a screenshot of the monitor. Using the functions and programs of the operating system, as well as additional tools, the user has the opportunity to take a picture of the entire monitor screen or a separate part of it. Screenshots are placed as illustrations in the software installation instructions and attached to the manual, placed in textbooks and manuals.
PC users use screenshots:
- when communicating with server technical support services;
- to copy web pages of interest;
- confirmation of electronic payments or orders;
- to send by email;
- when communicating in social networks.
- press the PrintScreen key;
- open Paint (path: Start - All Programs - Accessories - Paint);

- click the "Insert" button in the upper left corner: the picture will appear in the field;

- to save the file, you need to click the button in the upper left corner;

- Click "Save As" in the menu. In the field that appears on the right, you can select the format from the list: PNG, JPEG, BMP, GIF;

- when the format is selected, the "Save as" window appears; in the second line, you can select the location where the file will be stored;
- after selecting a disk or folder on a disk, click "Save" at the bottom of the window on the right.

- press the Start button;
- select "All programs";
- find and open "Standard";
- open Scissors.
- apply "Scissors" - this is possible if you have Windows 7 or the latest version of the OS;
- use an additional image editor: PicPick, EasyCapture, DuckCapture, Clip2Net or others;
- take a screenshot using additional equipment - a digital camera, which is the least convenient, therefore it is acceptable only as a last resort.
The ability to transfer a picture quickly from a computer online helps both in business correspondence and in friendly communication. It is useful for a novice PC user to learn how to take a screenshot of the screen, and where it is saved. Your attention is invited to the instruction, illustrated by the same screens received from the monitor.
Screenshot without programs in Windows
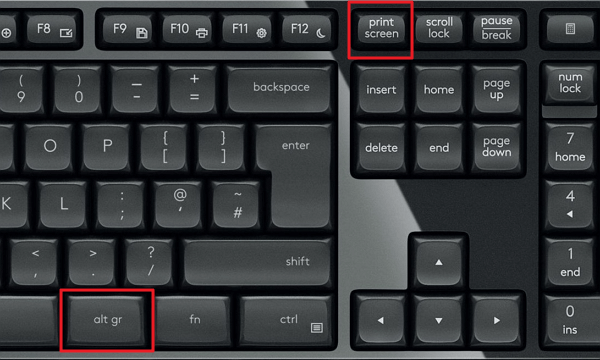
Taking a screenshot of a monitor is a function of the computer's operating system. No additional software is required. Just press the PrintScreen key. Depending on the keyboard model, the key may be called PrtSc, PrtScr, PrnScr, or PrtSc/SysRq. When pressed, an instant copy of what is shown on the monitor occurs.


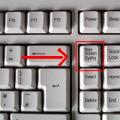
Photo: classic layout of the PrintScreen button 
Photo: PrtSc button options
Like all copied material, the snapshot is stored on the clipboard. To save it on your computer as a file, you can use any graphics editor.
The easiest way to save photos is through Paint, one of the standard Office utilities. To do this, follow these steps:
By default, the file is saved on the C drive, in the Pictures folder in Windows 7 or My Pictures in Windows XP.
A screenshot can also be immediately sent by e-mail, printed. You can also paste it into Word.
To do this, you need to do:

In this case, the screenshot is saved along with the Word file. The resulting image can immediately illustrate the text. You can work with it like with any picture inserted into Word: change the quality, size, position, compress, crop, copy...
Screenshot of the whole screen
The software utilities allow you to take a screenshot of the entire screen. With the help of "Scissors", you can select the entire field completely and save the picture or select the fragment of interest. To get an image from a laptop, just click keyboard shortcut Fn + PrtScn. The picture immediately opens in Paint - it remains to save it or select another task: print, send by e-mail. Most of the above image editors allow you to take a screenshot of the entire screen immediately after launching them and pressing the PrintScreen key.
Video: Screenshot in Windows 7
Image from a separate part of the monitor
Snipping Tool and Fn + Alt + PrtScn on any of the laptops to save an image of the active window - this is the fastest way to get a snapshot of the desired fragment. A screenshot of the active program is also performed by a key combination Alt + PrintScreen.
Scissors is a very simple graphics editor.
To open it, follow these steps:
The image you are interested in must be on the monitor before opening the "Scissors": when they are in operation, it will not be possible to perform actions outside the program. It is better to save the file in JPEG - editing pictures of this format, you get more options.
Consider the work of the image editor. Program PicPick not the most complex, but it has a sufficient number of functions for working with images, including the function of creating screenshots. If you open PicPick and press PrintScreen, the image of what is currently on the monitor immediately appears in the working field.

By default, in the same way as in Paint - the image is saved in the Documents folder. If you have previously worked in Paint, then understand how to take a screenshot of a separate part of the screen in PicPick, not difficult.
You need to do the following:

Working in PicPick, you get the opportunity not only to save the resulting screenshot in the selected format, but also immediately insert it into the desired program: Excel, Word, Power Point.
Custom area
You can select an arbitrary area of the screen by selecting "Custom area" from the list of tasks. The cursor moves like a pencil, highlighting the outline of the area you need. The shape of the selected area depends solely on your vision of the future screen and your confident command of the mouse.

Selecting an arbitrary area of the PC screen, copy the desired fragment. But when using such a screenshot as pictures in Word or Power Point, you get it, after all, in the form of a rectangle. A white background is formed around the picture you selected with the cursor.
Screenshot program
An example of working with Paint can be recognized as a classic way to get a screenshot. However, in Windows 7 in the "Standard" section there is still a very simple program "Scissors", with which you can select and "cut" any part of what we see on a working monitor. The figure shows how a screen of the Scissors work process was made through Paint.

Compact window "Scissors" does not interfere with the review. The cursor captures the entire screen or selects the desired part of it. Minimum editing tools. You can choose PNG, GIF, JPEG format to save. If you only need a fragment of a picture of a working monitor in your work, you can resort to processing the image obtained in Paint, that is, cropping it. It's cumbersome and archaic. The task is simplified by the aforementioned "Scissors".
There are many additional programs with more advanced features: graphic viewers, converters, image editors. Depending on your goals, choose the most suitable one: simple - for quick information, or voluminous - for editing, converting photos like Photoshop. A simple editor has the necessary functions to get a screenshot of the entire screen or a separate part, to create labels, draw, add labels.

More complex programs have the functions of correction, deformation, transformation, converting images, creating videos, presentations:

You can use an online editor like Pixtick. It has the necessary set of functions for obtaining screenshots and processing them. Some programs for digital cameras, photo and video converters also have a capture function. In addition to this, they have dozens of other functions, which makes the work longer if the user has not yet acquired the necessary skills.
Making without printscreen
The PrintScreen key may not function due to a defective or clogged keyboard. If the print screen does not work, this will limit your options a little.
To get a screenshot without the PrintScreen key, you can use one of the following methods:
It is still better to install one of the above image editors on your computer, since the standard operating system utilities can fail and do not always have a sufficient set of tools and functions.
Increasingly, when working at a computer, and on the Internet in particular, we need to take screenshots of pages.
Most likely you have already needed to do this in some game, or send some kind of report in the form of a screenshot of the screen, to confirm your words.
Well, or it happens that the interlocutor does not quite understand what they want from him and you need to literally on the fingers, or rather, on the skin, select some element on the page and indicate the action.
It is for these purposes that this article is to solve your problem, which does not give peace and help.
If you can't take a screenshot using the Print Screen key
Let's first take a look at how a screenshot of a page with the Print Screen key is taken, namely, without any additional programs.
Stage 1: put the screen in the clipboard
To do this, if you have a large keyboard (with a numeric keypad), then simply press the PrtScr key.
In this case, a screenshot of the entire screen will be taken and placed in the .

If you want to “take a picture” of only the active window (in the event that several windows are open in Windows), then you need to press the Alt + PrtScr key combination. That is, hold down Alt and, as it were, add PrtScr to make everything work.

If the key combination Alt + PrtScr does not work for you, then find the Fn key (near Alt) and read Fn + PrtScr.
This often happens on a laptop, where the keyboard is small and does not have a number pad on the right.

At this time, you can be on any site, or just in Word or another program, or play a game and press a combination of these keys to take a screenshot.
At the same time, we want to note that you will not see any information that the keys worked. In order to understand that the screen is made, you need to go to step 2.
Stage 2: paste the picture taken into the graphic editor
After we have completed the first stage, we launch the standard Paint program that is available on any Windows OS:

And then just in the program window, press the key combination "Ctrl + V"


The screenshot will be pasted into the program from the clipboard. Now you just need to select "Save" in the top menu, or press the key combination "Ctrl + S" and select a location on your computer to save in any of the available formats: jpg, png, gif.
If you wish, you can stretch or compress it.
Taking a Snapshot of a Page in Windows 7 Using Scissors
If you have a Windows 7 operating system, then you can do without the keys described in the previous section, and without all kinds of inserts.
You just need to run a standard and very convenient program called "Scissors" (Snipping Tool).
You can find it in the Start menu. If it is not visible there, then use the search, just as we searched for Paint.

Immediately upon starting the program, the cursor will change to a cross. By holding the right mouse button, you can select the desired area of the screen, release the button and the screen will automatically be made.
This mode is called Rectangle. It is by default. But you can choose other options from the menu, from the drop-down list: “arbitrary shape”, “window”, “full screen”.

After the screenshot is taken, save it to your computer with the keyboard shortcut "Ctrl + S".
Screenshot program Lightshot
Download software by button (for Windows):
Download Lightshot for free
or go to offsite https://app.prntscr.com/ru/. There is also a version for Mac.

In everyday life, a large place is occupied not so much by live communication as by the exchange of information over the Internet, and then there is a need to transfer, for example, an episode from a game, a text or its fragment. This may be an illustration for a user learning a new program, or other information that is convenient to transfer as a snapshot. Screenshot or screenshot is a snapshot of an image from the computer screen. In fact, there are several ways. It is worth considering some of them.
Ways to take screenshots using the OSWindows
As the simplest path that does not require additional software, Paint is perfect - the simplest one that comes with MS Windows. To capture an image from the entire computer screen, just use the "Print Screen" key on the keyboard, then go to the "Start" menu and select "All Programs", then go to "Accessories" and start Paint. In the program, you need to select the items "Edit" and "Paste". To save the received screenshots from the screen, you must click "File" and "Save", and you can select the image standard. To save a screenshot from one window (usually the active one), you can use the "Alt + Print Screen" keys.
Screenshot programs
Another useful program is called Magic Screenshot. It is not very different from the one described above, and how to take a screenshot on it, too. Before starting it, you can get hints on correct operation. Just like Floomby, the Magic Screenshot website publishes user screenshots and provides links to the images they have created. Screenshots can be described and touched up using the Brush tool. In the program settings there is a function for choosing the format in which the image will be saved, it can be png bmp, jpeg.
More complex and equipped with more options is the Jing program, which, however, has one drawback: it is only available in English. How to take a screenshot, tells the video posted on the website of the program. Among the positive characteristics of Jing, we can mention the convenience of selecting an image using a frame. The program itself recognizes the image, a rectangular selection area is set with one click. She can save the image to the computer's hard drive, post it to screencast.com, or place the image in a graphical editor to paste it into. With the help of the program, you can create both simple pictures and screenshots in video format. This is useful when it is necessary to produce instructions for users who are learning to use the computer. For the same purpose (creating a screenshot of a video), the free SnapaShot program is used.
Screenshots on the screen of mobile devices android
Android smartphone owners also have the opportunity to take pictures from a computer monitor to their mobile devices. To do this, you must simultaneously press two buttons: power and return, volume down and turn on the phone, or long press the "Recent programs" button. In order to get a screenshot of the android screen, you can use the ADB program, which must be installed on your computer. It should recognize the android tablet, after which you can shoot from the screen.
On the web, you can often find screenshots of the entire desktop, individual windows, or even arbitrary areas of the screen. Most often, such screenshots are posted in setup instructions or when asking for advice on solving problems with a computer. In order to make such a picture, you do not need any additional programs, you can only use the keyboard and standard tools that are available in any version of the Windows operating system. This is what this instruction will be devoted to, here we will tell you how to take a screenshot on a computer using the keyboard.
How to take a screenshot of the entire screen using the keyboard
Taking a screenshot (screenshot, photo of the monitor screen) of the entire desktop at once is quite simple. To do this, simply press the Print Screen (Prt Scrn) key. Typically, this key is located in the upper right side of the keyboard, next to such keys as Scroll Lock and Pause Break. After pressing the Print Screen key, a screenshot of the screen will be taken and placed on the clipboard. In other words, the screenshot will be copied and ready to be pasted into a program that knows how to work with images.
In order to get a screenshot placed on the clipboard in the form of a finished picture, it must be saved. Any graphic editor is suitable for this. However, the easiest way is to use regular Paint, which is available in any version of Windows. To start Paint, open the Start menu and type in the search "Paint"Or use the list of installed programs.

After opening the Paint program, paste the screenshot from the clipboard using the Ctrl-V keys on the keyboard or use the Paste button on the toolbar.


After saving, you will receive a screenshot as a PNG file. In the future, this file can be edited in any graphic editor, uploaded to the site or sent by mail.
How to take a screenshot of a separate window using the keyboard
If many people know how to take a screenshot of the entire screen, then most users do not even know about the next way to get screenshots. This is because Windows can only take snapshots of one single window. This method allows you to quickly take a screenshot of the desired window using the keyboard and not edit the resulting image, trying to cut off unnecessary parts from it.
In order to take a screenshot of an individual window, you must open the window you need and make sure that it is active. That is, the window should be at the very top among all open windows. To make the window active, simply click on it with the mouse. After that, you need to use the Alt-Print Screen key combination on your keyboard.
By pressing the Alt and Print Screen keys you get a snapshot of only one active window.
As in the previous case, the resulting image is automatically copied to the clipboard and in order to save it you must open a graphics editor (for example, the same Paint), paste the image and save it as a file.
How to take a screenshot of an arbitrary area of the screen
In order to take a screenshot of an arbitrary area of \u200b\u200bthe screen, one keyboard is no longer enough. In this case, you must use the program for creating screenshots " Scissors". This program is included with Windows 7/10 and can be launched using the Start menu.
To run Scissors, open the Start menu and go to " All programs - Standard - Scissors or just use the search.

Scissors is a very handy application that allows you to take screenshots of any part of the screen, add comments and notes to the screenshot, and immediately save the result as a picture in PNG, GIF and JPG formats. Using " Scissors"You will not need to save screenshots using Paint or another graphic editor, this can be done directly from the program.

After launching the Scissors program, you will be prompted to select the screen area from which you want to take a picture, this can be done with the mouse. Once the desired area of the screen is selected, it will be copied into a window where you can do basic editing of the resulting image.

The following tools are available in this program:
- Pen - with it you can add handwritten notes directly on the resulting screenshot;
- Marker - a tool for highlighting important elements in the picture;
- Eraser - a tool for removing inscriptions made with the Pen and Marker tools;
- Submit snippet- sending the received picture by e-mail;
- Copy - copy the resulting image to the clipboard;
- Create Fragment- a tool for creating a new snapshot;
After you have finished working, you can save the screenshot as a file, to do this, use the button " Save"On the toolbar or open the menu" File - Save As».

After saving, the picture is ready for use in other programs or sending over the network.
Professional programs for taking screenshots
Despite the fact that Windows 7 and Windows 10 allow you to take screenshots using the keyboard and without using third-party programs, if you need to take screenshots regularly, it is better to install specialized software. Such programs can greatly simplify the process and save you a lot of time. We described several such applications in the article "".
One of the best programs of this kind is PicPick. This program has many features and is completely free for home use. You can download it can be downloaded from .

PicPick allows you to:
- Create screenshots of the entire screen at once, a separate window, a selected area, individual elements, or the entire window with scrolling.
- Edit the resulting images, add shapes, captions, filters, effects and other objects to them.
- Publish the received images in popular web services, send them to instant messengers or by e-mail, transfer them to other programs.
- Independently choose key combinations on the keyboard that will be used to take screenshots.
- Work with multiple snapshots on different tabs.
- Automate the process of taking pictures, processing them and sending them.
Greetings dear readers. Sooner or later, every computer user faces the task of taking a screenshot (picture) of the desktop. Sometimes you may even need to do it very urgently and send it over the Internet. To be honest, I recently had to take a screenshot myself, but I did it on a tablet under the Windows operating system, and here I didn’t have a screenshot button on the keyboard. Moreover, when I started asking friends, I realized that even fairly experienced users do not know how to take screenshots of their screen. But it doesn't matter, all issues are solved. So let's look at two ways to do it.
How to take a screenshot on a computer using Windows tools?
So, for starters, I'll show you how to take a screenshot in Windows using the keyboard.
In order to take a screenshot, just press the PrtScr key, which is located to the right of the F12 button. It also happens that this key is signed like this: Psc or PrtSc, but it is pronounced like this - Print Screen.

After you press this key, Windows will take a screenshot to the clipboard. But how do you take a screenshot of a computer so that it is saved as an image? To do this, after pressing the Print Screen key, you need to go to the Paint graphics editor (Start-> All Programs -> Accessories -> Paint, or just click Start and enter Paint in the search), then click on the word Edit -> Paste or just press Ctrl+V on your keyboard.
After the image is inserted, you can save it, File -> Save, select the location, image format and name. Now you can go to the location where you saved the picture and check it out.
Even before saving the picture, you can make various notes or underlines or highlights on it. You can also cut out the desired fragment of the screen, but you can immediately take a screenshot of part of the screen, I will write about this below. All this is in the standard Paint. After that, we already save according to the scheme described above.
In Windows, there is another kind of screenshot, which is the screenshot of the active window. When is this feature needed? It is needed when it is necessary to take a picture not of the entire screen, but only of some small program window. For example, as shown in the picture below:!!!
Of course, you could first remove the entire screen, and then trim everything unnecessary in the same Paint. However, if you can make it easier, why not take advantage of it? In order to remove a separate window, you first need to make it "active". What does this terrible word mean? The active window is the window in which you are working at the moment, if suddenly you are not sure, then click in this window, with the left mouse button, on any place, for example, on the area that is located just to the left of the minimize, maximize and close buttons (Minimize button). Then hold down the Alt button and, without releasing it, press the Print Screen key.
Well, then go to Paint, and follow the same procedure that I described above.
Advantages and disadvantages of taking screenshots using Windows:
Advantages:
- The most important advantage is that the picture can be taken instantly. It all depends on your reaction, i.e. how fast you press the Print Screen button.
- You don't need to install any special software.
Flaws:
- Not a quick save. After removing, you need to separately open a graphic editor and insert a picture there.
- You can only take a screenshot of the entire screen or a selected window. It is not possible to remove any small piece.
- If suddenly there is no keyboard (as it happened with me), it is problematic to take a picture.
These are the main pros and cons, the rest you will see for yourself when you start using this feature.
How to take a screenshot on a computer using third-party programs?
On the Internet, you can find many such programs for different needs of users. But in my article I will analyze one program, to imagine what it is and what it is eaten with. And then you will already have an idea and decide for yourself what and how to use. And so, let's go.
In my opinion, the most simple and convenient program Lightshot . In addition, it is free, weighs little and does not waste resources, it works on Windows and Mac. Its insanely easy to use. You can download from the official site. After going to the site, click the "Download for Windows" button and the latest version of the program will start downloading. Installation goes quickly, at the end we do not forget to uncheck the boxes so that the program does not put us a bunch of unnecessary garbage from Yandex. All you can do is work.

Immediately after installing the program, it automatically starts and will turn on after each boot of your computer, i.e. you will not need to start it manually every time.
To take a screenshot, press the PrtScr key on your keyboard (if this key is not convenient for you, you can set another one in the settings). To not use the keyboard, you can right-click on the program icon in the menu bar (bottom right) and select "take a screenshot."
As soon as you press PrtScr, the screen will darken and now you need to hold down the left mouse button and select the area on the screen that you want to save in the screenshot. The selected area will have the normal color.

To cancel the creation of a screenshot, for example, if you accidentally selected the wrong area, press the Esc key on your keyboard, or the cancel button on the toolbar.

A window for preparing a link to a screenshot will appear at the bottom right of the desktop. When the link appears, click Copy.

When creating a screenshot, you can arrange it in the simplest way, for example, highlight something, underline, write text. To do this, the corresponding tools appear next to the area that you selected for the screenshot. Use them if you need to take a screenshot.


Through the Lightshot program, you can log into your own account so that all screenshots are saved there (it will not take up space on your computer!) And so that you can always see all the screenshots that you previously took.
If you are not logged into your account, then you can take screenshots in the same way, but you will not be able to see the entire list of screenshots you uploaded later.
You can sign in to your account either through your Facebook account or through Google+. Thus, you should already have an account in one of these social networks.
To enter your LightShot cabinet, right-click (hereinafter "RMB") on the Lightshot icon in the tray and click "Login".

Then all you have to do is enter your login and password from your account in the selected social network and you will be taken to your personal account on LightShot. Now, each screenshot that you upload to the server through LightShot will be saved in your account, and in which case, you can enter your personal account on the site and see all the screenshots taken earlier.
There are also more advanced programs like Hyper Snap. It is filled with a lot of settings, its own editor, various formats for saving pictures and much more. But there is no official Russian version, you can certainly find a crack. Also, this program is conditionally free, which means that you can download it for free, use, but not all the functions, in the paid version, all the features of this program will be available, and there are a lot of them. I will not describe in detail, this is a separate whole article.
Also, I would like to note that if you use Yandex disk, then there is also a screenshot function, and it is very convenient and fast. Also, through the PrtScr button, you can take a screenshot of the entire screen or an area of the screen, and you can save it both to your computer and to Yandex disk, it’s very convenient, you don’t need to install anything additionally. I have a separate article on Yandex services, if you are interested, visit.
Now the advantages and disadvantages of taking screenshots using third-party programs:
Advantages:
Flaws:
In my opinion, there are no disadvantages at all, only pluses.
I think everyone will draw their own conclusions, but we note that there are two ways to take a screenshot of your screen: standard Windows tools and third-party programs. And in the programs there is a complete flight of thoughts and fantasies. Here you can not only work with screenshots, but also have fun.
In conclusion, I will present you a video on this topic:
How to take a screenshot on a computer in Windows in two ways? updated: May 22, 2019 by: Subbotin Pavel
 How to take a screenshot on different devices
 Wrong MMI code or wrong connection - problem solution
 Internet Explorer update