How to restore shortcut for webcam. How to set up a webcam on a laptop
You have purchased a mini computer, installed an operating system, want to take a photo and it doesn't work.
The reason is that you need a laptop webcam program. In pre-installed windows 7, XP or 8, usually (but not always) it is, but if you install it yourself, it is not.
To be honest, finding a free simple program on the Internet to take a photo from a laptop webcam is not easy.
The names are written, you enter the site and there is nothing similar - no - just nonsense. You have to flip through dozens of pages until you find something.
But do not be sad in this article (a little lower) there is a direct link to download a free free program for a webcam of a computer or laptop to take a photo later.
It is in Russian, simple, small and at the same time very effective (nimble) - it satisfies almost everyone (read the comments).
You can download a free program for a webcam on a laptop at the very end of this page. Since the installation takes place as usual, I will not describe it, but I’ll throw a few words on how to use it.
How to use: instruction
Run (the shortcut should be on the desktop). You should see a window like the one below:
First, let's configure your webcam, for this, as shown above, click "settings". Here you can adjust the brightness and format in which your photos will be, but we are interested in something else, the save location (otherwise you won’t find your photo later).
- In addition to photos, you can also record videos. There is also a good free program in Russian for this.
To do this, as shown in the figure below, click on the icon under the line "directory for saving images." A new window will appear in front of you.
In it, on the left side, find the "desktop", select it and click "OK". All your photos now, the webcam will save on the desktop of your laptop.

Now you can start using the webcam through a laptop for its intended purpose. To do this, in the webcam, click "take a picture".

Everything will go on automatically. The webcam will save what it sees and place it on . But this is not its only function, if you press start, then at specified intervals it will independently (free of charge) photograph everything that catches your eye (depending on where it will be directed).
You can end there. In my opinion, each user will understand with minimal knowledge. After all, there is a link here not only from where to download the program for a laptop webcam for free, but also detailed instructions with pictures on how to use it.
Maybe I'm wrong, but it seems to me that this is the best program for a laptop webcam. It is free, very, very small, simple, in Russian and the photos turn out to be of high quality. What else does a beginner need?
Of course, there are better webcams for a laptop, but they are usually paid, 100 times larger and not always in Russian, though with the ability to make special ones. effects.
Developer URL:
http://ddd-soft.net.ru/
operating system:
XP, Windows 7, 8, 10
Interface:
Russian
There are times when the camera on our laptop simply does not work. Either it has not yet been set up on a new acquisition, or the one that previously worked has stopped working. Here is a list of options when the camera on a laptop may not work:
- Often, when buying a new laptop, the camera does not work at all. In this case, it needs to be configured.
- Your camera is not working correctly, that is, the image is upside down, the picture is colorless, and so on.
- Sometimes there were cases when the camera worked in normal mode, but the picture quality left much to be desired.
- Your camera works flawlessly, but you want to expand its functionality. For example, take a photo, or crop a video.
There are still a lot of problems that users face when using a webcam, but these are the most common.
How to get the webcam working on a new laptop
If you've never used a camera on your laptop before, but want to do so, first make sure it's installed as hardware in your software. To do this, we do the following:
- On the desktop, right-click on the "My Computer" icon, from the list that appears, find and select the "Management" item.
- In the column on the left, you should notice the directory "Device Manager" - click on it, after which in the right column we mark the inscription "Imaging devices" with a cross. If the camera is installed, then in theory it should be in this directory.
In any case, whether it is there or not, you need to follow the steps that are indicated in the “universal medical procedures” paragraph (This is installing or replacing drivers on your webcam).
- In order to remove all drivers, repeat the procedure above, then double-click on the name of your camera and click the "Delete" button in the "Driver" tab. Then we confirm the deletion.
- If you do not have drivers or you have just uninstalled them, you should install new ones. To do this, insert the driver disk into the laptop and install the driver packages from the "Webcam" folder. The disk should come with the laptop itself, but if it is missing, download all the drivers from the official website of the laptop manufacturer.
How to fix problems with incorrect camera operation (image upside down and the like).
Often the cause of such embarrassment is a failure in the operation of the drivers. Therefore, follow the procedure above. If installing new drivers did not help, contact the service center, while this is already a hardware problem.
How to make the picture quality on the camera better (if it is disgusting).
Image quality is already a problem with the camera itself, so you need to either replace it or buy a new webcam in any electronics store. There you will already select the quality that you need.
How to expand the functionality of your camera
To do this, you will need to install special programs. Often this is software that you can download from the official vendors of your operating systems.
You are comfortably positioned with a laptop in the hope of chatting with a friend in Skype, and the program reports that the WEB camera is not available. Do not rush to get upset, as this does not mean at all that your laptop needs repair. It is possible that the WEB camera is disabled, and you just need to connect it. It is quite simple and does not require special skills and time.
Instructions for turning on the WEB camera
First of all, check if the WEB camera is enabled
To do this, run the program that controls the operation of the WEB camera. Or run a camera test directly from the client program window. If after launching the image does not appear on the screen, and the menu items are not available, then you should connect the camera as a device.
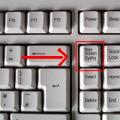
Find the key labeled "Fn" on your keyboard
It is usually located on the left side of the keyboard next to " ctrl". Keystroke " fn» allows you to use other function keys that allow you to control devices. They are usually marked in blue and are located in the top row of the keyboard. With this key, you can also turn on the WEB camera. Look carefully at the keyboard and find the WEB camera icon. Press the " fn» and, while holding it, press the second key with the WEB camera icon. The WEB camera image will be displayed on the desktop with the inscription " On". The camera is ready to go.
We achieve regular means of Windows
From the menu that appears after pressing the button " Start”, select “ Control Panel", and in it find the tab" Administration” and double-click on it. Look in the window for the shortcut " Computer management' and open a console window. On the left side of the window, find the " Hardware Manager' and run it.
Structured list of computer devices
Open the nested list under the "+" sign in the line " Imaging device". In this list you will see the name of your camera. Right-click on it and choose from the menu " Turn on". It remains only to click on the button " OK” to confirm activation. If you did not find the WEB camera icon in the Device Manager list, you may need to reinstall the WEB camera driver.
N. Romodanov
Original: "Add A Customizable Webcam Widget To Your Desktop With The Simple & Lightweight CamDesk"
Author: Yaara Lancet
Publication date: June 15, 2012
Translation: N.Romodanov
Date of transfer: June 2012
Webcams are awesome. Indeed, there is no limit to what you can do with a webcam. Now the camera may not be as interesting as it used to be, but it is still one of the most useful devices I have. One thing that strikes me as odd about webcams is the lack of flexibility in their use.
How can I make sure that I see what comes from my webcam on my workspace, regardless of what I'm doing? What if I don't like sitting around in a video chat and staring at the chat client?
Not so long ago I came across the CamDesk program. This is a tiny open source application that offers a really simple solution to the problems mentioned above using a webcam. With CamDesk, you can have a constant stream of data coming from any of your webcams into a customizable window, so you can follow whatever's happening in front of your webcam no matter what you're doing. The program can be used for any purpose, from tracking your cats and watching your front door, to constantly broadcasting your image in a video chat or recording a video. Fabulous!
Installing CamDesk
CamDesk is an open source project that is still being developed by several independent developers. So such, it is magnificent in its simplicity, but only in some places it is unfinished. CamDesk is reportedly available for Windows, Linux, Chrome, and Android, but for the last two implementations, they are still far from being developed, and even the developers themselves do not recommend downloading them.
If you are using a Linux system, when you download the tar archive, you will find installation instructions in it. With your permission, I will focus on the Windows version for now. To be able to install CamDesk for Windows, you must have the .NET Framework 4 package installed. That's all you really need to install CamDesk (assuming you have 1.17 Mb of free space on your hard drive, of course).
CamDesk is a portable application and there is no installation process as such. Just unzip the files and run the EXE file. Now you are ready to try some webcam features!
Using CamDesk
If you have more than one webcam connected to your computer, then the first thing you need to do is select the one you want to use for continuous video streaming. Unfortunately, the camera cannot be changed inside CamDesk and there is no other option but to restart CamDesk every time you want to change the video source. Because it's a very small and fast app, reloading it shouldn't cause too much of a headache.

Now that you've selected your source, a video feed should appear on your desktop. It looks something like this:

After combing your hair (which I don't seem to be able to do), you can start a video chat or start a video recording, or just surf the web and see yourself at the same time if you want. You can move the video window by dragging it with the mouse and place it in a less visible place on the desktop. Right click on the video to access some advanced options.

From the menu that opens, you can start and stop the video, switch to full screen mode, access advanced settings, and stop the CamDesk application. Each operation has its own hot keys, if you, of course, prefer to use them. Let's see what additional settings are in store for us.

This is Bibi, my old cat that I'm trying to watch with my other webcam. The advanced settings window, although a little unattractive, offers some useful settings. Here you can dock the video window and make it always on screen on top of other windows, or unpin it and make it behave exactly like other windows. You can also resize the video image and select it to your liking, and you can also change its transparency.
This last option will be interesting if you want to monitor yourself or someone else and do something else at the same time and don't want the video image to obscure anything of value displayed on the screen. To do this, you can set the video image to be semi-transparent so that you won't lose sight of it.

If you have an external webcam, you can always keep an eye on the object you are watching, no matter what you do on your computer. So I can write this post and see if my cat is awake.
Webcams are awesome. Indeed, there is no limit to what you can do with a webcam. Now the camera may not be as interesting as it used to be, but it is still one of the most useful devices I have. One thing that strikes me as odd about webcams is the lack of flexibility in their use.
How can I make sure that I see what comes from my webcam on my workspace, regardless of what I'm doing? What if I don't like sitting around in a video chat and staring at the chat client?
Not so long ago I stumbled upon the program. This is a tiny open source application that offers a really simple solution to the problems mentioned above using a webcam. With CamDesk, you can have a constant stream of data coming from any of your webcams into a customizable window, so you can follow whatever's happening in front of your webcam no matter what you're doing. The program can be used for any purpose, from tracking your cats and watching your front door, to constantly broadcasting your image in a video chat or recording a video. Fabulous!
Installing CamDesk
CamDesk is an open source project that is still being developed by several independent developers. So such, it is magnificent in its simplicity, but only in some places it is unfinished. CamDesk is reportedly available for Windows, Linux, Chrome, and Android, but for the last two implementations, they are still far from being developed, and even the developers themselves do not recommend downloading them.
If you are using a Linux system, when you download the tar archive, you will find installation instructions in it. With your permission, I will focus on the Windows version for now. To be able to install CamDesk for Windows, you must have the .NET Framework 4 package installed. That's all you really need to install CamDesk (assuming you have 1.17 Mb of free space on your hard drive, of course).
CamDesk is a portable application and there is no installation process as such. Just unzip the files and run the EXE file. Now you are ready to try some webcam features!
Using CamDesk
If you have more than one webcam connected to your computer, then the first thing you need to do is select the one you want to use for continuous video streaming. Unfortunately, the camera cannot be changed inside CamDesk and there is no other option but to restart CamDesk every time you want to change the video source. Because it's a very small and fast app, reloading it shouldn't cause too much of a headache.
Now that you've selected your source, a video feed should appear on your desktop. It looks something like this:
After combing your hair (which I don't seem to be able to do), you can start a video chat or start a video recording, or just surf the web and see yourself at the same time if you want. You can move the video window by dragging it with the mouse and place it in a less visible place on the desktop. Right click on the video to access some advanced options.
From the menu that opens, you can start and stop the video, switch to full screen mode, access advanced settings, and stop the CamDesk application. Each operation has its own hot keys, if you, of course, prefer to use them. Let's see what additional settings are in store for us.
This is Bibi, my old cat that I'm trying to watch with my other webcam. The advanced settings window, although a little unattractive, offers some useful settings. Here you can dock the video window and make it always on screen on top of other windows, or unpin it and make it behave exactly like other windows. You can also resize the video image and select it to your liking, and you can also change its transparency.
This last option will be interesting if you want to monitor yourself or someone else and do something else at the same time and don't want the video image to obscure anything of value displayed on the screen. To do this, you can set the video image to be semi-transparent so that you won't lose sight of it.
If you have an external webcam, you can always keep an eye on the object you are watching, no matter what you do on your computer. So I can write this post and see if my cat is awake.
 How to take a screenshot on different devices
 Wrong MMI code or wrong connection - problem solution
 Internet Explorer update