How to transfer to another phone. How to transfer data from an old Android smartphone to a new
Sooner or later, it is required to replace the old Android smartphone new. But before sending a device to the shelf or find the phone, another use must be transferred to the accumulated information into a new device. In the article you will learn how to transfer data from Android for Android, most convenient and affordable way.
Information transfer methods from android phone
Since the changeability of smartphones among users is a frequent phenomenon, there have been a mass of ways to transfer information, conditionally divided into three categories:
- Standard tools.
- Third-party services.
- Manual transfer.
To the first category include built-in toolsimplemented by the developer operating system or user interface. For example, Android OS owner services are Google, pre-installed on all certification devices. Or large companies developing their own shell. For example, Xiaomi with the Mi Cloud service pre-installed in MIUI firmware.
To third-party services include mobile and desktop programs.Created by Android devices, private companies or application developers.
Manual method, implies data transfer with in-depth user participation. Using tools that have not included in the first two categories.
Important! Methods in each category are oriented to transfer a specific data type. And the preferred method is affected by the convenience of interaction, type, number and amount of information transferred.
How to transfer data from android for Android using standard tools
The principle of operation is based on automatic. In accordance with the settings and in the presence of the Internet, the data is synchronized and sent to the storage server automatically. And since the contents are tied to the account, just enter the login and password on the new device, to obtain a copy of the content.
Automatic backup will allow you to transfer data and settings: contact phone books, application installation, calendar events, passwords, browser history, etc.
Multimedia files allowed to copy only on cloud Disk With fixed volume. If there are many videos, music and other massive files on the phone, you will have to buy additional space or use other transfer methods.
Let us consider the three ways to transfer data using automatic backup.
Method 1. Transferring data from Android for Android through Google Services
Important!
- To create a backup, availability and account - be sure to.
- The recovery parameters affect the type of device and. The transfer of files is impartial or only partially, if the data is transferred from the late version of the OS on the early version. For example, with Android 7.1 on 4.1 or 5.0, etc.
- For multimedia files, used cloudy google Storage disk. Basic disk volume - 15 GB.
- Application settings are copied to the server no more than 1 time per day. This requires to connect the Android device to the power grid and Wi-Fi. Also not use the phone for a couple of hours. If the device is inactive 14 days, Google will delete these applications after 60 days. The period is automatically extended when the activity is resumed.
- Backup For some applications is not supported, since the developers did not activate this option.

Instruction:
Create a Google account if you didn't make it earlier. Go to the settings, open the Accounts section. Then choose - Add Google Account. To complete the registration, follow the credentials wizard and enter the necessary data.

Activate backup. In most devices without a modified interface, the parameter is called - "Restore and Reset". Activate the option, as well as familiarize yourself with the data type that will be saved. Next, select Account.


Important! To restore the content of information on new Android Phone, you need to activate the "Automatic Recovery Function".
For multimedia files, go to Google disk, click the Add button and specify the location path of the files. Automatic download of photos and images is available in the Settings section.

Method 2. Transferring data from android for Android using Mi Cloud
Important!
- The service is available only in MIUI firmware.
- To use MI Cloud, you need to pre-register the MI account.
- Basic disk volume - 5 GB.
Instruction:
- Create a MI account if you didn't do it before. Straight link On the registration page.
- In the system settings, open the Mi Account section.
- Take terms of use, Allow access to the service.
- Enter login and password.
- Check the data type that you want to save, and then create backup.

Method 3. Creating a local backup on MIUI firmware
Important!
Local backup, does not save multimedia files: music, video, photographs, voice recorder records, etc.
Instruction:
- Open system settings.
- Choose an option additionally, further "Restore and Reset".
- Then - the item "Local Bacup".
- In a new window, click on the Bacup button and mark the data type that you want to save. The "System Settings" item includes: passwords Wi-Fi Networks, Messages, Call Log, etc. Item "Applications" - data third-party applications.
- For convenience, set the schedule to automatically create backup copies.
- After a while, what the amount of information is affected is, a folder with data will appear in the memory. Path: MIUI - Backup - Allbandup. Transfer the folder to the cloud or on a computer, to further copy to a new device.
- To restore files, you should visit the section to create backup copies, select backup and click on the Restore button.

Transferring data from one android to another Android using third-party services
Moving information, including photos, video and music, is carried out at the expense of the utility of a specific manufacturer: Motorola Migrate, Sony Xperia. TRANSFER MOBILE, HTC Transfer Tool, LG Mobile Switch or. Or programs written by application developers, for example - CLoneit - Batch Copy All Data.
Listed programs work on a similar principle. The user selects the data type, and then the new Android device, with the same program. Next, the application generates a copy of files and sends to a new phone.
Method 1. Transferring files using the Motorola Migrate application
- Load the application to the old and new phone.
- Run the program and set the pairing between two devices. With the help of an old device, scan the QR code on the new phone.
- Select the data type required for sending and then convenient way Send.
- Wait for the end of the transmitted files.
Important! The Motorola Migrate utility is not supported by Android 7 and above.
Method 2. How to transfer data from android for Android with CLoneit
- Install, and then start the applications on both phones.
- Activate Wi-Fi. On the old phone, click on the "Send" button, and on the new "accept".
- Wait until both Android devices will establish a connection.
- Select the files required for sending and then the corresponding button to confirm

How to transfer data from android on android manually
Manual file transfer is useful when you want to transfer a specific type of information or a selective file group. For example, music, video or application data. Moreover, sending directly to the new Android device, cloud storage or a computer.
Method 1. Backing up applications with Titanium Backup
The program allows you to selectively or completely create a copy. installed applications, or save only data, and then restore on a new device. At the same time on both smartphones needed. For details, visit the appropriate resource.
Instruction:
- Open on the old Android device.
- Click on the Backup Copies tab.
- Select the application you are interested in, in a new window, click on the "Save" button. Backup will start automatically. For the duration of the creation of R.K. Influences the amount of data.
- To transfer data, hold the application, until the window appears with actions. Choose a "pass the last backup", and then the data type.
- In the next window, select the desired way to transfer files: email, cloud disk, etc.
- If you want to make several backups, mark necessary applications. For full backup, visit the "Package Actions" section.
- By default, backups are saved in the Titanium Backup folder on the domestic drive. Move the folder to the new device, then go to the program, and alternately restore the data required programs. Either through the "Package Actions" section, restore all applications.
Important! Some programs are sometimes restored incorrectly due to hardware and software differences New and old smartphone.
Method 2. Copying files to cloud storage
Cloud Storage Services are offered 5-50 GB of free disk space. Sometimes this is enough, for temporary or constant storage of some data, including photos, music or video. To select the optimal service, we recommend reading the appropriate material below.
Instruction:
- Set the client of the preferred cloud storage service.
- Register an account and / or log in.
- To copy the contents, in the application, click the Add button, and then mark the necessary files.
- Install a similar client on a new phone, log in. Then go to the application and download the necessary information.
Alternative option:

Method 3. Transferring data to a computer
A convenient data transfer method in case the old device is damaged - the screen is broken or the sensor does not react.
Instruction:
- Connect the old cable.
- In the "USB Configuration" section, select MPT.
- Wait for removable discs. After that copy the necessary data to the computer.
- Then plug the new Android device and transfer the information copied earlier.
Method 4. Transferring data to a computer via Wi-Fi Router
Instruction:
- Install the Moto File Manager application on the old phone.
- Connect to K. Wi-Fi network Smartphone and computer.
- In the left hidden panel On the phone choose remote controland then "Connect".
- Enter the displayed address on the PC in the address bar of the conductor.
- Transfer the content from the old smartphone to the computer.
- At the end, stop the connection on the old phone, and then connect the new machine to pass the data.
Method 5. Sending files using NFC
Important!Data exchange is possible provided that the old and new smartphoneis equipped with a module.
Instruction:
- Open the system settings of both phones. Expand hidden sections To view additional items.
- Activate the NFC module and android function Beam, for the possibility of exchanging data.
- Select the files required for transmission, such as photos. Click on the "Share" button, and then select via NFC.
- Attach the old phone to the new one. If necessary, confirm receiving files.
Method 6. Transfer of files with Bluetooth
Instruction:
- Open the settings of both devices.
- In the Bluetooth section, turn the switch to the active state.
- At the old phone, prepare files for sending, select and click on the "Share" button.
- In a new window, select "Bluetooth".
- On the new device, activate detection.
- Wait for the old phone, the appearance of the name of the new device, and then select the device.
- If necessary, confirm receiving files on the new Android smartphone.
Method 7. Transfer of files using a memory card
If the old and new smartphone, support the installation of microSD cards, it is enough to transfer information to the drive, and then set the map to a new device.
Important! Do not use these method if the ADOPTABLE STORAGE function has been activated on the old phone.
Instruction:
- Install the memory card into the old device.
- Open file manager.
- Go to the internal memory of the device, select the required data and transfer to the memory card.
- At the end, remove the memory card and install it in a new device. If necessary, use the file manager to move information from the microSD card to the internal section of the phone.
Method 8. File transfer using OTG Adapter
If a new or old device does not support the installation of the microSD card, use the adapter to externally connect the drive.
Instruction:
- Install MicroSD card In the card reader - Card Reader, and then into the USB OTG connector of the adapter.
- Connect the collected design to the old phone.
- Open the file manager and transfer the data to the removable drive.
- Upon completion, disconnect the drive and connect to the new phone. Open the file manager and transfer the data into the internal memory.
Method 9. Use the Android application to transfer data
Another effective method Information transfer - data transfer programs. Works provided that both devices are working wi-Fi modules and / or bluetooth.
Principle of operation:
- Install on both devices one of the programs from the article ".
- On the transmitting device, select files, then click on the "Send" button or the button with the corresponding function.
- On the receiving device, click on the Accept button. Or use the QR code.
- Next, on the transmitting device, specify the recipient. A little time, and the information is successfully copied to a new device.
Video review
Output
For quick and convenient transfer important informationUse standard backup. This will make it easy to change the device, as well as save time on setting up and making additional information.
One of the first questions arises how to transfer contacts from Android to Android, because all the numbers from one android devices On the other manually too long, especially if there are many contacts in your phone book.
Below we will talk about several ways to help solve this issue in minutes.
Using a SIM card or flash drive (SD card)
If the phone numbers are stored not in the SIM card memory, then we must copy them first. To do this go to " Contacts"(" Phone book ") and open the section settings (on different models Smartphones This can be a virtual button at the bottom of the display or vertically arranged three points or dishes at the top of the screen). In the settings menu that opens, click " Import Export", Then choose the item from where you want to copy contacts.
If the contacts are stored in the phone's memory, click " Import from internal memory ", And then choose" Export to SIM card"(I.e. item where we will copy):

If the contact numbers are stored in different places, for example, not only in the device's memory, but also on the ES-di card, then copy the data from the smartphone first, and then just with SD, and after already exporting to the SIM card.
After selecting the storage location, the contact list will open, from which it will be possible to save really necessary, then press the " OK"And on this transfer procedure will be completed. Now we rearrange the SIM card to the new gadget and, if there is a desire, the same way to transfer data to the internal memory of the new phone or activate the display of contacts saved in the SIM card in the phonebook. What needs to be done for this: go to " Contacts", Open the settings (see above), press the contact filter and select the item" SIM-card»:

To transfer contacts from one android to another using the ES di card, perform the same actions, only instead of a SIM card select the flash drive (SD).
Through sync with the Google account
Most device owners on Android OS have account in Google. It is necessary to download applications in the play markete, but not only. Having a Google account you can configure synchronization and save not only your contacts, but also other important data - various media files, messages, etc. It is very convenient if you need to restore important information at the loss or breakdown of the phone.
To activate synchronization, go to the basic settings of your smartphone, in the section " Personal data"Find the item" Accounts", Press and select your account in Google, come in, and in the list that opens, mark data for synchronization, after which the selected information will be synchronized automatically and stored in a personal mailbox:

If synchronization has not been configured, we will need to copy your contacts to the account. This is done exactly as well as copying from the SIM card: " notebook", Further " settings", Then" import Export", Choose the source from which we will copy the contacts, and then press the string with your account.
Now, to transfer saved phone numbers to the new smartphone Android, open a browser from it, turn on full version and go to the site mail.google.com, Click in the upper left corner of the display on the inscription Gmail. and in the list that opens " Contacts", and then " All contacts»:
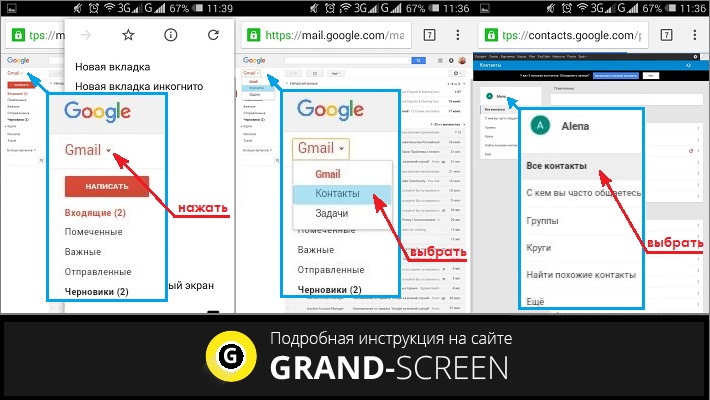
The dropped window will display full list Numbers in the phone book. Choose " All contacts"(Or maybe" choose everything ") and press the string" Yet».
Now choose " Export", And in the window that opens, specify Google CSV. (where CSV is the file format in which the contact list will be located). After that, all contacts will be saved on the device from which the entrance to the account was performed, in this case on the new smartphone.
If for some reason you could not enter your google account from a new phone, then, and then.
* Notes E: If for the transfer of contacts by this method, the model of your smartphone provides for the inclusion of USB debugging, do not forget to pre-activate this option:

There is another way in which your contacts will always be at hand on any device from which you can start a Google account. To do this, after sync, all phone numbers need to be saved in Google account. For example, creating a new contact, when requesting a system where to save it, from three options - the phone's memory, the memory of the SIM card or in google contacts, choose the last, and then, it is enough just to log in on a new device and all contacts will automatically fall on it:

Export contact with Android for Android via Bluetooth
To use this method, all contacts must be in the internal memory of the phone. If some of them are on the SIM card or on the outer carrier, then the method described above must be copied to the smartphone.
We connect both Android devices and install a Bluetooth connection on them: Select in the settings and turn on the option "Visibility for other devices". Then, on the old phone through the Bluetooth settings we find the new Android apparatus.
In both gadgets (if necessary), we enter a single password, which must confirm that we connect via Bluetooth. Now activate the "Submit" option and wait for the end of the process.
See more video information:
Export contact with third-party software
If for some reason you could not use the methods described or simply do not want to synchronize your contacts, you can use special applicationswhich easily solve such problems.
For example, the application McBackup - My Contacts Backup will make a quick backup of the desired information and send a file in format .vcf. on your mail. It will be enough to come in mail client From the new device and open this file:

Another application - SM Backup - Safe Cloudmake backups of all your data (SMS messages, photos, calendar, etc.), including phonebookand provide 5 GB free places in cloud storage With the ability to restore on the desired device:

On this, we believe that the question is like from android to throw contacts to another Android apparatus is closed. There are plenty of ways to solve the task, choose any convenient for you. Good luck!
In September, I talked about transferring data from one phone on Android to another (). The described method allows you to transfer contacts with photos and linking to ringtons, call history, SMS and MMS, all applications, settings of Golauncher EX desktops, photos, music.
It was not possible to transfer only one - data and program settings. For some programs, it doesn't matter at all, in some (for example twitter, Facebook, Instagram) to re-enter the login and password, but everything is more difficult with games: the data on the passage of the game is so easy not to restore.
In order to be able to copy these programs, the device on Android must have root access. As it turned out, getting root on many devices is very simple. So on my Samsung Galaxy S II sufficiently copy to the memory card two files and start them from the recovery console by pressing the "Turning on" button, "home" and "Volume Plus" when turned on (http://4pda.ru/forum/index.php?showtopic\u003d 259348 & ST \u003d 9980 # Entry13059622, for Android 4.1: http://4pda.ru/forum/index.php?showtopic\u003d296324&st\u003d180#entry14633175). To get root rights, do not even need to connect to a computer.
After receiving the root access, program data can be copied and restored using one of the special programs. Often, Titanium Backup is used for this, but it is paid and has a completely intuitive interface.
GO Backup Pro program (https://play.google.com/store/apps/details?id\u003dcom.jiubang.go.Backup.ex), which I offered to use in the September article, is good because it knows how to work like with Root-rights and without. When the root is not, Go Backup Pro simply saves applications, and then proposes to install them one by one manually. Once root appears, Go Backup Pro starts installing applications automatically, as well as save and restore all settings and applications.
The program interface is very simple. On the first screen only two buttons.
On the second screen, you can choose what exactly save or restore.
The GO Backup Pro version has a limit on the volume of saved applications 200 megabytes, but it can be very easy to get around, saving all applications 2-3 times (first all data and applications, except for large volumes, and then separate the rest of the applications).
Thus, using GO Backup Pro and "
After buying a new smartphone, the question of transferring personal information from the old gadget to the new gadget. And if the video files from the audio move simply enough, then with other data will have to tinker, because the same contacts or SMS messages quickly copy quite problematic.
Let's try to figure out how to transfer data from Android to Android through a computer, using third-party applications, through accounts search engines and other ways. That is, to make this procedure as painless as possible for both the user itself and for the smartphone.
PC transfer
In order to carry out the transfer of data from Android to Android through personal computerWe will need an old phone with which you need to transfer the information itself, the PC itself, the USB cable for synchronization (you can use "Wi-Fi") and the MobileDit program (you can download from the developer's official website).

The basic version of the program (Lite) has limited functionality, but it is enough for one-time copying from the gadget to the gadget. Expanded, that is, the paid version is intended, rather, for the tier fans something to move somewhere.
Features of copying
After installing the utility and subsequent launch, the program will offer to download all known driver for smartphones / telephones. In order for the transfer of data from Android to Android to go faster, you can choose the manufacturer's company that is your device from the drop-down list and confirm the update of the drivers.
After updating the drivers was completed, you need to go to the "Phone - Cable Connection" tab and select PC Sync mode in the pop-up window. Sometimes the name of another mode can fall out (depends on the brand of the phone), but the meaning must be one - synchronization (SYNC).
- "Settings".
- Click on the Developer Settings Parameters.
- We put the beacon in front of the Line "Debug USB".
The menu branches may differ in different versions "Android". For example, in the Platform 4.2 you need to open the "System" item, click on "Device Information" and go to the "Assembly" tab, where the debug mode is the USB interfaces. Keep this in mind before you transfer data from Android to Android.
Applications of this format as "mobile" intuitively understandable and do not require any special knowledge or skills - everything is simple there. Go to the "Export" tab and select the "Copy of the phone" on the left side, and then in the central window, we note which data we need to copy: contacts, messages, photos, music, video, or applications.

After that, on the right side of the screen, select the file name and extension (universal option for most smartphones - * .csv). Then save it on the computer and carry out data from the "Android" to Android via WiFi or USB cable through the import of the Import menu. If everything is done correctly, the window will be displayed on a successfully completed transfer operation.
Copying data using Google Account
When there is a personal computer, and connecting to the Internet, you can transfer data from Android to Android through Google. The whole process is to synchronize your personal data with the search engine account. This is a pretty practical option, because you can make almost any changes to your contacts, calendars and rule another information without the direct participation of the smartphone.

First of all, you need to go to the Google. Disc. To carry out data transfer from Android to Android, we already go to the new phone to the "Google" account and using the same "Google" and the Import tabs copy information from the previously created file. In the future, all your selected data will be duplicated in Google Account.
Yandex.Disk
Transferring data from Android to Android with the help of Yandex.Disk is quite simple. To successfully implement the procedure, you must install on the old gadget Yandex.Perenge's application, and on the new device, the usual Yandex.Disk. Download both the first and the second can be on the official "PlayInmark".
Process transfer
Both programs are fully in Russian and intuitively understandable. First you need to run Yandex.Perenge on the old phone and enter your account. After selecting "Moving" and select the necessary data for copying. The utility will give you a pin-code that will be needed a little later.

Then, on the new smartphone, we launch the Yandex.Disk application and go to the same account. Next, in the settings, select the "Move from the phone to the phone" section, where we introduce a PIN code issued to us earlier on the old gadget. The application will start its work and upon completion will notify you that the transfer of data from Android to Android (Samsung does not show such messages) successfully passed.
Transferring over wireless protocols
If there was no personal computer at hand, you can use the Bluetooth wireless protocols, with which you can copy not only music, videos and photos, but also a phone book.
To synchronize, you must perform the following procedure:
- activate Bluetooth protocols on both phones (Bluetooth and "see for other devices");
- on the old gadget, open the "Bluetooth" settings menu and start searching for a new device;
- agree to contact with the device by entering the same passwords;
- select all the data you want to copy;
- confirm the transfer and wait for the end of the process.

If you want to transfer absolutely all the information from your old device to a new one, then in each section and subsection just click on "Mark everything" items, but then the procedure will significantly delay in time, because Bluetooth protocols never differed in high data transfer rate .
SD cards
Copy almost all your data can be using external SD cards. If both mobile devices Support function fast transfer With the help of external media, the procedure will be as fast as possible and "painless" for both your nerves and devices.
Contacts
Surely everyone knows how to copy music, photo and video with the help of SD cards, but some problems may arise with the transfer of contacts, so this moment will look at in more detail.
Copy contacts with the SD drive:
- insert the memory card into the old device;
- we go into the phone book and call a pop-up menu, where the "Export / Import" item must be;
- click on the "Export to the SD card" subsection and select all the contacts that we need to copy;
- we wait for the end of the process and rebut the memory card to a new gadget;
- we go to the telephone book of the new device and in the pop-up menu select the same Punch "Export / Import";
- in the "Import" subsection by clicking on the line "Upload Contacts from an SD card";
- we are waiting for the slider to reach 100% and you can extract the memory card.
As for the transfer of exactly the contacts, you can still use a SIM card, but it is rather an extreme case, because the main disadvantage of such copying is a limit on the number of characters in the name. The process is similar to transferring data using SD cards, where in the pop-up menu you need to select "Export to SIM". It is also worth noting that copying is limited to 200 contacts, so in some cases a re-procedure is required.
Settings names are shown for clean Android. In third-party firmware, such as Miui, Flyme, Oxygenos, look for something similar.
Step 1. Prepare for data transfer

Make sure both smartphones are charged. Connect the old to Wi-Fi. Otherwise risk spending a lot of mobile traffic.
Surely yours old smartphone Already tied to Google account. If you are not sure, open the "Settings" → "Accounts" and find yours there.
If the account is not, you can add it. Click the Add Account button at the bottom of the screen and select Google. Enter the password to your smartphone if you need, follow the instructions on the screen.
Step 2. Synchronize the old smartphone data with the account


On the old smartphone, open the "Settings" → "Accounts" and select your google Account. Click on it.
Click "More" → "Synchronize". Wait until the process is completed.
Step 3. Create a backup of the data of the old smartphone in Google Account


Usually backup is enabled in Android by default, but not always. So make sure that all the information is to contact, calendar, mail, settings, application data - reliably saved in Google Account.
Open on the old smartphone "Settings" → "System" → " Additional settings"→" Backup ". Make sure that the "Download on Google disk" switch is activated, and in the "Account" section specified the desired address. Then click "Start copying" → "Continue".
The backup process starts. It will save the data to your "Google Disk". This operation can delay, especially if you used a smartphone for a long time and a lot of data has accumulated there.
When the process is completed, you can postpone the old smartphone.
By the way, you can get to the backup panel not only from the phone settings, but also from the "Google Disc". To do this, open the application and press the icon with three horizontal lines to the left above. Then log in to "Settings" → "Backup and Reset". Further everything is identical.
Step 4. Restore the data on the new smartphone
If the new smartphone is not activated


Turn on your new smartphone and follow the instructions of the setup wizard. Select language and region and connect to the network.
The wizard will suggest to transfer your data to a new smartphone. Click "Next" and select the option "Copular from the Cloud Storage".
Enter the login and password from the Google account and accept the terms of the license agreement.
Select the desired backup from the list and, if necessary, enter the password from the old smartphone. Specify what exactly needs to be transferred, and click "Restore".
Continue follow the instructions of the wizard. Recovery will be performed in the background.
When setting up a new smartphone is completed, wait 10 minutes: Android will install all applications from the old apparatus.
If your new smartphone is activated
Suppose your smartphone has already turned on. For example, a consultant in the store showed you his work. In this case, there are two options.
Option 1
Open the "Settings" → "System" → "Advanced Settings" → "Reset Settings". If the "Advanced Settings" item is not, select "Reset Settings" directly in the "System" menu.


Select "Delete all data" → "Reset phone settings". Wait until the device reboots.
Now follow all items from the previous instructions with the settings wizard.
Option 2.
If you do not want to drop anything, open "Settings" → "Accounts" (or "Users and Accounts", or "Synchronization"). Click the Add Account button at the bottom of the screen. Select the type of Google account.
Enter the password to your smartphone if you need, follow the instructions on the screen. You will need to enter your electronic address And password from Google account.


In the "Settings" menu → "Accounts", select the Added Google Account. Click on it.
Make sure that opposite all the necessary data types are ticks. If there are no them somewhere, slightly.
Click "More" → "Synchronize". Wait for the end of synchronization. So you post the contacts, mail, calendar, but not applications to the new smartphone.
To copy them, open Google Play and click on the icon with three horizontal lines on the left. Open "My Applications and Games".


Click the Library tab and install your application manually.
Step 5. Transfer to the new smartphone photo and video


The easiest way to do this with the application " Google photo" Run it on the old smartphone. Go to "Settings" → "Auto-loading and synchronization" and make sure the option is enabled. Then wait a bit until the download is over.
Now all your pictures and video captured will be loaded into the cloud, and you can view them on a new smartphone through Google Photo.
If you do not mind that the pictures will be stored in compressed (but still quite high quality) form, then they will not even need to pay for their storage: you will be provided with an unlimited volume in the cloud. Otherwise, you will have to acquire a service subscription.
Step 6. Copy music and other files.


If you have a lot of things stored in the memory of an old smartphone (for example, a music collection in MP3 or some documents), all this can be transferred manually through a USB cable.
Connect the old smartphone USB cable to a computer. Select File Transfer Mode and copy everything you need. Then disconnect the old smartphone.
Connect a new phone and transfer all your data through the "Explorer" or Finder.
In some cases, the computer cannot immediately recognize the connected smartphone. Especially this is sinned by the Mac, to which the old Android is connected. To cope with a similar problem, read our.
 Doesn't Diablo III start?
 How to check the computer to spyware
 Spyware on the computer