To start the DISM required. SFC and DISM: Check and restore system files in Windows
Read, what to do in case of error when downloading, installing or updating applications to "Microsoft Store" In Windows 10. Eight ways to eliminate the error 0x803F8001.
Microsoft Store. Error code: 0x803F8001.
In the operating system "Windows 10"developed by corporation "Microsoft", various tools and additions are presented, significantly facilitating its use. One of these tools, the possibility of using which appeared in "Windows 8", is an application store "Microsoft Store". This is a component "Windows 10"It is intended to purchase and download various universal applications, as well as classical software and desktop applications.
Operating system "Windows 10" can work on different types of devices: tablets, laptops, personal computers, gaming consoles and on a number of other devices. This means that programs and applications downloaded and installed from the application store "Microsoft Store"may be launched on all the above devices. This feature does "Microsoft Store" One of the important elements in the operating system "Windows 10". However, the emergence of problems that violate the performance of the application store "Microsoft Store"may cause significant inconvenience. Applications may simply not be loaded from the store, or "Microsoft Store" It opens and suddenly closes, applications are not installed, the boot or application installation process freezes (the download indicator or installation does not move and does not respond to commands), etc.
In many cases, when users try to install or update some applications in "Microsoft Store" in "Windows 10"The operation is completed with the output of the error message:
"Try again. An error has occurred. Error code: 0x803F8001 "
After receiving such an error message, users cannot update or download the necessary applications from "Microsoft Store" in "Windows 10". Sometimes users cannot download any particular application from the store, and when loading another application, the process is completed normally without any errors. (For example, when trying to install the application "King of Thieves" from the store "Windows 10"Error message appeared "0x803F8001", but when trying to install another game "Microsoft Sudoku" - It was fully installed.)
Therefore, it is important to be able to determine the cause of the error and know the algorithm to eliminate it.
Today in this guide we will try to solve this problem and share with you possible ways.
If you have come across such a problem earlier or she has arisen with you now, then try to apply the following ways one by one until the problem is completely eliminated.
Method 1: Cleaning the storage cache "Microsoft Store" in "Windows 10"
As follows from the name, you should try to clean the cache in "Microsoft Store" With a simple team "WSRESET". This command can be used as the first phase of troubleshooting and problems associated with "Microsoft Store". This method is suitable for all versions of operating systems. "Windows", beginning with "Windows 8".
"WSRESET" - This is a built-in program present in "Windows 8" and later versions that can be used for cleaning and reset cache "Microsoft Store". This small utility will clear the repository and application files just as you cleanse the cache in the web browser (temporary files).
Since the program deletes all cache files to the repository, that is, the high probability that it will eliminate problems associated with problems in "Microsoft Store".

If the problem is not eliminated, the problems are present or you see an error message before you, try to apply the following method:
Method 2: Try to troubleshoot the applications "Microsoft Store"
Corporation "Microsoft" It tries to instantly react to the occurrence of any errors, and if possible, trying to immediately correct them. To troubleshoot problems and solving problems with "Microsoft Store" The official tool was developed - ( "Microsoft Store Application Troubleshooting Tool). It is used to correct malfunctions and eliminate all the known problems faced by users. "Windows" When using various applications loaded from "Microsoft Store". You can run application troubleshooting tool. "Microsoft Store" Just downloading it from the official website of Microsoft Corporation. Open any web browser in which you are used to work, go to the support page. "Troubleshooting Microsoft Store Applications" And click on the button to download it to your computer.

Open the saved file and run it, after which the troubleshooting tool will automatically diagnose the following problems that may interfere proper work Applications from the store "Microsoft Store":
- Protected audio disabled;
- Some security parameters are missing or changed;
- Service registration is missing or damaged;
- Account required "Microsoft";
- Your system administrator has disabled some settings;
- Too low displays permission;
- You are not connected to the Internet;
- The user account is disabled.

After the diagnostic is completed, the application will determine the existing problem and suggest a possible version of its correction. Select the proposed method, and the application will return the store "Windows" in the initial state, wherein "Microsoft Store" will be restarted.

The troubleshooting module will make the necessary changes to the system and restore the application store performance. "Microsoft Store".

This official troubleshooting tool "Microsoft Store Apps Troubleshooter" Mainly eliminates all known problems associated with applications. "Microsoft Store", allowing you to fully use all available store applications without restrictions.
Method 3: Overwrite the program "Microsoft Store"
This method will require you to enter the computer system under accounting A user who has administrator rights to make subsequent changes.
To troubleshoot the store "Windows" You can try to re-register the program. "Microsoft Store"By completing the following steps.
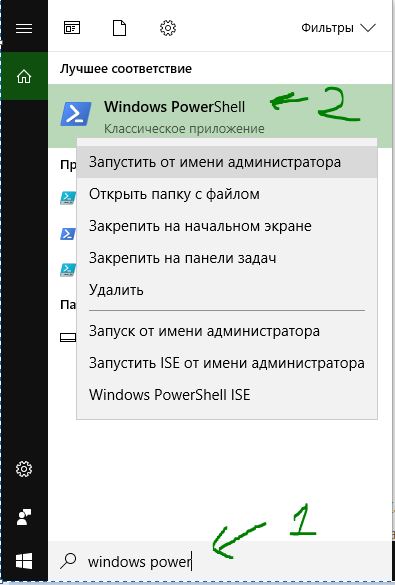
Close Application Store "Microsoft Store"if it starts with you automatically when you turn on the computer, then open the window command line as "Administrator". This can be achieved by several methods:
Method 1.: Open the dialog box "Run", one of the methods listed above and in the command line field enter "CMD".

Note: Sometimes, even if you are logged in "Windows" Under an account with administrator rights, this is not enough, and you can see the following message: "Error: 740. To run a DISM, a higher level of permissions is required. To perform these tasks, use the command line with elevated privileges. " .

In this case, follow these steps to enhance the command line privileges. In the File Explorer, go to the following address: "C: \\ Windows \\ System32" and find executable file "Cmd.exe". Click on it right-click and select item in the pop-up menu.

If you want the command line file with the administrator's rights, you always have at hand, then in the pop-up menu, go to the section "Send"Open the built-in menu and select.

The file will appear on "Desktop". Now you can click on it with the right mouse button and select the Select part-up menu, each time the need for a command line to start with elevated privileges. Or set this parameter on an ongoing basis. Then in the pop-up menu, press the section "Properties".

In the window "Properties" Click the tab "Label" and click "Additionally".

In the window "Additional Properties" Check the box in the cell and save the changes made.

Now in can always open the command line with administrator rights using the created shortcut on the desktop.
Method 2.: Click together the key combination "Windows + X" or right-click on the button "Start" in the lower left corner of the screen on "Task panels" (in earlier windows versions – "Command Line (Administrator)").

Method 3.: Log in to the main menu by clicking the button "Start" on the "Task panels"using scroll bar installed programs and applications, lower the slider down to the section "Service - Windows", open the built-in menu and find the section "Command line". Click on it right-click, select the section in the pop-up menu "Additionally"Open the attached menu and select.

In the window "Command line" Enter the following command and confirm the key key "ENTER" on keyboard:
PowerShell -ExecutionPolicy Unrestricted -Command "& ($ manifest \u003d (get-appxpackage microsoft.windowsstore) .InstallLocation + '\\ AppXManifest.xml'; Add-AppXPackage -DisableDevelopmentMode -DisableDevelopmentMode -Register $ MANIFEST)"

Upon completion, restart the computer, open "Microsoft Store" And try updating or install the desired applications.
Method 4: Log in to go out and again
Sometimes this method can help you if the wrong login has been performed. Exit the current session in "Microsoft Store"And then log in to fix this problem.
So, exit your account in the section "Profile" in the upper right corner of the window "Microsoft Store", Close the store "Windows"and then open again, now go to your account again "Microsoft" In the app store. After successfully logged in, try updating or install the necessary applications.
Method 5: Delete and reinstall the application
If an error message appears "0x803F8001" When updating the application, then try to delete the application first using the menu. "Start" or section "Parameters".
Delete the application using the menu "Start": All applications installed on your computer are displayed in the main menu, opening when you press the button. "Start" on the "Task panels". Using the scroll bar available list Applications and programs, select the required and click on it with the right mouse button, in the pop-up menu, select the section. On request "This application and all its data will be deleted." Click the button again to confirm your selection and complete the removal process of the selected application.

Delete the application using the section "Parameters" : Open section "Parameters" One of the three methods to choose from.
Method 1.: On the "Task panels" Press the button "Start" And in the main menu in the left pane, click the icon "Gears".

Or in the main menu "Start" Use the scroll bar and lower the slider down to the section "Parameters" In the list of installed programs and applications.

Method 2.: Right-click on the button "Start" on the "Task panels" Or press together a combination of keys "Windows + X"And in the pop-up menu, select the section "Parameters".

Method 3.: The fastest method - use the key combination together "Windows + I" And call the window "Parameters" directly.

Choose a section "Applications" And in the right panel of the window using a scroll bar to move the runner down, select the application you want to delete from the list. Press the button, and in the pop-up message, click it again to complete the removal process.

After deleting the application, try reinstalling it again using the Apps Store "Microsoft Store". It can also solve the problem.
Method 6: Enable user location service
You can also try to enable location service to correct this problem:

Method 7: Correct the Settings of the Region and Language
Sometimes incorrect location, wrong settings Language and region can also cause problems with the installation and use of applications from the store "Microsoft Store". Make sure that on your device in the operating system "Windows 10" Selected the right region and language, following the following:

Method 8: Use the command "DISM" For cleaning components
You can also use the executable command to clean the component storage. First you need to open the command line window. You can take advantage of one of the methods already described by us earlier in this article in paragraph: "Method 3: Overwrite the program "Microsoft Store"» . Mandatory condition From you is to enter a computer system under a user account with administrator rights, to make subsequent changes.
In the command line with administrator's command line, enter the following command to clean the component storage facility:
Dism.exe / Online / CleanUp-Image / StartComponentCleanup

Note: Executable file. "Dism.exe" Located in the system folder at the following address: "C: \\ Windows \\ System32". You can also immediately run it from there without using the dialog box. "Run".

This method can also help eliminate the problem in "Microsoft Store".
In this guide, we described for you possible methods Solving cases of various problems and pop-up error messages when downloading, installing or updating applications in "Microsoft Store" in "Windows 10".
System of maintenance of images, deployment and management of them ( Dism.exe.). Dism.exe. Sets, deletes, configures and updates components and packages in stand-alone images of Windows and in autonomous images of Windows Preset Environment (Windows PE). Commands and parameters available to maintain images depend on the serviced operating system Windows, as well as whether an image is autonomically or operating the operating system. With autonomically, Windows work all teams. Certain commands are available for servicing the operating system.
Command Line Settings DISM. are global and can be used with most service settings for the command line. Service parameters for command line are individually and cannot be used in conjunction with other service options for the command line. The Windows image is available for maintenance after connecting the image or indicating the operating system.
Before serving autonomous image of windows You must first connect the image. To connect the image of Windows (WIM), for the purpose of maintenance and control, you can use commands and arguments of the WIM image. These commands can also be used to display the list of indexes or check the plug-in architecture. After updating the image, you must disable it and either accept or cancel the changes made.
To connect, disconnect and survey WIM files, use the commands below. The register when using these parameters does not matter. Working with the DISM utility is necessary from the command line running with administrator access rights.
Consider the basic command line parameters DISM..
Before making changes to the image, it is necessary to mount it, this is done by such a command:
■ dISM / MOUNT-image
Syntax:
dISM / MOUNT-IMAGEFILE: Path_Wim file / index: Drawing Index / Mountdir: Mounting Catalog
Key / Optimize. Used to reduce time mounting
Key / Checkintegrity interrupt the mounting process if the image is damaged
Key / Readonly Mounts the image to the folder with the rights only to read (that is, by default, full access rights are installed on the mount folder)
eg:
DISM / MOUNT-WIM /WIMFILE :C:\\Install.wim / index: 1 / Mountdir: C: \\ Mount
File C: \\ install.wim will be unpacked (mounted) in the directory C: \\ Mount

This procedure is necessary in cases where you are the owner of a computer with non-standard devices (for example RAID). The DISM utility allows you to integrate into the image drivers from.inf files. This uses such parameters:
DISM / Image: Path_Directory _Smounted by _ shade / add-driver /driver:nd_k.inf- file
eg:
DISM / Image: C: \\ Mount / Add-Driver /Driver :C:\\DRIVers\\Scsiraid \\ati \\amdhdc'amdhdc.inf

Used to disable the (unmounting) image of the folder.
Syntax:
dISM / UNMOUNT-image / Mountdir: Path_Smotype
Key / COMMIT. Disconnection (unmounting) fixation image (with saving changes)
Key / Discard. Disabling (unmounting) image without changes to change)
eg:
dISM / UNMOUNT-IMAGE / MOUNTDIR: C: \\ MOUNT / COMMIT

Used to apply changes from the folder with an mounted manner to the image itself, without its unmounting.
Syntax:
dISM / COMMIT-Image / MOUNTDIR: PATH_K_Smotable_
eg:
dISM / COMMIT-Image / MOUNTDIR: C: \\ Mount■ dISM / REMOUNT-image
Used to restore the image mount to the folder, when loss of connection with it (for example, when disconnected from the network resource or shift a replaceable drive)
Syntax:
dISM / Remount-Image / Mountdir: Path_Smounted
eg:
dISM / REMOUNT-Image / Mountdir: C: \\ Mount■ dISM / CLEANUP-MOUNTPOINTS
Used to clean the mount folder after a failure. The team is performed without additional arguments.
Pay attention to one of the innovations of the DISM - the above commands can be applied not only to WIM files, but also to VHD (X) Virtual hard disks.
■ dISM / Get-WiminfoDisplays information about images contained in the WIM file, VHD file or VHDX file. This command is performed on a not connected WIM file.
DISM / Get-Wiminfo /Wimfile :C:\\Install.wim

Displays a list of files and folders in the specified image.
This command line parameter does not apply to virtual files. hard disks (VHD).
Syntax:
dISM / List-image / ImageFile: Path_Wim file / index: Draw index
For example:
dISM / List-image /ImageFile:C:\\Install.wim / index: 1■ dISM / DELETE-image
Used to delete a specific image from the WIM file
Syntax:
dISM / DELETE-image / imagefile: path_Wim file / index: Draw index
For example:
dISM / DELETE-image /ImageFile :C:\\Install.wim / index: 1■ dISM / Export-Image
Used to export an image from the WIM file to a new WIM file. At the same time, re-indexation is carried out, and, as a result, optimization of the image.
Syntax:
DISM / Export-Image (/ SourceImagefile: Path_Wim file | / Sourceindex: Draw Index / DestinationImageFile: Path_K_FE_Wim_File / DestinationName: Conference_name / Compress: (Fast | Max | none) / bootable / checkintegrity
Key / COMPRESS. Sets the degree of compression data
Key / Checkintegrity It is used to ensure that the administrator has been notified if an error occurs when exporting
Key / Bootable
■ dISM / APPEND-imageUsed to capture the image from file System And write it to an existing WIM file.
Syntax:
DISM / APPEND-image / ImageFile: Path_Wim file / Capturedir: Source_Wext_Forking_Digal / Name: Created_name / Description: Description / ConfigFile: Path_F_Fyl_Cofiguration
Key / Bootable Used if the image contains Windows PE bootable
Key / Checkintegrity It is used to ensure that the administrator is notified if an error occurs when an image is added.
Key / Verify
Key / COMPRESS.
■ dISM / CAPTURE-IMAGEUsed to capture the image from the file system in a new WIM file
Syntax:
DISM / Capture-image / imagefile: Path_Wim file / Capturedir: source_mail_digat_ / name: Draw_name / Description: Draw_name / Description: Description / ConfigFile: Path_F_File_Cofiguration
Key / Bootable Used if the image contains Windows PE bootable
Key / Checkintegrity It is used to ensure that the administrator is notified if an error occurs when the image is captured
Key / Verify Used to verify data indexing errors in the image
Key / COMPRESS. Indicates the degree of compression of data in the image
■ dISM / APPLY-imageUsed to apply the image from the WIM file to specified path in the file system.
Syntax:
DISM / APPLY-image / imagefile: path_Wim file / Applydir: Draw__DLA / INDEX / INDEX: Draw index
Key / Checkintegrity It is used to ensure that the administrator has been notified if an error occurs when applying an image
Whenever something goes wrong with a computer or laptop, there are a number of tools for troubleshooting that you can perform to try to eliminate the problem. In Windows 10/8/7 there are several built-in commands that can be used to check and restore damaged system fileswhich eventually cause problems when changing. One of the ways to troubleshoot problems associated with Windows is to check the system and restore system files. It can help in all types of problems such as a slow system, blue screen Death, sudden power failures and system failures.
Consider how to run the system file verification tool in Windows using cMD command line and PowerShell., such teams as sFC / SCANNOW. and tools DISM. I want to note that to update Anniversary Update Windows 10, it will be better to use methods from PowerShell.
Check and restore system files via CMD
System file verification tool scans your computer for any damage or changes in system files that could otherwise interfere with the normal operation of your PC. From there he replaces the file proper versionto ensure uninterrupted work. Using the command line, you can try to scan and restore system files of late operating systems as Windows 10/8/7 / Vista. We will examine two teams sFC / SCANNOW and DISM Using CMD.
1.
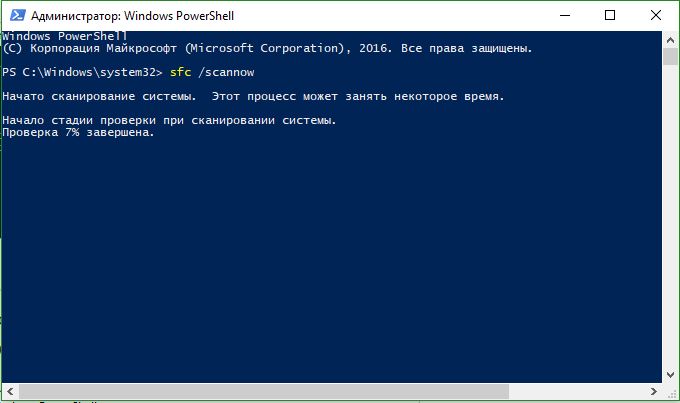
- Run the command prompt (CMD) on behalf of the administrator. Click "Search" and write simply "CMD" or "Command Line", then on it right-click and launch on behalf of the admin.
- Set the command sFC / SCANNOW.and wait for the end of the process.

Note:After scanning your system, one of three results will be issued:
- System file errors will not be.
- There will be errors of system files and Windows will restore them automatically.
- Windows has detected errors, but cannot restore some of them.
If you feature option 3, that the error is detected and the system cannot recover, then do the procedure. I advise you to disable encryption and, if at the time of the check they are available. Nothing succeeded? Moving below.

2. (DISM)
If the above does not work in safe mode, there is one last method Check damage in system files and fix them. Use the Deployment Image and Service Management (DISM) tool. The command works S. windows systems 8/8.1 / 10. Open back and use the following command:
The process can take a long time with the percentage of the percentage scale. Having finished working, restart the computer and run back sFC / SCANNOW, To make sure that there is no error or the error disappeared.

Check and restore system files throughPowerShell.
We will use Windows PowerShell to show how to use service and management service DISM. For scanning and correcting damaged system files in Windows 10. This method will be more efficient to update Anniversary Windows 10 than the command line.
1. Using the SYSTEM FILE CHECKER (SFC) tool
- Launch PowerShell. On behalf of the administrator. Click "Search" and type Windows PowerShell, after right-click and select on behalf of the admin.
- Set the command in the PowerShell window sFC / SCANNOW.If scan detects any problems, Windows will try to fix them. If Windows cannot fix them, he will warn you that further research and actions are needed. Move below if errors are detected.
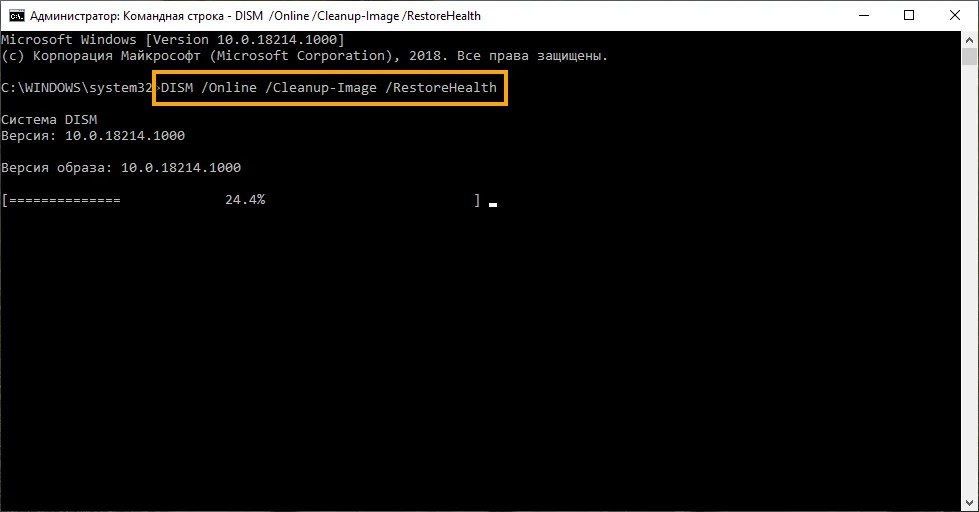
2. Using the Deployment Image and Service Management tool (DISM)
DISM scan detects corrupted system files and Windows will try to fix them, and will give you a progress report at the end. If Windows cannot find the files needed to restore damaged system files, you will also be provided with information about what to do next, with reference to the Microsoft website and troubleshooting options. Set the command below to the PowerShell window.
DISM / ONLINE / CLEANUP-Image / RESTOREHEALTH
If DISM fixed it or did not reveal the errors, then restart the laptop, computer and run to check back sFC / SCANNOW.

If the speed of the computer has decreased significantly, but the SFC utility could not solve the problem, the DISM system tool should be used to restore the Windows image.
Windows 10 includes a useful command line utility, which is called "Deployment Image Servicing and Management, DISM). This tool appeared in Windows Vista.. In Windows 10 and Windows 8.1, the DISM tool is set by default.

Utility can be used to restore and preparing Windows images, including Wednesday windows restoration, Windows installation and Windows PE. Also, DISM can be used to correct the image recovery image using the current OS installation and even to maintain a virtual hard disk.
If the computer began to constantly appear errors, and you began to notice problems at boot time, you can use the system file checking tool (System File Checker, SFC) to analyze the integrity of system files and replacing damaged and missed files to a working copy.
If the SFC utility cannot correct the problem, most likely the tool could not get the necessary files from the Windows image, which could also be damaged. In this situation, you can use the DISM to restore the Windows image, and then reuse SFC to correct damaged files.
In this guide we will present step by step instructions Upon use DISM to return a stable and operational state of the system.
A warning: Before you start working with the DISM utility, it is recommended to make a complete backup Systems or create a system recovery point. In case something goes wrong, you can return the source state of the system.
How to work with DISM commands in Windows 10
When working with DISM, there are three main options to restore Windows images: and RestoreHealh.. It is important to use them in this order.
Using Checkhealth option in DISM
The DISM command allows you to detect the image damage. This command is used only to search for damage, but does not perform problems correction.
Command line because to start the DISM requires the device administrator rights.
DISM / Online / CleanUp-Image / Checkhealth

Using SCANHEALTH Options in DISM
The DISM command allows you to scan the Windows image on any damage. Unlike / checkHealth, checking / scanhealth can take up to 10 minutes.
To run this command, do the following steps:
1. Enter the Start in the search menu Command line, Right-click on the link that appears and select Run on behalf of the administrator.
2. In the command prompt, enter the following command and press ENTER:
DISM / ONLINE / CLEANUP-Image / SCANHEALTH

Using the RESTOREHEALTH option in DISM
The DISM command allows you to automatically hold the procedure for restoring damaged Windows images. Unlike / ScanHealth, check / restorehealth can take up to 10 minutes.
To run this command, do the following steps:
1. Enter the Start in the search menu Command line, Right-click on the link that appears and select Run on behalf of the administrator.
2. In the command prompt, enter the following command and press ENTER:
DISM / ONLINE / CLEANUP-Image / RESTOREHEALTH
Note: During launch / restoreHealth or / ScanHealth, you can see the freezing of the procedure between 20% or 40% - it is absolutely normal behavior.
When starting the / restoreHealth DISM, you will try to use the center windows updates To replace damaged files. However, if the problem has spread to the Windows Update Components, then you need to specify an alternative source of work versions of files to restore the image.
You can specify a new location for work versions of files using the operator / Source. Next to / restoreHealth.
Before you can use the recovery commands, you need to prepare a copy of the Install.wim file from another computer installed windows media 10, or iSO file Windows 10. It is also very important that the source of the work versions of the files correspond to the same version, the editor and the operating system language, which is used on the computer.
You can download the ISO image of Windows 10 instructions below:
Note: Do not forget to replace "REPARSOURCE" on the path to the source of the files of the files. For example: E: \\ Sources \\ install.wim.
Now you can run the command to correct the image of Windows:
1. Enter the Start in the search menu Command line, Right-click on the link that appears and select Run on behalf of the administrator.
2. In the command prompt, enter the following command and press ENTER:
DISM / Online / CleanUp-image / restorehealth /source:repairsource \\install.wim

DISM / Online / CleanUp-image / restorehealth /source:repairsource \\install.wim / limitaccess
DISM / Online / CleanUp-image / restorehealth /source:wim:repairsource \\install.wim: / limitaccess
The command will start restoring the image of a Windows using the work versions of the files included in the install.wim file, from the Windows installation media. This will not be applied as a source to download the necessary files to recover.
In addition, you can not only specify the path pointing to install.wim, but you can also use the file. install.esd.which is an encrypted version of the image of Windows.
If you updated to Windows 10 with previous version operating system, setup files They can still be stored on a disk C: This means that you can have a source of good files.
To use the Install.esd file to restore Windows image on your computer, follow these steps:
1. Enter the Start in the search menu Command line, Right-click on the link that appears and select Run on behalf of the administrator.
2. In the command prompt, enter the following command and press ENTER:

You can use the following command to limit the use of Windows Update:
Alternatively, you can use the following command to perform the same task:
If the install.esd file is located on another disk, use the following command:
DISM / Online / CleanUp-image / restorehealth /source:repairsource \\install.esd
Note: Do not forget to replace "RepairSource" on the path to the source of good versions of the files. For example: E: \\ Sources \\ Install.esd.
The utility "Deployment and Management Images and Manage Maintenance System" always creates a log file on the path% windir% / logs / CBS / CBS.log, which contains all fixed and detected problems.
How to fix problems with Windows 10
The instructions described above relate only to the restoration of the system image. To correct problems in Windows, use the SFC system file checks.
1. Enter the Start in the search menu Command line, Right-click on the link that appears and select Run on behalf of the administratorBecause to start SFC, the device administrator rights are required.
2. In the command prompt, enter the following command and press ENTER:
SFC / SCANNOW.

Note: To eliminate the problem, you may need up to three SFC launches.
The SFC utility scans and restore damaged system files in Windows 10. For a detailed acquaintance and tool features, read the instructions.
Found a typo? Highlight and press Ctrl + Enter
Hello, dear readers and this again I am Trishkin Denis.
The option appeared a few years ago, when the update was updated KB2966583. In the operating system, the seventh version from Microsoft provides several so-called storages - for components and packages. They are located in windows folder In WinSXS and Packages directories, respectively.
After updating the system, it was often often possible to observe some malfunctions due to damage to one or at once two storages. And just the above-described utility allows you to correct such malfunctions. Previously, it could be done only with the help of the presented CheckSUR utility.
Turning on( )
So how to run the necessary us software module.? As usual, everything is simple:
The result of the work done can be viewed at: " System Disk: \\ Windows \\ Logs \\ CBS" We are interested in the file " checksur.log.».
If in the document you will see many problems with system components - it's time to think about reinstalling the operating system. Perhaps it is worth even paying attention to newer versions. In detail by windows installation 8.1 You can find out by clicking on.
Is there any more method how to recover system files? In addition, you can re-place the Operation on your computer, and another option is provided. You need simply download The appropriate set of System Update Readiness Tool tool.

Besides, in " Command line"Instead of" Scanhealth."You need to specify" ". Run the corresponding tool that will help remove errors, but unfortunately this tool works only on Windows 8 and higher.

Ideally, the text must be written in the file: " No errors Detected." This means that the system has not been found in the system, which means everything is fine.
Startup error( )
Sometimes users may encounter a problem when, when starting the tool, "" reports " unknown Parameter" Do not immediately panic - in some situations such behavior says simply about the wrong writing of the team. So, before each sign " / "There must be a gap.

True, situations occur when the error described above indicates that the only output will reinstall the OS. In any case, it is better to have a dial or flash drive with all the desired distribution. This will help for the crossed time to return the performance of the equipment.
WinSXS cleaning( )
In addition to the described above, the DISM tool has another one useful feature - Clearing the WinSXS system folder. Of course, this can be done with the help of special programs. But since we have already started talking about it, I believe that users should know all possible information.
So, to remove excess data from the folder, you must start again " Command line", Register what was indicated above, only instead of the last phrase, place" ". After time, the directory will be cleared of unnecessary data. Again, this command works only on Windows 8 and higher.

 How to combine two accounts on Facebook?
 Download and insert a beautiful framework to Word Document
 How to fix clock_watchdog_timeout type "Blue screen" (0x00000101)