Does not load in AHCI. Safe mode is not launched: reasons, descriptions, disorders in
One of the main elements of any computer device, as you know, is hDDwhere information is stored. With regard to hard drives of any type, such a term is used as AHCI. But many users not only know how to enable AHCI, but do not even have the idea what it is. Consider the value of the main term and the action necessary for activation. this regime In Windows systems.
What is AHCI?
Modern hard drives connected to the motherboard through the paper can use two modes: IDE (compatibility with outdated equipment) and AHCI - newest Standarddenoted as Advanced Host Controller Interface, allowing you to multiply to increase the performance of the device itself and installed operating system Due to faster data reading.
Almost all modern SSD discs Increased performance when accessing them is shown in the case when set aHCI mode. But this is not the most important thing.
What is the AHCI mode?
Let us last as if you turn on the AHCI mode in Windows, and look at the advantages that a modern computer user can retrieve when the mode is activated.
First of all, with activated AHCI mode, you can change or install additional hard drives, as it is called, "on the fly" (even without turning off the computer or reinstall the operating system). This is undoubtedly a huge plus for servers.

The second aspect is associated with the fact that during the installation of such a mode, special NCQ technology is entered, which allows to reduce the number of displacement heads, accelerating the simultaneous use of access to the Winchester different applications, programs and services. Finally, the AHCI activation is favorably affected by the performance of the entire system. Of course, according to the reviews of specialists and users, at home the gains of performance will not be particularly observed, but provided hard installations disk SSD. This mode is still better to include.
What should not be done and what to pay attention initially
But the most important error of most users is that they are trying to activate the use of exceptional primary settings bIOS systems (At least, this can be read in most reviews for emerging problems). This is strictly prohibited without performing preliminary action in the operating system.
You can activate the Mode in BIOS only if OS is installed on the "clean" hard disk. If you perform such a procedure with an existing OS on board, Windows will display an error when starting and goes into a constant reboot mode. Then they start, they say, the user turned on the AHCI mode in Windows, but nothing good came out of this. What to say? The basic rules may have been violated, since various actions should be taken in different modifications of the system.
How to check whether AHCI mode is active?
But to start, check whether the mode is enabled. Perhaps its additional activation and will not need.
In the simplest case, when starting a computer terminal or laptop, you need to go to the BIOS settings and refer to the SATA MODE section.

In the operating system itself, you can use the Device Manager, called from the "Control Panel", Administration or Console "Run" by the DevmGMT.msc command and go to the IDE ATA / ATAPI controller section. When the mode is enabled, the AHCI controller will be displayed in standard devices. If it is not in the list, you will have to decide how to enable AHCI in the system. Again, the solution depends on which version of Windows is installed on the computer.
How to enable AHCI mode in windows 7
So, for beginnings, consider the "seven". For the seventh and tenth versions of the action look somewhat similar, but for Windows 8 differ quite strongly.

- First of all, call the registry editor (Regedit in the "Run" console).
- Expand HKLM branch.
- Through the System, CurrentControlSet directories and the End Directory of Services to reach the MSAHCI folder.
- On the right, you should call the START parameter editing menu and set its value to zero.
- Now in the Services directory, you need to find the IASTORV directory, in which the action described above is performed for the Start parameter.
- Only upon completion of these procedures, the question of how to enable AHCI in BIOS without catastrophic consequences for the system will cease to be a problem.
Actions in Windows 8 / 8.1
For Windows 8, the above technique will not suit, because there is a simpler solution. In this case, you first need to set the mode of minimum system load in safe mode. How to enable AHCI? Quite simple.

- To do this, the command line is first called (necessarily on behalf of the administrator), and it is prescribed by the BCDEDDITIT / SET (CURRENT) SAFEBOOT MINIMAL combination.
- After that, it is necessary to reboot, at the very beginning of the restart, enter into the Bois settings and is already there to switch the IDE mode to AHCI.
- After saving the settings, a reboot should again, the command console is called, and it is prescribed the BCDEDDITIT / DELETEVALUE (Current) string, after which another computer restart.
In principle, the question of how to enable AHCI in the "eight" can be resolved through the use of a special utility from Intel (naturally, in the presence of a processor that is this manufacturer).
- First, from the official resource, you must download the driver in the form of the F6FLPY file and the setuprst.exe setup.
- After that, the desired hard disk is selected in the Device Manager, the driver update procedure is applied, and the downloaded F6FLPY file is specified as the driver itself in manual mode.
- Next, a reboot should be necessary, and after the start of the system with an already activated AHCI mode, to complete the configuration of the computer, the executable setup file of the SetupRst is running.
How to enable AHCI in Windows 10?
As already mentioned, for the tenth version of the action system, several similar to those are manufactured in Windows 7. The only difference is to choose the folders and parameters.

- In the system registry we find the SERVICES directory. Here, the Storahci directory is used for the Start parameter.
- Next, zero values \u200b\u200bare set for parameter 0 in Storahci / StartOverride and IASTORV / StartOverride directors.
- After that, you can proceed to activate the main value in the settings of the primary I / O system of the BIOS.
By the way, in the eighth version of the system editing similar parameters, it is also possible to produce. But why, if there is a simpler rational solution to the problem?
AHCI Activation in BIOS
To enter the settings on stationary computers The DEL key is most often used, and for laptops - F2, F12, combinations with ESC and FN keys or special buttons on the panel like Assist in Sony VAIO.

Here you need to find a section or settings for AHCI mode. How to enable the desired parameter in the BIOS? Simply on the SATA mode setting string, use the input key, and select the option to make an confirmation arrows as another pressing enter. Do not forget when you exit, save changes (F10 + Y) and overload the system. When you start the start, the system will automatically install the necessary drivers.
Possible problems
Unfortunately, sometimes in transition to AHCI mode, unforeseen errors may occur. Perhaps the hard disk itself does not support such a mode of operation. In this case, there is nothing to try to activate AHCI.
On the other hand, if the system is loaded, but some errors are issued or failed after switching from IDE to AHCI, you can try to troubleshoot the problems using the specially developed utility from Microsoft called Fix IT.
If it does not help, neither another will have to call the BIOS settings and change the mode of operation of the hard drive. Note: If AHCI is activated without performing preliminary action in the system registry, which were described above, such methods may not work. The output will be either recovery of the system using removable media, or a complete reinstalling Windows. So be alert. However, I want to hope that it will not reach this (of course, provided that the whole sequence was performed precisely in the order that was given in the description).
When repeated or clean, it is possible to initially enable this mode in the BIOS, then not to rush in search of the solution to activate it or eliminate problems and failures in the computer or laptop.
Instead of the result
In conclusion, it remains to add that inexperienced users who are not familiar with the intricacies of the primary BIOS system and Windows operating systems, without any particular need to activate this mode. All the same modern computers from powerful processors and large volumes random access memory Performance growth will not be particularly noticeable. There is no point in the old terminals or laptops to use such a mode. Basically, as already mentioned, such settings are more suitable for servers when several dozen child terminals on the local network are circulated to the hard disk.
Competent work of the computer is possible only with a well-coordinated interaction between the iron and the operating system. Technologies are developing, and recently it is most noticeable in the field of drives. Modern hard drives and SSD drives are at times faster than those used in computers 5-10 years ago. For data transfer, the SATA interface is used through which the drive is connected to the computer. The SATA interface is able to work in two modes: IDE and AHCI, and if you have a modern hard disk or SSD installed, you can speed up the operation of the computer by turning on the AHCI mode.
What is AHCI mode
As noted above, AHCI is one of the data transmission modes over the SATA interface. As you know, through the SATA interface, you can transfer information from 1.5 to 6 gigabytes per second. The maximum speed is supported precisely in AHCI mode, which should be used with all modern drives. As for the IDE mode, it is supported in the SATA interface for compatibility with old hard drives.
Default in the operating room windows system AHCI mode is not always enabled, even if drives are connected to the motherboard via SATA. Because of this, the user loses in the performance of the computer, since the speed of the disk is limited to programmatically. Having exhibit AHCI mode, you can increase the speed of the drive by 20-30%, which will affect the overall sensations from the computer.
How to find out if the AHCI mode is enabled in Windows
Most often, users do not even suspect that the AHCI mode must be enabled so that the computer performance becomes higher. At the same time, Windows does not always work with HDD and SSD, even the most modern, in AHCI mode. To check whether the AHCI mode is enabled in Windows, you must do the following:

Note: Also, the lack of devices operating in AHCI mode can be due to the fact that old drives are connected to the motherboard, which are not capable of working in a new mode.
Also check, the SATA interface is running in AHCI or IDE mode through the BIOS. To do this, you must restart the computer and press "DEL" or F2 during the download process. BIOS will start, where you need to find the SATA MODE item and see the AHCI or IDE version.

Important: If you have noticed in the BIOS that the SATA interface is set to work in IDE mode, you do not need to switch to AHCI mode, since no use will not be used.
How to enable AHCI mode in windows
Microsoft on Windows operating systems began to maintain AHCI mode with Windows 7. In this case, you can enable it in Windows XP if you download it required drivers On the Internet made by enthusiasts, and install them. However, it is worth noting that this method It does not always give an increase in performance, and better on Windows XP to abandon the idea of \u200b\u200busing the AHCI mode and work with drives through a standard IDE.
To turn on the AHCI mode itself, it is enough to install the appropriate setting for SATA in the BIOS. But it is necessary to do this before installing the Windows operating system, otherwise the computer will give an error 0x0000007B inaccessable_boot_device or goes into a constant reboot state. Therefore, to switch IDE mode in AHCI when installed WindowsIt is necessary to make some changes to the registry, below we will look at what actions to perform for each of the versions of the operating system.
How to enable AHCI mode in Windows 10
In the modern Windows 10 operating system, Microsoft has not suggested a setting that would enable support for the AHCI mode "on the fly", if the SATA interface has been working through the IDE. To properly switch to AHCI mode, you will need to do the following:

After downloading the computer, the Windows operating system will offer to install the necessary drivers to work with the AHCI mode, be sure to make it.
How to enable AHCI mode in Windows 8 and Windows 8.1
To switch the Windows 8 or Windows 8.1 operating system to work with AHCI mode, you need to spend some work on the command prompt. It will takes the following actions:

It is worth noting that if the computer works on the CPU from Intel, you can use the standard utility of the company that allows you to carry out the necessary settings to switch Windows to work with AHCI. This is done as follows:

Note: The above method is suitable only for computers on intel processorsFor AMD there is no such solution at the moment.
How to enable AHCI mode in windows 7
In the Windows operating system 7, the AHCI mode is close to that applied in Windows 10. It will also need to make some changes to the register as follows.
Safe mode (English - Safe Mode) - Diagnostic mode, which disables all unnecessary drivers and windows functions. It is used to eliminate the problems arising in the PC. Just run enough safe mode And eliminate errors, after which the PC will work again as it should.
In which cases may you need to enter a secure mode? For example, to solve the problem when.
Also, you can delete viruses, reset password, correct errors (including blue screen death), restore the system, etc.
There are several ways. Plus, they differ somewhat depending on what kind of operating system you have. Therefore, we will look at all available ways to go to the secure Windows mode.
There are 2 universal methods that work on all versions of Windows - XP, 7, 8 and 10. In addition, they are the most simple. Perhaps with them and let's start.
Logging through the MSCONFIG utility
First method - through special utility. To do this, you need to fulfill an easy instruction:
- Press Win + R (Button between "Ctrl" and "Alt") and enter the word "msconfig".
- In a new window, select the "Load" tab, specify the required OS and put the bird in the "Safe Mode" paragraph. There is a pair of subparagraphs here - it is recommended to choose or "minimal" (standard option) or "network" (in this case there will be access to the Internet).
- Press "OK" and restart the PC - now it will turn on in safe mode.
When you eliminate the errors, do not forget to return the usual computer start mode! This is done in the same way - using the msconfig utility (only now you need to remove a tick).
There is a small nuance: in this way, you can enable secure mode in Windows OS only, provided that the OS is loaded normally. If it does not even work out to load the desktop, then use the second method.
F8 entrance
This method is suitable for those who do not turn on the PC or laptop (the desktop does not load, the monitor is not loaded, etc.). In this case, do the following:
- Turn on a PC (or laptop) and immediately press the F8 key repeatedly until the menu appears (in some cases you need to press SHIFT + F8).
- If the Windows Logo appears or the woofer - you did not work. Wait until the system is fully loaded, then restart the PC and try again.
- When you do everything correctly, the menu will open, where you select the "Safe Mode" item with the arrow (optimal option).

P.S. On Windows 10, this method does not work! This feature is disabled by developers.
Special download options for windows 10
If Windows starts, then the following must be performed:


What if Windows 10 does not start? If the PC is loaded until the input screen, then "special download options" can be opened with a different way. To do this, click on the power button icon (in the lower right corner), clamp SHIFT and select the "Reboot" item.
Use a disk or flash drive
This is the most reliable way to upload Windows 10 in safe mode. But in this case you need a DVD or (they can be written on any PC or laptop).
Connect the USB media or insert the disk, load them (), and then perform the following:
- After download, click Shift + F10.
- After opening command line Enter - BCDEDIT / SET (DEFAULT) SAFEBOOT Minimal.
- Then you close it and reboot the PC. It will turn on.
To return the usual PC launch, prescribe on the command line as follows: BCDEDIT / DELETEVALUE (Default) SafeBoot.
You can perform it in the same way (or on behalf of the administrator ) .
Enable mode in Windows 8, you can also 4 in different ways.
The first two are painted in detail at the beginning of the article. The remaining two are quite similar to the options that are suitable for Windows 10, but we still consider them in more detail for you to easily navigate.
Diagnostic tools
So, the first method is the activation of the buffer format (suitable only under the condition that the OS is working normally). To do this, carry out the following:


PC will start in Safe Mode, and you can carry out the necessary manipulations.
And one more simple option to start a secure mode in Windows 8 - by means of a boot flash drive or a DVD disk with wINDOVS files. The procedure is as follows:

How to be on windows 7 and xp
You can go to secure Windows 7 or XP mode with one of the universal methods described at the beginning of this article. The first option is suitable in cases where the OS is working normally, and the second - if the PC or laptop does not turn on.
It is worth noting that the operating system is in no way connected with the BIOS. It also does not matter what your laptop brand has - Samsung, Asus, Lenovo, HP, Acer, LG, etc.
What if Safe Mode does not start?
Sometimes a PC or laptop stubbornly does not want to include a secure mode. Cause Banal - Viruses damaged the Windows registry. In such situations there are only 2 options:
- restoration of the PC (system rollback to the checkpoint);
- installing special programs.
The optimal, of course, will be the first way - restoring the computer from the control point. If you are not survived (for example, disabled), then only the option will remain with the installation of the Windows registry recovery. In this case, you can use free Safe Mode Repair or SafeBootKeyrepair.
Modern hard drives connect to the motherboard computer devices Through. sATA interfaceproviding for work, in particular, in IDE and AHCI modes. IDE is an old mode, it is necessary to ensure compatibility with outdated components and programs. AHCI mode is also not a new work in the field of IT, it appeared in 2004, but this is currently relevant to date hard disks Using the SATA II and SATA III interface. AHCI in front of IDE has a number of advantages:
- the ability to connect to the motherboard a larger number of devices;
- work hard drives at their maximum possible speed;
- the so-called "hot replacement" of hard drives, i.e. shutdown and connect without the need to turn off the computer;
- support NCQ technology that improves hard disk performance in multitasking conditions.
SATA mode is installed in the BIOS. On modern laptops, AHCI mode is usually set by default. But new motherboards for PC assemblies can be supplied with an active IDE mode for equipment compatibility. Change IDE on AHCI (or vice versa) at any time in BIOS computerssupporting the work of both modes. Not all computers support AHCI, but most of them, since this mode has been for 12 years. The minority includes rare rare devices released to the market, respectively, before AHCI appears. But even if a computer is less than 12 years old, if it supports AHCI, problems can still be switched to this mode due to the lack of appropriate settings in the outdated version of the BIOS. In such cases, it is necessary to resolve the issue with updating BIOS.
1. How to find out what mode - IDE or AHCI - installed now
Find out which of the mode - IDE or AHCI is active on the computer at the moment, you can in the dispatcher windows devices. Reveal the branch:
- "IDE ATA / ATAPI controllers" in Windows 8.1 and 10 versions;
- IDE ATA / ATAPI controllers in windows version 7.
If the hard drives of the computer are connected via the AHCI mode, the SATA AHCI controller will be present in the list of devices.

If the IDE mode is active, the branch list will contain a record, respectively about the IDE controller.

Alternative way - using the AS SSD Benchmark utility for testing hard disk speed. If hard drives can work in AHCI mode, but an IDE is displayed in the BIOS, the utility will notify the red "PCIIDE BAD" value.
If the computer works in AHCI mode, in the Utility window we will see the value of the green "Storahci - OK".

These two ways will make it possible to understand which mode is currently set. But to determine whether the support of the AHCI mode is implemented in the BIOS, it is necessary to enter it and find the possibility of using AHCI. Selection of SATA operation modes different versions BIOS may be in the "Advanced" or "Main" sections. For example, in Bios UEFI motherboard ASUS is the "Advanced" section, it is necessary to enter the "SATA Configuration" subsection and disclose the options of the "SATA MODE" option (SATA mode).

Another example is the BIOS AMI (V17.9) MSI motherboard, everything is more complicated here, and not everyone can figure out where the AHCI setting. In the "Integrated Peripherals" section, you must select the "On-Chip ATA Devices" subsection, and in it - "RAID MODE" (RAID mode), which provides for the selection of hard disk connection modes.
2. Consequences of switching to AHCI mode for Windows
So, changing IDE mode on AHCI can be at any time in bIOS settings. That's just for windows work Such a move will not have a consequence of a minor delay at launch due to automatic installation required driversAs when replacing some computer components. Does not help in this case even getting rid of the binding to the computer component using the standard windows utilities Sysprep, as in the case of the replacement of the motherboard or processor. Changing the IDE mode on AHCI leads to serious consequences - Windows is simply no longer starts. As a result, we obtain either a blue screen of death, or cyclic windows reboot With notification of the incorrect startup system.
The fact is that the IDE and AHCI modes are windows installation registered at the registry level. For hard drives in AHCI mode, a special driver is required, which is automatically installed with Windows versions, starting with Vista. Since the AHCI mode appears later Windows XP, the AHCI driver in the distribution of this version of the system must be previously integrated by taking it from a disk with the motherboard drivers or downloading from the Internet.
Ideally, switching to AHCI mode must be carried out before installation or reinstalling Windows. But there are ways to activate AHCI without the need to reinstall Windows - by starting a safe mode or edit system registry. Below will consider these methods for versions of Windows 7, 8.1 and 10.
3. Mandatory measures and procedures
In principle, any experiments with Windows can lead to undesirable results, but to the methods of adapting the operating system to the AHCI mode, it is necessary to take a special seriousness. Since in this case the settings affect the ability of the system will be touched. It is strictly forbidden to start executing the instructions outlined below without pre-prepared emergencies. Needless to do backup Systems and write a bootable media with a backup program, or create a system recovery point and prepare the Windows installation media. With the help of the latter it will be possible to enter the recovery environment. current system Or, as a last resort, run the process of reinstalling Windows.
The procedure for action is:
- Step 1 - Checking the AHCI switching settings in the BIOS;
- Step 2 - Preparation of emergency tools;
- Step 3 - depending on the selected method or configure the next system launch in safe mode, or edit the system registry;
- Step 4 - reboot, input to the BIOS and turning on the AHCI mode;
- Step 5 - Starting a computer.
4. Safe Windows Mode
The first method is designed for the fact that when entering safe mode Windows Driver AHCI will be installed automatically. But, unfortunately, it will work not in each case. In a working system, you must configure the next start in safe mode, perform a reboot, log in to the BIOS and set the AHCI mode. After starting the computer in secure mode, the AHCI driver must be installed in the idea. If everything goes successfully, it will only remain to restart the system in the usual mode of operation.
Universal way to enter the safe mode when next download windows For all current versions of the system - using the msconfig utility called using the "Run" command.


5. Edit Registry Windows
If the method with a safe mode did not work, it is possible to avoid reinstalling the system by editing its registry. To start the registry editor in the Run command field, enter:
4.1 Edit Registry Windows 8.1 and 10
HKEY_LOCAL_MACHINE \\ SYSTEM \\ CURRENTCONTROLSET \\ SERVICES
In this branch, we are looking for the "IASTORV" folder, we make click on it, open the "Start" parameter and set it to "0". Click "OK".
We reveal the "IASTORV" folder, select the "StartOverride" subfolder, open the "0" parameter and set it to "0". Click "OK".
Sunday below alphabetically and find the folder "Storahci". We make a click on it, open the parameter "ErrorControl". We remove the preset value "3" and instead fit "0". Click "OK".

4.2. Edit Registry Windows 7
In the registry editor window, we reveal the branch:
HKEY_LOCAL_MACHINE \\ SYSTEM \\ CURRENTCONTROLSET \\ SERVICES
In the branch we find the "IASTORV" folder, make the click on it, open the "Start" parameter and set the value "0". Click "OK".


After registry edits, we restart the computer, go to the BIOS, activate the AHCI mode and run the system.
6. If Windows does not load
If none of the ways helped adapt Windows to work in AHCI mode, the system will have to reinstall. But the current Windows can be started if, for example, it is necessary to remove the settings of the installed software or save in a safe place some important files stored on the disk of C. To do this, log in to the BIOS and set back to setting the active IDE mode.
However, it can also happen that the system will not be able to boot in any AHCI mode or in the IDE. If there is no blue screen of death, but the version of Windows 8.1 and 10 is cyclically reboot, giving out the screen with the inscription " Automatic recovery", We click" Additional Parameters ".

Going in the "Select Action" menu, we pass the path specified in the screenshot below, and roll back to the recovery point.

If a blue screen of death appears when the computer starts, you load from the installation windows media And at the installation stage of the system, select the "Restore System" option at the bottom.

Once in the "Selecting action" menu, we do the steps described above.
Choosing a way reserve copy Using third-party software, use, respectively, the bootable beacher software carrier.
Users often write: I can not start the computer, PC is loaded with numerous errors, a blue screen appears during its startup and Windows reboots, what to do? In most such cases, in addition to rolling back the system and its reinstallation, it will help the launch of the computer in one of the diagnostic modes. Consider how to enter the secure mode on Windows 7 different waysthat it represents and when can help out.
In Windows 7, there are diagnostic operating system launch modes for solving certain problems. One of them is a safe or Safe Mode (also called the troubleshooting mode) is designed to identify and troubleshooting in Win 7, the operation of the drivers and hardware components of the computer. In safe mode, the minimum possible list of processes, services and drivers required to ensure the operation of the operating system and the main hardware components are launched. Thanks to the functioning with disabilities, problems are revealed faster, because applied software not active.
Key F8.
The simplest and most popular way to cause secure mode on a computer with Windows 7 is the keyf8 key pressed during its inclusion.
- First, you should restart or enable your computer.
- After the logo appears the laptop or motherboard and motherboard and self-test equipment, click F8.
It is best to press this button for about once per second or a little more often in order not to miss the right moment.
If the F8 button does not work on the laptop, it means that the Fn key, located near the left Ctrl, should be pressed with it (on most of the devices, this combination disables the module wireless network Wi-Fi).
- When additional ways appear windows startup 7 By means of the cursor block, you must go to the desired item and press the input to enter the Safe Mode.
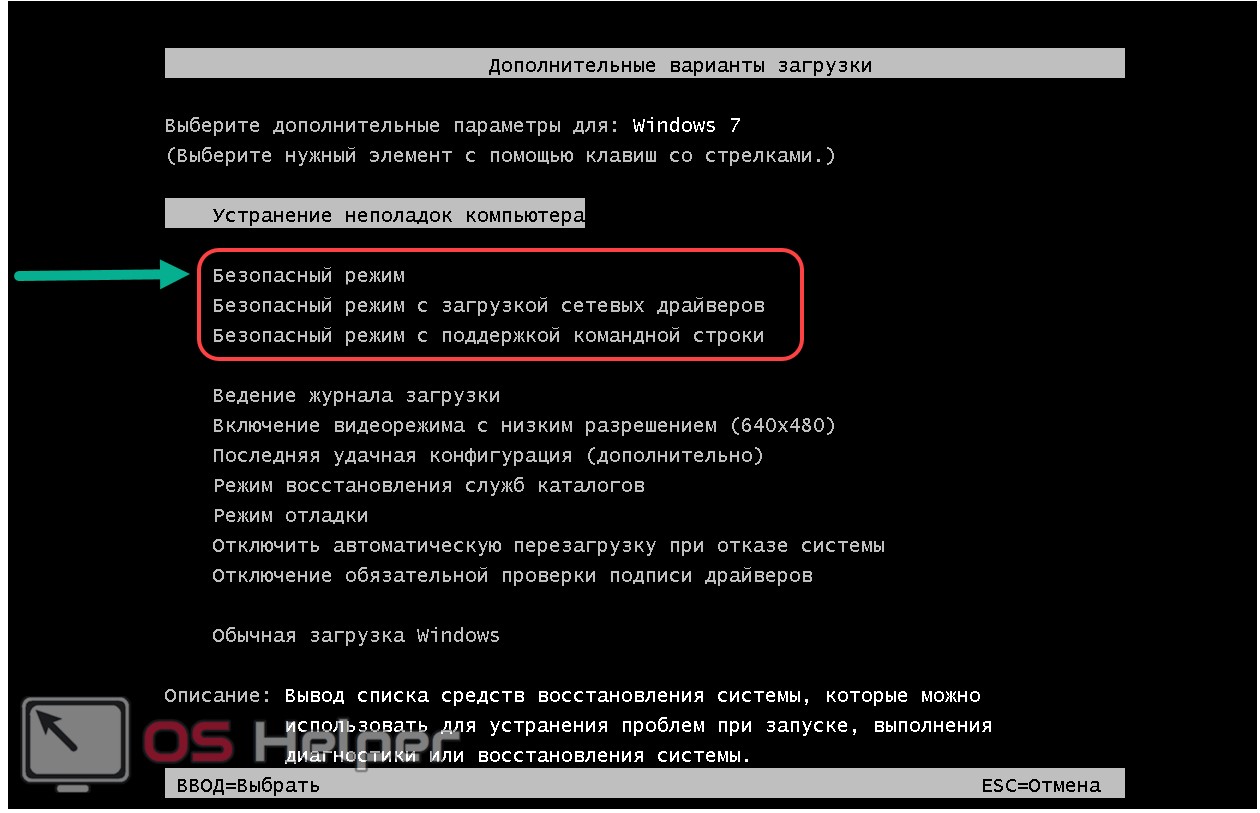
- As a result, a black screen will appear where the load progress is displayed. system files, And after a couple of tens of seconds, a familiar desktop will appear.
Most likely (for the owners of large monitors), the screen resolution will be lower than in normal mode, and the themes with visual effects will not be involved. Place the usual colorful screensaver will take a black background, and this is normal.
Running via graphical interface
We looked at how to run the msconfig utility. Now we use it to boot next time in safe mode.
- Open the command interpreter through "Start" or via Win + R.

- We prescribe the "msconfig" string in the text form and execute the command.

The "System Configuration" window opens.
- In the first tab, we move the trigger switch to the second item - "Diagnostic Start" - and save a new configuration.


- However, if the proposed launch diagnostic modes do not satisfy, after the second step, go to the "Load" tab.


- Another shell - with the command line support, and the "conductor" and the network will be inactive;

Registry editor

- Go to the section where global settings are stored for all users - HKLM.


Video instruction
"Diagnostic Run" and save a new configuration.
- If you enable Safe Mode now, in the next window, click "Restart". Otherwise, go to the diagnostic mode will turn out after the next inclusion / restart PC.
- However, if the proposed launch diagnostic modes do not satisfy, after the second step, go to the "Load" tab.
- In the first field, select the operating system, which should be downloaded in the diagnostic mode if several are installed on the PC.
- In the download parameters, mark the option on which attention is accentuated in the screenshot.
- Select the satisfying option from the proposed:
- Minimum - launch of the graphical interface with a minimum set of services and drivers;
- Another shell - with command line support, "Explorer" and network will be inactive;
- Recovery Active Directory - analogue minimum, but with Active Directory Activation;
- Network - Running network drivers.
You can also activate one or more of the following options:
- Without GUI - run the PC, bypassing the welcome screen;
- Download log - to the NTBTLog.txt file, located on the system volume, all information about the start-up process will be recorded;
- Basic video - the basic video driver will be loaded to use the minimum features of the video card (work with video and animation will be possible).
- OS Information - on the boot screen, the names of the started drivers will be displayed.
- We celebrate the option "Make these parameters permanent", if you are confident that the PC with such a configuration will include several times in a row.
In this case, do not forget to return everything back when the computer will need to start as usual.
- Click "OK" to exit the configuration window, and reboot the PC by completing all applications while maintaining the progress of work in them.
Registry editor
For the start of the secure mode, one of the registry keys is responsible, so you can manage the computer start modes through the registry editor, but for this you need to work from under account Administrator.
- Perform "Regedit" in the search bar.
- Go to the section where global settings are stored for all users - HKLM.
- Follow the hierarchy down the hierarchy, as shown in the screenshot.
- Create a section "25000080" through context menu Catalog "Elements".
- Similarly, add a binary parameter and call it "Element" on the principle of creating new files and renaming them in the "Explorer".
- Through the context menu, open the key change dialog.
- We enter it as shown in the screenshot, and save new settings.
All options for calling a secure mode that is offered in Microsoft, we considered.
Video instruction
You can watch the video where it is shown how to run Windows 7 in secure mode through the graphical interface for 20 seconds.
 How to combine two accounts on Facebook?
 Download and insert a beautiful framework to Word Document
 How to fix clock_watchdog_timeout type "Blue screen" (0x00000101)