As from a disk image. Create a disc image or how to create an ISO disc image
An ISO image is a file with an ISO extension that contains files and folders. Typically, the ISO file is created in the process of copying an optical disc using special programs. However, the ISO file can be created without an optical disc. In this article, you will learn how to make an ISO image from a real optical disc, as well as without it.
In order to make an ISO image from a real disc, we need a computer with a floppy drive, an optical disc, and an imaging program. There are many different imaging software available. The most popular paid programs of this kind are UltraISO, Alcohol 120%, Ashampoo Burning Studio, and DAEMON Tools Pro. Among the free programs, the most popular are Ashampoo Burning Studio FREE, CDBurnerXP and ImgBurn.
In this article, we will talk about how to make an ISO image using a free program as an example. This program has a minimum of functions and a very simple interface, which means that even a novice user can use it.
Insert the optical disc into your drive and launch the ImgBurn program. In the window that opens, click on the "Create image file from disk" button.
After that, you will see a window for creating an ISO image from an optical disc. Here you need to select the drive that will be used to create discs.

And also specify the folder where the ISO image will be saved.

After selecting the drive and folder to save, you can start the process of copying a disc to an ISO image. To do this, you need to click on the button at the bottom of the window.
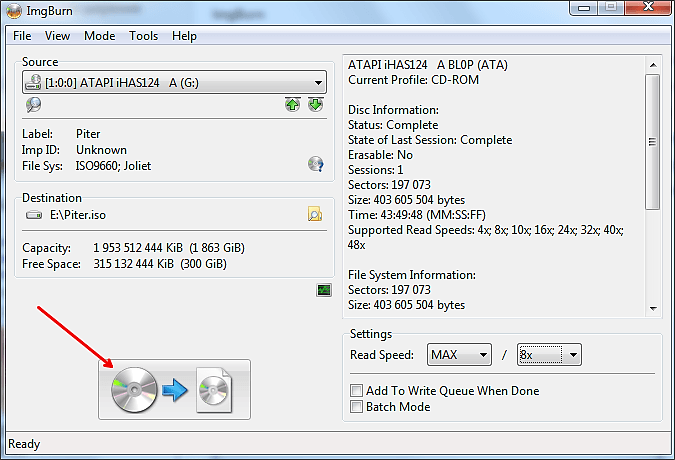

After the end of this process, an ISO disk image will be in the folder you specified.
How to make an ISO image from files
In order to make an ISO image simply from files without using a real CD you will need. This program is paid and costs about $ 30. You can check the trial version before purchasing.
To make an ISO image from files, launch the UltraISO program and add the necessary files to the main program window.

Today, users do not need to store a huge collection of discs. For example, you have a Windows 7 installation disc that you can optionally save to your computer as an image. For a more detailed flow of this procedure, read the article.
In order to create an ISO image of the Windows 7 operating system distribution kit, we will use a popular program for working with disks and images - CDBurnerXP. This tool is interesting in that it provides quite extensive opportunities for working with images and burning discs, but it is distributed absolutely free of charge.
How to create an ISO image of Windows 7?
If you plan to create a disk image for use on a USB flash drive, you will need a Windows 7 disk, as well as the CDBurnerXP program installed on your computer.
1. Start the CDBurnerXP program. In the window that appears, select "Data disc" .

2. The working window of the program will open, in the left area of which you need to select the drive with the Windows 7 disk (or the folder with the OS distribution files, if they are stored on your computer).

3. In the central area of the window, select all the files that will be included in the operating system distribution image. To select all files, type the keyboard shortcut Ctrl + A, and then drag them with the mouse to the lower empty area of the program.

4. After waiting for the end of processing the program files, click in the upper left corner on the button "File" and select the item "Save project as ISO image" .

5. The familiar Windows Explorer will open, in which you just need to specify the folder to save the ISO-image, as well as its name.

Do you know this famous proverb: live and learn? Well, this saying can be a good subtitle for today "s post. I would like to tell you about the useful feature of DAEMON Tools Ultra, which I have discovered recently. It is a very tricky way of and burn discs, using a virtual drive.
Definitely, I don "t need to explain you that DAEMON Tools Ultra is well-known image mounting software that creates various types of images. I bet you tried to make some virtual discs from the physical ones. Today I want to describe a little bit different situation. How to create an ISO image from files and folders, which are stored on your PC? How to "burn" not the CD, but the virtual disc? Let "s try to find out the answers.
I faced the question about how to create an ISO image from files when I decided to make backups of my immense photo collection. I have 6TB hard disk drive, and it is enough for storing big amount of data. I don "t want to buy discs, so I decided to create ISO images instead to store all my photos. I opened DAEMON Tools Ultra and chose Make Disc Image option. Here I faced a problem - to create a new image, I need an optical disc.
That "s a bit ridiculous. I want to create ISO image from files and folders, I don "t have a disc with my photos. Well, I can burn my data on CD-RW and then make a disc image, but it makes no sense. DAEMON Tools Ultra should have a better solution, and… it does! Now I "d like to describe, how to create an ISO image from files for those, who are also interested in this question.
How to create and ISO image from files and folders
At the beginning, let me remind you some copy-book maxims. To start using DAEMON Tools Ultra, download and install this program on your PC. DAEMON Tools Ultra has a 20-day long trial period, so you can evaluate its features - try to create ISO image from files or and, for example, - and then decide whether you need a paid license or not.
Now let "s look how this virtual drive emulator will let us burn some data to ISO image.

To open a newly created image, I need DAEMON Tools Ultra or any other software that mounts virtual discs. Look how my photos are presented now:

Hope my post about how to create an ISO image from files and folders was helpful. Would you use this feature? Write me your comments below!
A virtual disk image is extremely necessary for storing very important information. By creating ISO images, any game can be played without having a real disc. It is enough to create an emulated disc, and then mount it in the drive and you can enjoy the information recorded on it. Today there are dozens of programs from developers around the world. Some of them can be bought, others are distributed free of charge. Among such a multitude, it is difficult for an inexperienced user to find a truly useful product. Let's take a look at the best options offered by the manufacturer of disk imaging software.
Option 1: CDBurnerXP
CDBurnerXP is a powerful utility that works with any disks and images. Able to write, rewrite, erase data on the disk. It is a free product that has proven itself well among users. Allows you to create any bootable discs, save multimedia files to your hard drive. CDBurnerXP easily creates a convenient virtual disk with the * .iso extension. Works with multisession disks in all windows operating systems (7,8,10). To create a virtual ISO image, the user needs to follow 3 simple steps:
Option 2: ImgBurn
In terms of ease of use and intuitive interface, this free program can be called one of the most convenient. However, even on the official website, you won't find a clean executable file. Unwanted software is also hidden in the standard installer package.
If you are not jarred by this fact or there is a powerful antivirus, feel free to take this application and use it. By the way, no suspicious activity was detected in Windows 10, but you still need to be careful. Developer website: www.imgburn.com.
ImgBurn is a functional program with a simple interface. With its help, you can create a boot disk for installing the Windows 7 operating shell. When downloading, by default, the program is downloaded in English, but, if you wish, you can always download the crack file from the official source, and then insert the file with the Russian language into the Language folder.
The application can create virtual images from disks, from files. Creating an image from a file is very simple: just click on the corresponding icon and add files and directories to create the image.
Option 3: ISO Workshop
ISO Workshop is another option for creating an ISO image. Simple interface, works with images *. cue. Working with files of this format allows you to record images of albums in uncompressed form.
The main function of ISO Workshop can be considered the ability to burn an image, as well as extract from it. The program allows you to check disks for errors, as well as erase them. Link to the official resource: http://www.glorylogic.com/iso-workshop.html.
It is enough to select "Convert" and the necessary window will open in front of you
Option 4: Ashampoo Burning Studio
The user-friendly program with an attractive interface is absolutely free. Supports a number of formats besides the well-known ISO. Works with any disc. Creation of emulated drives is just one of the functions of Ashampoo Burning Studio. With this software, you can easily rewrite discs several times, copy any discs. For those who need to create a virtual disk with files, follow these guidelines:
Option 5: UltraISO
It is difficult to analyze utilities without such a giant as UltraISO. The program belongs to the paid representatives of the family of drive emulators. Works with a large number of files, creates virtual disks and writes images to a real optical disk.
Nowadays, virtual disk images and drives have found more widespread use, which have become an excellent replacement for such physical drives. Full-fledged DVDs or CDs are practically not used anywhere nowadays, however, work with disc images is still being carried out. The most popular storage format for such data is ISO, and the image itself can be created by each user. This is what we want to talk about further.
To accomplish this task, you will have to resort to additional software, in which the image is created, files are added and directly saved in the required format. There are many suitable software, so you will have to choose the one that suits best and will help you quickly cope with this process.
Method 1: UltraISO
The first on our list will be one of the most popular tools, whose functionality is focused specifically on working with drives and virtual disks. Of course, UltraISO also has a separate section where ISO files are created, and interaction with it looks like this:

After successfully completing the creation of the image, you can safely proceed to work with it. If you are going to continue working in UltraISO, keep in mind that this software also supports mounting ISO files. Read more about this in a separate article on this topic, the link to which is below.
Method 2: Daemon Tools
Surely many users have heard of such a program as. Usually it is used to mount ISO images in order to further read the contents or install various software. However, even the minimal Lite version has a built-in feature that allows you to create these images yourself. On our site there is already a separate instruction on this topic, in which the author has described the entire process step by step, accompanying each action with thematic screenshots. If you are interested in working with this tool, we recommend that you familiarize yourself with the tutorials by clicking on the link below.
Method 3: PowerISO
The functionality of the PowerISO program is also quite similar to those that we talked about earlier, however, there are certain additional functions that are useful to certain users. Now we will not focus on additional features, you will read about them in a special review on our website. Let's take a closer look at the process of creating an ISO disc image.
- Unfortunately, PowerISO is a paid distribution, but there is also a trial version that includes a limitation on creating an image. It lies in the fact that you cannot create or edit files larger than 300 MB. Please keep this in mind when downloading a trial build of this software.
- In the main window of the program, click on the button "Create" to start working on a new project.
- Now you will be prompted to select one of the data images, which depends on the type of files placed there. We will consider a standard way when objects of various formats can be saved to a virtual disk. You can choose absolutely any option.
- Next, select the created project and proceed to adding files by clicking on the corresponding button.
- The built-in browser will open, through which the search for the required items is carried out.
- The amount of free disk space will be displayed at the bottom. On the right, there is a mark that characterizes the formats of the drives. Specify the one that is suitable for the size of the loaded data, for example, a standard DVD or CD.
- Look at the top right panel as well. There are tools for copying discs, compressing, burning and mounting. Use them when needed.
- When all the files have been added, proceed to save by clicking on "Save" or Ctrl + S... In the window that opens, just select the format "ISO", specify the name and location where the image will be located.
- Wait for the end of the save. It will take a certain amount of time, depending on the size of the final ISO.
- If you are running a trial version of the software and trying to burn more than 300 MB, a notification will appear on the screen, which can be seen in the screenshot below.


As you can see, there is nothing difficult in completing the task through PowerISO. The only noticeable drawback is the limitation of the trial version, but it is immediately removed after purchasing a license if the user decides that he will use this software on an ongoing basis.
Method 4: ImgBurn
ImgBurn is one of the simplest programs that has about the same functionality. The interface here is implemented as friendly as possible, so even a novice user will quickly figure out the controls. As for creating an image in ISO format, this is done here as follows:
- Download and install ImgBurn on your computer and then launch. In the main window, use the option "Create image file from files / folders".
- Start adding folders or files by clicking on the corresponding button in the section "Source".
- The standard Explorer will start, through which objects are selected.
- On the right, there are additional settings that allow you to set the file system, set the date writing type and include hidden files in the display.
- After completing all the settings, start recording the image.
- Select a location and set a name for the save.
- Set additional options as needed, or set up a scheduled recording if required.
- After completing the creation, you will receive information with a detailed report on the work done.


If the above options for creating an ISO image do not suit you, you can safely choose any other similar software. The principle of interaction with it is practically the same as you saw in the above methods. Read more about the most popular software below.
Now you know about the methods of creating an ISO image using special software. Use any of the above tools to mount them further in order to read the contents, as they are all universal in this regard.
 Recover unsaved document in Word
 Repair a damaged Word file
 Creating an ISO image on a computer