Connect hard disk to maternal. How to connect the second hard disk to the computer
All site sections Website
All problems S. hard disks (screws) can be divided into two groups: incorrect connection (which is understandable, is not a malfunction) and malfunction of the device itself (refusal of electronics and / or disks themselves).
It often happens that everything works great until you connect the second hDD . After that, the system "does not see" both disks or "does not see" the second disk.
Or you went to a friend with your hard drive (screw), it all worked perfectly well, and when you came home, they found that your disk does not see the system.
All this is the symptoms of the wrong connection. hard disk. There is nothing complicated in the hard drive connection, so each user should know how hard drives are connected to the computer.
It's like to be able to replace the car's wheel. Do not cause the tow truck if the wheel is broken.
Hard disk interface
For connecting hard disk to computer One of the three interfaces can be used:
IDE (Integrated Device Electronics) - developed in 1986 and is still used;
SCSI (Small Computer Systems Interface) - also designed in 1986 and is also used so far;
Serial ATA (Advanced Technology Attachment) - developed in 2003, confidently gains momentum.
In addition to these interfaces for connecting hard disks Previously, ST and ESDI interfaces were used, but they forgot about the first in 1989, but about the second - in 1991.
Initially, IDE was developed only as an interface for connecting hard drives. Later he was modified and received the official name ATA - an extended connection interface for drives.
The difference between the IDE is that the ATA can be connected not only hard drives, but also CD / DVD drives.
The ATA interface was constantly improved, and at the moment there are several of its varieties decorated in the form of standards (Table 4.1).
Table 4.1. ATA standards

Yes, the latest version of ATA was released in 2001. It seems that in the future the interface will not develop, but will live peacefully. The following adopted standard is ATA-8 (2004) - already describes SATAII, and not IDE (ATA).
The SCSI interface is a high-performance interface for connecting various kinds of devices. Via this interface Not only drives can be connected to the computer, but peripherals.
For example, there are SCSI scanners, whose speed of which is significantly higher than speed works scannersconnected to the parallel LPT port. But with the advent of the USB bus, the need to produce peripheral devices with the SCSI - USB interface is much more convenient.
Therefore, now the SCSI interface is used mainly on servers - ordinary users, as a rule, do not buy SCSI disks due to their high cost. Yes, and the motherboard with the SCSI controller is quite expensive (compared to ordinary fees).
The SATA interface (Serial ATA, consistent ATA) was developed in 2000, but only in 2003 first appeared in the finished systems. Compared to the usual ATA (it is sometimes called PATA - Parallel ATA - Parallel ATA) it provides greater performance. Much depends on what is the actual hard disk cache.
The ATA interface is described in the ATA-7 standards (in parallel with the usual ATA) and ATA-8. The ATA-7 version interface supports 150 MB / s data transfer rate, and ATA-8 - 200 MB / s. As you can see, even the very first version of SATA is faster than the most latest version PATA. And Sataii is even faster.
While 200 MB / s is the limit for a home / office computer, that is, for the workstation. But the data rate on the modern SCSI interface (FAST-320DT technology) is 640 MB / s.
But these interfaces are used only at high-performance servers - most of the usual users are not affordable, and there is no need for such a speed.
Physical connection of the gesting disk
As we know, gesting discs are two types: ATA (IDE) and SATA (Serial ATA). The first discs are more "ancient", but nevertheless there is on sale the second - more modern, promising and faster.
Definitely - the future for SATA. It seems to me that after a few years, ATA disks will be removed from production. I think so. Wait and see.
Attention! Any change in the physical configuration of hard drives and other disk drives Requires power off!
ATA-Disk Connection (IDE)
As a rule, on motherboard There are two controller to connect IDEs - primary and secondary. Two IDE devices can be connected to each controller. I specifically not say "two hard drives", because CD / DVD drives can be connected to the IDE controller.
The first device connected to the controller is called a master (MASTER). This is the main device, so you need to choose a faster device on the role of the wizard.
The second device is called subordinate (Slave). So, the system may have four (maximum) IDE devices:
primary Master (Primary Master);
primary slave (Primary Slave);
secondary master (Secondary Master) - the second controller;
secondary subordinate (Secondary Slave) is the second controller.
Open the computer enclosure cover. Typically, the first controller is marked by IDE0, and the second - IDE1 (that is, the numbering begins with zero). If you have already installed an IDE (because you could buy a computer with a SATA disk), it will be connected to the first controller.
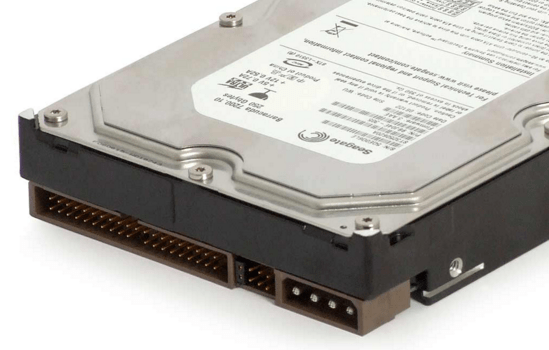
How to distinguish the IDE connector from the SATA connector? Very simple: IDE key connector (Fig. 4.3), and SATA is small (Fig. 4.4).

Fig. 4.3. IDE connectors on the motherboard
Pay attention to the IDE-loop color to which the motherboard and hard disk are connected. If he is gray, it is better to replace it on yellow - these are more high-performance loops (your hard disk will faster to workIf you connect it with a yellow loop).
You can see a visual video allowance - subtlety and nuances by
check hard disk in the HDD SCAN program
The difference is that old (gray) loops have 40 contacts, and new (yellow) - 80. When connecting the drive using an old BIOS cable, it issues a warning that a 40-pin cable is used (40 PIN) instead of 80-pin ( 80 PIN).

Fig. 4.4. SATA connectors
One end of the IDE-loop is connected to the IDE connector on the motherboard (do not worry - you will not get it wrong, because the key will not allow), and the other is a hard disk.
And here it starts the most interesting. You have connected a hard drive to one of the controllers, but now you need to select its mode - Master or Slave.
Next to the connector for connecting the IDE-loop on the hard disk will be a connector of the mode of operation. The mode of operation is selected using jumper - jumpers (Fig. 4.5) to be installed in one of the provisions corresponding to one or another mode of operation.
Map of modes hard work The disk is drawn on the hard disk - on the sticker from above. Sometimes the main device (master) is called Device 0 (Fig. 4.6), and the subordinate (Slave) - Device 1. Let it be confused.
Keep in mind: two main or two subordinate devices cannot be connected to one controller. If the device is connected to the controller, you need to disable it and check the operation mode - if Master, then connect the second device as Slave, or vice versa.

Fig. 4.5. Connecting IDE device
It is unwanted to change the mode of operation of already installed devices. Now I will explain why. Suppose, a hard disk is connected to the first controller as a wizard - Windows is downloaded from it.
If you install new hard drive As a master, but the old one will make a subordinate, then the computer will try to download Windows from a new hard disk and he does not work out, nothing!
Usually there is a third IDE mode of the IDE device - on the selection of the cable (Cable SELECT). In this mode, the device will be the main or subordinate depending on how it is connected to the loop - to the middle or by the end of the plume. You do not need to choose this mode, otherwise there may be two wizards or two subordinate devices (if you are incorrectly connected).
So, we have connected the IDE cable, chose the operation mode, it remains to connect the power. With this, everything is simple: many power cables come from the power supply unit, connect one of them to the hard disk. Do not be afraid - you will not connect it wrong. Usually, when the power is connected, the yellow wire is addressed to you.
The general connection diagram of the IDE device (yes, it is the device, since CD / DVD drives are connected similarly) depicted in Fig. 4.5.
Why didn't we talk about the location of the device in the computer case? I remember, a friend came from America and brought his computer, more precisely, one system unit.
It was a system unit of the so-called white assembly. When I opened it, I was pleasantly surprised - the length of all the wires was adjusted to a millimeter. There was an air intake from the fan to the processor, the second fan was directed to the IDE device - for optimal cooling.
Our computers are the so-called yellow assembly. Although they are collected from us, but all components, including the corps, are produced in Taiwan (from here and the name of the assembly is yellow).
And with Taiwanese corps, the situation is such that hard drives have to be placed where you want or need from the point of view of cooling, and where they will fit. I'm not talking about fitting the length of the wires. I'm silent about it ...
Connecting the SATA-Disc Winchester
Now let's talk about SATA disks. Connect the SATA disk is easier than simple. But on board your motherboard, there must be a SATA connector (see Fig. 4.4). On all modern motherboards it is. Do not be afraid, you will not confuse: SATA cable can not be connected to any other portion of the motherboard.
Connect SATA disk easier than IDE:
The SATA cable has two identical connector - at the ends. One end connects to the motherboard, the second to the hard disk. Connect the SATA connector is incorrectly impossible - the key will not allow;
The SATA disk has no jumpers (jumpers), so you do not need to choose the device mode;
Only one disk can be connected to one SATA connector;
Jumpers on available IDE devices do not affect SATA disks;
After connecting the SATA cable, do not forget to connect the power to the SATA disk. Please note: you need a special power cable (3.3 V), which comes with a hard disk.
Sometimes an adapter is supplied, which allows you to connect a conventional power cable to the SATA disk (Fig. 4.7).

Fig. 4.7. SATA power cable with adapter (left) and SATA interface cable (right)
As you can see, the physical connection of the SATA disk is simple. If you want to install Windows on the SATA disk, then it needs to be done boot.
How? When booting a computer when you see an inscription, press DEL to enter the Setup, then among the setup settings, find one with the name Boot Sequence or Boot Device. Priority.
If you plan to go to her later ... ( Connection order
Hard disk to computer | Connecting Winchester)
Imagine the situation: you perform on a laptop urgent work and suddenly ... the laptop turned off and no longer turns on. Following the work remained a few hours, and the repair of the capricious apparatus does not promise to be fast. What to do?
The main thing is not to panic! You can still have everything if you have a stationary PC. It is enough to have a screwdriver at hand and know the secret, how to connect a hard drive from a laptop to a computer. We will talk about it now.
Briefly about drives that are found on laptops
On modern laptops there are not only classic HDDs, but also. Both those and others may have different interfaces that are incompatible with each other.
SATA.
The most common interface and rigid, and solid-state disks is called "SATA". It is represented by a 7-pin data transmission connector and 15-pin - to connect power.

The SATA interface is most often found among storage drives for stationary computers, it supports any modern motherboard (if you do not take into account specialized and old devices). It is fully identical to the SATA standard, which is used in laptops. More precisely, it is a single standard.
IDE (PATA)
Drives with IDE interface (PATA) today can only be found on very old devices - released more than 10 years ago. Them distinctive feature - Long 40-pin connector for the data transfer loop and 4-pin power port.
Mother's fees of stationary PCs of the last generation IDE interface (PATA) no longer support. To connect the IDE disc to a computer where SATA support is implemented, an adapter will be required.
mSATA.
MSATA format produces miniature latter generation storage. In the form of the MSATA connector is very similar to Mini PCI-E, but electrically they are incompatible.

Connect the MSATA device to most desktop motherboards will be able only through an adapter, since this interface is rare on them.
M.2.
The SSD discs of the standard M.2 are even more compact than MSATA, and are used mainly on ultrabooks. They are released with three types of connectors, which differ from each other by the location of the key cutout:
- Type B has a cut out closer to the left edge. The part that is located to the left of the key, accommodates 6 contacts.
- Type M has a cut out closer to the right edge. A portion that is located to the right of the cut, accommodates 5 contacts.
- Type B & M has both keys.
SSD with connectors B and M can only be connected to the slot of their type, and B & M - to that and the other.

On desktop motherboards Slots M.2 are also very rare.
Connecting HDD from a laptop to the interface of the same type on PC
Everything is easier simple. To connect the SATA disk from a laptop to a similar interface of the stationary PC, you will need a SATA-loop data transfer (on the picture on the right) and a suitable connector on the power supply cable. If the last is not, buy the Molex-SATA adapter in the computer store (on the picture on the left).

The second end of the SATA loop is connected to the port on the motherboard. Port speed (3 GB / S, 6 GB / S) In terms of compatibility, the value does not have.

To connect the IDE disk (PATA) to the IDE port on the motherboard, you will need a wide 40-pin loop, the Molex power cable + IDE adapter 3.5-2.5.

To do not try to boot from "not a native" drive, the latter need to be switched to the "Slave" position. This is done using jumpers (jamrers) on the IDE discs, which are located near the power port. Information about the location of the jumper in the "Slave" position can be found on the disk or in the manual for it on the manufacturer's website.

When installing the jumper to the "Cable SELECT" position, the presenter and subordinate media are determined by the cable. At the same time, the "Slave" disk should be connected to the block on the middle of the loop (it is white in the picture).
MSATA and M.2 drives just insert into the appropriate slot on the motherboard.
Connecting another type disk
To connect a drive that is not supported motherboardMost adapter adapter. For example:
- IDE-SATA (SATA-IDE).

- SATA-USB.

- mSATA-USB.

- M.2-USB-SATA.

- IDE-USB, MSATA- SATA, M.2-SATA, etc.
A lot of adapters, but not all of them are easy to find on sale.
How to place a small mobile HDD in the system unit
Another problem that often puzzles users - how to arrange HDD from a laptop inside stationary computer. Here are also allowed by several options:
- Installation Add to Cart 2.5 ". Many of the latest generation computer enclosures have baskets for SSD, where you can insert a 2.5-inch HDD from the laptop.

- Using the adapter 3.5 "-2.5". A mobile drive is placed inside the adapter, fix it, then insert everything together into a basket for a standard hard disk 3.5 "and fasten with screws. There are adapters and for more compact carriers - 1.8 ". January 13, 2018 by the author: Johnny Mnemonic
Computer technique has long ceased to be a wonder, it is practically available for everyone in stock. Only the nature of use is different: Some users actively exploit the technique by pumping films, games and music on it, and others use the electronic computing machine when they wish to view latest news in world Wide Web Or perform part of the scene.
At a certain time, it is necessary to replace obsolete components
In this connection, the level of loading of the hard disk is different. If free space remains very little, then we should not expect normal performance from the PC at all. Given such circumstances, many owners make a decision to acquire the second "screw", thereby increasing the disk space. However, it is very important to first find out how to connect a hard disk to a computer.
Find information on the Internet, how to connect a hard disk to a computer, it does not constitute any difficulty. It is important only to carefully read with all the recommendations, and then no problems will arise if the user will independently install an additional hard drive, while old leaving on the same place.
Old hard disk is subject to withdrawal solely when he completely accounted for disrepair and is not subject to recovery. By installing the second Winchester together with the old, the user receives an extended space, thanks to which all actions will be performed faster.
Installation in PC Corps
Connecting a hard disk to a computer starts from that step when the user must initially place it in the case and securely fix it.
To ensure that the "screw" is properly implemented, it should be initially removed from the housing system Block. In front of the front, you can easily detect special compartments designed for drives and rigid disks. The drives are placed in the upper part, and the second hard disk should be defined in the lower part of such compartments.

Winchester is inserted into any free compartment, but preferably on a short distance from already existing. It is very important because in the process of work they both are heated, which will adversely affect the performance of the PC.

Then the second hard drive is strictly inserted along the guides so that the connectors are directed towards the inside of the system unit to ensure its comfortable connection in the future. When the new Winchester took its correct position, it should be securely secured, twisting the screws on both sides, providing a dense connection with the compartment.

After fixing, check the strength, trying to break it. If the hard drive is not exposed to stagger, it means that all actions were made correctly.
Connection using loops
After you connect the second hard disk to the computer successfully, you can move to the second part of such important actions. At this stage, it is necessary to connect directly the second hard drive with the motherboard, as well as to provide power to it.
To do this, you will need to purchase additional loops. By the way, it is advisable to note that the connectors through which the hard disk directly connects may differ, depending on the year of the PC.

The old computer is equipped with IDE connectors, while new already has SATA connectors, which are characterized by amazing speed. Previously, users were focused when making buying to pay attention to the connectors and acquire only the hard drive with the desired type. Currently, finding a hard disk with IDE connector is problematic, but it does not indicate that there is no hope of installing the second disk. Simply in this case, the user is obliged to additionally acquire special adapters.

Connecting the second hard drive using SATA connections and adapters, the owner of the smart machine not only ensures the speed of the system, but also facilitates the installation process.
Setting a few years ago old Winchester With the IDE connector, it was necessary to carry out the manual configuration of the "screws" mode, which was the installation of jumpers at certain positions.

Connection using SATA connectors is much simpler. All connectors on new technique Equipped with special partitions, so it is impossible to connect an incorrectly a priori.

Connection using USB
There is one more alternative way, providing an absolutely easy connection of a new disk space, while absolutely excluded the need to disassemble the system block case.
In this regard, many wish to know how to connect an additional hard disk to a computer without experiencing any additional difficulties. The answer is obvious, the second hard "screw can be connected to the electronic computing machine using a USB device.

Such hard drives receive power through a USB connector to which it is directly connected. However, this is characteristic exclusively for disks having a size of 1.8 or 2.5 inches. More powerful, for example, starting with 3.5 inches, already need an additional power source.
External devices are very simply connected, so preferred by a large number of users.
Definition of devices in BIOS
Provided proper connection Winchester, you should take care that it is correctly displayed in the BIOS, otherwise it will be just stupid to dream of quality work.
To produce correct settings In the BIOS, it should also be understood how to connect an old hard disk to a computer, how to connect a new hard drive, how to ensure the correct operation of these two disks.
The user understands that the operating system is installed on it on one of the disk spaces, in most cases it is the old hard drive is a place where the operating system was once loaded.
In connection with this in bIOS settings The user must set the priority of loading from the old hard drive. The error priority will not allow you to boot the system. In the BIOS, it is completely simple to determine the priority, since SATA with a assigned number will be written opposite the available hard drives. It is the number that points to priority. Winchester with the operating system must have SATA 1.

If any rigid disk is not displayed in the BIOS, you should double-check the correct connection, otherwise you cannot use the installed disk space.
So, the installation of an additional hard drive is a predictable act, accompanied by actions that can be easily performed by any user, if it becomes the effort and manifests increased attention.
Connecting a hard disk to a laptop or computer is not too complex task, however, those who have never come across it may not know how it is done. In this article, I will try to consider all possible hard disk connectivity options - both installation inside the laptop or computer and external connection options in order to rewrite the necessary files.
Connect to a computer (inside the system unit)
SATA cable due to its form is more resistant to multiple connections. The SATA feeding cord is also designed taking into account multiple connections. SATA power connector supplies 3 supply voltages: +12 V, +5 V and +3.3 V; However, modern devices can operate without voltage +3.3 V, which makes it possible to use a passive adapter from the standard IDE power connector on SATA. A number of SATA devices comes with two power connections: SATA and MOLEX.
The SATA standard abandoned the traditional connection for PATA two devices on the loop; Each device is assumed to be a separate cable that removes the problem of the impossibility of simultaneous operation of devices located on one cable (and arising from here delays), reduces possible problems when assembling (the problem of the SLAVE / Master of devices for SATA is missing), eliminates the possibility of errors when using non-emissible PATA- loops.
The SATA standard supports command queue feature (NCQ, starting with SATA Revision 2.x).
The SATA standard does not provide for the hot replacement of the active device (used Operating system) (Up to SATA Revision 3.x), additionally connected discs to disconnect you need gradually - power, train, and connect in reverse order - loop, power.
SATA connectors
SATA devices use two connectors: 7-pin (connection bus) and 15-pin (power connection). The SATA standard provides the ability to use a standard 4-pin Molex connector instead of a 15-pin power connector. Using both types of power connections simultaneously may result in damage to the device.
The SATA interface has two data channels, from the controller to the device and from the device to the controller. To transmit the signal, LVDS technology is used, the wires of each pair are shielded vita pairs.
There is also a 13-pin SATA connector connector used in servers, mobile and portable devices for CD / DVD SLIM drives. Devices are connected using SATA SlimLine All-in-One Cable cable. The combined connector from the 7-pin connector for connecting the data bus and 6 and contact stroke to connect the power supply of the device. In addition, to connect to these devices, a special adapter is used in servers.
Using http://ru.wikipedia.org/wiki/sata.
The most interesting comments on the colors of the SATA power connector cable:
RU2012: "There are adapters for converting a 4-pin Molex connector into the SATA power connector. However, since the 4-pin Molex connectors do not provide 3.3 V, these adapters provide only 5 V and 12 in power and leave 3.3 V lines are disabled. This does not allow you to use such drives with drives that require a 3.3 V power - orange wire.
Understanding this, hard drive manufacturers largely left support for the orange power cable by 3.3 V in their data storage devices - the power of the line in most devices are not used.
However, without a power of 3.3 V (orange wire), the SATA device may not be able to make a hot disk connection ... "- http://en.wikipedia.org/wiki/Serial_ata
Have questions - ask - We will help than we can (for the work of comments, a java script is needed in the browser):
To comment, it is enough to ask a question in the window below, then click "POST AS" - Drive E-mail and name, and click "POST Comment".
In the system block case, there are compartments for devices (usually they are in front of the case). The topping of the housing compartments are designed as a rule to set the CD / DVD optical drives, Blu-Ray. And the lower compartments shown in the photo are designed to install hard drives.
From the available compartments, we choose anyone and put a rigid disk there. It is necessary to position it so that the connections (see the image) of the disk looked inside the housing.

Then, we take the hard drive and insert it on the guides that do not give it down.

Everything. The disc is inserted, now it needs to be secured by screws. As you can see, there are appropriate mounting holes on the housing.

It is necessary to make the threaded holes on the disk coincided with the holes on the case. Now we will spin the screws in them.

It is desirable that the screws were four, two on the one hand and two on the other. Having screwed the hard drive on one side, deploy the housing and screw the other side.

Hard disk we recorded. Check that it does not walked if the disk moves, then tighten the screws stronger.

Installing the hard disk is completed, now it can be connected to the motherboard. First of all, it should be noted that, hard drives of different generations have different connectors, different cables ("plumes") for connecting.
We will consider connecting a hard disk with the most common IDE interfaces (outdated, but still used) and SATA.
Connecting a hard disk with SATA interface
Connecting a hard disk to a laptop or computer is not too complex task, however, those who have never come across it may not know how it is done. In this article I will try ...
In the system block case, there are compartments for devices (usually they are in front of the case). The topping of the housing compartments are designed as a rule to set the CD / DVD optical drives, Blu-Ray. And the bottom compartments shown in the photo are designed to install hard drives.
From the available compartments, we choose anyone and put a rigid disk there. It is necessary to position it so that the connections (see the image) of the disk looked inside the housing.

Then, we take the hard drive and insert it on the guides that do not give it down.

Everything. The disc is inserted, now it needs to be secured by screws. As you can see, there are appropriate mounting holes on the housing.

It is necessary to make the threaded holes on the disk coincided with the holes on the case. Now we will spin the screws in them.

It is desirable that the screws were four, two on the one hand and two on the other. Having screwed the hard drive on one side, deploy the housing and screw the other side.

Hard disk we recorded. Check that it does not walked if the disk moves, then tighten the screws stronger.

Installing the hard disk is completed, now it can be connected to the motherboard. First of all, it should be noted that, hard drives of different generations have different connectors, different cables ("plumes") for connecting.
We will consider connecting a hard disk with the most common IDE interfaces (outdated, but still used) and SATA.
Connecting a hard disk with SATA interface
Hard disk SATA. Connects using a narrow information cable depicted in the figure.

We attach one end of this cable to the disc connector, and the other to the motherboard.

After connecting the information cable, connect the power cable (from the power supply) to the corresponding SATA disk connector

If your power supply has no connections for SATA devices, use the IDE / SATA power adapter. If the hard disk is present connectors of the two types of SATA and MOLEX, there is enough connection, one of them.
Everything. Winchester with the SATA interface is connected.

How to connect a hard drive via SATA video:
Connecting a hard disk with IDE interface
When the IDE is connected, first of all you need to set the mode of its operation: Master (main) or Slave (subordinate). Since we set one hard drive, you must install the Master mode. The mode is determined by the position of the jumper (jumper) on the back of the disk.

From above the hard drive in the figure shows which position to install the jumper to work as a master.
This is how IDE connectors on the motherboard for connecting IDE disks and other IDE devices.

Devices are connected using IDE loop (cable).

Take the end of the longer plume segment and connect to the connector on the motherboard. Since we have one hard drive, the loop should be connected to the first IDE channel (on the motherboard usually there is a designation - IDE 0 primary (primary) and IDE 1 Secondary (secondary).

Now connect the loop to the hard disk. Master always connects the connector located at the end of the short segment of the loop.
That's all. We have steply reviewed how to connect a new hard disk through the SATA and hard disk with the old IDE connector. By holding this instruction, you can also additionally connect the second hard disk to the computer. If the hard drive is new or transferred from another computer, the following all the necessary procedures for its configuration will be performed during.
 State Services Personal Account
 State Supervisory Cabinet- Entrance on SNILS and Telephone
 Single telephone rescue service in the Russian Federation