Why there is no Boot Device Priority in BIOS. No in BIOS download from a flash drive - how to set up? Data transfer to USB
There are sometimes quite unpleasant situations when the operating system "flies". And for recovery requires an original disk. If there is no such available, you can burn the image and on the usual USB flash drive. But here is the problem - what to do when not in the BIOS boot from the flash drive? Many users simply do not know what to do and lose on this issue. Let's try to place all the points above I.
How to enable in Bios the simplest method?
To set these parameters, you must first decide how to enter the BIOS input. The most common way is to use the Del, F2, F12, etc. keys.
However, on the same sony laptops VAIO access is carried out using special buttons Assist rendered on the keyboard panel. On some laptops, access to the BIOS can be obtained exclusively through the call of the primary load menu using the ESC key.

How to set the download from the flash drive in the BIOS? Yes, very simple. After calling the I / O system, you need to go to the boot section (BOOT). Here you need to find a loading priority string that may have disseminated names, depending on the developer and manufacturer BIOS (Boot Device Priority, Boot Sequence, etc.). In any case, something in this spirit will be present. But the essence is not.
What if not in the BIOS boot from the flash drive?
It also happens that the loading flash drive of the primary input / output system is not recognized. With what it can be connected? The reasons for this, as a rule, several:
- incorrectly recorded image or installation distribution;
- damage to the usb carrier itself.
To make sure that all the steps to download from the flash drive are made correctly, you need to take several steps. As long as the question is, how to turn on the download from the flash drive in the BIOS, will leave on the second plan, but will go to urgent problems.
Check in "Device Manager"
Let's start from the last item. When checking the device itself, there may be two options for its functionality: either it is defective in itself, or there is no or incorrectly an accompanying driver that is responsible for recognition of the flash drive operating system.
With malfunctions, everything is clear. The device will have to be replaced. But what to do when it is in working condition (at least, is defined on another computer or laptop)? You need to check its functionality. And for this, in the simplest version, you should simply insert it into the appropriate USB port 2.0 / 3.0, and then call the standard "Device Manager" through the "Control Panel" or use the command DevmGMT in the Run menu bar (Win + R).

Suppose that after inserting to the port in the manager, it can either be either displayed, or displayed with a yellow icon, which is present in the second case everything is simple: you need to install or re-install the driver. It may very much that the system itself does not find the appropriate driver, although it should do it automatically. But this mostly concerns non-standard devices. Flashki like Transcend is usually recognized immediately.
If the device is not displayed in the corresponding dispatcher, there can also be two reasons: either the corresponding driver of the universal USB controller is not installed, or the port itself is defective. Again, you should install the driver (the controller is indicated by yellow or missing in the manager at all), or try to turn on the flash drive to another port. It should be noted that if the device is calculated exclusively for data transfer only with USB 3.0 support, when connected to a standard port 2.0, it will not be determined.
Formatting USB Devices
The question of how to make the download from the flash drive in the BIOS, while we leave aside, but we turn to the procedures without which even the image recording to install the system on the device may be in vain.

First of all, if the device has problems in the work or it cannot be made with it, it should be formatted for a start. At the same time, it is undesirable to make a quick cleaning of the table of contents, and it is better to fully format. Only in this case the file system contained on it will ensure correct data transfer and their reading.
This operation is performed in the standard "conductor". On the device you just need to make the right click, and from the menu select the corresponding string. In a new window, it will be necessary to remove the "bird" from the line quick formattingAnd then activate the beginning of the process. Depending on the total volume it may take a long time.
Creating a boot distribution
If we consider the question of how in the BIOS to set the download from the flash drive, is still wider, you can not get around the face and the creation question boot image And its transfer to the drive. You can do this with the Ultraiso utility or similar to it.

However, the original installation must use as a source. windows disk. Actually, it is not so difficult, so there is no particular sense to stop at this in detail. And if not in the BIOS of loading from the flash drive, in the future everything comes down to correctly transfer the image or unpacked distribution files to the drive. Here you have to tinker a little.
Preparation of carrier
In case of use own funds Systems Even after formatting with a USB device, a number of additional actions must be made (it is assumed that the image has already been created from the original disk using the same Ultraiso program or even 7-zip, and the flash drive is in working condition and is connected to a computer or laptop) .
First call command line (CMD in the "Run" menu), be sure to behave from the system administrator. In the console appeared, we enter and click the input button.

After that, apply the List Disk command, again, followed by pressing the ENTER key, after which we view the existing discs and remember the USB device number. To accurately check the USB drive number, you can use the DiskMGMT.msc command entering the "Run" menu.
Now in the console, you need to enter the Select Disk command and specify the number of the desired disk via the gap. Next, the device should be cleaned of the contents of the Clean command.

The next step will be the creation of primary boot section. This is done using the Create Partition Primary command, followed by entering. After confirmation of a successful operation appears on the screen, we use the Select Partition 1 command, then Active (To activate the selected partition) and finally - Format FS \u003d NTFS Quick to format the selection If you want to create a FAT32 file system, a similar Format FS team is used \u003d FAT32 Quick.
Further step - assigning a name device using the ASSIGN command (name will be assigned automatically). Finally enter EXIT and complete the work. The boot USB device is ready to work. It remains only to correctly transfer the distribution files to it.
Data transfer to USB
At this stage, you will no longer need to configure. BIOS for download from the flash drive should not be needed yet, but the 7-ZIP program will need. In the simplest embodiment, it is possible to correctly copy the installation files to the media (roughly speaking, remove them from the image).

Run the ZIP File Manager utility from the standard "Explorer", then select the previously created or loaded image of the installation distribution in the Internet, indicate as end device Flashpan and confirm the actions by pressing the OK button. At the end of the process, the carrier will be fully ready for work.
Starting download
But now we go to the question of how to install in the BIOS download from the flash drive, directly. We overload the system and at the initial stage, press the key or the shortcut of the keys to enter bIOS settings. This is usually Del, F2, F12 (for ASUS laptops BIOS-loading from a flash drive is carried out exactly as), but they can use other keys or combinations described above. Depending on the manufacturer of the equipment, you may first call the main menu. This situation is characteristic of laptops like HP - loading from the flash drive (BIOS) is set somewhat differently, although the operation itself is very similar.
In the download section (boot), we are looking for a boot device priority and look at the 1-St Boot Device string. By pressing the PGDN key, select the desired device, after which you exercise with saving parameters (as a rule, it is done using the F10 key). Next should be rebooted, and the installation starts automatically.
However, it is a little known how to choose the download from the flash drive in the BIOS. It is important to remember that calling the settings of the primary I / O system follows only when the USB device is connected before starting the computer or laptop. Otherwise, the flash drive simply will not be determined.
How to fix problems?
Now let's look at the situation when the device seems to work and should work, because all the actions described above are presumably fulfilled correctly, but in fact it's still not in the BIOS of loading from the flash drive. What to do in this case?
We use the same command line. Suppose that the USB device in the system is denoted by the letter F, and the optical drive is E. Now you need to register the command E: \\ boot \\ bootsect.exe / nt60 f: (F - in our case, the flash drive, and E is the drive).
Alternative method
If this does not work, alternately enter the following:
F: \\ Boot \\ Bootsect.exe / NT60 F:
After that, everything will accurately earn as it should be.
Compatibility issues
If none of the above methods helps, to begin with, pay attention to the status of the drivers. In the most optimal option, you can use programs like Driver Booster.which are able to update the drivers automatically.
If everything is in order with them, the reason may consist that the user tries to install a 32-bit system over 64-bit. In addition, the file system on the USB carrier and the installation distribution may also differ from the bit. Actually, the flash drive itself may not support uSB ports 3.0, in which it turns on. Here you need to be very attentive.
Instead of the result
Here, in fact, all that concerns how in the BIOS to set the download from the flash drive. Of course, many users may have questions about the expediency of using their own systems for preliminary action, because automated programs make it much faster and easier. But here I would like to note that such knowledge is extremely important, and programs in access to the Internet are also not always at hand.
But mandatory conditionAs already understandable, the disk image is created based on the original or loaded from the Internet. Without him nowhere. It remains to add that attention should be focused also on the bittenness of the system being installed, since the 32-bit version over 64-bit without formatting system partition Not installed. This is only due to the fact that for versions of the 32 bits, it is required for 64-bit modifications - minimum NTFS. And on the flash drive must be present file Systems Fat or NTFS, not UDP, as it sometimes happens. As for the volume, the 4 GB will be quite enough for any system, including even gaining tenth modification.
Most often we remember BIOS ( Basic system I / O) only when we need to reinstall operating system And you need to set the boot from the disk or flash drive in it. I often wrote about it in these articles like: and others. Now I want to gather together and refer only to this article if necessary. This article will be useful for all versions of bios and for different firms. Single unified reference book
The first thing you need to know - BIOS is divided by manufacturers and versions.
To change the boot method in BIOS - You must first enter it.
You can, of course, find out what version and manufacturer of your bios, from the manual going with the computer.
Also, it is possible to learn looking at the string at the top on the black screen when loading (the manufacturer will be indicated).
Well, then enter BIOS, knowing what you have.
In some versions of the bios, there is no such screen with a lines. There simply stands the logo and the bottom is written in the bottom. Something like "Press F2 to Enter Setup" means and press F2. If it is just a logo and there are no inscriptions - press ESC and then Del or F2
Here is a small list of manufacturers and shortcuts of keys to enter the BIOS:
Also at the bottom of the black screen, the keys are written to enter the BIOS and to display the list, which contains the available devices for download and so that you can boot from it. But about him at the end of the article.

As you can see - most often you need to press the key F2. or Del..
Now you need to put a flash drive or disk.
Consider on several examples different from the BIOS manufacturer.
Setting up Award BIOS to download from a flash drive or disk:
The main window is this kind in which we need a second point:

Further depends on the firmware version. In one case, you will need to go to the item similar to "BOOT SEQ & FLOPPY SETUP"

in another case, it is not necessary to go anywhere - everything will be so before our eyes

Schelkov on First Boot Device. (First boot unit), click ENTER and such a window will appear

in which you need to select a disk or flash drive that will be started first. You can specify the second boot device, for example, but usually the BIOS itself fills this data.
On a note:
If you choose a USB flash drive, then, among other things, you need to go to the item "Hard Disk Boot Priority "and move our USB flash drive to the very top with the" + "and" - "or" pagep "and" pagedown "buttons:

It is also worth remembering - that in order for BIOS to see the USB flash drive, you need to connect it until you turn on or before rebooting
Then click "F10" (see the exact key in the prompt at the bottom of the screen with the name "Save", "Exit") or exit the main menu of the bios and select the "Save and Exit Setup" item. In the red window, select "YES" with the "Y" button on the keyboard and press "ENTER"

The computer reboot and when downloading from the installation disk with Windows, there may be such a request for a few seconds "Press Any Key to Boot From CD or DVD ..."

What is translated as "Press any button to boot from CD or DVD".
This means that if at this moment you do not press any button on the keyboard, then the computer will continue to load from the following device list.
Another variety of this bios:
I met only on the old computers of the decade ago until 2003. The main menu looks like this:

To customize the load order, you need to go to the menu Bios Features Setup.:

At this point, we just select the Pageup and Pagedown buttons (or ENTER and arrows) what to set first - CDROM or USB flash drive. Do not forget about the second and third device
And further:


How to choose where to boot in ami bios
If, entering the bios, you see such a screen, then you have Ami Bios.:

The button on the "Arrow right" keyboard is moving to the Boot tab:

We go to the "Hard Disk Drives" and in the "1st drive" line (may be called "First Drive") select the disk or flash drive:

Next we go to "Boot Device Priority", go to "1st boot device" and select from the list what has been chosen in the previous tab (i.e., if you choose a flash drive in Hard Disk Drives, then you need to specify it. This is important! )

To boot from the CD / DVD disc, you need to select "ATAPI CD-ROM" (or just "CDROM") in this menu, while there is no need to enter the previous menu "Hard Disk Drives".
Now we save the results with the "F10" button or go to the "Exit" bios section and select "Exit Saving Changes".
Another AMI BIOSbut everything is clear here:

Setting up Phoenix-Award BIOS to download from a flash drive
If, entering Bios, you see such a screen, then you have a Phoenix-Award BIOS:

We go to the "Advanced" tab and opposite the "First Boot Device" exhibit what you need (USBA or Disk):

Save the key F10.

Configure EFI (UEFI) BIOS with a graphical interface for download from a flash drive
Now you will not surprise anyone. Almost all new computers are supplied with a similar shell. You can read more about it in the article.
When loading, at the bottom of the screen there is a section "Boot Priority", where you can use the mouse (dragging) to set the desired load order.
You can also press the "EXIT / ADVANCED MODE" button in the upper right corner and select the Advanced Mode in the Advanced Mode window that appears.

Next, go to the tab "BOOT" and in the section Boot Option Priorities. In the "Boot Option # 1" field, install the default flash drive device, a DVD-ROM, a hard disk or other device available.

How to boot from the flash drive or from the disk without entering bios
This is what I wrote about almost at the very beginning of the article.
This is when you need to press the key once and the window will appear with the download selection. This method does not change the BIOS settings.
Usually Award Bios. Offers to click "F9" to call the boot menu, and AMI asks to click "F8". On the Not Bugs, this can be the "F12" key.
In general, see the bottom line and look for Press F8 for BBS Popup or Press F9 to Select Booting Device After POST.

Why can't boot from flash drives in BIOS?
Possible reasons: 
On ancient computers, there is no possibility to load from USB flash drives. If there is no more than new bios, then the project can help.
1) Download the link above last version "Plop Boot Manager" and unpack.
2) There are files in the archive: plpbt.img is an image for a floppy disk, and plpbt.iso is an image for a CD.
3) Record the image on the disk and load from it (or from the diskette).
4) A menu will appear in which you choose your flash drive and already load from it.
Little decoding of disk designations when choosing:
Do not forget after you did what they wanted (namely, why changed the download in the BIOS) - return the download settings back so that the computer loaded with hard disk.
Good day to everyone!
Why memorize what is not needed every day? It is enough to open and read the information when it is needed - the main thing is to use! Usually I do it yourself, and these signs with hot keys are no exception ...
This article is help, it contains the buttons to enter the BIOS, to call the boot menu (it is also called Boot Menu). Often they are simply "vitally" needed reinstalling Windows, when restoring the computer, configuring BIOS, etc. I hope the information will be relevant and you will find the cherished key to call the desired menu.
Note:
- Information on the page, from time to time, will be replenished and expanding;
- Buttons to enter the BIOS can be viewed in this article (as well as how to enter Bios generally :)):
- At the end of the article, examples and explanations of cuts in the table are given, decoding functions.
Laptops
| Manufacturer | BIOS (model) | Hot key | Function |
| Acer. | Phoenix. | F2. | ENTER SETUP. |
| F12. | Boot Menu (Change Boot Device, MULTI BOOT SELECTION MENU) |
||
| Alt + F10. | D2D Recovery (disk-to-disk System Recovery) |
||
| ASUS | AMI | F2. | ENTER SETUP. |
| ESC | Popup Menu. | ||
| F4. | Easy Flash. | ||
| Phoenix-Award | Del. | BIOS Setup. | |
| F8. | Boot Menu. | ||
| F9. | D2D Recovery. | ||
| Benq | Phoenix. | F2. | BIOS Setup. |
| Dell. | Phoenix, Aptio. | F2. | Setup. |
| F12. | Boot Menu. | ||
| Ctrl + F11 | D2D Recovery. | ||
| emachines. (Acer) | Phoenix. | F12. | Boot Menu. |
| Fujitsu. Siemens. | AMI | F2. | BIOS Setup. |
| F12. | Boot Menu. | ||
| Gateway. (Acer) | Phoenix. | Click Mouse or Enter | Menu. |
| F2. | Bios settings | ||
| F10 | Boot Menu. | ||
| F12. | PXE Boot | ||
| HP. (Hewlett-Packard) / Compaq | Insyde. | ESC | Startup Menu. |
| F1 | System Information | ||
| F2. | System Diagnostics. | ||
| F9. | Boot Device Options. | ||
| F10 | BIOS Setup. | ||
| F11 | System Recovery. | ||
| ENTER | Continue Startup. | ||
| Lenovo. (IBM) | Phoenix Securecore Tiano. | F2. | Setup. |
| F12. | Multiboot Menu. | ||
| MSI (Micro Star) | * | Del. | Setup. |
| F11 | Boot Menu. | ||
| Tab. | Show Post Screen. | ||
| F3. | Recovery. | ||
| Packard Bell (Acer) | Phoenix. | F2. | Setup. |
| F12. | Boot Menu. | ||
| Samsung | * | ESC | Boot Menu. |
| Toshiba. | Phoenix. | ESC, F1, F2 | ENTER SETUP. |
| Toshiba. Satellite A300 | F12. | Bios. |
PERSONAL COMPUTERS
| Motherboard | Bios. | Hot key | Function |
| Acer. | Del. | ENTER SETUP. | |
| F12. | Boot Menu. | ||
| ASRock | AMI | F2 or DEL | Run Setup. |
| F6 | Instant Flash. | ||
| F11 | Boot Menu. | ||
| Tab. | Switch Screen. | ||
| ASUS | Phoenix-Award | Del. | BIOS Setup. |
| Tab. | Display BIOS POST Message | ||
| F8. | Boot Menu. | ||
| Alt + F2. | ASUS EZ FLASH 2 | ||
| F4. | Asus Core Unlocker | ||
| Biostar | Phoenix-Award | F8. | Enable System Configuration. |
| F9. | SELECT BOOTING DEVICE AFTER POST | ||
| Del. | ENTER SETUP. | ||
| Chaintech | Award | Del. | ENTER SETUP. |
| Alt + F2. | ENTER AWDFLASH. | ||
| ECS. (ELITEGROOR) | AMI | Del. | ENTER SETUP. |
| F11 | BBS Popup. | ||
| Foxconn. (WinFast) | Tab. | POST SCREEN. | |
| Del. | Setup. | ||
| ESC | Boot Menu. | ||
| Gigabyte | Award | ESC | Skip Memory Test |
| Del. | ENTER SETUP / Q-FLASH | ||
| F9. | Xpress Recovery Xpress Recovery 2 |
||
| F12. | Boot Menu. | ||
| Intel | AMI | F2. | ENTER SETUP. |
| MSI (MicroStar) | ENTER SETUP. |
Help (according to the above tables)
BIOS SETUP (also ENTER SETUP, BIOS SETTINGS, or JUST BIOS) - This is the button to enter the BIOS settings. You need to press it after turning on the computer (laptop), and, it is better several times until the screen appears. Depending on the manufacturer of the equipment, the name may vary somewhat.

Boot Menu (also Change Boot Device, Popup Menu) - A very useful menu that allows you to select the device from which the device will be loaded. Moreover, it is not necessary to enter the BIOS to select the device and change the download queue. Those., For example, you need to install Windows - I pressed the Boot Menu button, chose the setting flash drive, and after the restart - the computer will automatically be loaded from the hard disk (and no unnecessary BIOS settings).

Example Boot Menu - HP Laptop (Boot Option Menu).
D2D Recovery (also Recovery) - Windows restore function on laptops. Allows you to quickly restore the performance of the device from hidden section Hard disk. To be honest, I personally do not like to use this feature, because Restoration in laptops, often, "curved", works Topoon and does not always have the ability to select detailed settings "How and what" ... I prefer to install and windows restoration From the boot flash drive.

Easy Flash - Used to update BIOS (I do not recommend using beginners ...).
System Information - System Information on the laptop and its components (for example, this option is on HP laptops).
PS.
For additions on the topic of the article - grateful in advance. Your information (for example, buttons to enter the BIOS on your laptop model) will be added to the article. All the best!
Today I will tell you how to turn on the boot from the flash drive in the BIOS of various manufacturers. It does not matter what version you have, the procedure for gestures will be as follows:
1. Insert our bootable flash drive into the USB connector of your computer. I recommend inserting it to the port, located directly to motherboard. On the back of the system unit.
2. Turn on the computer and click the key Delete.(or F2.) to get to the BIOS. Depending on the manufacturer and the BIOS version, other keys (ESC, F1, TAB) can be applied, so you need to carefully read the tips on the screen.
In BIOS, we can move on tabs only with the keyboard.
Below I will describe in detail this process On the example of the most applied versions of the BIOS.
Attention!Remember that if you install the operating system from a flash drive or a CD and selected the boot device in the BIOS, and not in the boot menu, then after the first automatic windows reboots You must log in to the BIOS and return the boot from the hard disk. If this is not done, it will start the startup from the flash drive or the CD, and Windows will again begin the first stage of the procedure installations.
Setting up Award BIOS to download from a flash drive
Award Bios.:
First check whether the USB controller is enabled. We go to "Integrated Peripherals". Let's go down the arrow on the keyboard to the "USB Controller" item. Click the "Enter" key and in the window that appears, select "Enable" (also using "Enter"). Opposite "USB Controller 2.0" should also stand "Enable".
 We leave this tab by clicking "ESC".
Then go B. "Advanced Bios Features" - "Hard Disk Boot Priority".Now in my example in the first place is Winchester, but should stand flash drive.
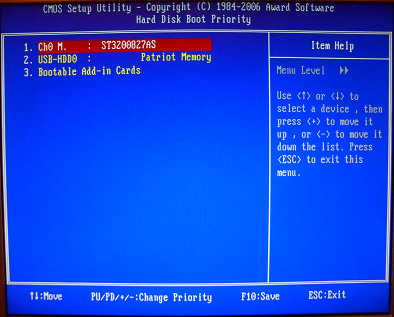 We become on the line with the name of our flash drive (Patriot Memory) and raise it at the very top with the "+" key on the keyboard.
 Let's go out from here by pressing "ESC".
Setting Ami Bios. To download from a flash drive
If, entering the bios, you see such a screen, then you have Ami Bios.:
 First check whether the USB controller is enabled. We go to the "Advanced" tab - "USB Configuration".
 Opposite the points "USB FUNCTION" and "USB 2.0 Controller" must be "enabled".
 If this is not the case, we become on this line and click the "Enter" key. From the list that appears, select "Enabled" (also using "Enter").
Then we leave this tab by clicking "ESC".
We go to the tab "Boot" - "Hard Disk Drives".
 Now I am in the first place is Winchester, and you need to put a flash drive here. We become on the first line, click "Enter" and in the appeared window, choose our USB flash drive Patriot Memory.
 It should be like this:
 We leave here through "ESC".
Choose "Boot Device Priority". Here, the first boot device must be a flash drive.
 Click ESC.
Then we leave bios, keeping all the settings made. To do this, go to "EXIT" - "EXIT & SAVE CHANGES" - "OK".

Setting up Phoenix-Award BIOS to download from a flash drive
If, entering the bios, you see such a screen, then you have PHOENIX-AWARD BIOS :
 First check whether the USB controller is enabled. We go to the "Peripherals" tab - opposite the "USB Controller" and "USB 2.0 Controller" items should be "enabled".
 Then go to the "Advanced" tab and opposite the "First Boot Device" exhibit "USB-HDD".
 After that, we leave bios by saving the changes. To do this, go to "EXIT" - "SAVE & EXIT SETUP" - I press the "Y" key - "ENTER"
 Almost all that you need to know in order to boot from the flash drive. In my article, I described the process of configuring the bios of the most popular versions: Awardand AMI. In the third example, presented PHOENIX-AWARD BIOSWalking much less often.
In different versions of bios. The described procedure may differ slightly. But the main thing is that you understand the principle of configuration.
By the way, I would still like to add: in order to choose from which device to boot your computer, it is not necessary to change the settings in the BIOS. You can immediately after turning on the computer, call a special menu to select boot devices (this can be made by the F8, F10, F11, F12, F12, F10, F10, F11, F12 or ESC). In order not to guess with the keys - we look carefully on the monitor immediately after switching on. We need to have time to see the inscription like this: "Press Esc to Selest Boot Device". In my case it was necessary to click "ESC".
BOOT ORDER, in translation means a sequence or literal download order, if there is a lot of download options - from a hard disk, flash drives, networks, CD / DVD drive, you need to somehow sort them in order, and first put basic, it will significantly reduce the inclusion time. And downloading a computer, because it does not have to go through all the download options in the search for the current one.
How to customize boot order order in BIOS
There are several settings options, menu items may be called differently and located in different places, but only two different options:
- The Boot Order menu indicates specific deviceswhich can be built in order
- The Boot Order menu specifies in order of the types of devices, and if more than one one, then there is an optional menu item in which specific devices can be built in order.
The first option is more common and a little easier in the setup, you need and find the menu with the download settings is usually called Boot or Startup.This page displays a compete boot settings or a laptop. Their list depends on the manufacturer, in the example of Boot Order it is simply a boot but can have another name, go to it:
We see the Boot Priority Order menu and on the left instruction on how to change order, in the total up / down arrows, select the desired item and the + keys and - raise it in the list or respectively release:

After setting, we go to the previous menu, in the overwhelming majority BIOS output - ESC. In the example there is still a Boot Order Lock item - it is needed to fix the loading order and it has not changed when connecting other devices with which it is possible to download, indirectly it also improves the security of your device - the attacker will not be able to connect the bootable flash drive and boot from it:

The second option is most often found on old computers, here in Boot Device Priority are built up on the list of devices - hard drives, flash drives, network, etc., and in Hard Disk Drives, which is not always there you can adjust the load priority already with Specific devices:

Configure, save the settings, overload and check that everything works as it should. Below some more examples where to search for the Boot Order setting, this option is found on very old computers:
We go to the Advanced Bios Features menu, in the Boot Order Rectangle - the first, second and, accordingly, the third boot device, you need to select the type if you need the drop-down menu. hard disks several (flash drives are often considered for hDD) That in the first point - Hard Disk Boot Priority can be specified by their priority: 
Item "Boot Order" may be subject to an unexpected place: 
How to set up boot order order in UEFI
The Boot Order setting in UEFI is not much different from that in the BIOS, and is performed according to the almost the same algorithm.
We go to the BIOS UEFI, when turned on, usually at the bottom of the screen shows a hint about how to do this, for computers in 99% of cases it is F2 or DEL, for laptops More ESC, F1, F2, F10, F11, F12 (sometimes need to be pressed together With the FN button) in general, try. I can easily press F2 or DEL:

i'll find it in the UEFI, the interface for all manufacturers is more or less standardized and built by one principle, immediately after entering the UEFI, you get to the information screen with general data on the computer and the readings of the main parameters of temperature, stresses, etc. Go to the Boot Priority menu and configure everything, but we will go on the old way - we are looking for a way to switch to the advanced mode, usually either there is an appropriate button (in the picture below is the arrow below), or below the key is specified with which you can go to Advanced Mode in our case F7, click: 
Here you choose arrows up down or mouse - Advanced Mode

And we get into the extended menu, remotely resembling BIOS, only graceful in graphical terms, here we move to the Boot section and then at Hard Drives BBS Priorities:

and set up the priority of the download, choosing from the drop-down menu opposite each item Boot Option The desired hard drive:

After the Boot Order setting is finished with click on Exit at the top, select Save Changes & Reset to save the settings and restart the computer:
 Overload and check that the download went immediately with specified device, without loss of time to the survey of the rest.
In general, as you can see no difficulty in the Boot Order setting, but with this article you can easily fix problems with downloading on your computer or laptop, if something does not work, write in the comment, preferably with the photo, I will tell you where to harm .
 State Services Personal Account
 State Supervisory Cabinet- Entrance on SNILS and Telephone
 Single telephone rescue service in the Russian Federation