The first partition of the hard disk on which sector. Types of logical partitions of the hard disk
On hard disks most computers running Windows, there are two sections - system and user, at least this shows the conductor. In fact, partitions are more, just some of them are hidden, having no letters, in which it is easy to make sure, opening a regular disk management snap. The meaning of them to hide them, hope to understand everything. They contain important data.
The intentional or accidental removal of which can lead to the fact that Windows will work incorrectly or can not even boot.

Another thing is healthy to them interest, many, probably, I would like to know what the service sections of the system hide in themselves and the user risks, who wants to remove them, say, for the sake of increasing the free disk space. By the way, you can still delete service sections, just to do it correctly and only when it is really necessary. It should also be remembered that in any case it will lead to a decrease in the overall failover of the system provided by separate storage of important system and boot files. However, the offline loader storage is far from the only purpose of hidden partitions, they may contain encryption data BitLocker , image "factory" Systems, recovery environment and so on.

Hidden sections first appeared in Windows 7., in Xp There was nothing like that if the system stopped being loaded, it was simply reinstalled. In Windows. Vista. used a more perfect mechanism in this OS. The user could create on DVD -Disc is the restoration environment and with it to return the system to life if she could not boot. But B. Windows 7. Already one could see one on the disk, and in OEM. -Systems two service sections - "Reserved by the system" Size 100 MB and volume without the name of the size of 6 before 15 GBcontaining the original operating system from divided into several parts "Factory" settings - analogue full backupcreated by programs like Acronis True Image. .
If you were mounted first, I would see the storage file configuration files folder Boot and download manager file bootmgr. , on the second volume you would find the program Recovery. And several files of the original system image. With exit Windows 8.1.and then Windows 10. Everything has changed a bit. Section "Reserved by the system" became more, support appeared UEFI , together with it, a few more service volumes were added to the disk, including mandatory GPT. - Discovery section MSR. not displayed in the disk control snap. You can view all hidden partitions available on your computer using third-party disk managers or the most ordinary command line. Run it on behalf of the administrator and execute such commands:
lIST DISK.
sELECT DISK 0.
list Partition


On our PC There are two service hidden partitions, you can be more. Let's try to go to them, for which I will install the volumes of interest to us with the help of the team. Without leaving the utility, we perform such commands:
list Volume
sülect Volume 2
aSSIGN or ASSIGN Letter \u003d X

2 in this example This is the number of the volume of the volume, and X. - the letter assigned to him (if you do not specify the letter, it will be selected and assigned automatically) . After that, we go into the section through the conductor and see the content, turning on the pre-display of hidden objects.

True, this method has a disadvantage - folders can be inaccessible to view due to the lack of you necessary rights, so we still recommend using third-party file managers, best of all "Live" disks.
So, what do you still contain our hidden sections?
On disk "Restore" Size 498 MB There is a folder Recovery. .

Which in turn contains a folder Windowsre .

With Windows Recovery Environment.

If you delete it, Windows is still able to load, however, all emergency recovery tools will be inaccessible.


Second service section (EFI encrypted) Size 99 MB Contains folder EFI .

In which catalogs are stored Boot and Microsoft. With download files.

In addition to these two volumes, you can have another or two service partitions. Section MSR. Size 128 MB with notice "Reserved" not so important as a section EFI , but his removal can also lead to deposits. Usually it stores the data responsible for marking. GPT. but in it may be and boot files. The largest hidden section (more than 5 GB) with notice "Restoration" Contains image "Clean" Windows with source parameters. This section is found on OEM. -The devices with pre-installed OS..
If there is little space on the disk, you can delete it, but at the same time you will lose the restoration of the system to "Factory" Settings. Finally, the fifth hidden section marked "Restoration" Size 400-600 or a little more megabytes can be found on computers updated with Windows 8.1. before Windows 10.. He stores the recovery environment previous version systems, that is Windows 8.1.. You can format it without any negative consequences.
And on this while everything.
If you suddenly want to remove "excess" The service partition, first think well, is there really such a need and only then proceed to the planned one.
Separation of the hard disk on the sections with Windows7
 Disk separation C: \\ Win7
When buying a new computer or laptop with a pre-installed Windows 7 operating system, many users face the problem of separating a hard disk into several sections.
The partitioning of the hard disk into several sections is important both in terms of convenience of using the system interface and the ability to save the data after reinstalling or restoring the operating system.

Main section C: \\
As you know, when you reinstall the operating system, all data placed on a C: \\ disk is lost, while on the other sections of the hard disk the data remains in preservation. All important files can be easily used and after restoring the system performance.
The partitioning of the hard disk is conveniently also in the fact that on the C: \\ system sections and applications are installed. If the C: \\ disk is the only one, when adding all sorts of files and folders to it, there is a confusion between system files and conventional folders added to it. In this case, it is easy to get confused in files and a lacaround to remove some important system file. Therefore, the partition of the hard disk is necessary.
In order to break the rigid disk in Windows 7 into several sections (logical disks), many use specialized programs, like Partition Magic and similar to it. With the help of such programs, you can split the disk into several sections. But Windows 7 provides the possibility of splitting it using system utilities. In this case, the need for third-party programs completely disappears.
To split a hard disk in Windows 7, you must go to the computer control panel.
You can do this in two ways:

It is clear that the first way is easier.
In the Disc Control tab, you can view all the information on our HDD and its partitions. In addition to the main partition C: \\ There is a chance to detect the hidden recovery section.

Main section C: \\ and hidden recovery section
The recovery partition serves to store information to restore the operating system in case of a serious failure when the system is not loaded. It is not denoted by the letter. It is worth noting that the memory volume occupied by the recovery files can reach several gigabytes (usually about 15GB). Also besides him on the disk there is a section System Reserved. , 100 megabytes. These sections are serviceSince they are not used in any way and serve to normal operations.
So, we turn your attention to the C: \\ disk, which is to be divided into sections - additional logic discs.
In order to divide it, click on the conditional disk image with the right mouse button. In the drop-down menu select the item " Say…”.

Item "Squeeze Tom ..."

After the request is completed to appear the window in which compression parameters will be indicated. If the disk was previously not divided, then by default the utility will be offered to divide it approximately in half. If initially HDD had a memory volume, for example, 1.8 terabytes, then after separation, two sections are formed by a volume of approximately 900 gigabytes each.
In the window that appears, the size of the volume C: \\ to compression (in megabytes) and the size of the compressible space is indicated. The size of the compressible space is the amount of the memory of the new partition, which will be created. The total size after compression is the size of the volume C: \\ after compression. It will be a little more than the newly created. As already mentioned, the system will propose to divide available memory approximately in half.

If there is a desire and confidence in your abilities, you can specify your numbers and divide the disk according to your needs. In any case, it will be possible to conduct a reverse procedure - expansion of Toma And return everything to the previous state.
When reading the separation parameters, click the "Squeeze" button. After a short process on the HDD, another section appears with the inscription "not distributed".

Item "Create a simple volume ..."

Start the "Wizard of the Simple Tom". Click "Next". A window "Note the size of the volume" window appears - press "Next" again. In the next window, choose the letter of the new volume in paragraph " Assign a letter of a disc". The letter you can choose any what you like.

Appointment Letter for a new section
Confirm the selection and in the new window, specify the file system. In point " Format this volume as follows:"Specify the file system NTFS , Cluster size is left by default. We put a checkbox in Chekbox " Fast formatting "And press" Next. " A window appears with all specified parameters. If everything is correct, then press the "Finish" button.

If you are not satisfied with the parameters installed by the default system, then, of course, you can set yours. But in most cases it is not required.
After a few seconds, the new HDD partition will be formatted, the letter will be set and the inscription will appear in the symbol field (logical disk). Now the C: \\ disk will be divided into two.

New HDD section - New Tom (E :)
If you wish, you can change the name of the new section, and instead of " New volume", Give another. You can do this in several ways:
1 . With the computer control panel in the Disk Management window, choose the one whose name we want to change. Right-click and choose the item " Properties". In the name field, we set a new name and confirm by clicking OK.
If you have in the system instead of HDD installed solid drive (SSD), then the separation technique is similar.
When buying a computer or when installing Windows or other OS, many users want to break hDD Two or more precisely, into several partitions (for example, a C disc into two disks). This procedure makes it possible to store separately system files and personal data, i.e. Allows you to save your files in the case of a sudden "club" system and improve the speed of the OS by reducing the fragmentation of the system partition.
Update 2016: New ways are added to split the disk (hard or SSD) to two or more, also added video how to split the disk in Windows without programs and in the Aomei Partition Assistant program. Posted in management. Separate instructions :.
Smash the hard disk or SSD into several sections can not only be "driven drives", but also using the command windows strings 10, 8 and Windows 7.
Be careful: The example shown later will work without problems only in cases where you have the only one system section (and perhaps a pair of hidden) to be divided into two sections - under the system and data. In some other situations ( disk MBR And already there are 4 partitions, with a decrease in the disk, "after which" is another disc) it can work unexpectedly if you are a beginner user.
The following steps are shown how to split the C disk into two parts on the command line.

Ready, you can now close the command line: in windows Explorer You will see a newly created disk or, rather, a disc partition with the letter you specified.
How to split disc to sections in the Minitool Partition Wizard Free program
Minitool Partition Wizard Free is an excellent free program that allows you to manage partitions on disks, including one partition to two or more. One of the advantages of the program is that the official site has a bootable iSO image with her that can be used to create boot flash drive (Developers are recommended to do this with RUFUS) or to record the disk.
This makes it easy to perform actions to split the disk in cases where it fails on the running system.
After downloading in the Partition Wizard, it will be enough for you to click on the disk to be divided, right-click and select the "Split" item (split).

Further steps are simple: Configure partition dimensions, click OK, and then press the "Apply" button on the left at the top to apply the changes made.

Free download boot image ISO Minitool Partition Wizard Free can be from the official site https://www.partitionwizard.com/partition-wizard-bootable-cd.html
Video instruction
Also recorded the video on how to split the disk in Windows. It shows the process of creating sections. staffing systems, as described above and using simple, free and convenient program For these tasks.
How to split the disk during installation of Windows 10, 8 and Windows 7
The advantages of this method include its simplicity and convenience. Breaking to the same takes relatively little time, and the process itself is very visual. The main disadvantage is to apply the method only when installing or reinstalling the operating system, which in itself is not very convenient, besides there is no possibility of editing partitions and their size without HDD formatting (for example, when the system partition ended, the user wants add some space from another section hard disk). In more detail, creating partitions on the disk when installing Windows 10 is described in the article.
If these shortcomings are not critical, consider the disk breaking process during the installation of the OS. This instruction Completely applicable when installing Windows 10, 8 and Windows 7.

Attention! When removing disk partitions, all the data will be deleted on them.

We divide the hard disk when installing Windows XP
During the development of Windows XP, an intuitive graphical interface was not created. But at least control and occurs through the console, divide the hard disk when installing Windows XP is also simple, as when installing any other operating system.
Step 1. Delete existing sections.
You can redistribute the disk during the definition of the system partition. It is required to divide the section for two. Unfortunately, Windows XP does not allow this operation without formatting hard disk. Therefore, the sequence of actions is as follows:

Step 2. Create new sections.
Now you need to create the necessary partitions of the hard disk from the unintended area. It is done quite simple:

Step 3. Determine the file system format.
After the sections are created, select the section that must be systemically and press Enter. You will be prompted to select the file system format. Fat-format is more outdated. You will not have problems with compatibility, for example, Windows 9.x, however, due to the fact that the system of XP today is a rarity, this dignity does not play a special role. If also consider that NTFS is faster and reliable, allows you to work with files of any volume (FAT - up to 4GB), the choice is obvious. Choose the desired format and click ENTER.
Further, the installation will go in the standard mode - after formatting the partition, the installation of the system will begin. You will only be required to enter custom parameters at the end of the installation (computer name, date and time, time zone, etc.). As a rule, this is done in a convenient graphic mode, so it does not represent difficulties.
Free Aomei Partition Assistant
Aomei Partition Assistant is one of the best free programs to change the partition structure on the disk, the system transfer with the HDD on SSD and, including, can be divided into two or more disk. At the same time, the program interface in Russian, in contrast to another good similar product - Minitool Partition Wizard.
Note: Despite the fact that Windows 10 support is stated in the program, in this system it has not been fragments for some reason, but no failures have happened (I think, by July 29, 2015 should correct). In Windows 8.1 and Windows 7, it works without problems.
After starting the Aomei Partition Assistant, in the main program window you will see connected hard drives and SSDs, as well as sections on them.
To split the disk, click on it with the right mouse button (in my case by C), and select the section "Section Section" menu.
In the next step, it will be necessary to specify the size of the section being created - this can be done by entering the number, or by moving the separator between the two disks.

After you click OK, the program will be displayed that the disc is already divided. In fact, it is not so - to apply all the changes made, you must click the "Apply" button. After that, you can be warned that the computer will reboot to complete the execution of the operation.

And after rebooting in your explorer, you can observe the result of separation of discs.
Other programs for creating hard disk partitions
To split the hard disk there is a huge number of different software. It is like commercial products, for example, from Acronis or Paragon and distributing free license - PARTITION MAGIC, MINITOOL PARTITION WIZARD. Consider delivery tough Disk using one of them - Acronis Disk Director programs.

How to break the hard disk in macos x full-time
You can drive a hard disk, without reinstalling the operating system and not put an additional software on your computer. In Windows Vista and above the disk utility is built into the system, there are also cases in Linux and MacOS.
To run a disk breakdown in Mac OS, do the following:

After that, after a short (in any case, for the SSD) section of the creation of the section, it will be created and accessible in Finder.
I hope the information will be useful, and if something does not work as expected or have any questions, you will leave a comment.
Tweet
The hard disk in the computer and the disk icon in the My Computer window are different concepts. For example, one hard disk can be installed on the computer, while there may be several of them in the "My Computer". The reason for such a strange inconsistency is that the hard disk can be divided into the so-called sections. This is called the logical marking of the disc.
I will tell you why you need such a markup, how to do it correctly (and whether it is necessary to do at all), as well as I will tell you about free programs for such a small procedure.
Why do you need to divide the hard disk to the sections
Reasons to divide the hard disk to sections several:
- The hard disk sections are primarily needed for competent storage of information. For example, some users prefer the following division: operating system and software on one disk (usually it is C.), Documents - on the second ( D.), archive photos on the third ( E.) etc. In this case, the hard disk may well be one.
- If you have a hard drive, but you want to have two or more operating systems, you have to share a hard disk to sections, since Windows and other operating systems can only be installed on different sections or hard drives.
- Manufacturers of laptops (and some computers of eminent manufacturers, such as Acer) have their reason to divide the hard disk sections: on a section that is visible as a disk C, installed Windows, the second ( D.) is absolutely empty, and the third one (which is not visible in the "My Computer" window) keeps a compressed copy of the section C.. This hidden hard disk section is called section of recovery. If something happened to the operating system ("Windows flew" - as some users like to say), then when you turn on the laptop, it is enough to press the keyboard shortcut (what - see the instructions for the laptop) and the special program will cleanse the disk C., Then unpacks the contents of the hidden partition there. As a result, the user will receive a laptop with programs that were on it initially at the time of purchase in the store. Disk D. In this case, it will not be changed. It suggests the conclusion: if on a laptop with such a recovery system all documents to store not on disk c, but only on D., It will be possible at any time to restore the damaged Windows new, while not losing important data for yourself. By the way, such a recovery system can make any advanced user, but I will tell you about it somehow else.
- Windows 7 and Windows 8 operating systems when installing on a clean, "unrequited" hard disk create a hidden section of 100-350 megabytes. This small section stores a bootloader designed, oddly enough to download Windows. There will be no this partition or its contents will be damaged - and the computer will not start the operating system by issuing an inscription on the black screen "BOOT FAIL", "CANNOT FIND BOOT DEVICE", "BOOT ERROR", or similar, the meaning of which one - not found boot disk with operating system. Actually, the bootloader can be stored on the disk C:, and / or in hidden sectors hard The disk (outside of sections), but the developers decided to use a separate hidden section in Windows 7/8 to save them to secure the loader from damage to other programs, viruses or a user.
- There are other reasons separation hard disk to sections. For example, for the correct operation of the GNU / Linux operating systems, several sections should be created, but this is the subject of a separate article, we will not consider them here.
So, the main reasons for separating the hard disk to sections:for convenience of storing information, to install multiple operating systems, for the restoration system, for storage windows bootloader 7/8.
A bit of theory: file systems, sections
Section information (i.e. logical disks) is stored in the "Table of Sections". Each logical disk can have its own file system. You can read more about all this in Wikipedia Articles: disc partition, logic disk, file system. The novice user is enough to know the minimum:
- If you share a hard disk on logic disks (sections), disk capacity will not increase - Free place to take just nowhere! You can make partitions of any size, but in sum they cannot be larger than the volume of the real hard disk. Here is less - please. Then you get an unblocked free space that is not visible in "My Computer", from which you can get one or more new sections. This question I often get from newbies, so place in the first place.
- Exist primary (basic) and extended (Additional) Sections. On a single hard disk there can be no more than four main sections (why so - according to the links above), so invented an extended section - this is a primary partition that may include any sections. As a result, thanks to the extended partition, on the hard disk can be any sections - dozens, hundreds.
- Each section can have its own file system. At the moment, only NTFS can be used to install Windows Vista, 7 and 8, and the outdated Windows XP can be installed on disks with FAT32 file system. However, I do not recommend that you do, because at the same time too many restrictions. Make all sections in NTFS - everything will work as it should.
- Any hard drive must be posted one way or another. In one or more logical disks - to solve you. When buying a hard disk is usually already marked in one section - I solved the manufacturer. If you are satisfied with this way of organizing information - do not touch.
- In the laptops to make disc marking very undesirable - most of them have hidden recovery sections that may be damaged (see paragraph 3 of the previous chapter).
- If you bought a hard disk with a volume of 2 terabytes, and in "My Computer" - "just" 1,86 terabytes (1860 gigabytes), then do not rush to run back to the store. The thing is, according to the volume of manufacturers and Windows. More about this is written in the article Hard Disk Wikipedia. The larger the size of the hard disk - the more clearly it can be seen that real gigabytes are less.
- Sections can be delete, create, shift (change their physical position on the disk), change their size, format, convert File systems on sections from one to another. Moreover, many programs can do it with the preservation of all data. There are other operations, but novice users most often needed above.
- In case of error in the process of changing sections (see paragraph 7) information is almost always lost. Yes, it will be possible to restore (or part it) with special programs with the participation of specialists, but best to save all in advance important information Other discs (not logical, and real discs) or flash drives not to pay money for data recovery.
Enabled "Disk Management" in Windows
Windows has standard remedy Changes in sections - " Disk management". Depending on the version of Windows, the possibilities of this program are changing a little, but in general over the past years (if we talk about Windows Vista, 7, 8) serious changes. Windows XP in this plan looks more modest - except for formatting and changing the letter of the disk, there can be little there.
As an example, I will take Disk management»Windows 7. You can open this program in several ways:
- The simplest - press the right button on the line A computer on the menu Start - Select item Control - In a new window, choose Disk management.
- Open Control Panel - Administration - Computer Management - Disk management.
- Press Start - Perform (or Keyboard keyword + R) - We enter in the window that opens diskmgmt.msc. - Press OK.
Disk managementlooks like that:
Here are visible both physical disks (including DVD drives, flash drives and other devices for storing information) and logical, i.e. Virtual - Hidden section of Windows 7 bootloader, discs C. and D.. On your computer, the number of disks may be different.
The main actions are available by pressing the right mouse button on the desired section:
The list of actions is quite meager:
- Points Open, Conductor allow you to see the contents of the disks
- Make a section active - Specify on which disk (section) is the bootloader. In Windows 7 and 8, this is a reserved system section. Making an active other section cannot be done - the operating system will stop loading.
- Change the letter of the disk or the path to the disk - You can change the letter disk displayed in the "Computer" window or display it as a folder. Yes, sections can be displayed not only as discs, but also as folders on any disk.
- Format - You can read about this in the article formatting Wikipedia. The item opens a window with which you can run high-level formatting.
- Extend - If there is a place on the hard disk, not labeled as a partition, then you can expand the size of the section due to this free space.
- Say - This item allows you to reduce the size of the section. The result will be the formation of an unbalanced space that you can put into the case - to expand the volume of another partition (see the previous item).
- Remove Tom - Delete partition. Do not click on the item without thoroughly thinking about the consequences. If you delete the section, the information on it will be able to save only with special programsYes, and it is not always.
- Properties - The properties window will open with the information about the selected disk (section).
Of course, this is not a complete list of possibilities. Disk management. You can create dynamic disks, for example. However, novice users are for nothing, this article is designed for them.
So to create, delete, change the size of the partitions through Disk managementYou need only three menu item: Expand the volume, squeeze the volume, remove volume.
All operations occur in real time, i.e. After pressing the right point and the affirmative answer to the question - whether we want to do this - there are actual action.
Do not forget that there is a risk of failure, because of which we can lose both one section, and that's it. This applies primarily to computers with large quantities. unnecessary programs - Each of them can be a culprit of deleting all data. And the script when you need to change the section from which Windows is running (usually this disk C.), It is the worst - most often the problems of users arise exactly when trying to change the system partition.
To minimize the risk of failure, There are three methods:
- Insert a hard drive to another computer and change the sections from it, running Disk management or any other program to change partitions. Due to the fact that Windows will be launched from another disk, no programs will climb on a foreign disk, interfering with a responsible operation.
- Boot with a Live CD disk - the operating system and programs will be launched not from the hard disk, but from CD or DVD, flash drives - again nothing will interfere with changing sections.
- Use a program that can work in Native mode to change partitions. For example, check disc C. It always works in this mode - a black window with white text before booting the desktop. In this mode, the minimum of programs is launched, the risk of failure is minimal.
The third option is the easiest, because the user is essentially not necessary to do anything - just restart the computer and wait a few minutes. It is able to two the following programs Review.
Free for home use Change program hard sections disk.
By clicking on the section (no matter - on the list at the top, on the bottom of the bottom), you can see the menu (both pop-up and on the left side) with all sought-after actions:
Resize / Move Partition - change the size of the partition and / or move its physical position on the disk. By the way, on the official website it is written that Easeus Partition Master version HOME (free) does not support the change in sections. It is not so - everything works fine.
Copy Partition - Copy the section on another disc with all information available on it.
Merge Partitions. - Merge two or more sections. Conveniently, if you need to save information on the hard disk, but reduce the number of sections. Convert to Logical / Primary - Conversion to logical (advanced) / main (primary) section.
Change Label - Change the label of the disk.
CHANGE DRIVE LETTER - change the letter of the disk.
Defragment. - Start standard program Windows for disk defragmentation.
Check Partition - Checking the disk on errors using again standard windows programs.
Hide Partition. - Make it so that the partition is not visible in the "Computer" window.
Delete Partition. - Deleting a partition.
Format Partition. - Formatting section.
WIPE PARTITION. - Clearing the contents of the section. All folders and files will be deleted, the partition will remain. Information removed in this way will not be able to restore.
Explore Partition - View the contents of the section.
View Properties.- See how much space on the section is occupied, what he has file system and find out other technical information.
The list of action varies depending on where to press. In the screenshot, I clicked on a non-system section. By clicking on the system partition (where Windows is running), there will be no removal, hide, cleaning items. If you click on the physical disk icon, the list of action will be completely different:
I will list items:
Copy Disk. - Copies the contents of the entire disk: sections, information in them. This requires a second disk of the same or more.
Upgrade Disk. - the function first is needed for windows transfer On the new hard drive of a larger volume. Copying and increasing the size of the section is proportional to the size of the new hard disk.
Delete All Partitions - Delete all sections.
WIPE DISK. - The same as the previous item, only with special removal algorithms, thanks to which it will be impossible to restore information.
Surface Test - checking the surface of the disk (physical). Allows you to detect bad sectors (the so-called "Bads", "Bad blocks").
View Properties. - Disconnect information.
Yes, knowledge of English is clearly required, especially if you consider that almost every item calls the window with the settings of the action performed. After you produce the necessary manipulations, you need to apply changes to the button by pressing the button. Apply(Apply):
Only then will begin changing sections. This process may take some time - from the pair of minutes to several hours.
Depending on whether the system section is addressed or not, the operations are carried out either immediately in the window, or you will need to restart the computer and start changing the section in Native mode:
The program has a lot of functions, everything is not listed. I recommend to get acquainted with the help of Easeus Partition Master. She is on english languageUnfortunately, it is possible to use the Google translator. Translation turns out quite understandable.
Pluses Easeus Partition Master Home Edition:
- Very functions.
- All Actions "Virtual" before pressing the Apply button. So, you can cancel the operations before this "point of non-return" and try to do something else with sections. Or not to do at all, if changed.
- It works stably and predictably. For example, in the testing process during sections, I launched copying files to a section that should be changed. The result - a window appeared that it is not possible to block the section, all operations were interrupted, the data did not disappear anywhere.
- The program is free for home use.
Cons Easeus Partition Master Home Edition:
- Interface only in English.
- Opportunities, perhaps, even too much - it can confuse newcomers.
- Serious failure in the process of operation will lead to serious consequences.
- For example, if you turn off the computer at the time of changing the partition, the data from the section will disappear. However, it is minus absolutely all programs to change sections.
Output:the program is good. You can use and need, there are no alternatives among free programs.
Paragon Partition Manager 11 Free
Free program for changing sections from a company based in Russia. Unfortunately, the English-language program. What made developers go for such a step - it is incomprehensible. Moreover, the paid version of the Russian-speaking program.
The main window of the program is no different from the window of the hero of the previous review, except that the buttons changed their order:
Separate mention deserves Express Mode.(Simplified mode). By clicking on this button, we will get a window with the list of the most frequent actions:
It would be possible to say that this is the ideal mode for beginners, if it were not for one "but": everything is in English. Moreover, I had a suspicion that English here is some kind of wrong, as if I did not translate a person, but a car.
pros Paragon Partition Manager 11 FREE:
- Many windows have a sufficiently visual appearance to understand the functions.
- Some operations are carried out immediately in the program window, part (if required) in Native mode. That is, the program does everything to reduce the chance of data loss.
- The program is free to use the house.
Cons Paragon Partition Manager 11 FREE:
- English-speaking, and because of the strange construction of phrases is quite difficult perceived.
- Simplified Express Mode mode works with accuracy to the opposite: first, the descriptions of operations and the operations themselves have more technical subtleties than required; Secondly, this mode is very capricious and really does not work, issuing meaningless errors.
- The program works too slowly. For example, I have a removal of a 38 GB hard disk partition took about 5 minutes - long enough for such a simple operation.
Output:the program works, but somehow unpredictable. I do not recommend using this program, the good has an alternative in the form of Easeus Partition Master Home.
Changing sections during installation of Windows 7, 8, 10
This tool also deserves mention.
We take any installation disk with Windows Vista, Windows 7, 8 or 10, run the installation of the disk, we reach the selection of the section and click Disc Setup:
It seems to be simple: you need to click on the section in the list, then the action button. Unfortunately, there are few actions here: delete, formatting, creating a partition and expansion.
You can, for example, delete the partition and by the released location to increase the size of another partition or partitions (choosing the desired partitions, you need to click the Delete and Extension buttons).
Alas, a very sought-after operation - a decrease in the size of the sections - there is no. You can delete the partition, then re-create a new one with a smaller partition, but, unfortunately, we will lose the data.
All operations occur in real time, i.e. After pressing the button, the action takes place.
Outcome:editing sections during Windows installation is an extremely primitive tool. Works, but performs only a limited list of actions, including the only one that saves data is an increase (expansion) of the size of the section. If you need to install Windows and it does not need to save data on sections, then the tool will be useful.
If suddenly you are inappropriately deleted the section while installing Windows or through any program, do not despair - the partition restore function is in Easeus Partition Master Home Edition.
In order to restore the remote partition of the hard disk, do not touch the sections, immediately boot into Windows (or insert the hard drive to another computer if you deleted the system partition and download windows Impossible), then run the aforementioned program, click on the list on the line with the word Unallocated ("Unallocated"), then click Partition Recovery..
The rest, as they say, the case of the Technology - the Master of Action will tell you where to press where to put ticks, then restore your remote disk.
Tip # 2: Installing two or more Windows operating systems for one hard drive
All that is needed for this - several sections. If the hard disk already has a second section, which is visible in the window " A computer"- Ensure that there is a free space of at least 20 GB (more - better), then during Windows installation simply specify this second (third, fourth, etc.) disk. After installation, you can choose Windows using the menu that will appear while turning on the computer.
If you have one disk ( C.), I propose the easiest option: through Disk management First give the section FROM Team SqueezeBy reducing at least 20 gigabytes (and better - more, because except Windows you will install and programs):
Press the right button on the disk with ...
After pressing the button Squeeze Disc size C.reduced, not distributed (free) space appears in the sections map:

Indicate an unoccupied space. The section will create the installer itself.
After installation, you will have two operating systems. You can make more unoccupied spaces or empty disks, specify them for installation.
Thanks to the reader Vladimir, that raised this topic.
You could notice that on the screenshots of the disk management window, all sections are marked with a blue stripe. You can have sections with green stripes. What is the difference between blue and green partitions?
Green strip in disk management is a sign of an extended (additional) section. As I wrote above, there may be "nested" partitions inside, which from the user's point of view are no different from the main (primary). There are one feature in nested sections - if you decrease their size, then due to the free space that has appeared simply to expand the main partition. You must first compress more and the advanced section itself (which stores free space and the decreased partition) to form a free space outside of any partitions, only then you can expand the discs.
Standard disk management does not know how to work normally with advanced disks, so if you see green labels instead of blue, it is better to use free programs above - they will reduce the extended sections, move free space where it is necessary and expand the main disk.
Sometimes you need to create an additional partition on the disk ( divide it) for example, for the second operating system or for separation system files with user. Thus, it is possible to ensure their safety if with a computer, something will happen. I will show you how to create a section in Windows through the drives and when it is installed.
I anticipating the question: Does the files from which section will be created? No, it will not be deleted and it will work in the same way. You take only part of the free space and the section will be created from it.
Creating a section in drive management
Open the Start Row \u003e\u003e Run (or Win + R) and enter the command that opens the disks panel.
Then you will see all the discs and sections. To create a new need free place ( green area) or undisturbed place ( black region).

I have only 118 megabytes of the unallocated area - this is certainly not enough, it means you need to take free space with free disk. In this case, C.
Before this is extremely desirable to perform, otherwise the place may not stand out at all. IN context menu Click "Squeeze Tom" and wait.

Select Size for Tom. I have enough 5000 megabytes for Windows XP. For Windows 7, 8 and 10 - minimum 16 gigabytes. Better more if you plan to actively use the system.

As a result, such a non-distributed area of \u200b\u200bblack color should appear.

Make a section of it. To do this, right-click on it and select "Create a simple Tom" as in the image below.

A built-in program for creating volume will open. Go further.

From the free space you will be offered to choose the size. I choose 5000 MB to install Windows XP. This size is only for the demonstration, you can deliver much more to work comfortably.

Then assign an unoccupied letter to not get confused.

After that, you need to formatting.
- File system - NTFS.
- Cluster size - default.
- Tom label - specify the name of your operating system to not get confused. I am going to install Windows XP there, and called.

Complete the creation of the section.

Then a section with a blue area, which can be used when installing Windows or to store files. I prepared it specifically for Windows XP.
It can also be seen as an additional disc going into the conductor my computer.

Now it remains and installing the operating system. You can also create a section directly during ( see below).
The same instruction can be viewed in video format. All actions are held on operating system Windows 7.
Creating a section during installation of Windows
I believe that this method is much more convenient and easier than others as it allows you to do everything at once during the installation process. But if you want to just split the disk on a few, then this method is unlikely to suit you. The instruction is applicable for versions of Windows 7, 8 and 10. They have almost the same interface when installed.
Once selecting a language and accept the license agreement, a window with sections settings will appear. In it, you need to create a new click on the corresponding button as depicted from below and assign it size.
If you do not have an unemployed space and there are still partitions, remove them using the appropriate button. They are transformed and from them you can make a new section. Note that all data on them will be permanently removed.

Then select the created section and click Next, clicking on the simple installation process.

Disk separation using the program
Most programs for working with hard drives are paid, but there is a free solution for both in Russian. I will consider it now.
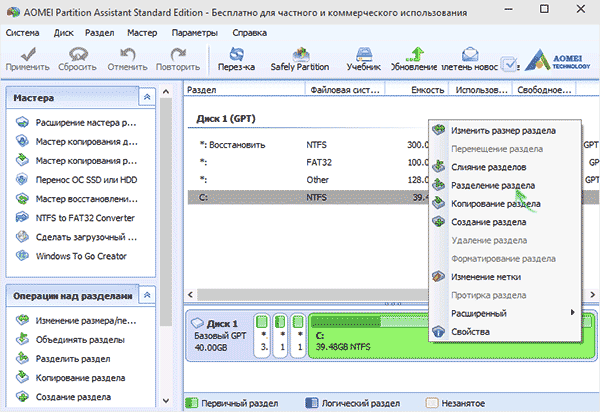
Download Aomei Partition Assistant Standard and set. It is very convenient to divide, create and modify sections. In addition, there are many other features in the program, but in this article I will consider how to divide the disc for 2 or more. With the rest of the possibilities you can familiarize yourself with yourself.
All discs and sections are located on the main screen. Select the one you want to divide and then in the context menu, press the division section.

In the window that appears, set the size. For example, I installed 256 megabytes.

Now you need to confirm the changes. To do this, on the main screen, click "Apply" and a window appears in which it will be a warning that a reboot is required. After it, changes will occur and you can see the result.

I think these ways are enough to solve this task. Ask your questions in the comments.
How did you create a section?
 Firmware for HTC One SV from flash drive
 Why is the laptop heats and what to do about it?
 Reset to factory SAMSUNG smartphones