TWRP Recovery - how to install how to make backup copies on Android, restore the system, install firmware, patches and kernels
Those who use a tablet or smartphone based on Android based tablet or a smartphone, often want to get more functionality than is provided when purchasing. To do this, you need to get root rights (access to the authority of the administrator), install custom firmware, install another bootable animation and many other.
When a user studies information on changing its device, often faced with the mention of a modified recovery, which is usually referred to as CLOCKWORKMOD Recovery or TWRP Recovery. The general concept of modernity and you can find in other articles, and here we will get to know the other famous type of modified factory menu, namely, with TWRP Recovery, which has developed TeamWin.
Before we touch the TWRP Recovery functions in more detail, it should be noted that in comparison with CLOCKWORKMOD there are a number of features, thanks to which many users prefer to use TWRP:
- the ability to fully use the touch to control the functions of the modpecore;
- more flexible setting of a number of options;
- support for installing several ZIP files at once;
- a detailed menu of choosing what needs to be saved in backups;
- Ability to use S-PEN on Galaxy Note Tablet;
- Screen lock and sleep mode using the power button.
User's Guide when working with Modpecavery TWRP Recovery
1. General information about TWRP
2. Installing TWRP Recovery
3. How to get to the TWRP Recovery menu
4. Detailed consideration of the main functions in the TWRP Recovery menu
5. Refracting, replacement of system files, installation of updates, modifications to Android devices using TWRP
What is TWRP Recovery
We will get acquainted with what is the TWRP Recovery.Compared to the standard factory menu, TWRP Recovery has much more than a large number of features available to user. Using it, you can save a full system cast, install non-standard software, other firmware, replace the OS kernel, restore the system from the backup, many other features are available. TWRP is recorded in a special partition of the internal memory of the phone or tablet, replacing the factory recovery.
Often, in a number, at first glance, hopeless situations, TWRP Recovery can come to the rescue. Despite the fact that the phone can stop loading, not rarely using TWRP, you can fully restore the performance of the device from the backup, saving all installations, programs and their settings.
Let us give a brief list of the main features of TWRP Recovery:
- Installation of alternative (custom) firmware, or nuclei;
- installation of system updates, corrections, making adjustments to the function of the gadget;
- Creating a full backup of the system or its individual parts (application data, system partition, cache, settings);
- Connection by usb cord to a computer as a removable drive;
- restore the previous state of the system from an early saved backup (backup);
- edit sections on the memory card (creation, formatting, deletion);
- Ability to reset to factory settings (WIPE - DATA / Factory Reset). Only part of the data can be deleted instead of full reset to the original state: removing battery statistics (Wipe Cache), Dalvik-Kesha Erasing (Wipe Dalvik-Cache);
- use as a terminal to execute commands;
- Ability to work with system files on the tablet or telephone.
Installation TWRP Recovery.
To install TWRP Recovery to most of the devices, it does not need a lot of effort. If you install GoManager from Google Play, you can use the "Install OpenRecovery Script" in its menu.Many gadgets on Android, for example, Nexus smartphones and tablets, have specially designed programs like Google Nexus 7 Toolkit, where there is a function of installing a modified recovery. In addition, using the ADB program, you can also install TWRP Recovery.
How to get to TWRP Recovery
In order to enter the modified recovery menu, you can use in several ways:1. With the help of a special combination of buttons when the gadget is turned on. The combination can be varied for different models of devices on android. For example, on a number of devices, you can get into the recovery by closing the inclusion of the volume of sounds and the power button at the same time.
2. Taking advantage of a specialized program as GoManager and Titanium Backup, which allow you to select the download function to Recovery mode in your menu, "Reboot Recovery".
3. If the PC installed the corresponding drivers gadget and configured the connection using the ADB program (TNA ADB Shell), connecting the wire from the computer to the USB device, you can run the command to:
aDB Reboot Recovery.
Basic functions and menu TWRP Recovery
By downloading the phone or tablet in TWRP Recovery, you first fall to the main menu.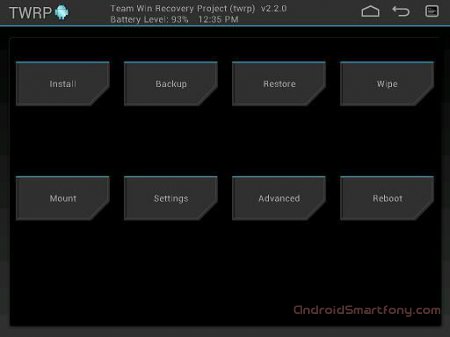
This instruction considers the functions and capabilities of TWRP Recovery version 2.3.2, which is the most relevant at the time of writing the article. Other versions of TWRP may have a slightly different interface, but the main functionality will remain the same as in the version we are considered.
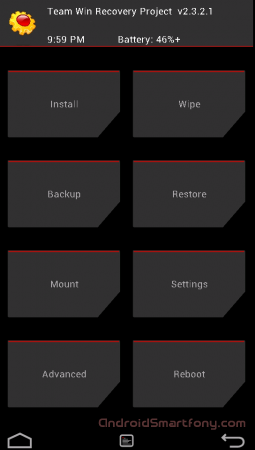
The appearance of TWRP Recovery can also be slightly different, depending on the specific device and the selected design theme.
Since TWRP Recovery supports sensory control, then select the desired menu items and navigate it is quite simple - sufficient, as well as with the usual use of the gadget, click on the finger item you need.
If you want to return to the previous menu, then in each submenu is located in the bottom (phone) or the top right (tablet) of the display of the return button. Also above shows the percentage of battery charge and the current time.
Functions of the main menu items:
1. Install
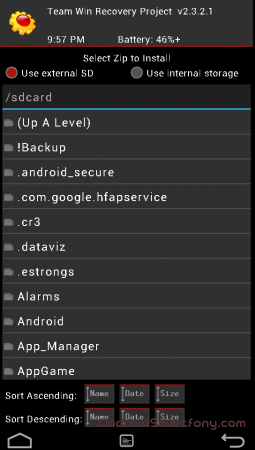
Used to install firmware, patches and modifications.
This is one of the most applied TWRP Recovery functions.
Using this option, you can install custom (unofficial), official firmware, programs in the system section, replace the kernels, change the boutation, themes, and more. Updates are installed from files that are in any place of the device memory card, in the ZIP format.
By selecting the desired file, the menu opens in which you can add the next update. Thus, you can make a queue on which the installation of patches will be held (add more zips). After the necessary files are selected, you need to start the firmware, stretching from the left side to the right slider, which is located at the bottom of the display.
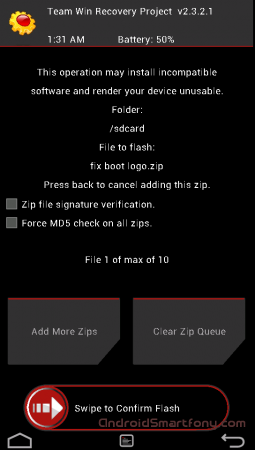
The ZIP Signature Verifications feature can activate the zip file digital signature check.
Using the Force MD5 Check On All Zips, checking the installed updates to comply with the control MD5 sums.
2. WIPE. Menu Cleaning and Deleting Data
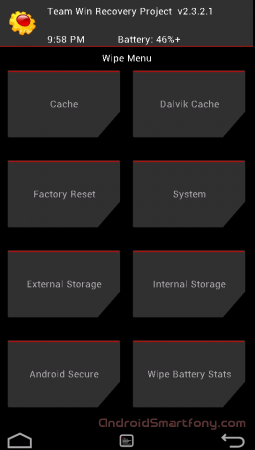
In this section, you have the ability to clean the phone's memory, as fully returning to the factory settings (Factory Reset) and selecting the cleansing of only its particular part, as the system section System, cache (Cache), or Cache Dalvilk. After applying the Factory Reset, the device will return to the state in which it came from the factory.
In addition, it is possible to clean the internal memory (Internal Storage) or an external SD card (External Storage), clear the folder where the Android_Secure installed on the external media (Android_secure) is stored or reset the battery statistics counter (Wipe Battery Stats).
Similar to other executable functions, you can confirm your choice by using the slider that will appear at the bottom of the display. You can cancel task execution by tapping on the "Back" button.
3. Backup. Data Reservation Section or System
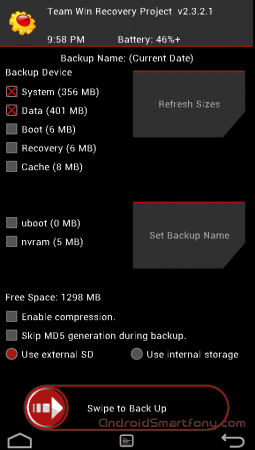
This is one of the most important items in the modified recomerry. Here you can make a backup of the entire system of the phone or tablet, including applications and device installation data - Nandroid Backup.
In this section you can:
- Select parts of the memory you want to reserve: Data, System, Recovery, Boot, Uboot, Cache, NVRAM;
- look at the available space in memory (Free Space);
- Turn off the creation of checksum in reserve files (SKIP MD5 Generation During Backup);
- activate the compression of the backup files (Enable Compression);
- Select to save backup data internal device memory (USE INTERNAL STORAGE);
- select an external memory card to save back-up files (USE External SD);
- Update free memory information in sections (Refresh Sizes);
- Set the name for a backup (Set Backup Name).
Also, as before, you can activate the launch of your selected functions using a slider, after which the progress of the operation will be shown.
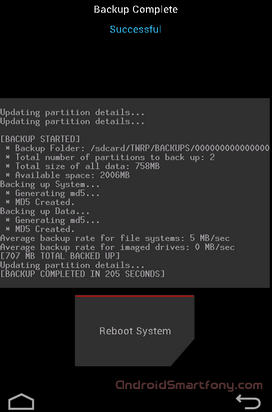
When the process is completed, you can restart the gadget, using the Reboot System option, or return to the TWRP main menu, using the arrival.
4. Restore. Recovery menu of parts or fully system from a previously created backup
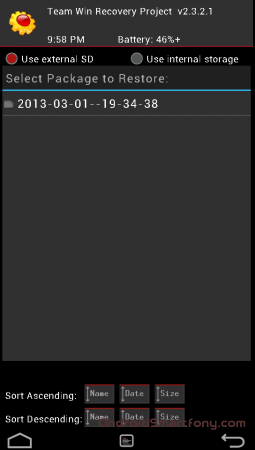
This section provides the following features.:
- selection of the internal memory of the device as a place where the search for backup will be selected (Use Internal Storage);
- Install an external memory card as a section where recovery will search for backup (use external SD).
If you have not changed the settings when creating a backup, then by default, the names of the backup copies are made up from among the creation times. Files can be sorted in the following ways:
- ascending (Sort Ascending) or descending (sort descending) of creating dates;
- increase or decrease the size of backup copies.
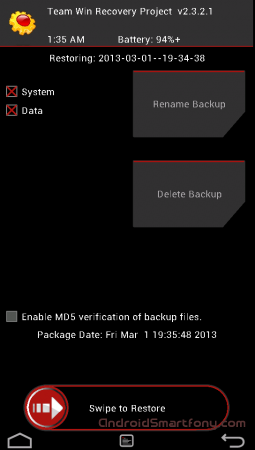
When the desired backup is found, the following selection of functions is provided.:
- Mark those sections you want to restore (DATA, System, Recovery, Boot, Uboot, Cache, NVRAM);
- Delete this backup (Delete Backup);
- give another name of the selected backup (Rename Backup);
- Enable checks on control MD5 sums in backup files.
Start executing the selected operation by confirming the selection by using the slider at the bottom of the screen.
5. Mount
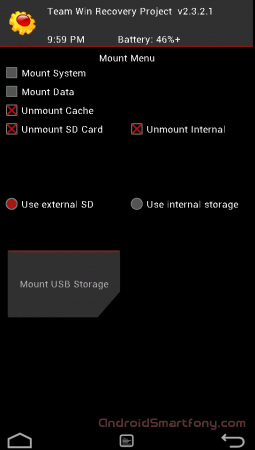
Here you can mount and unmount sections and perform operations with them. When mounting, the data contained on the section becomes available.
This section has functions.:
- Mounting, unmounting the system partition (Mount / Unmount System);
- mount, unmounting cache section (Mount / Unmount Cache);
- Mounting, Unmounting Data Section (Mount / Unmount Data);
- Mounting, unmounting internal memory (Mount / Unmount Internal);
- Mounting, Unmounting an external memory card (Mount / Unmount SDCard);
- Connecting the device to a PC as a drive (Mount USB Storage). Here you can connect the SD card to the PC or the integrated memory of the gadget (USE INTERNAL STORAGE).
6. Settings Settings modified recovery
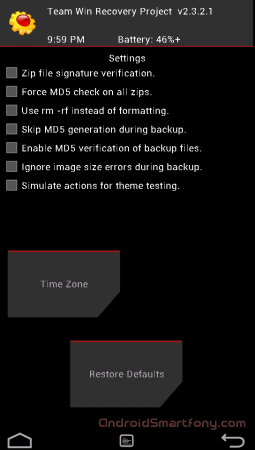
Here sets the settings that TWRP Recovery will use the default when performing functions:
- Enable / disable the digital signature of the installed files (ZIP File Signature Verification);
- Enable / disable checksum checks for any Zip format files (Force MD5 Check for All Zips);
- erase files instead of formatting during memory cleaning (USE RM -RF Instead of Formatting);
- not to consider errors in the sizes of files when Ignore Image Size Errors During Backup is held;
- Do not create checksums during the creation of backup (SKIP MD5 Generation During Backup);
- choose your time zone (Time Zone);
- Return to the default TWRP Recovery settings (Restore Defaults).
7. Advanced Additional options TWRP.
![]()
Here you can:
- Activate Saving Operation Log File to Memory Card (Copy Log to SD);
- Return to the initial state of access rights to system folders and files that can be violated by some root privileges applications. Sometimes the violation of access rights can lead to the failures and hangs of a tablet or phone (Fix Permissions);
- change partitions on the memory card (create, delete, create SWAP cache files). SWAP is usually applied to speed up the work of android devices. Partition SD Card).
Here you can run the following commands: Copy, CHMOD 755 (Set access permissions 755, which are used by default for all system files), CHMOD (Install Other Rights), Delete, Rename File (rename file);
- Run the command entered manually in the terminal mode (as well as with a PC using the ADB SSHELL interface) (Terminal Command).
8. Reboot
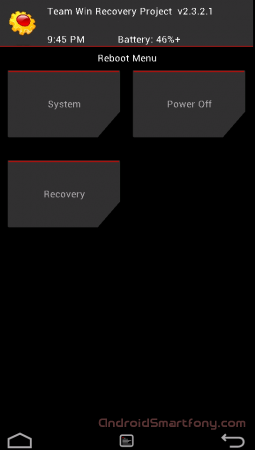
With this item, you can restart the device. Available options:
- reboot to the device mode (System);
- reboot into recovery (recovery);
- Turn off the tablet or phone (POWER OFF).
Refracting, replacement of system files, installing updates, modifications to Android devices using TWRP
In order to establish another firmware or patch, you will need these files in the ZIP format to copy to the memory card or in the internal memory.Next, we carry out the following:
1. Loading in TWRP Recovery;
2. Select the "Install" function;
3. Select the inner (USE Internal Storage) or external memory (use external SD), depending on where we copied the files you need.
4. Find and select the file you want to install.
5. If you have a MD5 file with Zip, you can activate the amount check (Force MD5 Check On All Zips), otherwise we do not do this;
6. Run the installation by stretching the slider on the left to the right.
You can select 10 zip files at once, which will consistently be installed. At the end of the process, the installation is made.
When the process is completed, it is recommended to clean the cache and Dalvik cache.
 Service "Prohibition of Calls" from MegaFon
 Tele Support Service2: Free Phone
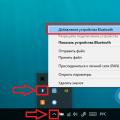 How to connect bluetooth headphones to a computer?