Installing Windows 7 from a flash drive on the MacBook Pro. As many ways as possible, install Windows on Mac
Using Boot Camp from Apple You can download your Mac initially in Microsoft Windows., without launching two operating systems at the same time. This is largely useful for programs that do not work in virtual machinesoh Parallels or VMware Fusion.
Preparation for installing Boot Camp
To begin with, it is necessary to make sure that all Apple updates are installed:
- Go to Boot Camp support page to see if there are updates for your model. Download and establish if necessary;
- In the Apple menu, open the software update and install all system updates;
- Be sure to create a backup!
Starting the boot camps assistant (for x 10.6 or later)
- Close all open applications, then in Finder in the program / utilities, start the Boot Camp Assistant;
- Click the Next button to start the installation;
- If necessary, select "Upload the latest Windows Support from Apple";
- If you want to enter the administrator password to start loading software. After the download is complete, save the files to hDD or USB.
Section of the hard disk
Once download software Ended, the assistant will propose to create a section for Windows on a hard disk. It will be necessary to indicate how much free space will be assigned to this section. To install Windows 7, MAC will require at least 16 GB of free space.
Installing Windows on Mac
- Insert the Windows installation disk;
- Click the Start Installation button. The computer will restart and launch the installation of Windows;
- Follow the instructions in the Windows Installation Wizard;
- On the screen with a question "Where do you want to install Windows?" Select BootCamp;
- Then select the disk settings (optional) and format the disk. It is better not to touch other settings.
Installing Windows Drivers
Once Windows is installed, you need to install drivers that have been downloaded earlier so that all the equipment work correctly in Windows, including sound, display and wireless network adapters.
- Remove the Windows installation disk;
- Insert the flash drive or disk to which the Windows drivers were previously recorded;
- Open To view the contents and in the Boot Camp folder, double-click the setup.exe file to install drivers. Next, follow the instructions on the screen to complete the installation. Do not cancel the installation!
- After the installation is completed, restart the computer.
Select operating system to start
Now you are installed on your Mac simultaneously Windows and Mac OS X, and when loading can be selected what operating system use. Just hold down the OPTION key when the computer is turned on or when you reboot to open the selection menu.
Experts and users agree that MacBook laptops exceed the rest of the reliability, lightness and power models. However, for Windows adherents, Apple developers have provided the ability to work this operational system and on Macs.
The Windows installation process on any Mac does not represent a big problem. In principle, the algorithm of actions is similar to installing Windows on the "ordinary" PC, only takes a little longer. The easiest way is to use the standard OS X "BOOT CAMP Assistant" service program.
Preparations for installing Windows on MacBook Air
To install Windows on the MacBook Air you will need:
- external USB-DVD-drive;
- 64-bit version of Windows 7 "home extended";
- 8 GB flash drive.
Installing Windows on MacBook Air
The installation process takes no more than an hour and requires the following actions:
- Insert the USB flash drive.
- We connect a USB DVD-drive and insert Windows distribution to it.
- Run Boot Camp.
 Photo: Launch Boot Camp
 - In the dialog box, remove the "Create Windows Installation Disk or Newer" and click "Next".
- To save drivers and other data, choose our USB flash drive.

- In order to split the disk, move the slider to determine the number of space on the built-in drive, which we will assign under OS X and Windows. For example, in half "split into equal parts".

- Click the "Install" button. The process will take about 30 minutes. The end of the Boot Camp setting will restart the computer.
- After the computer rebooted, starts automatic installation Windows. Everything will be here as usual. We step in step by enter the data requested by the system and wait. Windows can request manual formatting Bootcamp in NTFS. We agree and format.
- After the download is completed on the computer, Apple support will be installed.
Download and select RAM
Mac does not support the "traditional" operating system selection menu. Therefore, even after Windows, when rebooting or inclusion, OS X will still be loaded.
In order to go to Windows, you hold down the Alt button when loading, which will appear on the selection menu screen, which will most likely contain three options:
- Recovery (OS X recovery).
- OS X.
- Windows.

We celebrate Windows. Unfortunately, Windows is rebooting much more often OS X, so it will be reasonable to configure automatic windows download. You can do this again through Boot Camp.
Remove Windows with MacBook Air
In the case when Windows is more on the MacBook AIR is not required and you want to remove it (everything takes less than a minute):
- Loading under the OS X RAM.
- Activate "Boot Camp Assistant".
- Click on the "Delete Windows 7 or Newer" option.
- The removal process will automatically be launched.
- We are waiting for the end of the process.
In the article Dana detailed instructions How to install Windows 7 on MacBook.
Everyone is used to working with Windows and when buying MacBook there is a need for its installation for a familiar work with documents.
Installing Windows 7 on MacBook Air with Boot Camp
Installing Windows. 7 on MacBook Air. It does not take much time. To install, you need an optical USB drive or USB drive 16 GB. Before installing, you need to check the software updates on the computer.
- Turn on McBuck and run Boot Camp.
- Remove the tank from above where you want to create a disc. Put the checkbox if the installation will be conducted from the image.
- Use a USB drive to save drivers and other information. All information on the drive will be deleted, so use an empty drive.
- Spice the disk into two equal parts for two operating systems.
- Connect the USB-DVD drive and insert Windows distribution.
- Wait until Boot Camp will download the last software from the Internet and will restart the computer.
- Install Windows, following the instructions, select the proposed settings.
Installed Windows just over an hour. For those who do not know how to run Boot Camp: on the desktop on top, press the meadow. In the search window, write the name of the application And click "Continue."
Creating an image
If for installing software in the presence of a disk, then you need to create its image.
- Use the optical drive.
- Using Finder on a laptop, open the disk utility.
- In the window that opens, select the installation disk.
- Enter the file "File", "New Image" menu and then press "DVD disk".
- In the "Master DVD / CD", find "Image Format" and "Encryption". Note "No".
- Create a file name, enter the password and wait until a new image is created.
- After completion, turn off the optical drive.
- Using the Finder program, find a new image.
- Rename the name of the s.cdr by .iso file.
- When applying removable drives, make sure that they are displayed as removable devices in the Finder program.
- Connect the UBSB drive.
- After creating image of ISO. Start setting the program.
Keyboard
After downloading the software, you can use the keyboard in several options. Keys in different operating systems can perform different functions. Many laptop keys with Windows operating system have analogs on the Apple layout.
Formatting Windows OS
For formatting, use the installer, after the question about the installation site, select section boot Camp. Next, begin to format by selecting "Disk Settings".
The new section can be renamed, format or deleted. After creating two sections, change their dimensions will not work. To resize, you will have to delete the partition and reappear the desired partition. To rename the section Load the operating system itself and rename the section. Do not use other programs to resize the section, it can lead to problems.
Be careful! Deleting a section leads to loss of files.
Application Boot Camp.
The application consists of three sections:
- selection system for download;
- setting the keyboard operation;
- take the trackpad work.
The first section will allow you to upload one of the two operating systems. Using the second partition, you can control the F1 - F12 key functions. In the third section, choose the usual gestures to work in any OC.
Running Windows
On MacBook Air 11 or on MacBook Pro, there is no choice of operating system when loading, so to work in Windows 7, press Alt. A menu appears in which select the desired system and download. If you do not click when the ALT button is turned on, the loading will start the MacOS.
Removing Windows
To delete just run Boot Camp in OS X and select "Delete". After deletion OS X. It takes all the space. For the previously installed operating system, it will take less minute to retire completely.
PO Updates
Use the program App Store. To check the updates on the laptop. Select "Update" in the "Updates" section. In the application setting, set the "Download recent renovation renewal background mode" Then updates will be carried out automatically. When established last updateYou can start installing Windows.
If you have a disc with the update, follow these steps:
- Load MacBook in MacOS.
- Connect the Windows update disk.
- Unpack and transfer files to USB drive.
- Restart the laptop and turn on the installed version Windows.
- Update spend using the installation program.
Driver
Some users have a question: "What is the driver?" The driver is a program without which the connected device will not work with the computer. At least once in life, each installed the laptop driver for the work of the scanner or printer. Usually there are already drivers in OS different devicesBut sometimes updates are needed, so checkout updates. For example, for correct operation of the audio system download free driver Realtek. from the Internet.
Apple does not provide technical support Installation or restore Windows. Consultation can be obtained by telephone about a special boot camp assistant, its installation or recovery.
In the previous parts of the lesson, we got acquainted with the basics of installing Windows on the poppy and prepared everything you need (I downloaded the distribution and recorded it on the USB flash drive). Now it has come a turn to make the installation itself.
In this part we step by step install Windows 7 Lite with BootCamp On the previously created section (volume of 10GB). Ten gigabytes must be quite enough for the deployed Windows 7 Lite, the installation of drivers and some small programs.
If you later want to install a heavier software, specify an external HDD as the installation site.
- Incompatibility of the MBR and GPT sections when installing Windows on Mac -
My Windows Installation Instructions using Bootcamp Assistant:
Step 1 - insert, created earlier, USB flash drive in the USB connector of the computer and reboot it. After the reboot will go out in the reboot process, clamp and hold the OPTION button (ALT).
As a result, on the screen will appear Download manager With a list of boot volumes (disks or partitions with suitable OS). Select an image of an orange flash drive with a Windows mark.
The only thing that I want to concentrate your attention is the choice of the disk partition where all this "good" will be installed. Here you will have to choose a section marked as Bootcamp..
To continue the installation, you will need to format this section in NTFS (Click Format. At the bottom of the window).

Step 3 - wait for the completion of copying all files. The process will take some time.

Step 4 - After all files are copied, MacBook will overload itself. Do not miss this moment, and again, after the sound guend, clamp the Option (ALT) button on the keyboard to display the download manager.
Now in the menu that appears, you must select a disc partition with by the name of Windows (Gray disk icon). First will begin running Windows and setting parameters.

Step 5 - Congratulations! Now on your Mac installed lightweight Windows 7. Only this is not the end. In order for all devices of your MacBook (etc.) recognized and operated, you need to install the appropriate drivers. Make it very simple.
Remember, in the first step of this lesson downloaded Boot Camp support files? It is these files that will be useful to us as much as they contain everything. required drivers. We need only to start the file setup.exe. From Dericory D: / Bootcamp / (where D: This is an installation flash drive).
Next will follow the standard steps of the installer (how I " love»Application Installer in Windows). It will come many times on the Next\u003e button. 
Well, now you can breathe with relief. We just just installed Windows 7 with Boot Camp Assistant. What we did it very compact borrowing the built-in SSD only 10 GB of space. T.
ak how we chose to install lightweight windows version 7 Lite, we also managed to reduce the size installed system. So we used only 4.73 GB out of 10 available.

We also installed drivers and support files for all devices of your computer. If everything is clear with the drivers, support files in turn give us the opportunity to use the top row function buttons (Volume, brightness, keyboard illumination, etc.) from under Windows. 
Let me remind once again. In order to switch to Mac OS X on Windows, you need to overload a computer with a pinned Option (ALT) key and from the download manager to select the appropriate section.
If during the installation process, you did not understand something or something did not work out, be sure to read the step number 5 of this lesson, where we will look at the most frequent problems arising when installing Windows on Mac computers.
In any case, leave your questions in the comments and I will try to find a solution to your problem.
Be sure to explore the remaining parts of the lesson:
- Table of Contents
- STEP 1 - -
- Step 2 - -
- Step 3 - - Installing Windows 7 on Mac using Bootcamp Assistant
- Step 4 - -
- Step 5 - -
Subscribe to our Telegram, Twitter, VK.
Watch the IMAC or MacBook purchase, but for many years got used to the specifics and functionality of the Windows operating system? Worried how quickly will be able to get used in the Mac OS environment? And maybe just want to explore the operating system from Apple? For these purposes, it is not necessary to dive into the thick debris of the specifics of the installation on PC Hakintosh, if you are familiar at least with Aza Vmware Workstation. This hypervisor is the most simple way Launch Mac OS in Windows. For him, the network has ready-made virtual machines (VM) with an installed and configured system from Apple. How to test Mac OS Sierra or High Sierra on VMware?
1. Ready MAC VM for hypervisors
The finished VMs save us from the mass of the trouble with which we are forced to encounter when installing Macintosh on ordinary PCs and laptops. Do not need to be installed clover bootloader or chameleon, look for kekkers and special files Type FakeSMC, set the emulation of components. No need to wait until the system is established. All these troubles took over the collectors of the VM. We get a ready-made virtual computer with already integrated guest OS add-ons and a user profile, which can be renamed or deleted if desired by creating another.
Since Mac is officially prohibited to install on ordinary PCs and laptops, naturally, test assemblies of the operating system in the format of working files of hypervisors will not find on apple official resources. But find them on the torrent trackers of the Internet.
VM S. installed MAC. - It is essentially the same Khakintosh devices. Lawyers and sofa experts in the subject may occasionally discuss the existence of an offense in terms of using Macintosh on hypervisors, but technical side The question is nothing to do. Working with a hypervisor, us, alas, you will have to face with the problems of the functioning of the virtual OS, and with the problems of Khakintosh devices as it: the absence of the smoothness of the interface effects, periodic brakes idle due to the lack of drivers separate functions or specific equipment, etc. For VM with Mac, there are the same processors restrictions as for Khakintosh - you need a computer on intel database, preferably with support for SSE4.2.
Ready VMs exist for both VirtualBox, and for VMware. The latter are more convenient to work with virtual Mac: VMware products have consistently working guest OS additions, and we can customize common folders With the main Windows, as well as the screen resolution you need.
2. Sierra or High Sierra
At the time of writing a network, there are ready-made VM with current Mac OS:
Sierra (10.12) - version of 09/20/2016;
High Sierra (10.13) - version of 09/25/2017.
And, perhaps, there is already a VM with the most recent version of Mojave (10.14). But it is Sierra that is considered the most stable version suitable for experiments on the PC. It is the VM Mac OS Sierra that we download and configure to work with VMware. And then fix it in the snapshot and update to High Sierra through the App Store.
3. Downloading VM
To download VM Mac OS Sierra files for VMware, go to Rutracker:
https://rutracker.org/forum/viewtopic.php?t\u003d5287454.
We add distribution to the torrent client, and so far it will download the archive with the VM, we will do some operation directly with the VMware hypervisor. In the description of the distribution, in the column "Tablet", click on the link "Version VMWare 11 and above". If, of course, you have an actual version of the hypervisor above the 11th. Today, the last is the 14th.

4. VMware Unlock for Mac Support
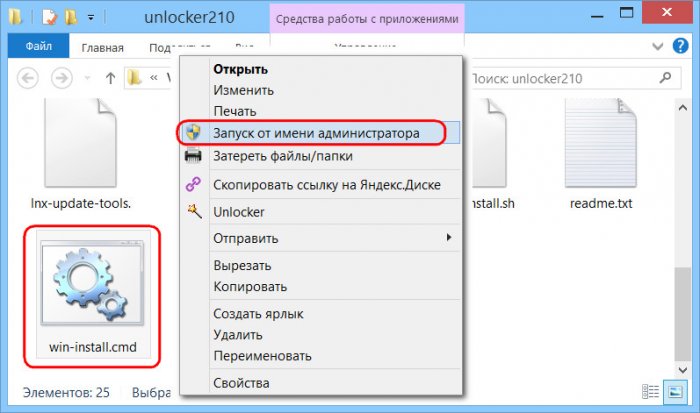
By clicking on the link in the Torrent Distribution Description, download a certain archive with the name "unlocker210". This is an unlocker VMware to support Mac OS. The fact is that VMware products initially do not provide for Macintosh support as a guest OS. Actually, this unlocker210 is needed to solve this issue. Unpack the downloaded archive, we find the file-install.cmd file in the folder and launch it (important) on behalf of the administrator.
Now VMware is among the maintenance of the guest OS will be able to offer us Mac OS - any, right up to the latest version 10.14.

5. Unpacking and setting up VM
Loaded by torrent archive unpack using Total Commander or 7-Zip archiver.
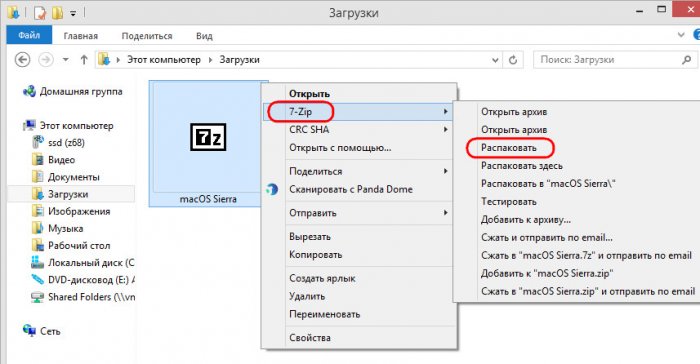
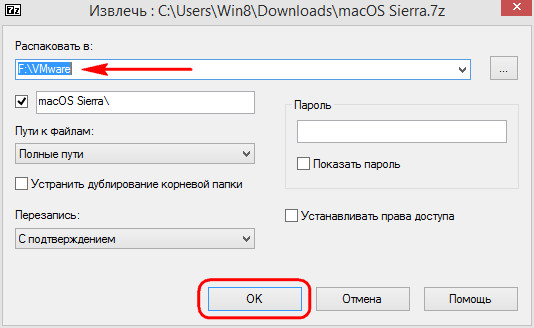
Indicate the unpacking path, it is the way of storing VM files.

If used latest version VMware products, update VM.


Click "Change this virtual machine", then "ready."

Now we go to the settings of VM.

We need a section "Equipment". In the "Memory" tab set the volume random access memory 2 GB If the computer allows you to select more, allocate.


 Doesn't Diablo III start?
 How to check the computer to spyware
 Spyware on a computer