Write a disk image to DVD drive. How to make a boot disk from an ISO image? Recording using the "Run" string
If you are not sure about your abilities, using the materials of this article, you can find out how to record ISO image Windows 7. or Windows 10. (The process is the same for both versions of Windows) on a DVD disk using the program Ultraiso., Nero. or freely distributed program Burnware Free..
Introduction
Disk image - This is a special format file that contains all contents of a CD or DVD disk.
You can draw an analogy with the RAR or Zip archive.
In this case, we consider ISO Image. ISO (.iso) is a generally accepted format with which most programs created to record information on CD and DVDs can work.
The Ultraiso program can also record the ISO image of Windows 7 or Windows 10.You must correctly select the pretenuation of the Windows distribution kit, which is going to record on the disk for the subsequent windows installations.
How to write an image in ultraiso
If you have not yet installed the Ultraiso program, you can download it on the link above. Then you need to install it. The installation is very simple and runs literally in 3 clicks with the mouse. You can leave all settings (checkboxes) by default.
- The program is paid, but you can take advantage trial period. In the window "Welcome!" Simply select the appropriate item - Trial period ... (picture 1).
 Picture 1. Trial version Ultraiso is enough to record ISO image of Windows 7 or Windows 10 on the disk
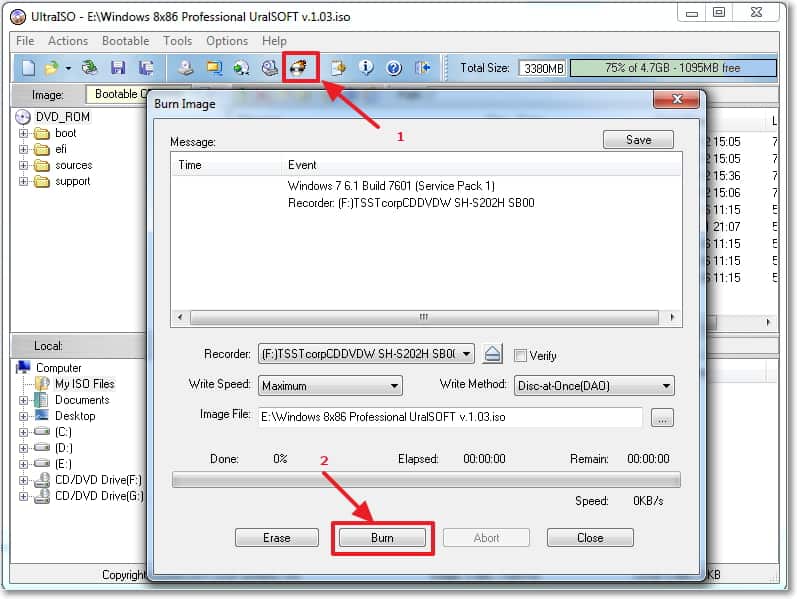
 - After starting the program you need to select the menu item "Tools" → "Record CD ..." (Figure 2). Not properly Just dragging the image to the list of files, because You write the image file, and we need to write it content On the disk so that it turns out the boot.
 Figure 2. Select the "Tools" menu → "Write an image of the CD ..." to write an ISO image
 - In the recording window that opens, use the button «...» As shown in Figure 3, select the ISO image on your hard disk.
- It is important to choose the disc record speed correctly. If you use a rewritable disk (DVD-RW), then you can leave the maximum speed. Otherwise, it is better to set the speed x4 or x8 (for old DVD drives Perhaps less) to minimize the risk to spoil the disk when recording.
 Figure 3. Use the "..." button to select the image file on your computer.
 - Click on the button "Record" (It is circled in Figure 3).
When writing to a rewritable disk, formatting will be formatted, which will take additional minutes.
Wait for the end of the disk recording - the program will appear in the program (see Figure 4) Figure 4. Disk recording results using Ultraiso.
 - The disk with Windows 7 or Windows 10 is ready to install.
- First install this program On your computer and run it. (Figure 5).
- You will see the item called " Write an ISO image", Click on it. After that, the following window opens:
 Figure 6. Selecting the image of Windows 7 to record
 - Specify your file image. To do this, click "Select".
 Figure 7. Window Selection of the image of Windows 7
 - If there are several CD / DVD drives on your computer, you need to specify in the string "Drive-purpose" - The one in which an empty disk is inserted. Settings in paragraph "Options" It is advisable to leave unchanged.
- To start writing an image, click "Record" in law upper corner Windows and wait for the end of the operation.
- If an error has appeared "Disc is not inserted"Make sure you choose your writing your writing drive and have not forgotten insert a clean drive.
 Figure 8. Message about the absence of a disk in the drive.
 - After completing the record, the disk is ready for installation of Windows 7 or Windows 10
- First of all, install this program on your computer and run it (Figure 5):
 Figure 9. Start recording a disk with Windows 7 or Windows 10.
 - And first, click "Cancel", followed by the main screen of the program.

 Figure 12. Setting the disk recording settings
The first Info tab provides only a brief information about the recorded project. The second entry tab has a number of settings. Consider in more detail those required to record our image:- Record.
- Recording a disc (Inclusive by default).
- Finalize CD - for this regime This feature is not active, the disc is finalized automatically.
- Record speed - Selects the recording speed to the disk.
The recording speed is automatically tuned from the maximum speed supported by a pure CD. The value of this parameter depends on the type of CD recorded.
Right choice Speed \u200b\u200bis needed to minimize the risk of errors when writing a disc, so it is better to wait longer, but write a disc without errors. We have already written above that if you use a rewritable disk (DVD-RW), then you can leave the maximum speed.
Otherwise, it is better to set the speed x4 or x8 (for older DVD drives, possibly less) to minimize the risk of damage when recording.
Also carefully look at what maximum recording speed is indicated on the disk itself (for example: x2, x4, x8, x16). It is better to divide this speed by 2 or 4.- Number of copies - The number of disks you want to write at the same time.
- After selecting all installations, click "Burn" to record our image.
- Installation windows disk Ready!
Record the image of Windows 7 in BurnaWare Free
BURNAWARE FREE is a free and high-quality program for writing data on CD or DVDs. Consider how to write a Windows image with it.

Writing Windows 7 Image in Nero Burning
Nero Burning ROM. - Very famous and proven program for recording disks. If you have exactly it on your computer, then below you can familiarize yourself with the actions that need to be performed to record the image of Windows 7 or Windows 10 for the subsequent installation.Why is it better to use third-party programs to write an image, and not embedded Windows 7 mechanism
Starting with Windows 7, WinODWS has built-in CD or DVD record mechanisms.
But the quality of them leaves much to be desired: recording standard Windows mechanisms often leads to a damage of a CD or DVD disk, so it is better to use famous programs, tested by time and millions of users (although even they sometimes give failures).
Hello. I decided to write some more useful text to write today, well, so far inspiration is not lost :). I'll tell you about how to write a Windows image to diskThis can be made by many ways and programs, but I will write how to write the image of the Ultraiso program, it is the most cool and easy-to-record disks, I always use it. Well, if you do not want to install additional programs, then write an image on the disk, can be standard windows tools 7 (B. Windows Vista. Such a chip is like there too).
I looked at the instructions that I wrote on and, and I realized that in them, I gave a link to the article about that. This article describes a way to which you can simply burn files to the disk. Music, movies, etc. But we can create boot disk For further installation of Windows. And the process of recording the image, from a simple file entry is slightly different.
When we download the image of the operating system from the Internet, then it looks like a single extension file .iso . For some reason, I seem to me that many just took and recorded this file to the disk, and then complained why not loading from the boot disk when Windows is installed, because it is configured.
And so that there were no such problems with the installation of the operating system, I will write about how to record .iso the image of Windows to the disk. And then from this disk install Windows Link to detailed installation articles are above.
I also forgot to write about the size of Windows images and discs that will be needed for recording. For Windows XP suitable and cD-R disc, or RW it does not matter. The image of Windows XP takes about 700 MB, in CD it is humoring. Of course, if this is not an assembly with a lot of programs and additional utilities, in this case, the CD may not fit. For Windows Vista, Windows 7 and Eight need a DVD disk. There are more images, the seven occupies about 3 GB.
Record .ISO image of Windows to Disc Program Ultraiso
After installing the program, it is associated with extension.iso and all files of this format will be opened via Ultraiso.
In order to record.iso image, it is enough just to open an image with Windows double by pressing if it looks like this:
 The Ultraiso program will be launched, which will already be ready for recording a self-loading disk. Insert disc In the drive, click on the record button, and then confirm the record by clicking on "Burn". You only need to wait until the program will record the disk, and you can start installing the Windows operating system.
And one more thing, in the speed settings, it is best to choose the speed than smaller, the recording quality will be better. If you record a disc on high speed, then problems are possible during the installation of the operating system.
Create a Windows installation disk with a standard agent
Write an image of the installation disk and the standard means. Such a utility appeared like in Windows Vista, well, there is definitely in the seven. With it, you can write out without any problems .ISO image. And the disk that will eventually be bootable, it will be possible to install the operating system from it.
In Windows 7.iso file looks like this:

Let's figure out how to burn a Windows image to disk different ways, For the subsequent installation of the operating system to the computer. Many computers have a special device: drive - drive to open optical CD / DVD discs on PC.
First, the user writes the ISO system image to a DVD disk, and then executes the download from the laser disk on which the system is recorded to install Windows. For modern versions of Windows (Windows 10, Windows 8.1, Windows 8, Windows 7, Windows Vista) due to big sizem ISO image will need a DVD disk, and for the image of Windows XP is sufficiently compatible CD disc.
To write Windows images, DVDs or CDs are used in formats: DVD-RW, DVD-R, or CD-R, CD-RW. There may be different designations between the abbreviations: "+" ("plus") or "-" ("minus"). To record the system, you can use discs of different types.
Formats dVD-R discs Or CD-R cannot be changed after recording, you can write data only once. The "DVD-RW" and "CD-RW" formats are rewritable, so you can record new data on a similar disk, before removing the old information from the disk, if it becomes irrelevant. It is more practical to use DVD-RW format, because such a disc can be used many times.
If you need to record the Windows boot disk to the optical media, follow the following recommendations:
- recording the image image is desirable to perform at the lowest speed supported by the drive, to prevent the appearance of errors when recording;
- during recording it is necessary to ensure uninterrupted nutrition computer;
- if possible, use the option to check the disk to errors immediately after recording on a DVD disk;
- use discs from well-known manufacturers, because in this case, the chances will increase the fact that the boot disk will last for a long time, with proper storage.
First you need to get the image of Windows in the ".iso" format, and then write the image image to the DVD disk. Read the article on the official site of Microsoft. To write to a DVD, select the desired bittenness of the system: 32 Bit or 64 bit, which should be installed on the computer. Multi-digit image of Windows 10, which includes both bit (x86 and x64), not suitable for recording on the usual optical disk, due to the large size of the image file exceeding the size of the standard DVD disk (4.7 GB).
The ISO file contains all the contents of a DVD or a CD disk saved in the same image file. When you write an ISO image of Windows, you need to make a carrier (DVD disc) bootable, to be able to install the operating system on the PC. Record simple disk It will not work with data, because such a disc will not be bootable.
Record installation disk Windows can be used using built-in systems, or with third-party software. In the article you will find the instructions on how to record ISO Windows. To disk in different ways: first we will try to burn a disk through Windows, and then write the image image using third-party programs.
How to record windows to disk disk image tool
Using the Windows disk image recording tool, you can record Windows 10, Windows 8.1, Windows 8, Windows 7 to the disk. The recording tool is equally operating in these operating systemsoh.
To record the ISO image of Windows on a DVD disc, follow these steps:
- Right-click on the disk image on your computer.
- IN context menu Select "Record Disk Image".
- In the Windows Drive Record Record Tools window, the name of the disk image file will be named. To start the recording process, click on the "Write" button.
I recommend to activate the settings item "Check disk after recording". In this case, you make sure the disc was recorded without errors. Recorded data will be compared with the original way. If, in the process of recording, errors were detected, the DVD disc can be rewritten again. The disc check will take some time, but you will find out that the system entry is successful. Otherwise, you will not know anything about the errors, in the responsible moment of installing Windows, the boot disc will be submitted, and you will not know of the present cause Problems.

- In a warning window, you report that before recording, all data on the disk will be deleted. Click on the "Yes" button.
- Next, the process of writing the image image to the disk will begin.
- After the disk burning is completed, the disk check will be checked for errors when recording.
- At shutdown, click on the Close button.
Download Windows in Media Creation Tool and write the image image in the disk image recording tool
Using the Media Creation Tool application, you can download the original image of Windows from the official Microsoft website.
Record ISO Image of Windows in BurnaWare Free
Free BurnaWare Free program is used to record optical disks.
In the main window of BurnaWare Free in the "Images" section, click on the "Write ISO" button (in the View menu view - "icons").

In the "Write Image" window, select the path to the disk image to add Windows to the program. Check the recording speed and disk application. Enter the Options tab, check the "Check files after recording" item.
Click on the "Write" button.

The Windows image is recorded on the disk and ready for use.
Read detailed review BURNAWARE FREE programs.
WINDOW REPITION IN ASHAMPOO BURNING STUDIO FREE
With the free AShampoo program Burning Studio. FREE, you can burn the installation disk with the operating system.
In the main window of Ashampoo Burning Studio FREE, in side menu Select "Disk Image", and in the "Write Image" menu that opens.

In the Display Image Recording window, click on the "Advanced Parameters" button to enable the disk check option for errors after recording.
After applying the settings, click on the "Write DVD" button.

Windows record on the disk in CdBurnerXP
In the free CDBURNERXP program, you can easily record the Windows boot image on the DVD.
Run the CDBURNERXP program. In the main application window, select "Write an ISO image", and then click on the "OK" button.

In the ISO Image Recording window, in the Record Options tab, perform the necessary settings:
- using the "Browse" button, specify the path to ISO image of windows on the computer;
- select the recording speed;
- check the box next to the "Check Data after Recording" item.
Click on the "Record disk" button.

When default settings, the program will remove the drive from the drive, after completing the recording and checking the media.
Conclusions Articles
If the user arises the question of how to record Windows 10, Windows 8.1, Windows 8, Windows 7 to the disk, you can use the built-in system, or third-party applications. Image recording tool, Media Creation Tool, Ultraiso, Imgburn, Burmaware Free, Ashampoo Burning Studio Free, CdBurnerXP will be recorded on a DVD disk image of the Windows operating system from which you can install the operating system to the computer.
Sometimes there is a need write an ISO image on CD / DVD disk (). Certain built-in functions records of disk There is also in the operating system, however I prefer to use for iSO records on disk Specialized programs (as, however, and to record other data - video, music, files). And once this site is dedicated free programs, then they will be considered.
I will present here three ways, how to record on disk iso. form (For any other file image file will be absolutely similar to):
Method 1. Record the image of ISO to disk using Ashampoo Burning Studio 6 free.
2. Install Ashampoo Burning Studio 6 Free.
The installation process is not difficult. We agree with the terms license Agreement, Zhmem. Further And we expect until the installation process is completed.
3. Open Ashampoo Burning Studio 6 Free (If you have just installed this program, it will open at the end of the installation).
Choose Create / Write Disk Image - Write a CD / DVD / Blu-Ray disc from the disk image .
In the window Record disk image To specify the desired image file, click Overview .

In the window Choosing a disk image Find the desired file. the image and open it, clicking twice or highlighting with the mouse and pressing Open .

Now when the field Disc image path Filled, click Further .

Insert an empty disk. You can not be empty if the disk supports overwriting (). In this case, the disk will be automatically cleaned and overwritten.
If you have several drives, I specify the one in which the disk inserted. If you click on the button Open tray This will open the specified drive.
To start recording, click Record .

We are waiting for the successful completion of the burn. The disc is ready to use.
Method 2. Record ISO image to disk using CDBurnerXP.
2. Install CdBurnerXP.
Here, too, everything is simple. Run installation file.. Press Further . We celebrate the point I accept the terms of the agreement and choose Further until we get to Component selection . CDBURNERXP multilanguage program and offers to set multiple languages. We are quite Russian, so we leave a tick on the contrary Russian (RUSSIA) (You can choose for yourself and other necessary) and click Further and Set . On advertising rights, we are invited to register with the online game. Put the point on the contrary Reject (If you, of course, suddenly did not want to join the game). One way or another, then choose Further And wait for the completion of the installation. Press Complete .
3. Run CdBurnerXP (after installation start automatically).
Twice click on Write an ISO image (or highlight Write an ISO image and click OK ).

Click on Browse ... To select the image file.

Specify the desired file.

Field ISO image for recording Filled, you can start burning. In this window, you can also select a recorder (what drive will be recorded - if you have more than one), write speed: 8x, 4x, 2.4x, etc., method and additional options Entries. Then click Write disk .

We wait for the end of the record and remove the finished disk from the drive.
Method 3. Record the ISO image to disk using standard Windows tools.
In this way, we will not need to download or install additional applications.
Just open the folder where our file image is. Click on the ISO file right mouse button. Select in the context menu that appears To open with - . If you are not displayed in the selection, then press Choose a program ... and double click on Windows Disk Image Recording Tool In the list that opens.

Opens Windows Disk Image Recording Tool . We indicate which drive will be used (if you have several of them), and click Record .

We are waiting for the completion of the record, and the disk is ready for use.
That's all. Naturally ways iSO entries for disk More than more, but the above should be enough to ensure that any user successfully coped with this task. Good luck!
Recently, I often ask me how to record disk image. What programs.?
You can use the built-in operational windows system 7 means of which many beginners do not know. right mouse On the downloaded image, located for example, we choose on the desktop and in the opening menu Write a disk image,

insert a clean drive into the drive and click Record, occurs recording, That's all, now go to third-party programs.

Description of the recording process on the recorded and rewritable CDs in Windows XP
The CD recording feature built into the Windows XP shell does not allow creating images that comply with ISO standards. To create an ISO image in Windows XP, you must install a third-party program that supports the execution of such a task.
ISO image file is a copy of the status of data and the CD structure on certain moment The time recorded in ISO-9660 format. Such files are widely used to store the contents of the CD. ISO is standard format CD images for DOS operating systems, Windows (Joliet ISO extension), Linux (Rockridge ISO extension) and some others.
Description of the area of \u200b\u200bplacement
To store data during the Windows XP CD recording, uses the placement area in the following hidden folder:
letter_Disk: \\ Documents and settings\\ user_name \\ Local Settings \\ Application Data \\ Microsoft \\ CD Burning
In addition, before recording the data, the contents of the placement area is copied to a single disk image file, which is created by default in the root directory under the name "CD Burning Stash File.bin". Placing a file can be changed by clicking in the recording dialog box to the CD button Properties.
Note Since the Local Settings folder is hidden, to get the opportunity to see it, you will need to change the parameters. windows Explorer. To do this, follow these steps.
- Run the conductor.
- On the menu Service Select Team Folder properties and go to the tab View.
- For parameter Hidden files and folders Select Mode Show hidden files and foldersthen click OK..
How to copy files to the placement area
Copy files to the placement area can be one of the four ways below.
- Method 1. Drag files to the CD icon with the mouse.
- Method 2 Click File or Selected File Group Right-click, select Send, and then - .
- Method 3. Select the file to select in the menu File paragraph Send, and then - CD Drive (name_I_BUKVA_Disk).
- Method 4. Manually copy files to the placement area.
How to start the recording process
After the files are copied to the placement area, start writing data to the CD in one of the following methods.
- Method 1. In the group Tasks for recording CD Click link Write files to a CD .
- Method 2. Right-click the CD CD icon and select item. Write files to a CD.
At this stage, data from the area of \u200b\u200bplacement in a single file, which is then written to the disk as an image.
To view a video clip with file copying instructions to the placement area and start the recording process, press the play button (
Collapse this imageExpand this image
) In the window below windows player Media.
Description of the Properties of the CD Recording Device Properties
In addition to the tabs provided for all disks, the CD recording device properties dialog box contains a tab. Recordon which are located the following parameters CD records.
- Allow CD record on this device. Check this box to allow CD recording files and folders to the disk icon.
- Placing a temporary disk image. Select a disk to create an image file before writing to a CD.
- Record speed. Used to set the recording speed up to the value maximum allowed for this equipment.
- Automatically remove CD after recording. Check this box so that after the recording is completed, the media is automatically extended.
I offer you a review of 4 (in my opinion) the most optimal programs.
✔ Program Nero.
✔ Program Ashampoo Burning Studio..
✔ Program Imgburn..
✔ Program Ultraiso..
Nero program.
1. Open the Nero program.
3. Clean disk (DVD) You have already inserted into the drive, then click the item "Record image to disk".
4. Choose your file image you want to write. After that, you will have the "Final Record Setup" window.
5. On the right side of the window, click on the arrow.
6. You will have an additional menu window, in this window, be sure to put the smallest write speed and click the "Record" button.
I hope everyone everything was clear how to write an image to the disk.
Interface language: RUS / ENG.
Medicine: Available
Nero Burning Rom + Nero Express 6.6.1.15 (Russian version) Portable
Contains:
Nero Burning ROM 6
Nero Express 6.
Platform: Windows All
Interface: Russian
Medicine: not required
Size: 19.7 MB
ASHAMPOO BURNING STUDIO program.
The official page of Ashampoo is moving by reference to the official website, then a little lower on the same page ashampoo Burning Studio version


The installer is only 16 MB, downloaded in seconds where we indicate, for example, right on the desktop.

If you wish, you can choose the Russian language on the site, that's all. Run the program installer, then as usual.

We accept the Agreement. In this place, prefer the selective installation and remove the checkboxes everywhere, as the toolbar, and the search from Myashampoo is of course not needed.

Complete.

Run the program, choose Create / Write Disk Image->Write a CD / DVD / BLY-Ray disc from the disk image.

In this window, click Overview.


Insert a clean drive into a drive.

Click on write a CD, one minute and our Internet downloaded on the Internet is burning to a CD or DVD.

Portable version.

DOWNLOAD
ImgBurn program.
Well, now IMGBURN is the queue of the program. Here, too, everything is very simple, we go to the official website of the program, click Download.

Go to the download page and choose the very first version of the utility, then download it,


by the way on the same page, just below can download the crack to the ImgBurn program.

Installation is very simple, the truth is made in English,


next, insert the crack in the program and we can work in the Russian interface. How to Russify, violent at the end of the article. But in English, you can burn our image without problems with one mouse click. Insert a clean CD into the drive, depending on the image -cd or DVD. We have an imgburn,

before us is the main window of the program, choose in it Write Image File To Disc.

We indicate the finding of our image by clicking the button with a magnifying glass.

Our conductor opens, find an image.


How to Russify the ImgBurn program? The crack, which we downloaded, is in the archive, remove it from there, we click on it twice the left mouse, this is if you have installed WinRAR,
if not, we can take advantage free program 7-zip. Next, click Remove and specify the desktop and OK.
Ultraiso program.

Establish a disk recording:
Ultraiso - utility for working with disk images in * .iso format. It allows you to edit the contents of the CD image, retrieve and run the files available on it. The program makes the ISO file with CD-ROMA or hard disk. Ultra ISO works not only with files in ISO format, but also with images created in popular programs such as Alcohol 120%, Nero, NTI CD / DVD Maker, Virtual CD, Clone CD, Blindwrite, etc. Ultra ISO can work in A pair with Nero Burning ROM and use the engine of this program to record disks.
Install ultraiso
Remove the "Install CD / DVD emulator" checkbox if you do not want to see my computer in the menu virtual drive
- Run the program
- choose the file - open
- Choose our file, in our case chip_2009.03_cd_lite.iso
- It must be written: "Self-loading"
- Choose "Record the CD image"
- Select the recording speed: The minimum recording speed is recommended.
- Click: write down. After recording the disc to install is ready.
Ultraiso Premium Edition 9.3.5.2716 Unattended - Silent + Portable
Name: Ultraiso.
Year of issue: 2011
OS.: Windows® 2000 / XP / Vista / 7
Language: Russian / English
Treatment: Sewn
The size: 14.89 MB.


 State Services Personal Account
 State Supervisory Cabinet- Entrance on SNILS and Telephone
 Single telephone rescue service in the Russian Federation