Plugin WP Mega Menu: Functionality, Installation, Setup. Horizontal drop-down menu Super plugin Wordpress vertical mega menu Wordpress
It is widely known that the support of arbitrary menus (custom menu) has been added to WordPress 3.0. The thing in my opinion is extremely comfortable and useful. Actually, from here and this article.
Convenience is that you can now create and configure the menu directly from the admin, adding links with clicks on checkboxes and changing the order of links to simple dragging. You can add links to pages, categories and individual posts in the menu. You can create a multi-level menu, you can also add your arbitrary links to which WordPress does not know. In general, complete freedom of action.
However, so that such "freedom" is available, you need to say so, with a slight movement of the mouse, configure the output of the arbitrary menu into the template.
Use such a menu will be extremely convenient if you use the WordPress multisayteable feature, because for different sites you can configure different menus, and the template for them to use one.
Note: The menu works via taxonomy (NAV_MENU) WordPress, and arbitrary (external) references are recorded in the main table of POSTS database. This approach is more flexible and dynamic, but requires constant generation of such menus.
Register_nav_Menus (Array ("top" \u003d\u003e "Top menu", // Location name Menu in the "Bottom" template \u003d\u003e "Lower menu" // Name of another location of the menu in the template));
Now we have registered 2 menus with "Top" and "Bottom" identifiers with the corresponding names. Identifiers are needed to use them in the subject, to specify the place where, through the WP_NAV_MENU () output function, the menu created in the admin will be displayed. We will see the names of the registered locations when I go to the Appearance section -\u003e Menu.
After the menu is registered, we go to the admin and create your own menus (in this example 2 menus):
- Select where the menu is located, since we registered 2 menus, we will have 2 options: "top menu" and "bottom menu".
We specify the menu name (the menu in the template can be displayed on the specified name, the WP_NAV_MENU () function
Create menu items. Use the left block: page links, rubrics

Support for arbitrary menus in WordPress turns on for each topic separately, such a line in the Functions.php Add_Theme_Support file ("Menus"); However, in this line there is no need if we register the menu. In this case, support will be enabled automatically.
Display arbitrary menus through the WP_NAV_MENU function
The menu is registered and created, it remains to add them to the template. This is done by the WP_NAV_MENU () function, which can take the following parameters:
WP_NAV_MENU (Array ("MENU" \u003d\u003e "", // (String) The name of the displayed menu (is specified in the admin when creating a menu, priority // How the specified location of theme_loocation is indicated, then the select_location parameter is ignored) "Container" \u003d\u003e " Div ", // (String) Container Menu. The UL ward. The container tag is specified (by default in the DIV tag)" CONTAINER_CLASS "\u003d\u003e", // (String) Class container (DIV tag) "Container_ID" \u003d\u003e "" , // (String) the container ID (DIV) "MENU_CLASS" \u003d\u003e "MENU", // (String) Class of the menu itself (UL tag) "MENU_ID" \u003d\u003e "", // (String) ID menu ( UL tag) "echo" \u003d\u003e true, // (boolean) display on the screen or return to process "Fallback_CB" \u003d\u003e "WP_Page_MENU", // (String) used (backup) function, if the menu does not exist (failed to get ) "Before" \u003d\u003e "", // (String) text before each reference "after" \u003d\u003e "", // (string) text after each link "link_before" \u003d\u003e "", // (string) text before anchor (text) links "link_after" \u003d\u003e "", // (String) text after the Ancor (text) links "depth" \u003d\u003e 0, / / (Integer) Ness depth (0 - Unlimited, 2 - two-level menu) "Walker" \u003d\u003e "", // (Object) Class Class Menu. Default: New Walker_Nav_Menu "Theme_Location" \u003d\u003e "" // (String) Location of the menu in the template. (the key is specified by the menu in the register_nav_menus function)));
In this example, in the template you need to insert approximately (depends on the parameters you need) such, 2 code:
#one. Location menu output
Top Menu.We insert into the template header (header.php), where the top (TOP) menu will be displayed:
"MENU", "Theme_location" \u003d\u003e "Top", "Afterter" \u003d\u003e "/")); ?\u003e
Withdraw the menu created in the administrator, attached to the "Top Menu" Location with a similar structure:
Lower menu.We insert into the basement of the template (footer.php), where the bottom (BotTom) menu will be displayed:
Withdraw the menu created in the administrator attached to the location "Lower Menu". The structure will be identical first.
Note, in the first embodiment, the parameters were transmitted through an array (array). In the second through the string. Both options are correct. This is a common case for WordPress functions - parameters can be transmitted both by an array and string (the string is converted into an array).
# 2 display menu by name
To display the menu by its name, you can use the "MENU" argument. The name is indicated, which was specified when creating a menu in the admin. In our example (see picture) "Main menu". The Menu argument has a great priority than theme_location, which means if we are displayed by name, then the theme_location parameter will be ignored.
You can specify the menu ID, not name. So, when changing the menu name, the code will remain working. The menu ID can be viewed in Url while editing the menu:
Notes
Remove the wrapper div
You probably noticed that the menu "turns", often, unnecessary Div tag. It can be deleted by specifying in arguments for the WP_NAV_MENU () function () empty parameter "CONTAINER" \u003d\u003e "".
Change the default settings
To constantly not specify the same parameter for the inserted menu, you can override them in Functions.php. It is done through the WP_NAV_MENU_ARGS filter:
Register_nav_Menus (Array ("top" \u003d\u003e "Top menu", "Bottom" \u003d\u003e "Lower menu")); Add_Filter ("WP_NAV_MENU_ARGS", "My_WP_NAV_MENU_ARGS"); Function My_WP_NAV_MENU_ARGS ($ args \u003d "") ($ args ["Container"] \u003d ""; Return $ args;)
By analogy, you can create your default arguments: $ args ["argument"] \u003d "value".
Check whether the menu is registered
In Wordpress, there is also a function: HAS_NAV_MENU ("TOP") - checks whether the location of the TOP menu has been registered. If the menu is not specified, then the WP_NAV_MENU () function will work as WP_LIST_Pages (), but the "robber" div will remain, despite the fact that we removed it in the arguments. You can solve this problem like this:
If ("has_nav_menu (" top ") (WP_NAV_MENU (Array (" Container "\u003d\u003e", "theme_location" \u003d\u003e "top", "menu_class" \u003d\u003e "Menu"));) Else (Echo "
"; }The site on the site facilitate the movement of visitors on the site. Websites with a large amount of content can not work only with the usual menu. Most of the content of this website is unlikely to fit into them. In this case, the mega-menu enters. The appearance and menu functions are largely dependent on which technology you use. Many WordPress plugins for the mega-menu promise you so much functions that the best for myself is difficult for yourself in this list.
From this large number of plugins mega-menu there is one that is suitable for most users. This is a plugin WP Mega Menu. It offers all the basic functions and functionality, and it is free.
In the article, we will look at the main functionality of the WP Mega Menu plugin, how to install and configure it.
WP Mega Menu features
A wide range of WP Mega Menu features includes:
- Drag and drop menu.
- Visual menu construction.
- Widgets in menu items.
- A variant of several topics.
- Export / Import menu themes.
- Branding with logo and social icons.
- Magnification Menu / Icons.
- Support icons.
- Stretched menu and picture in the background of the menu.
- Adaptive and mobile menu.
- Unlimited colors and Google Fonts.
Consider some of the powerful functions in more detail.
Functionality Building the drag and drop menu
After the WP Mega Menu plugin is installed on your site, you can create a menu using dragging functions. Add strings, and then drag the widgets in the columns of these lines. This WordPress plugin automatically saves changes when editing the menu layouts. You do not need to write code or something to program. A powerful drag and drop system WP Mega Menu makes it possible to create the best menus with minimal effort.
Fully adaptive and mobile menu

The menu created using WP Mega Menu will be 100% adaptive and mobile. Regardless of the size of the devices on which your site works, it will not have problems with the display. You can control the adaptation to the screen resolution to automatically switch between desktop and mobile versions. Your menu of your website will work perfectly in all OS.
Integration with WooCommerce

If you have products for display and sale on your site, WP Mega Menu gives you a fantastic way to directly access visitors to product details right from the menu. You have a system to display Ecommerce products in the menu items. Turn your website to the site with highly organized eCommerce navigation using Mega Menu.
Multi-level drop-down menu

Create so many menu items as you want. You can design a multi-level drop-down menu, and they will look equally beautiful. Enrich the elements of the main menu using the submenu with a drop-down list. It will give you even more navigation features. Building such multi-level drop-down menus is much easier with this editor plug-in.
Extended functions

Use any short code in the menu. Along with this, you have the opportunity to use two pre-installed extended widget: add photos, headlines and small parts to be displayed during hang over them.
Social icons and search option in the menu
![]()
You have the default WordPress search system directly in your menu. With a plugin WP Mega Menu you can do it in just a few clicks.
Full of settings

WP MEGA MENU allows you to fully configure the menu. Setting this menu and making the necessary changes are quite simple. Install indents and fields of any item in the menu. Control the visibility of the menu in accordance with the devices on which your menu will work. You can also apply effects on the menu items. Use a variety of items, such as icons, Background options when setting up the menu.
Multilingual: WPML compatible

Regardless of which language your site will work, WP Mega Menu will not have any problems with any languages. It is fully compatible with WPML. Make your menu content in any language, and the menu will work.
How to build a mega-menu on your WordPress website
1. Install WP Mega Menu plugin
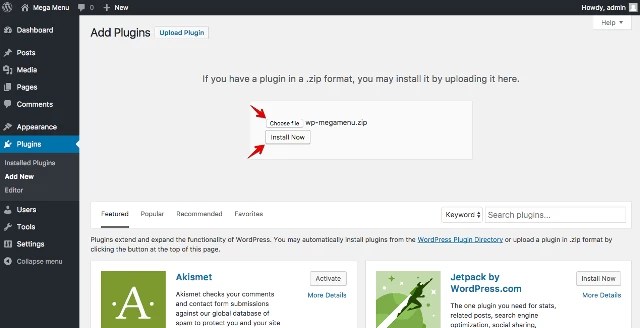
Like any other WordPress plugin, you can install it on your site in two different ways. First go to your personal account -\u003e Plugins -\u003e Add new. Specify in the search string "WP Mega Menu" and click "Set Now". Then activate the plugin when the Activate button appears.

You can also download plugin WP Mega Menu From the WordPress catalog. Then open the WordPress toolbar. Go to Plugins -\u003e Add New -\u003e Download Plugin. Upload a zip file with a plugin and click "Set Now".
Activate the plugin after a successful installation message. In fact, the system itself will ask it to activate.
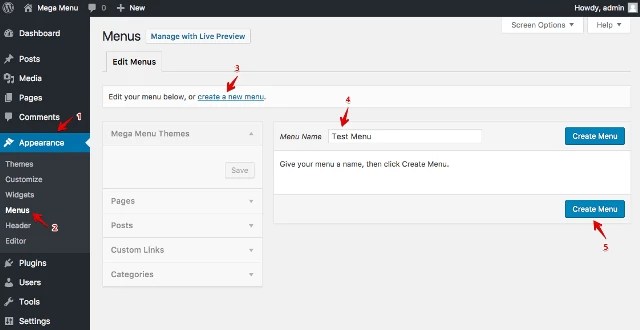
2. Create a menu
First of all, create a menu by clicking on the WordPress toolbar -\u003e Appearance -\u003e Menu. Then create a new menu. So WordPress allows you to create the default menu.
3. Global settings WP Mega Menu
Find the WP MEGA MENU tab on the left sidebar and click on it.

4. Create a topic for menu
Menu themes define styles and behavior of navigation panels in the menu. To create the menu theme, open WP Mega Menu -\u003e themes. You can either create a new topic, or import it. Click the "Import theme" or "Create a new topic" to perform an action.

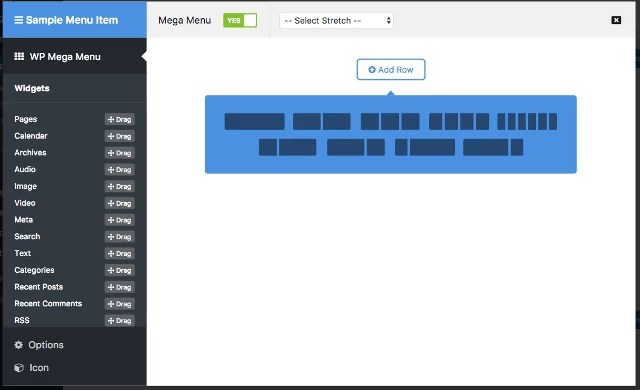
5. Settings Mega Menu Elements
Visit WordPress toolbar -\u003e Appearance -\u003e Menu. The WP Mega Menu parameter will appear when you hover the mouse cursor on the menu items.

Click on it to make installation. Set the MEGA MENU parameter to "Yes" and click "Add a string" to select the rows and columns. Also select the menu theme on the left side.
Shop in the mega-menu
On the left you will see useful widgets with which you can add extended functions. Drag widget WPMM Grid Woocommerce and place it in the column.

Edit WPMM Grid WooCommerce widget. Place your products with images and information, as you want buyers to see them. You can specify the name and select a specific category or all categories to display products from all categories.

You have completed creating your first mega-menu for your WordPress website. With this revolutionary WordPress designer for the menu you can make a lot. To find out what else he can do, and how to do it, read the detailed documentation To the plugin.
Do you want to configure WordPress navigation menu to change their color or appearance? Your topic WordPress processes the appearance of the navigation menu on your site. You can easily configure it using CSS to meet your requirements. In this article we will show you how to configure the WordPress style of the navigation menu.
Method 1: Use manual change style Navigation menu in WordPress
This method requires you to edit the WordPress theme files. You must use it only if you are convenient to edit the code and understand how it works.
The best way to make custom settings in your WordPress theme is. If you only change CSS, then you can see our guide on how without changing the theme files.
The navigation menu in WordPress is displayed as an unordered list (label).
If you just used the next tag, it will display the list without any CSS classes associated with it.
Your disordered list will have the name of the 'Menu' class with each element of the list that has its own class.
It can work if you have only one place menu. However, most of the topics have several places where you can display the navigation menu.
Use only CSS classes by default can lead to a conflict from the menu on other places.
That is why you need to determine the CSS class and the menu location. Most likely, your WordPress theme is already done by adding a navigation menu using code, about this:
"PRIMARY", "MENU_CLASS" \u003d\u003e "PRIMARY-MENU",)); ?\u003e
This code reports WordPress that this topic displays the initial menu. It will also add the CSS Primary-Menu class to the menu navigation.
Now you can configure the style of your navigation menu using this CSS structure.
#Header .primary-menu () // Container Class #Header .primary-Menu UL () // Container Class First Unordered List #Header .primary-Menu UL UL () // Unordered List Within An Unordered List #Header .primary -Menu Li () // Each Navigation Item #Header .primary-Menu Li A () // Each Navigation Item Anchor #Header .primary-Menu Li UL () // Unordered List If there is DOWN Items #Header .primary -Menu Li Li () // Each Drop Down Navigation Item #Header .primary-Menu Li Li A () // Each DRAP DOWN Navigation Item Anchor
Replace #Header to the class of the container or ID used by your WordPress theme.
This structure will help you completely change the appearance of the navigation menu.
However, there are other classes that are automatically added using WordPress for each menu item and menu. These classes allow you to configure the navigation menu even more.
Current_Page_Item () // Class for Current Page .Current-Cat () // Class for current Category .current-menu-item () // Class for any Other Current Menu Item .Menu-item-Type-Taxonomy () // Class for a Category .menu-item-type-post_type () // Class for Pages .Menu-Item-Type-Custom () // Class for Any Custom Item That You Added .Menu-Item-Home () // Class FOR THE HOME LINK
WordPress also allows you to add CSS classes to separate menu items from within the administrator area.
You can use this feature for menu items styles as adding an image icons with a menu or simply changing the color to highlight the menu item.
Go to the page Appearance »Menus. And click on the button.
After you checked these settings, you will see that an additional field will be added when you edit each individual menu item.
Now you can use this CSS class in the style sheet to add a custom css. It will only affect the menu item using the CSS class you have added.
Method 2: Configure the menu style in WordPress with plugins
Your WordPress theme uses the style for the navigation menu. Many beginners are not very convenient to edit the files or write CSS independently.
That's when WordPress Menu Styling Plugin is useful. It eliminates you from editing the file or writing files.
First you need to install and activate the CSS HERO plugin. For more information, see our step by step a guide about.
CSS Hero is a premium plugin in WordPress, which allows you to design your own WordPress theme without writing a code of code (without HTML or CSS).
After activation, you will be redirected to get your CSS Hero key. Just follow the instructions on the screen, and you will be redirected back to your site in several clicks.
Now you need to click on the CSS Hero button in your WordPress admin panel.
CSS Hero offers WYSIWYG editor (what you see, and get). Pressing the button will make you on your site with a floating CSS HERO toolbar visible on the screen.
You need to click on the blue icon at the top to start editing.
Direct the mouse to your navigation menu and CSS Hero highlight it, showing the borders around it. When you click on the highlighted navigation menu, it will show you the items you can edit.
The above screenshot shows us the menu item, menu navigation, menu navigation container, etc.
Let's assume that we want to change the color of the text of all items in the navigation menu. In this case, we will choose the navigation menu that affects all the menus.
Now CSS Hero will show you various properties that can be edited as text, background, borders, fields, indents, etc.
You can click on any property you want to change. CSS Hero will show you a simple interface where you can make your changes.
In the above screenshot, we chose the text, and it showed us a good interface for selecting fonts, changing the color of the text, size and other properties.
As the changes are made, you will be able to see them alive in the preview topic.
After you are satisfied with the changes, click on the Save button on the CSS HERO toolbar to save the changes.
It is best to use this method that you can easily cancel any changes you do. CSS Hero saves the full history of all your changes, and you can go back and forth between these changes.
We hope that this article helped you find out how to create a style menu of navigation in WordPress.
This can be done with styles.
But you need to understand that you have the menu then you need to move from the top to the Sidebar, which you do not have yet.
Well, that is, if this topic allows you to connect Sidebar on the right side and transfer the menu to it.
And so that it was vertical, it is enough to add / change CSS
Main-Navigation UL Li, .secondary-Navigation UL Li (Display: Block! Important;)
Well, there even after that you need to change the indents and other properties.
Maybe I misunderstood you, but Max Mega Menu is already in the field of the left column (it is black, it lined up in 2 lines due to the inverseness of the region, and so it is the default in the plugin horizontal), added there through widgets, at the top I have a standard menu of topics and they both need them, now I will try CSS, thanks
It is possible that I also did not quite rightly understand.
I talked about the menu that you have on the screenshot in the horizontal top block of a salad color "tea sweets ..."
But rereading your answer, I understand that we are talking about different menus.
On the screen, you see the most Max Mega Menu in the left side, but I do not see it on the site according to your link.
BC I have not seen him and yesterday, then I did not look at the screen.
Now I also do not observe.
I try to do something constantly, I put it differently and clean up, until I understand how this menu is made vertical, seeking another suitable. For this menu, the same solution using CSS can be applied as you wrote? You could not tell, which part of the code insert the line data in the plugin itself? Is the location matter?
The plug-in-edit-chose Max Mega Menu, then there are such sections:
CSS.
Megamenu.scss.
Reset.SCSS
Toggle Blocks.scss
Admin.
mixin.scss
None of them found such lines to fix
I just absolutely noob and did not understand why you need it to be displayed, apparently to look and tell the code. Found in the Support Forum Max Mega Menu, the answer of the administrator, which is vertical only in about (paid) version, so it will have to abandon it. Could you please advise any similar plugin, such criteria:
- Ability to install in Sidbar
- The menu should be dropping
- When switching to any of the categories, so that it remains open at this stage, and not completely closed with the page update
Exactly.
Without seeing this Menu - it is impossible to give advice and recommendations. It is possible that there is enough pairs of lines in CSS. But not a fact.
Although, if you really plan to use this Max Mega Menu revealing all its capabilities, then for such a product 23 dollars - not much. It's worth it.
 Extension to work with files in the web client
 Fixing the error "Server refused access via POP3" when connecting Gmail mail!
 1 does not start on windows 10