Booting flash drive using WinToflash. WINTOFLASH or how to make a USB flash drive loading
WINTOFLASH - allows you to fully transfer the Windows XP installation program, Windows 2003, Windows Vista, Windows 2008, Windows 7 to the flash drive for several mouse clicks. This means that you can install Windows with a flash card, HDD, on your computer or non-pub. And this is not all she can do. WinToflash can transfer your Live CD / DVD to flash card. After all technological manipulations, you can clear the flash card on a low level and format it into Windows for daily use.
What will be required to create a boot flash drive.
To create a loading flash drive or memory card withinstallationWindows We will need:
1. Windows distribution in the form of an image with extension.iso or simply recorded Windows disk.
3. USB flash drive or 4 GB memory card and more (it will be necessary to format the NTFS file system). If you have a memory card, it is recommended to use an external USB card reader. This is due to the fact that not all laptops are capable of being loaded correctly from the built-in cartride. It is worth noting that all the contents of the flash drive will be deleted. Therefore, you need to copy all the important information.
Now unpack the archive in any for a comfortable place.
After unpacking, run the WinToflash utility.
After that, the main program window should open. Click on a large green tick
" The path to the file"We indicate the place where our installation files unpacked.
" USB disk"Choose your flash drive letter
You can download this program for this link.
Congratulations! You have created a bootable USB flash drive using WinToflash.
If for some reason you need to make a loading flash drive, for example, with the operating system, then you need to take care of the installation of software for these purposes in advance. Yes, the bootable USB flash drive can be done using a special utility from Microsoft, but many users in this matter trust third-party software.
In this article, consider such a program as WinToflash from Novicorp.
Creating multiple images on one flash drive
In contrast to most programs of similar orientation, WinToflash allows you to record several workflows at once. Due to this, even one medium can be placed several operating systems and programs that require loading from third-party media.

However, when recording multiple operating systems, consider that this can lead to failures in the installation of the installation and / or images on it.
Transferring information from the disk to the USB flash drive
The program has integrated information transfer functions from disks to flash drives. For example, the image of the operating system from the disk to third-party media. At the same time, the workability of the image will not suffer.

Record of the boot image
The main "chip" of the program is that you can record the Windows boot image in just a few clicks, the main thing is to be on your computer. You will need in a special window to specify the location of the ISO image, as well as a flash drive on which the image will be created and start creating.

Attention! Before you start creating a boot image, make sure that there are no important information on the flash drive, since this will be deleted immediately after recording the bootloader.
Preparation for recording
Before making an entry on a USB media, it is advisable to spend it some preparation, namely: make formatting, eliminate errors in the file system, if any, create the correct directory structure, etc. All of these item can be performed from the tab. "Stages of preparation", noting them with checkmarks and running the procedure.

Creating a loader with MS-DOC
MS-DOC is one of the first mass use operating systems that served as a prototype of Windows. If for some reason you need to install it on your computer, then many programs designed to create loading media may not cope with this task.

In the case of WINTOFLASH, all the necessary functionality in the program is available, and you will easily make a loader under MS-DOC.
Formatting flash drive
The program provides for two formatting modes: fast and complete. In the first case, only the table of contents are removed, and in the second case, you can change the file system on the carrier.

Creating a LiveCD.
This item will be suitable for those cases when you want to create a bootable flash drive not to install the operating system, but for its recovery. The program has a special tab that allows you to create a LiveCD.

Advantages and disadvantages of WinToflash
This program did not identify any serious deficiencies, however, the following items can be distinguished among the advantages:
- There is support for the Russian language;
- In stock FREE version, where the main functionality is practically not trimmed;
- Simple interface.
WinToflas is a multifunctional interface to create bootable flash drives under Windows. It can also work with bootable carriers of other operating systems, such as Linux.
The happy owners of new netbooks have to deal with such a problem as installation and reinstalling the operating system. Cause - There is no internal drive for reading DVDs. To install Windows 7 on such a netbook, you will need to resort either to using an external DVD drive, or to the USB bootable flash drive ("Flashki"). External DVD-drive is quite expensive device compared to a simple flash drive. Therefore, choose a USB flash drive and proceed.
Note: However, simple copying of Windows for a flash drive is not separated - the installation will not begin. In the case of Windows XP, for example, you need to rebuild the directory structure, write a flash drive loader, configure files. Previously, all this was done by the USB_PREP8 / USB_MULTIBOOT10 utility, but it worked from the command line and not always quickly and efficiently. loved to replace the settings of the installation, which was not asked for and was in English, which prevented its development
For the correct creation of the boot flash drive, we need:
- USB Flash Drive 4 GB or More
- Windows 7 installation disk
- Computer equipped with DVD-drive-driven drive
- Windows XP / 2003 / Vista / 2008/7 operating system
- NOVICORP WINTOFLASH program
NOVICORP WINTOFLASH. - This is an application that allows you to fully transfer the Windows XP, Windows 2003 installation program, Windows Vista, Windows 2008, Windows 7 to flash to a few mouse clicks. This means that you can install Windows with flash card, HDD, ETC to your computer or nonBC.
And this is not all she can do. WinToflash can transfer your Live CD / DVD to a flash card, for example, Bartpe. After all technological manipulations, you can clean the flash card on a low level and format it into Windows for daily use.
Program capabilities WINTOFLASH.:
- Transferring Windows XP / 2003 / Vista / 2008/7 installation with Flash CD
- Winpe Transfer to Flash
- Erasing Flash, Full or Quick
- Creating a disk with an emergency loader
- Transfer DOS to Flash
I add from myself that
She is Russian, you don't miss anything, because they did not understand what is written on the screen
It has a wizard mode in which only 2 questions are set.
Has an advanced mode in which without sex liters do not understand all settings
Has a Russian website and support
Made in the portable version, VZIP archive spreads
Takes up only 10 megabytes
It's all for free! (only for home use, the price of a commercial license is unknown to me)
You can download directly from the official site http://wintoflash.com/download/ru/ via Torrent, FTP or partner sites like upload.com
After downloading the program, you will receive .Zip archive containing the latest version WINTOFLASH., Save it and unpack it. To run twice, click on the WINTOFLASH.EXE file and allow it to start with administrator rights. When you first start, you will need to accept the terms of the license.
The program language will automatically be selected equal to your Windows language, if possible. We accept the license and proceed to the most important thing.
The main window will appear WINTOFLASH.. There are two modes: plain - to quickly create a loading flash drive, and advanced - To perform such actions as a complete USB cleaning of the drive or transferring DOS / WINPE to a USB disk, as well as set to set up the markup settings, disk formatting and transferring Windows
Advanced mode. You can perform other actions, such as complete USB cleaning or transferring DOS / WINPE to a USB disk, as well as configure the settings of the markup, disk formatting and transferring

Let's start with Windows 7 transfer to a USB drive, select the appropriate item and click Run. The window will change, and you will need to specify a few more parameters than in the wizard mode. Most of the parameters are already in auto-selection mode, the minimum required set is the same as before - the path to the Windows disk and USB drive

On another screen, you can configure the WinToflash logic when transferred. For example, you can refuse to format a drive if you already have a downloader

The "Collect Distribution Information" option will create an accurate list of files and folders to transfer Windows disk two other options on this list will create and copy the files and folders of the formatting options are united for all transfers. Their description is beyond the limits of this article, they can be found in the books of Peter Norton and the official Microsoft documentation by FAT.


The parameters that need to be changed if the installation from your flash drive does not start are in the Basic Parameters block. The formatting type must match the type that supports your BIOS, refer to the BIOS instructions to set this file system - the most frequent problem. Experiments with this item allow you to solve 80% of download problems. After you have prepared all items, we recommend to save the profile by selecting the task - save

WINTOFLASH. Save the profile with the parameters you specified and you can always return to it, select the job to download. Button Auto Write your profile yourself, according to the current time and date

For Windows XP / 2003, there are several more settings items, for example, you can fill out some auto install script fields, just put a check mark and enter the required value. If you enter the serial number, you can set a password when saving a profile.


On the screen preparation stages also provide extended logic

For example, you can prepare information about the text of the installation only, removing the checkbox with "Collect information about the graphic stage of the installation" if you need the recovery console, but not installing Windows completely. This will significantly reduce the time for the preparation of the drive.
In some cases, you need to take a check mark "Set a Disc Letter for Installation Program" if you have problems checking W: or refuse the SSA program, which requires the modification of the Txtsetup file, if problems arise when working with this file. If the SSA is not automatically running, then you will have to manually configure the boot.ini file for your Windows or run SSA yourself.

Feedback does not require you installed email client or other communication program. WinToflash will send on its own protocol in Novicorp and answer you if you specify your email address
"Greg Schultz" says how to use a flash drive as an alternative to the standard installation disk. The described method is very convenient and reliable, but provides for the use of the command line utility. For those who are not used to working from the command line, there are other solutions to the problem with the help of graphical interface programs.
For this purpose, I usually use the application from Novicorp. It allows you to turn the flash drive into the downloaded disk and copy the installation files from the Windows 7 / Vista / XP DVD to it.
Why change the discs on the USB flash drive, you ask? Well, first, this is the most convenient way to install the operating system on netbooks, which have no optical drive. And secondly, CDs and DVDs are tested and deteriorated. Several scratches - and the disc is no longer read. USB drives are less vulnerable. They are strong, reliable, portable (I have a few flash drives on the key chain), and data is much fastened with them. So why not use them as an alternative to traditional installation disks?
There is here, however, one small "but". In the case of the CD / DVD, the system activation key can be written directly on the disk, and it will be lost only with the disk. You can not write a key on the flash drive, so you have to look for other ways to preserve this important information. You can, for example, write the code into a file and save it on the flash drive itself - but only after using WinToflash, otherwise this file will be erased.
Another factor that should be taken into account is the volume of the USB drive. To copy successfully, it will take about 2.37 GB of free space, so it is better to take a flash drive on 4 GB. For a place you will need less - a gigabyte flash drive is enough.
So, how is this done?
No installation of WinToflash provides. Just download the zip archive with the program and unpack it into any convenient folder. A new directory will appear with the name "Novicorp WinToflash XXX", where XXX is the version number. This directory contains several subfolders and files, one of which is the WINTOFLASH executable file. For convenience, it can be fixed in the Start menu or on the Quick Start pane by selecting the appropriate item from the context menu by right-click.
Using
When starting WinToflash, a message may appear that the program is not supported by your operating system. At the time of writing this article, the official support for Windows 7 is not provided, but WinToflash still works in a new OS without problems, so you can ignore this warning.
The program is very easy to handle. To get started, it is enough to click the "Windows Setup Transfer Wizard" button ("Windows installation files wizard").
Figure A. The wizard will help you set up a program in a few simple stages.
You do not have to use the master - you can open the tab "Task" ("Task") (Fig. B) and configure everything manually.

Figure B. By default, Windows XP is selected.
First, select Windows 7 from the drop-down menu. Two options are available: "Windows 7 Pre-Install Environment" ("Windows 7 Preset Wednesday") and simply "Windows 7". The preset environment takes less space on the disk, and the standard version is easier to install. Selecting the desired option, click the "Create" button to go to the next step.
Next tab - "Basic Parameters" ("Basic Parameters") (Fig. C). All settings for the installation disk are concentrated here.
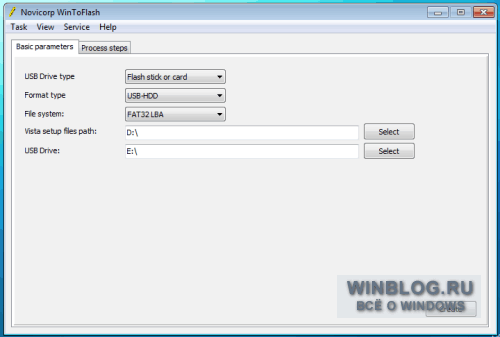
Figure C. Change the "USB Drive Type" options ("Type of USB-drive") and "Format Type" ("Format type").
The most important settings are "Setup Files Path" ("path to installation files") and "USB Drive" ("USB-drive"). Make sure that you entered the right paths, otherwise you risk erase the desired data.
On the Process Steps tab, you can choose which actions must execute the program, including:
"FORMAT DRIVE" ("Disc Formatting");
"Collect Information of Setup" ("Collecting Installation Data");
"CREATE FOLDERS STRUCTURE" ("Creating Folder Structure");
"Copy Files" ("Copy Files").
After completing the setting, click "Create". A license agreement will appear. Take the Conditions and click "Continue" ("Continue"). A warning will appear that all data on the selected USB drive will be destroyed. Click "OK" to launch the process of preparing the flash drive.
The entire operation will take 15-30 minutes (depending on the speed of the system), after which the message appears on its successful completion. Click OK.
Now you can view the contents of the USB disk (Fig. D) to make sure all installation files are in place. After that, it will only be left to connect a flash drive to the desired computer and boot from it to start installing Windows 7.
Main features
- transferring system installation programs to USB drives;
- saving on flash drives recovery discs;
- creating a flash drive with an emergency loader;
- formatting and complete cleaning of the device;
- detailed setting of partition table options;
- checking the device for errors in the file system;
- removing programs that block access to OS;
- restoring system operation.
Pros and cons
- free distribution;
- a large number of settings and useful tools;
- cleaning flash cards;
- the presence of a special antivincleer module.
- when installing, it proposes to change the default search system, the home page, as well as install additional unnecessary programs, be careful.
Alternatives
Win32 Disk Imager. Free application for writing an image on a flash card, as well as records from the memory card to the image on the hard disk. His only minus is an English-speaking menu.
Unetbootting. A free utility in which you can create a bootable flash drive. It quickly writes the necessary data from the network or an ISO image without formatting the memory card.
How to use the application
After installing the program, a window opens with a wizard mode:

After that, it is desirable to turn off the antivirus. This is not necessary, but otherwise the installation will occur much slower.
In the next window, you should accept the Windows Agreement and click "Continue".
The program will then give a warning to format the flash drive, after this process is completed, the transfer of OS files will begin:

File transfer
The speed of operation will depend on the power of the computer.
After the installation is complete, all installation files OS will appear on the drive.
WinToflash is an easy way to restore the system in case of unforeseen incidents and the need for a regular reinstall.
 Extension to work with files in the web client
 Fixing the error "Server refused access via POP3" when connecting Gmail mail!
 1 does not start on windows 10