Batch reduction in photos in Photoshop. Batch processing of images
2. Tablets are of different shapes - smooth and rough. Some of us prefer the capsule tablets - the same tablets, but only an extended form. We recommend drinking them for those people who are not suitable for the description in the first step. Such pills and the truth is easier to swallow due to their form. In addition, such capsules are smooth, and they can easily swallow, not shooting in the oral cavity.

3. Those people who are afraid, or for some reason they cannot swallow pills in the form of capsules, we recommend "use" chewing pills. Such medications need to be chewed as much as possible, in order to avoid heartburn and irritation of the stomach. Usually such pills are not recommended to give small and infant children. 4. Sometimes it is possible when it is possible to disappear a tablet and drink it with something sweet, for example, juice or compote. However, not all tablets can be used in this way. For example, it is impossible to drink those capsules that have an acid-resistant shell. They cannot be chewed, as they are not intended for direct dissolution in the stomach. They should fall into the intestine, and there already dissolve the shell, and at the same time release the contents of the tablet or capsule. If such pills can be checked, they will negatively affect the mucous membrane of our stomach.

5. There are such tablets that can be chopped on a N-number number of parts. As a rule, pills are divided into ten equal pieces. Usually these medicines have a special notch across their foundation. But, just in case, about the correctness of the reception of these tablets you better ask your attending physician, or read the instructions on the packaging of the medication.

6. If you can not chop the tablet on a lot of small parts, then you can enroll in this case as follows. Before swallowing medication, drink a large sip of water. It moughs her throat, and the tablet in this case will be easily passed into the esophagus. Keep in mind that such pills do not drink sitting, and even more so in the position lying. They are drinking only standing.

7. If the pill is stuck in the throat, or does not go into the stomach, you can eat any food to help the tablet reach the destination. Many suggest that you can take a piece of bread and drink it with water. Thus, you push the tablet, and shift it from the place where it is stuck.
In this lesson, we consider the foundations of automated processing of photos in Photoshop and their practical use. We will create a range of operations, and then apply it to other images.
Batch processing It will significantly save your time and will save you from the need for tedious repetition of the same action when editing images. Let's explore this useful reception on practice.
Creating operations.
Preview final result:
Step 1.
Not every amateur Photoshop It is a graphic or web designer. For convenience and relieve work in the program simple users or people who are indirectly interested PhotoshopIt is provided for the recording function of all actions performed above the image, and then applying these actions to edit other program documents.
The first thing we must do is choose the photos to which we want to apply some changes and place them in one folder anywhere in your computer. Then, select one shot from your collection, and open it in Photoshop.

Step 2.
Now proceed to creating operations. To do this, we turn to the top menu of the program to the window-operations tab. (Window\u003e Actions) or press the key combination Alt + F9. To call the window window. At the bottom of the opened "Operations" panel (Actions), click on the folder icon to create a new set of your operations. Enter the folder name (in this example name "Psdtuts +").
Now, after you have created a new set of operations, click at the bottom of the panel to the icon of the new operation (the leaf with the bent edge, as the new layer icon). In the dialog box, enter the name of the "Vintage Halftone" operation. (Vintage Halftone)and then click on the "Write" button (Record)To start the recording of all your actions to the image from this moment. As you can see, the bottom of the operation panel appeared three icons designed to control performed by actions: recording, playback and stop (Record, Play, Stop).

Step 3.
From now on, we will begin a consistent construction of photo operations. You must be extremely careful when performing each step, otherwise the result will not justify your expectations.
The first action will be a change in the size of the photo. To do this, proceed in the top menu in the Image-Size Image tab. Image\u003e Image Size)and in the dialog box Change the value of the width (Width)up to 700 px. Activate the "Preservation of proportions" feature (Constant Proportions) and "Interpolation" (Respumple image) At the bottom of the window, and also select the "Biobubic Clever (Best for Reducing)" at the bottom (Bicubic Sharper)which is well suited for photos not very good quality and small size.
Do not use the change in the size of the transformation Free Transform)Since here you need accurate mathematical values. The entered parameters will be performed only for similar images of the horizontal location, whereas for vertical pictures such values \u200b\u200bwill not fit.
Click OK in the dialog box and go to the next step.

Step 4.
Now, when performing each complicated step, activate the "Reset Samples" function (RESET SWATCHES)by clicking on the keyboard "D". The color of the front and rear plans was set on black and white.
Now, double-click on the background of the background, unlock it by converting it to the "layer 0", and then drag it to the icon of the new layer (a leaf with a bent edge) at the bottom of the layer panel to create a duplicate.

Step 5.
Now, on the "Layer 0" copies, go to filter filter-gallery (Filter\u003e Filter Gallery)and chose a distortion folder - scattered glow (Distort\u003e Diffuse Glow). We perform settings for option: grain 2, degree of glow 3, original 10. Click OK.

Step 6.
On the layer copies will change the level of opacity (OPACITY) 75%, driven by value exactly in the window option. You do not need to use the slider to change the parameter, otherwise the recording will be displayed a gradual decrease in opacity: 100, 99, 98, 97, etc., which is undesirable.
Now, holding the CTRL, click on the original layer, highlighting it and copy in the layers panel. Make the click right-click on the selected layers and select from the menu - Combine Layers (Merge Layers). As a result, two layers will be combined into one "Copy layer 0".

Step 7.
Duplicate the "Copy layer 0", having dragging it on the icon of the new layer at the bottom of the layer panel, and we obtain the "Copy 2 layer". On duplicate, go to the Filter-Blur Filter-Blur tab for Gauss (Filter\u003e Blur\u003e Gaussian Blur)and we set the blur radius on 2 Px, click OK.

Step 8.
Next Change the mixing mode Blending Mode)for duplicate to overlap (Overlay)without opening the mixing modes window, while clicking on the arrow down in the Options window in the layers palette, and selecting the desired mode. You can try different output modes outside the recording, pre-stopping the Stop button recording (square below the operation panel). By selecting the desired mode, turn on the record again by pressing the circle at the bottom of the panel.

Step 9.
Next, create a new correction layer "Color" (ADJUSTMENT LAYER\u003e SOLID COLOR). To do this, click on the bottom of the layer panel. Black and white circle and in the drop-down menu, select the "Color" parameter. In the Options dialog box, select Black Color (# 000000) Fill and click OK. Take this layer down the layer panel under the "Copy layer".

Step 10.
Go to the thumbnail "Layer 0 copy", and then go to the layer-mask layer layer layuring all (Layer\u003e Layer Mask\u003e Hide All).

Step 11.
Now we will change the boundaries of our image. To do this, make a selection of a mask by clicking Ctrl + A. ("Allocate everything") on the keyboard. It is important to allocate all the pixels of the mask, otherwise the future result will not be impressed.
Be sure to apply the command "Select All" (Select all)and do not make it allocating manually to the "Allocation of the region" tool Marquee Tool).
If you use arbitrary selection, then Photoshop It will save these coordinates and values \u200b\u200bonly for a specific image that will not work on other pictures.

Step 12.
Activate the "Rectangular Selection" tool Marquee Tool) And right-click Click on the image. In the drop-down menu, select the option - transform the selected area TRANSFORM SELECTION)and in the top of the settings panel change the values \u200b\u200bfor the width (Width) and height (Height)selection by 95%. To apply the function twice press Enter ENTER).
Thus, your selection will decrease exactly 5% of the initial state.

Step 13.
Now we are a little distorted the form of our allocation to create a vintage (ancient) effect. Make sure you are on the "Copy layer" mask and your selection is reduced. Go to the Selection tab and clarify the edge (Select\u003e Refine Edge) And enter the settings from the screenshot below. Click OK.
You should have uneven selection, as for the example below.

Step 14.
Next fill the selection with white (fffff). Click on the keyboard "D" to reset color samples (Swatches). Then, activate the "Rectangular Selection" tool Marquee Tool) and right-click on the canvas, choosing from the option - Run fill (Fill). Specify the color of the foreground (Foreground Color), opacity is 100% and normal mode. Click OK. Remove the selection (Ctrl + D).
Step 15.
Now you need to repeat the entire previous process with the frame for the layer of the "Copy 2 layer" layer. You can repeat steps from 10 to 14, or make a duplicate actions in the "Operations" panel. First, go to the "Copy 2" layer in the layers panel and press the STOP button in the operation panel to interrupt the recording. We highlight all operations with a frame and duplicate them. To do this, stand on the first action with the frame in the "Operations" panel ("Make" string (Make)) and holding away Shift.Click on the most last operation with frame (string to determine the selection (Set Selection)). Then press the above right arrow and select the option from the list - Create Duplicate (Duplicate). Now drag the string "Select the layer" layer 0 copy 2 "on top of duplicate actions and stand up on the" Make "string (Make), Click playback to duplicate the mask. After a copy of the mask appeared on a "Copy 2" layer miniature, go to the last string in the operations window and click the record button to go on.
Step 16.
Activate the layer 0 copy layer thumbnail and go to filter filter gallery (Filter\u003e Filter Gallery). Click on the sketch folder (Sketch), and in it on the "halftone pattern (Halftone Pattern). After entering the settings, click OK.
Step 17.
Go to the layer "Copy 2 layer 2" and press the layer panel at the bottom of the correction layer icon (black and white circle). From the list, select Photo Filter Correction (Photo Filter)and activate the "Color" option (Color) In the dialog box. Click on the color square and enter the color value of 957345, and the density (DENSITY)increase to 100%.

Step 18.
Now, create another correction layer "Color Tone / Saturation" (Adjustment Layer\u003e Hue Saturation)By clicking on the black and white circle at the bottom of the layers panel, and configure the values \u200b\u200bfrom the screenshot below. Do not forget to activate the Toning checkbox in the Options window:

Step 19.
In the layers panel, create a new layer (Ctrl + SHIFT + N)or a leaf icon with a bent edge at the bottom of the panel)) above all previous ones and name it "layer 1". Highlight everything by clicking Ctrl + A.and activate the "Rectangular Selection" tool Marquee Tool). Set the colors of the front and rear plans by default ("D"). Right-click on the canvas and select the option - Run Fill (Fill). In the dialog box, specify the color of the foreground (black), the opacity of 100%, the normal mode and click OK.
Step 20.
Double click on the layer 1 layer layer Open the layer styles window and select the "Pattern" parameter (Pattern Overlay). Open the set of "Gray Paper" patterns (Grayscale Paper), and in it the texture "Gray Granite" (GRAY GRANITE).

Step 21.
For the rasterization of this layer, create a new layer. (Ctrl + SHIFT + N) above the patterned and highlight them both in the layers panel ( Ctrl+ Click on the layers icon). Then, combine them into one by pressing Ctrl + E.

Step 22.
Change the mixing mode Blending Mode)for layer "Layer 2" on multiplication (Multiply), and opacity (OPACITY)reduce up to 75%.

Step 23.
Now we will perform all the layers. Allocate in the palette of the layers all the layers, starting with the "layer 2" and ending with the layer "Color" below, holding Shift..
Right-click on the selected layers and choose from the menu - (Flatten Image). Then press the stop button in the "Operations" window (Actions). Now all our performed actions are ready for use for other photos or images.

Now it's time to check how our entry works for other pictures. If you are all done correctly, the program will perfectly handle your images.
To repeat all actions with another photo, open it in Photoshop, Select the "Vintage Halfone" operation and press the play button below the "Operation" panel).
Now you need to save this set of operations. Switch to the name of the operation set, in this example on the PSDTUTS + string and press the right window down the arrows down. In the drop-down menu, select the option - Save operation Save Actions). In the dialog box, enter a name for the operation and save it anywhere in your computer. Now everything is ready for batch editing images.
Creating a droplet.
Droplet applies actions to one or multiple images (folder with images). You can save the droplet anywhere in the computer and use it as many times as you want. To create a droplet, go to the top menu File Automation-Create Droplet (File\u003e Automate\u003e Create Droplet ...). In the dialog that opens, first select the folder where you save the droplet. In the row set (SET) Specify the name of the dial ("PSDTUTS +" in this example), in the operation line, specify the name of the set operation ("Vintage halftone").
Next, select the folder with the photo to which you want to apply the effect by pre-making it a copy, and work with it. In addition, you can configure the names of future images, add text to them, series number, extensions to ensure maximum compatibility. After you entered all the necessary data, click OK.
On the example below you see that I placed the droplet into a folder with a large number of photos in it.

Now select the images from the Copy folder and drag them to the droplet icon to apply it to the photo. The program itself will load the image and process them, saving all the images in the folder you specified. Finally, open the folder with the changes made and see how now your pictures began to look.

Now you have a whole collection of vintage photos ready for printing or for use in your blog. Good luck!
You can handle a large number of photos on a recorded scenario. Make it very simple, while you will save a lot of time.
Invent photos processing scenario, for example:
1. Reduce the photo to 1000 pixels in width;
2. Apply the autocontrast function;
3. Make a white frame;
4. Sign a photo;
5. Save the photo.
If you specify Action for the first time, take some single ration (for example, to reduce photos) and try batch processing on it.
Create a new Action.
Let's call our script "Frame and Signature". Please note that we can call this Action hot keys for photoshop photoshop. Install them, it will be CRTL + F12.

Press the Record and Photoshop button starts writing our script.
1. Open a photo. As a command of Image Size, reduce the size of the photo. For example, exhibit width width in 1000 Pixels. If you are sure that you have the sizes of the original photos are all the same, then you can set the height in pixels. But if there is no such confidence (for example, cropping was previously used to some photos), it is better to determine the size of only one party.

2. Apply to the photo the function of the autocontrast.

3. We make the frame with the Image / Canvas Size command. If your photos are not the same in height, it is better to set a frame as a percentage, put 115%. It should be remembered that Actions record a strictly defined sequence of actions and cannot determine what and how they need to do. As a rule, different Actions apply for the processing of horizontal and vertical photos. But in this case, we only attached to the width of the photo and the frame was set as a percentage, so the vertical photo Photoshop. Processes correctly.

4. We write text on the Horizontal Type Tool tool frame on the left toolbar. We carry the text to the desired location, in this case it is the right lower corner. We have all photos of 1000 pixels width, so the text will be correctly located in all photos.
Next, it is necessary to drain the layers (the text is written in a separate layer). For drainage, press Ctrl + E.
And save the photo with Save or Save AS features. Choose the desired format and quality.
This is what the image looks like after processing.

Next, click the Stop Play button in the Actions button and look what happened in the end. Now we can open any photo in Photoshop, select Action "Frame and Signature", click Play and get a processed image in seconds.
Note that in front of each action there is a tick. You can turn off any action from the script and turn back.

You can apply Actions immediately for large number Photos. To do this, use the Batch function in the File-\u003e Automate tab.
When the novice photographer faces the need to process a large number of photos, the question of how to reduce the costs of processing time, how to automate routine operations?
For this in the arsenal of the program Adobe Photoshop. There are several tools: operations or action, scripts or scripts, and droplets.
Operationsotherwise called also action, macros or macros are recorded and saved actions on the image that can be applied to another image, as well as used in batch processing. Action are also the basis for creating droplet.
Droplet. - This is a small application, a kind of program that automatically processes all the images dragging on it. The droplet icon can be placed, for example, on the desktop and drag folders to it with images for processing.
Scripts Or scripts are also programs, but written on one of the scripted programming languages. Using scripts allows you to automate operations for which it is impossible to write action, that is, the capabilities of the scripts are much wider. The only minus is to write scripts to master certain programming languages, such as Java Script.
In this article we will write a simple action and consider how to use it in batch processing using the command Image handler
As an example, we take a method of toning photos using the color fill in the overlay mode Hard light. Here is the original photo
First, create a set in which we will place the recorded operation. To create a set, you need to click on the folder icon in the operation palette. In the dialog box that opens, enter the name of the set.


Now, with an active set, click on the icon for creating a new operation.

In the dialog that opens, enter the name of the operation. If necessary, assign a color and keyboard reduction so that you can quickly start the operation. Click Record To start the recording process. Now in the palette Operations The recording icon will be active, it will become red.


Before starting the recording, it is advisable to plan all the steps and write them on paper. Competently planned action works without errors and the stability of its work does not depend on which version of the program is used, Russian or English. Properly recorded action will work in any. If this is not the case - it means that methodological errors were allowed when planning and recorded, for example, the names of the layers or channels were recorded.
Now create a correction layer Color. For this, click on the icon of the correction layer in the palette Layers, then choose a layer from the list Color.


In the dialog box that opens, select the desired color. It is necessary in advance, even when preparing for recording, record the values \u200b\u200bof this color via RGB channels to then enter it and immediately get the desired color.

Change the layer overlay mode Hard light

We get about such an image

Now you need to weaken the effect of the correction layer on the skin. The skin, as is known, the most bright in the red channel image. We make an active mask of the correction layer. To do this, press the key combination Ctrl + \\. Active layer mask will be circled by frame

Now download the red channel image on the mask. To do this, go to the image menu - external channel. In the dialog that opens, we will put the following settings. Layer - BackgroundSince it is from the background layer we will use a red canal. Channel - red, right to put a tick Invertsince for the mask we need just an inverted red channel, Overlay - ordinary, opacity - 100%. After performing the settings, click OK. Now the impact of the correction layer turns out through a mask based on an inverted red channel, which looks like this


We got a lightweight toning effect in the image

Now the action record can be stopped. Then, returning the initial state Images using palette HistoryIt is necessary to check the operation of the action. Now it can be used for batch processing.
Batch processing is best done with the script Image handler. It can be found in the menu File - Scripts - Image handler.

Either, which is much more convenient, you can run the image handler from the module BridgeAfter after selecting photos for processing. In Bridge Image handler Located in the menu Instruments -Photoshop - Image handler.

Configure batch processing parameters in the dialog box Image handler It does not represent difficulties. You need to select the location of the files, format and the quality of the save, as well as a set of action and actually an action that needs to be applied to the selected images.

For the study of automatic processing, I spent a whole evening. The instruction is shared below.
Batch color reduction in Photoshop
IN graphic editor Photoshop To automatically process photos according to a predetermined algorithm, the Action tool is provided.
1. Create two new folders and assign them the names of the Latin! For example, Begin and End. If the folder name contains Cyrillic characters, an error may be issued during batch reduction. In one of the folders, for example, Begin, put all the photos that need to be reduced. All photos must have the same permission, for example, JPG.
2. We call the Action (operation) palette screen on the Window menu.
3. Create a new set of commands in the palette. To do this, press the CREATE NEW SET button (create a new set). The name of the set of commands can be assigned any, for example, SmallPhoto. Next, in the created new set of SmallPhoto commands, create a new action, for example, called Size750. To do this, click the CREATE NEW ACTION button. new operation). We run the recORD (recording).
4. In the process of reducing the pictures, their quality deteriorates and in order to minimize losses, it is better to use the Bicubic Sharper interpolation method from the Edit menu - Preferences - General (edit-installation-primary).
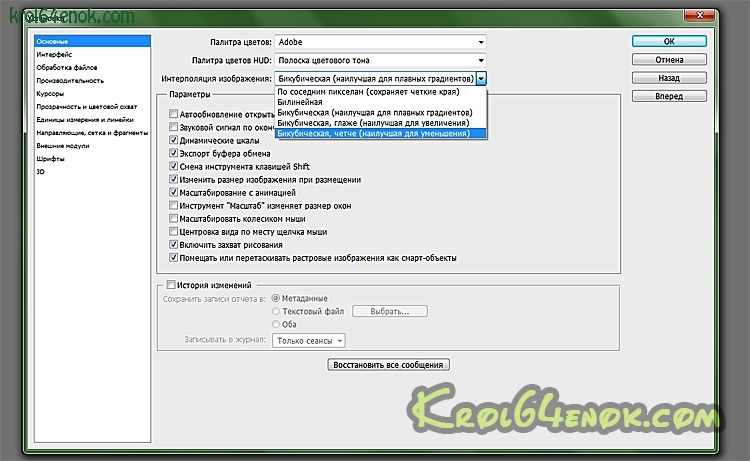
5. Open one of the source photos designed to reduce from the File-Open menu.
6. In the Image - ImageSaze menu, in the Resolution window, set the value of 72 Pixels / Inch.

7. To reduce the size of the photo, execute the File command - Automate - Fit Image (File-Automation-Change dimension). In the dialog box that opens, set the parameters the necessary Width and Height parameters, for example, 750 and 500.

8. On the File menu, open the Save for Web command (Save for Web and Devices ...). We specify the level of quality for the photo, the extension (must be .jpeg) and click SAVE. In the menu that opens, specify the path to the End folder. In the menu that appears, click "OK". We close a photo without saving editing results.

9. In the Edit - Preferences - General menu, return the interpolation back to Bicubic (bicubic).
10. Stop recording with the STOP button - Button with a blue square at the bottom of the Action palette.

11. In the End folder, we delete a photo that got into it while recording the Action command.
All of the above actions must be done only once to record the command you need. For a permanent packet reduction of files to the set dimension, only the next item will be performed.
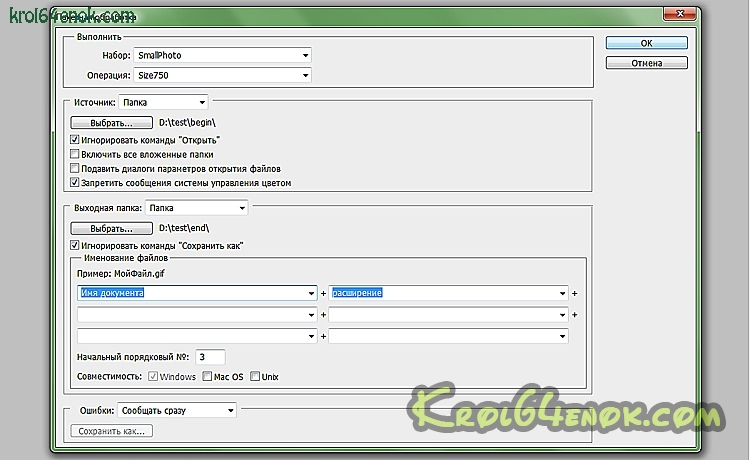
12. Open the File menu - Automate - Batch (file-batch processing file). In the Set (Run) section, select the SmallPhoto command set and the Size 750 command. In the Source window, select the Folder (folder). Press the Choose button and specify the folder with the photos of Begin photos. In the Destination column, select the folder (folder) and specify the folder where the processed photos will be saved, that is, the end folder. We put the ticks opposite the Override Action "Open" Commands (ignore the "Open" commands); Suppress Color Profile Warnings (Disable Color Management Systems); Override Action "Save As" Commands (ignore "Save As" commands). In the Starting Serial # window (the number of photos of photographs at a time), set the value 3. Count The file name is filled by your desire, as well as a way of notification of errors. Next, you only need to click OK, and the program will finish work. Reduced photos can be found in the output folder you specified, in our case, the END folder.
P.S. Already after writing this time-consuming article, I found a simpler method of batch change in the size of the photo. To change the sizes, we pass along the path-scenario of image handler (it is not confident that this function is present in all photoshop assemblies). Further, everything is very simple, select the source folder and the destination folder, put the checkbox to resize and enter the w on (in the pischel) parameters, click Run.

P.S.S. The instruction of the 12-items outlined above may be useful for more complex photo processing than simply resizing. By analogy with the example described, you can record any operation you are interested in (for example, a set of commands Open an image-autocontrast-authoton-filter "Smart sharpness" -CHRM image) for batch processing.
 Extension to work with files in the web client
 Fixing the error "Server refused access via POP3" when connecting Gmail mail!
 1 does not start on windows 10