Hard disk editing program. Hard disk service - Review of the best programs to work with sections
Like
Like
Tweet
The hard disk in the computer and the disk icon in the My Computer window are different concepts. For example, one can be installed in the computer. hDDAt that time in "My Computer" there may be several of them. The reason for such a strange inconsistency is that the hard disk can be divided into the so-called sections. This is called the logical marking of the disc.
I will tell you why you need such a markup, how to do it correctly (and whether it is necessary to do at all), as well as I will tell you about free programs for such a small procedure.
Why do you need to divide the hard disk to the sections
Reasons to divide the hard disk to sections several:
- The hard disk sections are primarily needed for competent storage of information. For example, some users prefer the following division: operating system and software on one disk (usually it is C.), Documents - on the second ( D.), archive photos on the third ( E.) etc. In this case, the hard disk may well be one.
- If you have a hard drive, but you want to have two or more operating systems, you have to share a hard disk to sections, since Windows and other operating systems can only be installed on different sections or hard drives.
- Manufacturers of laptops (and some computers of famous manufacturers, such as Acer) have their own reson divide sections hard disk: on a section that is visible as a disk C, installed Windows, the second ( D.) is absolutely empty, and the third one (which is not visible in the "My Computer" window) keeps a compressed copy of the section C.. This hidden hard disk section is called section of recovery. If something happened to operating system ("Windows flew" - how to say some users), then when you turn on the laptop, it is enough to press the keyboard key (what - see the instructions for the laptop) and the special program will cleanse the disk C., Then unpacks the contents of the hidden partition there. As a result, the user will receive a laptop with programs that were on it initially at the time of purchase in the store. Disk D. In this case, it will not be changed. It suggests the conclusion: if on a laptop with such a recovery system all documents to store not on disk c, but only on D., It will be possible at any time to restore the damaged Windows new, while not losing important data for yourself. By the way, such a recovery system can make any advanced user, but I will tell you about it somehow else.
- Operational windows systems 7 and Windows 8 When installing on a clean, "undeveloped" hard disk create a hidden section of 100-350 megabytes. This small section stores a bootloader designed, oddly enough to download Windows. There will be no this partition or its contents will be damaged - and the computer will not start the operating system by issuing an inscription on the black screen "BOOT FAIL", "CANNOT FIND BOOT DEVICE", "BOOT ERROR", or similar, the meaning of which one - not found boot disk with operating system. Actually, the bootloader can be stored on the disk C:, and / or in hidden sectors hard The disk (outside of sections), but the developers decided to use a separate hidden section in Windows 7/8 to save them to secure the loader from damage to other programs, viruses or a user.
- There are other reasons separation hard disk to sections. For example, for the correct operation of the GNU / Linux operating systems, several sections should be created, but this is the subject of a separate article, we will not consider them here.
So, the main reasons for separating the hard disk to sections:for convenience of storing information, to install multiple operating systems, for the restoration system, for storage windows bootloader 7/8.
A bit of theory: file systems, sections
Section information (i.e. logical disks) is stored in the "Table of Sections". Each logical disk can have its own file system. You can read more about all this in Wikipedia Articles: disc partition, logic disk, file system. The novice user is enough to know the minimum:
- If you share a hard disk on logic disks (sections), disk capacity will not increase - Free place to take just nowhere! You can make partitions of any size, but in sum they cannot be larger than the volume of the real hard disk. Here is less - please. Then you get an unblocked free space that is not visible in "My Computer", from which you can get one or more new sections. This question I often get from newbies, so place in the first place.
- Exist primary (basic) and extended (Additional) Sections. On a single hard disk there can be no more than four main sections (why so - according to the links above), so invented an extended section - this is a primary partition that may include any sections. As a result, thanks to the extended partition, on the hard disk can be any sections - dozens, hundreds.
- Each section can have its own file system. At the moment, only NTFS can be used to install Windows Vista, 7 and 8, and the outdated Windows XP can be installed on the disks with file system FAT32. However, I do not recommend that you do, because at the same time too many restrictions. Make all sections in NTFS - everything will work as it should.
- Any hard drive must be posted one way or another. In one or more logical disks - to solve you. When buying a hard disk is usually already marked in one section - I solved the manufacturer. If you are satisfied with this way of organizing information - do not touch.
- In the laptops to make disc marking very undesirable - most of them have hidden recovery sections that may be damaged (see paragraph 3 of the previous chapter).
- If you bought a hard disk with a volume of 2 terabytes, and in "My Computer" - "just" 1,86 terabytes (1860 gigabytes), then do not rush to run back to the store. The thing is, according to the volume of manufacturers and Windows. More about this is written in the article Hard Disk Wikipedia. The larger the size of the hard disk - the more clearly it can be seen that real gigabytes are less.
- Sections can be delete, create, shift (change their physical position on the disk), change their size, format, convert File systems on sections from one to another. Moreover, many programs can do it with the preservation of all data. There are other operations, but novice users most often needed above.
- In case of error in the process of changing sections (see paragraph 7) information is almost always lost. Yes, it will be possible to restore (or part it) with special programs with the participation of specialists, but best to save all in advance important information Other discs (not logical, and real discs) or flash drives not to pay money for data recovery.
Enabled "Disk Management" in Windows
Windows has standard remedy Changes in sections - " Disc management". Depending on the version of Windows, the possibilities of this program are changing a little, but in general over the past years (if we talk about Windows Vista, 7, 8) serious changes. Windows XP in this plan looks more modest - except for formatting and changing the letter of the disk, there can be little there.
As an example, I will take Disc management»Windows 7. You can open this program in several ways:
- The simplest - press the right button on the line A computer on the menu Start - Select item Control - In a new window, choose Disc management.
- Open Control Panel - Administration - Computer Management - Disc management.
- Press Start - Perform (or Keyboard keyword + R) - We enter in the window that opens diskmgmt.msc. - Press OK.
Disc managementlooks like that:
Here are visible both physical disks (including DVD drives, flash drives and other devices for storing information) and logical, i.e. Virtual - Hidden section of Windows 7 bootloader, discs C. and D.. On your computer, the number of disks may be different.
The main actions are available by pressing the right mouse button on the desired section:

The list of actions is quite meager:
- Points Open, Conductor allow you to see the contents of the disks
- Make a section active - Specify on which disk (section) is the bootloader. In Windows 7 and 8, this is a reserved system section. Making an active other section cannot be done - the operating system will stop loading.
- Change the letter of the disk or the path to the disk - You can change the letter disk displayed in the "Computer" window or display it as a folder. Yes, sections can be displayed not only as discs, but also as folders on any disk.
- Format - You can read about this in the article formatting Wikipedia. The item opens a window with which you can run high-level formatting.
- Extend - If there is a place on the hard disk, not labeled as a partition, then you can expand the size of the section due to this free space.
- Say - This item allows you to reduce the size of the section. The result will be the formation of an unbalanced space that you can put into the case - to expand the volume of another partition (see the previous item).
- Remove Tom - Delete partition. Do not click on the item without thoroughly thinking about the consequences. If you delete the section, the information on it will be able to save only with special programsYes, and it is not always.
- Properties - The properties window will open with the information about the selected disk (section).
Of course, this is not a complete list of possibilities. Disk management. You can create dynamic disks, for example. However, novice users are for nothing, this article is designed for them.
So to create, delete, change the size of the partitions through Disc managementYou need only three menu item: Expand the volume, squeeze the volume, remove volume.
All operations occur in real time, i.e. After pressing the right point and the affirmative answer to the question - whether we want to do this - there are actual action.
Do not forget that there is a risk of failure, because of which we can lose both one section, and that's it. This applies primarily to computers with large quantities. unnecessary programs - Each of them can be a culprit of deleting all data. And the script when you need to change the section from which Windows is running (usually this disk C.) is the worst - most often the problems of users arise exactly when trying to change system section.
To minimize the risk of failure, There are three methods:
- Insert a hard drive to another computer and change the sections from it, running Disc management or any other program to change partitions. Due to the fact that Windows will be launched from another disk, no programs will climb on a foreign disk, interfering with a responsible operation.
- Boot with a Live CD disk - the operating system and programs will be launched not from the hard disk, but from CD or DVD, flash drives - again nothing will interfere with changing sections.
- Use a program that can work in Native mode to change partitions. For example, check disc C. It always works in this mode - a black window with white text before booting the desktop. In this mode, the minimum of programs is launched, the risk of failure is minimal.
The third option is the easiest, because the user is essentially not necessary to do anything - just restart the computer and wait a few minutes. It is able to two the following programs Review.
Free for home use The program for changing the partitions of the hard disk.
Surface Test - checking the surface of the disk (physical). Allows you to detect bad sectors (the so-called "Bads", "Bad blocks").
View Properties. - Disconnect information.
Yes, knowledge of English is clearly required, especially if you consider that almost every item calls the window with the settings of the action performed. After you produce the necessary manipulations, you need to apply changes to the button by pressing the button. Apply(Apply):

Only then will begin changing sections. This process may take some time - from the pair of minutes to several hours.
Depending on whether the system section is addressed or not, the operations are carried out either immediately in the window, or you will need to restart the computer and start changing the section in Native mode:


The program has a lot of functions, everything is not listed. I recommend to get acquainted with the help of Easeus Partition Master. She is on english languageUnfortunately, it is possible to use the Google translator. Translation turns out quite understandable.
Pluses Easeus Partition Master Home Edition:
- Very functions.
- All Actions "Virtual" before pressing the Apply button. So, you can cancel the operations before this "point of non-return" and try to do something else with sections. Or not to do at all, if changed.
- It works stably and predictably. For example, in the testing process during sections, I launched copying files to a section that should be changed. The result - a window appeared that it is not possible to block the section, all operations were interrupted, the data did not disappear anywhere.
- The program is free for home use.
Cons Easeus Partition Master Home Edition:
- Interface only in English.
- Opportunities, perhaps, even too much - it can confuse newcomers.
- Serious failure in the process of operation will lead to serious consequences.
- For example, if you turn off the computer at the time of changing the partition, the data from the section will disappear. However, it is minus absolutely all programs to change sections.
Output:the program is good. You can use and need, there are no alternatives among free programs.
Paragon Partition Manager 11 Free
Free program for changing sections from a company based in Russia. Unfortunately, the English-language program. What made developers go for such a step - it is incomprehensible. Moreover, the paid version of the Russian-speaking program.
The main window of the program is no different from the window of the hero of the previous review, except that the buttons changed their order:

Separate mention deserves Express Mode.(Simplified mode). By clicking on this button, we will get a window with the list of the most frequent actions:

It would be possible to say that this is the ideal mode for beginners, if it were not for one "but": everything is in English. Moreover, I had a suspicion that English here is some kind of wrong, as if I did not translate a person, but a car.
pros Paragon Partition Manager 11 FREE:
- Many windows have a sufficiently visual appearance to understand the functions.
- Some operations are carried out immediately in the program window, part (if required) in Native mode. That is, the program does everything to reduce the chance of data loss.
- The program is free to use the house.
Cons Paragon Partition Manager 11 FREE:
- English-speaking, and because of the strange construction of phrases is quite difficult perceived.
- Simplified Express Mode mode works with accuracy to the opposite: first, the descriptions of operations and the operations themselves have more technical subtleties than required; Secondly, this mode is very capricious and really does not work, issuing meaningless errors.
- The program works too slowly. For example, I have a removal section hard The disk on 38 GB took about 5 minutes - long enough for such a simple operation.
Output:the program works, but somehow unpredictable. I do not recommend using this program, the good has an alternative in the form of Easeus Partition Master Home.
Changing sections during installation of Windows 7, 8, 10
This tool also deserves mention.
We take any installation disk with Windows Vista, Windows 7, 8 or 10, run the installation of the disk, we reach the selection of the section and click Disc Setup:

It seems to be simple: you need to click on the section in the list, then the action button. Unfortunately, there are few actions here: delete, formatting, creating a partition and expansion.
You can, for example, delete the partition and by the released location to increase the size of another partition or partitions (choosing the desired partitions, you need to click the Delete and Extension buttons).
Alas, a very sought-after operation - a decrease in the size of the sections - there is no. You can delete the partition, then re-create a new one with a smaller partition, but, unfortunately, we will lose the data.
All operations occur in real time, i.e. After pressing the button, the action takes place.
Outcome:editing sections during Windows installation is an extremely primitive tool. Works, but performs only a limited list of actions, including the only one that saves data is an increase (expansion) of the size of the section. If you need to install Windows and it does not need to save data on sections, then the tool will be useful.
If suddenly you are inappropriately deleted the section while installing Windows or through any program, do not despair - the partition restore function is in Easeus Partition Master Home Edition.
In order to restore the remote partition of the hard disk, do not touch the sections, immediately boot into Windows (or insert the hard disk into another computer if you deleted the system partition and Windows loading is not possible), then run the aforementioned program, click on the list on the line with the word Unallocated ("Unallocated"), then click Partition Recovery..
The rest, as they say, the case of the Technology - the Master of Action will tell you where to press where to put ticks, then restore your remote disk.
Tip # 2: Installing two or more Windows operating systems for one hard drive
All that is needed for this - several sections. If the hard disk already has a second section, which is visible in the window " A computer"- Ensure that there is a free space of at least 20 GB (more - better), then during Windows installation simply specify this second (third, fourth, etc.) disk. After installation, you can choose Windows using the menu that will appear while turning on the computer.
If you have one disk ( C.), I propose the easiest option: through Disc management First give the section FROM Team SqueezeBy reducing at least 20 gigabytes (and better - more, because except Windows you will install and programs):

Press the right button on the disk with ...

After pressing the button Squeeze Disc size C.reduced, not distributed (free) space appears in the sections map:

Indicate an unoccupied space. The section will create the installer itself.
After installation, you will have two operating systems. You can make more unoccupied spaces or empty disks, specify them for installation.
Thanks to the reader Vladimir, that raised this topic.
You could notice that on the screenshots of the disk management window, all sections are marked with a blue stripe. You can have sections with green stripes. What is the difference between blue and green partitions?
Green strip in disk management is a sign of an extended (additional) section. As I wrote above, there may be "nested" partitions inside, which from the user's point of view are no different from the main (primary). There are one feature in nested sections - if you decrease their size, then due to the free space that has appeared simply to expand the main partition. You must first compress more and the advanced section itself (which keeps in yourself free place And the decreased partition) to form a free space outside of any partitions, only then you can expand the discs.
Like
Like
This article talks about how to create, change or delete hard disk partitions using Windows 7.
To work with the hard disk partitions in Windows 7, there is a tool called "Disc Control": Control Panel → System and Security → Administration → Computer Management → Disk Management or Start → Enter the Search Row: diskmgmt.msc. And press ENTER.
1. Creating a section
Right-click on the free, not occupied by other sections, the location of the desired hard disk → Create a simple volume... The "Wizard creation wizard window" opens, click the "Next" button. Then specify Size created section, assign a disk letter, select the desired file system and formatting options, make sure that you have done everything right and press "ready"
2. Compression section
Right-click on the desired section → Say... a window message appears about the request for compression, we are waiting until the end of the survey. Then in the appeared window in the line "Size of the compressible space" specify the amount of free space and click "compress"
3. Expansion of the section
Extend... A "Tom Expansion Wizard" window appears, click the "Next" button. Then select the desired free section in the list, click "Add", then specify the size of the free space allocated by the section, click the "Next" button, check the information and click "Ready"
4. Delete partition
Right-click on the desired section → Remove Tom... before continuing the operation, copy everything required files and folders to another disk, because After removing the volume, all the data on it will be lost.
5. Change the letter of the disc
Right-click on the desired section → Change the letter of the disk or the path to the disk... Click the Edit button, select the desired drive letter and click OK. Next, we will consider in detail how to expand the discs and do not harm the nano information.
In order to divide the hard disk to the partitions, you need to go to the "Start" menu → right-click on "Computer" and click on Management.

In the window that appears, you need to go to the "Disk Management" section.

Select the hard disk and the partition to be divided and click on it with the right mouse button.

In the drop-down menu you need to select "Squeeze Tom" and then select the size to which it is necessary to reduce the existing partition. The place liberated after compression and will be a new hard disk section.

To create a new partition, you need to click on the right mouse button and select "Create TOM". Then to specify the size of the new partition and wait for the operation. Sooner or later, any computer user faces such a problem as a lack of free space on the system section of the hard drive. Here and the question arises: How to expand the disk with?
First, we need to go to the "Computer Management" tab (see above).
When this tab opens, you will see all media in the window that are connected now to the computer. Each hard disk can be broken into several logical. The very first will go "Disc 0". On the right will be displayed space reserved by the system, and logical partitions (C, D, E, F, etc.). If you have only one disk C and it is overflowing, then you can "compress Tom" (see above). If you have several logical partitions, then go further.
The principle of disc division.
The principle of actions is: we must expand the disk with due to the neighboring logical partition. It can be a D, E drive, and so on. In the same way, you can increase not only section C, but also others if you have such a need. So, we remove the adjacent disk, for example, D. Click on it with the right mouse button and select the "Delete Tom" option. Click OK. Immediately after that, this volume should be displayed in black. It should appear the inscription "volume is not distributed." Now you can add the space to the C drive you need to add to this by clicking the right mouse button on the C and select "Expand Tom". Click "Next" and choose the size that we want to add.Can be used maximum sizeHow will be offered by default, or choose at your discretion. Click "Next" and then "Done". If no additional windows have jumped out, the operation has passed successfully. You learned how to expand the disk with Windows 7. The main thing is that you need to remember is that the system section can be increased only if you have free space on the right. Otherwise, nothing will happen.
Possible difficulties.
What else may be difficulties? Suppose we have five volumes. We want them to configure them in such a way that part of the space add to the disk with, and the other - to the disk D. When you delete one of the sections, we may not be active to "Delete Tom" function, and the "Expand Tom" function is not availableThe thing is that the style of section can be used. MBR *. This is an outdated style. At the same time, two neighboring volumes can be bound by a green frame. This means that with the style of the MBR section, more than four volumes cannot be created.
Windows 8 provides the same tools to increase space. Therefore, this method also applies on this operating system.
Wrecked hard disk to sections in the Windows 7 operating system is a very simple thing. You yourself can make sure that if you break down and create a new partition according to the described algorithm.
* MBR (Master Boot Record) Home boot record In PC - table in the first sector of the boot disk, storing data on the physical and logical organization of the disk. If this record is spoiled, the OS load becomes impossible.
That's all. Thank you for reading an article. I hope she was helpful to you.
Easeus Partition Master Free 12.9 - a program for splitting a hard disk to sections. This software will help you create local disk partitions directly from the program window. You do not have to do it via BIOS or reinstall Windows.
When buying a computer, there is often such a situation when only one local volume with an operating system has been created on the computer, which takes all the hard disk memory. But for ease of use, properly store system files separately from others. Share the hard disk to the sections will help Easeus Partition Master.
Features Easeus Partition Master Free
When you first start, the program scans your hard disk to detect the amount of free memory and local disks. In the main interface window, scan information will be displayed. I.e local disksIf they are present and the remaining non-marked memory area. Below, in the form of the progress of the bar, the occupied and free Memory on disks.
The main features of the program are made by separate buttons for quick access to them. This is: Creating / Changing Disc Sizes, Delete, Connection, Formatting and Copying. Easeus Partition Master has the ability to convert the MBR disc in GPT and vice versa without data loss.
Each operation can be canceled before its execution. And if you are confident in your actions, a window with a progress indicator will appear by clicking. Depending on the selected operation, it will last from several to a tent of minutes.
Also in the program there are functions of data recovery and creating a boot disk. This software It is free, and you can download it without registration, completely free.
Specifications:
Version: Easeus Partition Master Free 12.9
Russian language
Status: Free
Posted by: Easeus.
System: Windows All
Size: 27.8 MB
Good day!
Many users, for some reason, believe that the heart of the computer is the processor (for some lovers of games - a video card). But in my opinion - the most important piece of iron on the computer / laptop is a hard disk (HDD).
Whatever iron breakdown was (if it is not connected with the disk) - by replacing and repassing it, you restore your work and continue it, as if nothing has happened.
But if the "will fly" a hard disk - then it is not always possible to restore the data ... okay lyrics, on this page I want to collect the most necessary and useful programs For work S. hard disk. I give only the most popular and current programs that are more than once and did not use two.
I really like this utility for my visuality and focus on novice users. All you need to do is install the program, after a while you will learn:
- state of "health" of your disk in percentage terms;
- state of its performance;
- temperature;
- how much actual time it worked (not to be confused with age and date of manufacture).

The utility works in constant mode (minimized in the tray, next to the clock), and when alarming signals appear - you will be brought on time. What else is needed to diagnose not to tempt users?!
Approx. : Not only work on a PC, but also on laptops, netbooks, etc. also supported SSD discs.
One of the most famous utilities for testing and diagnosing disks. The program allows you to test: HDD, FDD, CD / DVD, USB / Flash / SCSI.
Main functions:
- view full information about the accumulator;
- support IDE / SATA controllers;
- tests for checking the "mechanics" of the disk;
- Smart monitor;
- low-level formatting and more.

In general, I must admit that the program is not very friendly and easy for novice users. It is necessary to use it with caution - here, more than ever, right: "You do not know - do not click!".
Developer website: http://mhddsoftware.com/
Very popular free program For diagnosis hard disks. Allows you to make a fairly accurate diagnosis of fur. Parts of the drives, view Smart attributes, brighten the defective sectors (approx.: Bad blocks), there are various tests in its composition, and other useful functions.

Excellent program for testing discs. Its main advantage over MHDD and Victoria (discussed above) is support for all disks with the most diverse interfaces: ATA / ATAPI / SATA, SSD, SCSI and USB.
By the way, the program does not work from under Windows, it is necessary to record the loading media (USB flash drive or CD / DVD) to start it, and booting off it, run the utility.

Very high quality utility for checking HDD and SSD on broken sectors, viewing S.A.A.R.T., To configure specials. parameters (power management, adjustment of acoustic mode, etc.).
The temperature of the hard disk can be displayed on the taskbar (to be aware of how things are going).

Supported drives:
- HDD with ATA / SATA, SCSI, USB, FireWire or IEEE 1394 interface;
- SSD with ATA / SATA interface;
- RAID arrays with ATA / SATA / SCSI interface;
- Flash drives with USB interface.
A decent program to track the status of hard drives that support S.A.A.R.T. technology.
The program displays detailed information About your drives: interface, total working hours, firmware, serial number, Standard, allows you to manage AAM / APM settings, (useful when your drive is not much noise), displays the parameters S.M.A.R.T. (Read errors, track search time, number of switch-on cycles, performance, start / stopping spindle, sectors errors, etc.).

HDD cleaning from garbage
Advanced Systemcare.
One of best programs To clean the computer from garbage, correct errors, editing registry, removing incorrect labels, etc. Allows you to put your Windows in order in order and make it work significantly faster.
Use the program is very simple: it is enough to install and run. In my example below, I did it - it turned out that there are enough problems (although, I regularly use masters for cleaning from Windows ...).

Also note that after installing the Advanced SystemCare - a special manager appears in the upper right corner of the screen: shows the current loading of the CPU and RAM (in percent). Thanks to this manager, you can make screenshots, watch the download of the disk, memory, processor, perform fast cleaning, diagnostics. In general, it replaces the task manager ...


CCleaner
Free utility for integrated cleaning your Windows. Cleans different trash: temporary unnecessary files, "residues" from remote program, history views in browsers (all popular are supported: Firefox, Opera, Chrome, etc.).
there is portable version: which does not need installation. The program works in all popular windows versions: XP, 7, 8, 10.

Wise Disk Cleaner
This program allows you to carry a deep cleaning of your Windows system and hard disk from a variety of garbage. So much garbage, how much will find Wise Disk Cleaner - no longer finds any utility!
In addition to the main destination, the program has a built-in defragmant. Very well affects responsiveness and hard performance Disk defragmentation carried out after cleaning.
In Wise Disk Cleaner, a convenient and pleasant interface: all the main tabs are located on top, by clicking on one of them - you can quickly execute the current task. In general, some positive emotions from such a software ☺!

Formatting, breakdown - Working with sections
Very comfortable I. multifunctional program To work with hard drives. Its opportunities are more than enough for a regular user, here you: change the size of the partition (without formatting), move the disk partition, connection (merge) of partitions (without loss of information), delete partition, formatting, master reserve copy, Migrating Migration with HDD on SSD and much more.
What really deserves attention: all operations with disks are performed using a step-by-step wizard, which will prompt at each stage that and for what is used. Also, most disk operations occurs without data loss (if the program has not warned about another).

Aomei Partition Assistant - What can be done with the HDD section
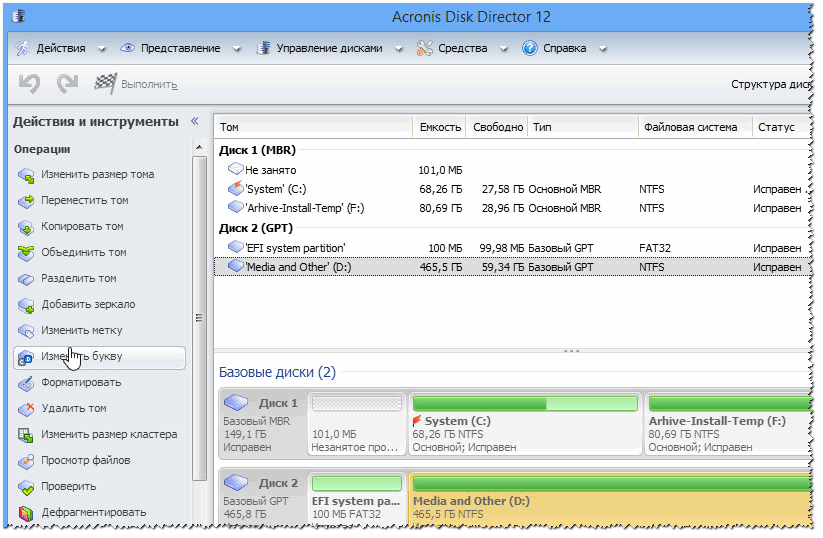
Acronis Disk Director.
A very powerful and reliable tool for controlling discs and volumes on a computer. Basic functions: split and combine disk volumes, disk formatting (all popular file systems are supported: FAT16, FAT32, NTFS, EXTS, EXT3, Reiser3, Linux or SWAP), restoring randomly remote volumes, the ability to download the program in offline mode (without windows uses - for this you need to prepare in advance blood flash drive) and etc.
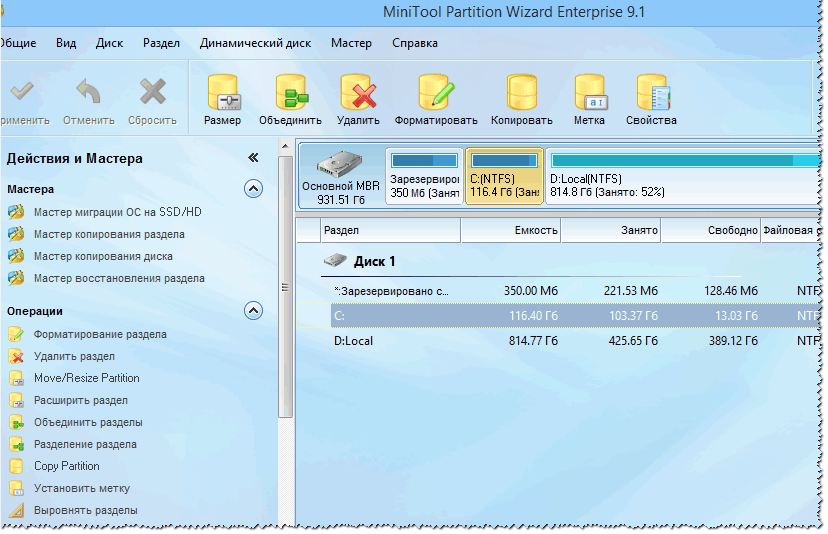
Minitool Partition Wizard.
A very convenient combine for working with a hard disk: Allows you to perform the entire list of operations, which can only be needed by an ordinary PC user.
Main functions:
- windows Migration Wizard to another drive / section (convenient, for example, when transferring Windows with HDD on SSD);
- section Copy Wizard;
- recovery wizard;
- combining, formatting, splitting, deleting sections;
- support for Russian language;
- works in all popular Windows: 7, 8, 10.
Easeus Partition Master Free
The best free solution for Windows 10/8.1 / 8/7 / Vista / XP, which will help create, delete, change size, transfer, expand, split, format, cloning partitions of any disks: HDD, SSD, USB media (flash drives, discs etc.), memory cards, and other media.
The program allows you to change the file system (with FAT32 on NTFS) without data loss, change markup disk MBR on GPT or reverse operation - GPT markup disk on the MBR (also without data loss).
In general, a convenient and indispensable manager for working with discs (it is precisely more comfortable in Windows Masters ...).

Defragmentation
If, when you open any files from the disk - your PC began to think about it, does it slowly and not immediately, then in the harmless case - fault fragmentation. To fix this disgrace, you need to reverse operation - defragmentation (Such is the tautology ☻).
Defragmentation - The process of optimizing the storage of information on the disk to ensure a continuous sequence of clusters. In general, if you retreat from incomprehensible terms, then after defragmentation, your disk begins to work faster: accelerates reading, writing files. Thanks to this, your programs become responsive, it becomes more pleasant to work for such a PC!
In Windows, by the way, there is also your master of defragmentation, but in my opinion - it works far from perfect ... Therefore, I will give a couple of necessary utilities.
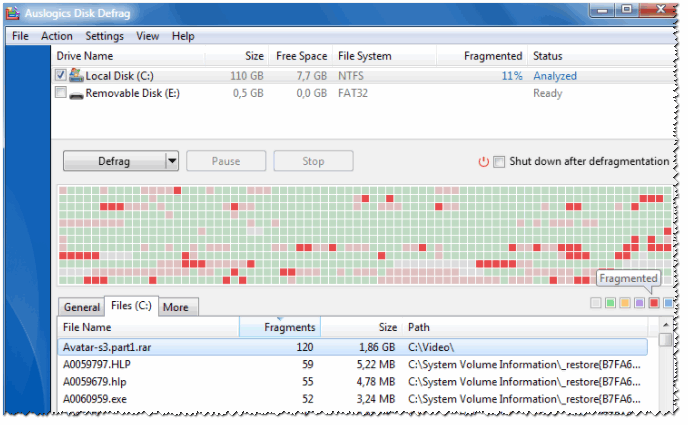
Auslogics Disk Defrag.
Despite its compact size - this utility will give odds to a lot of competitors! The program works very quickly, optimizes the file system, due to which your work accelerates. Is it worth saying that the program is used by more than 11 million users worldwide!
Main functions:
- defragmented files and not occupied place on HDD;
- special attention is paid to defragmentation system files (which affects performance);
- you can defragment specific files (not many programs where there is data chip);
- the ability to work in the background (i.e., imperceptibly for you);
- free for home use!
A free and small utility for defraging HDD, USB disks, memory cards, floppy disks. By the way, the program is very convenient to configure the start time - you can customize the work schedule so that the disk is analyzed and defragmented when you do not work for PC.
Main functions MyDefrag:
- there is a version that works from command line (does not need installation);
- 2 algorithm for defragmentation;
- there is a scheduler (timetable) of tasks;
- the standard version of the program is automated and does not take a minute of time for the setting.

Free defragmenator from the manufacturer cCleaner utilities (Company Piriform Ltd). The program allows you to work both with a whole section of the disk and with separate files and folders.
After analyzing the desired hard disk partition: the program will display a list of fragmented files. You can choose those that are needed, and Defraggler quickly optimizes their location. As a result, do not lose time on the defragmentation of the entire disk entirely (in general, in some cases it is very convenient!).

The page will be replenished with new software as you work with the site.
Additions on the topic of the article - are welcome!
While working with personal computer It may be necessary to change, add or remove partitions of a hard disk. If at initial windows installation 7 Creating partitions passes in the dialog mode and intuitively clearly, then making changes to the sections created requires a certain skill. Due to the lack of any experience in these issues, the user can incorrectly perform the necessary actions, which will subsequently lead to a complete loss of data or at all to the failure of a hard disk. To facilitate the process of creating and changing the disk partitions will help the "Disk Management" utility.
Utility "Disk Management" and its function
The "Disk Management" utility is a tool for performing various operations with hard drives and their sections.
With it, you can:
- create, delete, combine the volume of the disk;
- squeeze
- format volumes;
- assign literas for volumes;
- add volumes without rebooting;
- manage local and remote disks on the network.
Opening "Disk Management"
You can run the program in several ways.
Through the "Start" menu
- Click on the "Start" menu and press the right mouse button on the computer. Select "Management".
Press the right mouse button on the "Computer" and select "Management"
- In the "Computer Management" window that opens, click on "Disk Management".
Select "Disk Management"
- The "Disk Management" program window opens.
Window Utilities "Disk Management"
Through the command line

Through the "Control Panel"
- Click on the "Start" menu, select the "Control Panel".
Click "Control Panel"
- In the search bar, enter "Administration" and click on the "Administration" section.
Click on the section "Administration"
- In the list, select "Computer Management".
Select "Computer Management"
- In the "Computer Management" window that opens, click on "Disk Management".
Click on "Disc Control"
Why does not open "drives"
There are situations where the "Disk Management" Console does not open or opens, but the console window is empty, and a warning appears "Could not connect to the logical disk manager."
The reasons that caused the appearance of this problem may be different. To exclude their effect on the disk management process, you must perform the following steps:
- Spend antivirus check. Starting the antivirus program is recommended from an optical disk or with a protected flash drive. After checking, open the "quarantine" of antivirus. If the DMDSKMGR.DLL library found itself in Quarantine, then return it to the place.
- Run the Rundll32 SetupAPI command, InstallHinfsection DefaultInstall 132% windir% \\ inf \\ dmreg.inf through the Start menu and the "Run" window.
- Pass the "Control Panel" path - "Administration" - "Services" and make sure that "Logical Disk Manager) and" Logical Disk Manager Administration Service Manager "(Logical Disk Manager Administrative Service) are launched. If they are stopped, then turning them on.
- Log in to the Basic I / O (BIOS) menu. To do this, while turning on the computer, press Del, F2 or ESC (the key selection depends on the computer manufacturer). If there is no information about the HDD connected information in the starting panel, then check the connecting loops in connecting places to the drive.
How to create a logical disk
The very first hard drives, first created by IBM in 1973, contained 30 cylinders, each of which was broken by 30 tracks. By analogy with automatic rifles using cartridge .30-30 WINCHESTER, such discs were called "Winchesters". Over time, in conversational speech, the word "Winchester" was transformed into the "screw".
Most "Winchesters" are sold already prepared for installation of Windows, i.e., the main section on them has already been created. The remaining operations are carried out during the installation of the system. Installation is carried out from a boot optical disk or a USB device. At one of the installation steps, a window will appear with a proposal to select the space to install the system.
If the "Winchester" before entering the sale was not prepared for the immediate installation of the system, then all operations will have to make the user. This will require bootable optical disk or USB drive.
Before installing, configure in the BIOS ( base system I / O) Download from a DVD or USB drive:

When forming a section on "Winchester", all free space is used, and additional partitions are created after installing Windows 7.
If you have the opportunity, it is better to use boot windows PE, which built into Acronis Disk Director or Partition Magic. These utilities are designed to manage the sections of the hard drive.
Windows Presets (Windows PE) is used to prepare a computer to install Windows. It is an embedded element of other means of installing and restoring the system and is not intended for use as the main operating system.
In the absence of such a boot disk, like Windows PE, you can:

Created logical disks need to format using the Format.com utility. Now you can go to install Windows 7.
Management of logical disks "Winchester"
You can control the hard drive sections through context menu each of them. They contain a set of commands required for work.
Compression section
A logical disk compression command is set in the context menu.

Creating a section
The new section is created in the free region of the hard drive, which has not yet relate to the formatted this. At the bottom of the Console "Disk Management" This space is highlighted with bright green color, and the legend line is indicated as "freely".
- Upon completion of the compression section, we right-click on the unoccupied space and select "Create a simple volume" in the context menu.
Right-click on the unoccupied space and select "Create a simple volume" in the context menu.
- It will be launched "Wizard of Simple Tom".
After launching a "wizard creating a simple volume", click "Next"
- Indicate the size of the new volume.
Indicate the size of the new volume
- We assign a CD to the Literature (letter).
We assign the Literature disk (letter)
- We are determined with the file system, the size of the cluster and the Tom Tag.
- We carry out the formatting of the section.
We carry out the formatting of the section
- In the last window, click on the "Finish" button and create a new logical disk.
Click on the "Finish" button

After reformatting, the volume is ready for use.
Change litera section

Combining sections
When there is a need to reduce the number of logical disks, two in one joint logical disk is combined. Before the union the necessary information From a removed logical disk copied to another disk or removable media.
To combine one disk with another:
- We allocate the Tom that we want to attach, and call the context menu. Click on "Delete TOM".

 Installing the official firmware on Samsung Galaxy A3 (2017) updates compared to last year's model
 Samsung Galaxy S8 Gets Update Update S8 Android up to 8
 0 Specifications