How to install Android on a desktop computer. How to run android on your computer
Many users have a desire to come acquainted with Android before buying a smartphone. In order to understand whether the smartphone is suitable for them with this operating system or not. Fortunately, now it can be implemented using a computer. After all, you can install Android to your PC and explore its capabilities.
In this article, we will consider the whole process in detail. android settings on PC. Starting from download ISO Imageand with the Android operating system and ending it with a PC installation.
In order to install android on a regular PC, you first need to spend some preparatory work. First, you need an ISO image with android, which is prepared for work on a PC with the X86 architecture. Such an ISO image can be downloaded from the Internet. For example, you can download ISO images from Android version 4.3. If you need a more modern version of android, then at the moment there you can download android version 6.0.
After the ISO file with a way operating system Downloaded, it needs to be recorded on a CD or flash drive, which will be used to install android on PC. You can use various programs for recording. In this article, we will demonstrate how this is done on the example of the Ultraiso program.
Run the Ultraiso program on your computer and use the "File-Open" menu. Open the ISO image downloaded earlier. After that, you can start writing an ISO image. If you want to record an ISO image on a CD, then press the F7 key or the button on the Ultraiso toolbar.

If you want to make a loading flash drive with Android, then it can also be done in Ultraiso. To do this, you need to open an ISO image in the program and use the "Self-loading - write a hard disk image" menu.

After that, you need to select a USB flash drive, which should be used to install the Android on the PC, and click on the "Write" button.

As a result of the above actions, you should have a bootable CD or loading flash drive with installation files Android operating system.
Installing Android on PC
After the preparatory stage is completed, you can proceed directly to the installation of android. To do this, reboot your computer, turn on the boot from the flash drive or disk to the BIOS, insert the boot disk or flash drive in the PC from this drive.
As a result, the menu should appear on the screen of your PC with a proposal to boot in LiveCD mode or start installing android on PC. Select the option with the installation and proceed on.

After that, the process of installing the android on the PC will be launched. At the first stage you will need to choose the section you want to install Android. Please note the selected partition you formatted, so before you continue make sure you do not lose any data.


After that, let me write to the system directory.

And we are waiting for the finish the Android installation process to your PC.

When the Android installation on the PC is complete, you will see the offer to immediately run android or reboot PC. Choose a reboot.

After restarting the PC, we turn off the loading flash drive or disk and boot with just installed android. When you first start, the Android on the PC will appear menu for the initial setting of the operating system.

You will need to select the operating system language, as well as configure some other options. After that, on the screen of your PC will appear Android desktop.
Everyone knows that the Android operating system is developed by Google for smartphones and tablets. At the moment, this is the most popular platform for these devices. Official version Android can only work on supported devices with Arm architecture. But since Android is an open source project, the community forces were created by the Android port for X86 computers, which will work almost on any modern computer.
The official version of Android 6.0 from Google came out for a long time, but only a few days ago the developers released a stable version of the Android X86 port for version 6.0. In this article, we will consider installing Android X86 6.0 to a computer or laptop. Perhaps the platform is still not stable enough, but you can already be used and you will be sure of it.
System Requirements Android X86 6.0
Android X86 is quite demanding for equipment. Ideally, he should work on any computer with the X86 processor. But in fact, not everything is so simple. The developers tested the system on several devices, such as laptops from Asus, Eeepc and Dell full list Supported devices and their support level you can find on the official website.
As for the equipment and characteristics, such parameters are recommended:
- CPU: Intel;
- RAM: 2048 MB;
- Free disk place: 10 GB;
- USB flash drive - To record the installer.
Preparation for installation
As for other operating systems, we first need to download installation carrier. You can download the new version of the system from the repository on SourceFoge or the official website. Images are available both for 32 and 64 bit architecture:
It takes the image a bit, only 400 more than megabytes, so boot quickly.
Step 2. Record for media
To install Android, you need to use either a flash drive or a disk with the ability to overwrite. But it's better after all the flash drive. I do not advise you to use different utilities for writing the image, do it with such a command:
dd if \u003d ~ / android-x86-6.0.iso of \u003d / dev / sdc bs \u003d 5m
Here ~ / Android-x86-6.0.iso is just downloaded, a / dev / sdc is your flash drive.
Step 3. Configuring BIOS
Everything is standard here. Restart the computer and during the BIOS screensaver, click F2., F8., SHIFT + F2. or Del. For entry B. bIOS setupthen go to the BOOT tab and select 1st Boot Device. Your USB flash drive.

It remains to go to the tab EXIT and press EXIT & SAVE CHANGES.
Installing Android 6.0.
Step 1. Starting installation
Immediately after rebooting the computer, you will see such a bootloader window. Here you can either boot into the Live system, or go to its installation. We will be interested in the last item, installation:

Installer Run very quickly:

Step 3. Disk selection
In the first step, you will have to choose a disk to be installed:
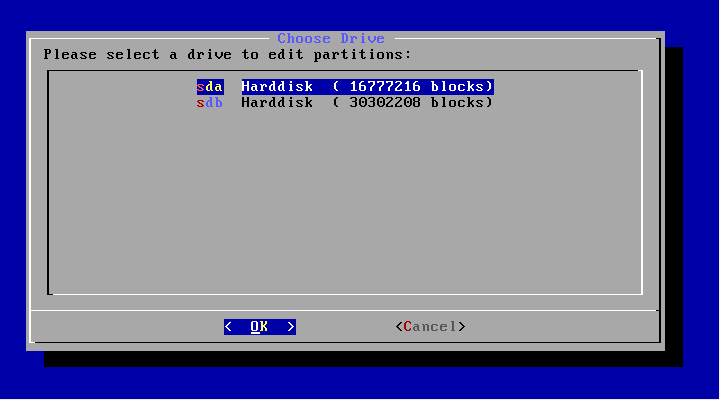
Step 4. Partition Table
Further, if this disk is not yet marked, you must select the partition table. You can use GPT, but I do not recommend this, since the high probability that the installation will simply hang. Therefore, in this step, choose No. In this case, MBR will be used:

Step 5. Creating a section
Installing Android X86 6.0 is performed only on one section. And in this step we will have to create it. To do this, the CFDisk utility will be used. First click New to create a new section. You can navigate through the buttons with the left / right arrow, and click Enter:

Select Type primary.Primary:


Find the Bootable button and press ENTER to make this section boot:
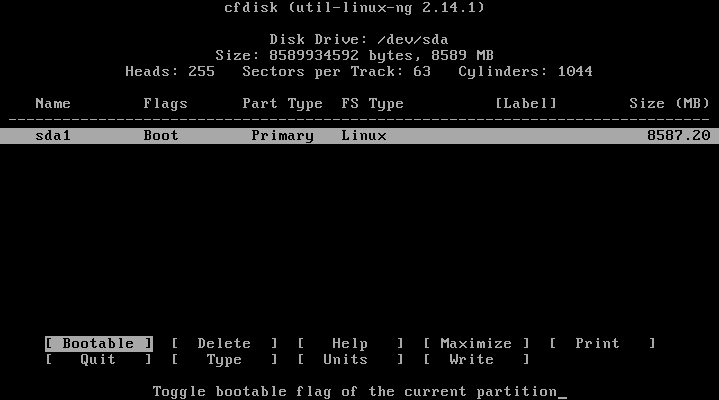
Find and click the Write button to record changes to the disk. To confirm, type Yes:

It remains to click the QUIT button to exit the program:

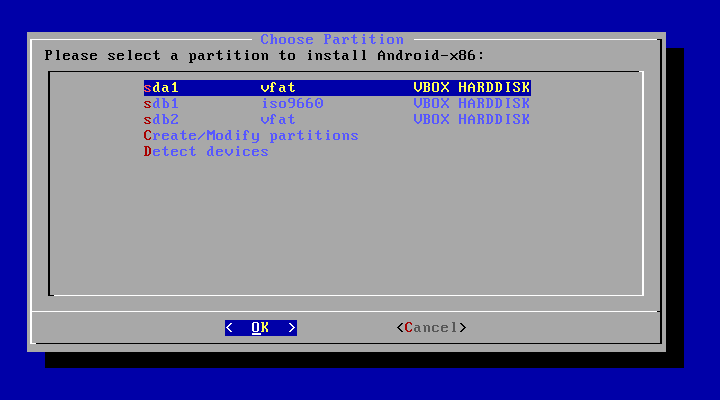
Step 6. Selecting a section
After the markup is completed, you need to select the newly created section:
Step 7. File system
Choose file System, for example, EXT4

Step 8. Formatting
Since we need a clean partition, agree that it will be formatted:

Step 9. Downloader
We will need the bootloader, so select YES:

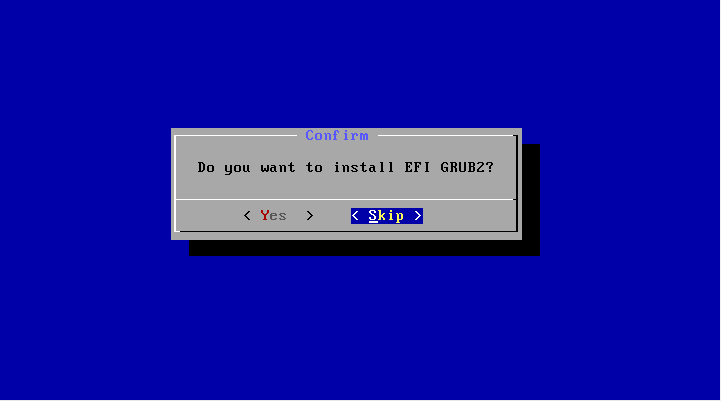
Step 10. EFI Downloader
But the EFI loader we do not need, considering that we used the MBR. Choose Skip.:
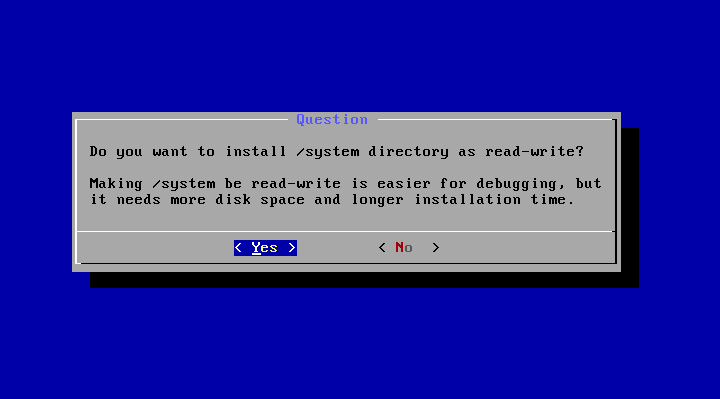
Step 11. Access Mode
In this window you need to choose whether to mount system section / SYSTEM in reading and writing mode. It will be useful for installing new programs, so select Yes:
Step 12. Completing installation
Wait for unpacking all files:

When installing Android to the computer will be finished, select Reboot to restart the computer and log in to the new system:

Step 14. Downloader
Select the first bootloader point:

Step 15. Running system
Wait for the end of the system download.
Step 16. Ready
That's all, installing Android X86 on the computer is completed. Now you can use Android directly on your computer. You can install and run Android applications, play games:

conclusions
As you were convinced, the installation of Android X86 on the PC is not so much different from other operating systems. If you are lucky and the system will fully support your equipment, then you can very just get a full Android system on your computer. If you have any questions, write in the comments!
At the end of the video with the process of installing Android from the American video blogger:
Installing the operating system Android on a netbook is a completely logical and reasonable solution in the conditions of development. cloud technology and corresponding to this trend. The idea of \u200b\u200ban inexpensive device, the main purpose of which is to provide access to the Internet, determines its key characteristics:
- the lack of a hard disk drive in its traditional representation, the external memory device is implemented either on the external memory cards or on solid-state drives data;
- no optical drive, data reader with CD or DVD discs;
- small screen size (within 12 inches);
- small weight I. low power consumption in comparison with similar devices;
- relatively low price.
Based on the purpose of modern gadgets, Android Inc has developed a specific operating system based on the Unxi core. Subsequently, Google bought this decision and is currently engaged in its support on different platforms. Based on the open code, the operating system was very successful and easily adjusted for the needs of smartphones, tablet computers, TVs and other household and industrial devices. It is openness source code And the special libraries created by Google allowed for a short time to create a huge number of all kinds of user and system programs for android devices.
At the end of last year, 90% of the gadgets were sold under the control of this operating system.
Cloud technologies
An important factor in promoting android as the operating system was the development of the company Google Serviceslargely replacing microsoft programs Office. Now the user is not at all necessary to have an application device on its device, allowing you to create and edit texts, work with spreadsheets, databases. You can process and catalog images to conduct a correspondence and generation of an arbitrary nature in ON-Line mode, for which your computer is enough to have a modern Internet browser. By the way, Google takes responsibility for the safety of your data.
The development of cloud technologies and services involves an increase bandwidth Access channels in the global network, but contributes to popularization wiFi access and the development of 3G / 4G technologies. Thus, a netbook originally created exclusively for Web surfing, with the development of cloud technologies turns into a full-fledged personal computer. 
Installing Android on a netbook is completely logical and justified. Android as an operating system is a completely free software product, and this factor may be decisive when choosing software netbook.
Install OS on netbook
Let's figure it out in detail how to install Android on a netbook. First you need to understand, whether this operating system will work at all on the selected device. If yes, then perform actions in such a sequence:
- Installing Android begins with a selection of the most suitable versioncorresponding to the target device on a specialized site. The ISO format file is the manner of the operating system boot disk.
- Since there is no optical drive in the netbook, it is necessary to emulate it, placing the image of the operating system on the USB drive - flash drive. The image volume is about 500 MB, that is, the drive is needed by the appropriate volume. Format this flash drive using standard applications netbook.
- We will make a USB drive loading and move the image of the operating android systemswhich was copied from the project site. To do this, the UnetBootin program is suitable or similar to it.
- After the boot flash drive is created, you must specify the netbook that the download will be made with USB devices. This is done by the corresponding BIOS settings.
- We reboot a netbook, if everything went fine, then we will fall into the boot menu, which will offer or install the system into the selected disc partition, or run without installation (trial mode).
Trial mode We start using the device settings. It is important to remember that due to the fact that the download occurred from the external drive, all the installations made are not saved after turning off the device. It will be necessary to perform:
- setting the system language;
- keyboard setting (switching mechanism between Russian and english layouts different from the traditional);
- setting up network access, you will need to specify the settings for connecting to the Internet via WiFi (encryption method, network name, password);
- registration B. cloud storage Google, if there is no corresponding account, then you will have to go through the registration process;
- the trial setting step is to install any Play Market application.
If in a trial mode, everything went smoothly, the system works stably, there is a full-fledged access to its Google Account, everything necessary applications Start and work, you can go to the full installation of the android operating system to the device. The procedure is similar to the start of the trial system: rebooting netbook, select Installation item (Install Android-x86 to Harddisk). It is very important to correctly determine the physical device to which the android system will be installed.
The most flexible solution is to create a multizrode disk, which allows you to use a netbook under the control of different operating systems, depending on the situation.
Is it possible to install "android" on netbook? Yes, possibly. Moreover, this mobile operating system works amazingly well on any device on "Windows", including stationary computers. It is provided free of charge, unlike Windows or Mac, and at the same time elegant and easier to use than Linux.
Android is an OS, aimed at smartphones and tablets, which is a mobile operating system for the advantage. Therefore, it may seem strange to its presence on a laptop or netbook, but this does not mean that it is impossible. The main reason why "Android" often does not work on such devices is associated with equipment. Most netbooks and mini-laptops operate on the basis of Intel or AMD processors, which are created specifically to work on the X86 instruction set. "Android", on the other hand, was developed with the orientation of processors of mobile devices using
However, the devices recently appear to the X86 ports, and some users can apply Android OS as a secondary operating system on laptops. This is mainly done in order to have access to thousands of applications for Android, available only in Android Market.
OS "Android" on a netbook or smartbook
There is a class of devices (today it is very rarely used), called smartbooks. They were intended for android launch and other software with open source and differed in functionality associated with mobile devices: excellent communication, portability, long time autonomous work. All this was placed in one device, which cost much cheaper than a netbook or laptop.

Smartbooks were displaced from the market with netbooks and tablets, but some models still remain in use. In fact, they represent and mainly contain applications specifically designed for smartphones and tablets. But, since today they are quite rare, you should figure out how to install Android on a netbook or laptop.
Convenience in functionality
It is worth noting that Android is designed to use less energy than Windows. For this reason, it offers quite mediocre indicators. The power of this shell is not created to play HD video or games, but to view web pages and work with entertainment applications It is quite suitable. According to user reviews, this operating system is very convenient for solving simple tasks.
Ready netbook on the system "Android"
As already mentioned, the Era of Smartbukov comes to its completion. The most famous gadget from the mobile OS can be called Toshiba AC100 - a 10-inch netbook operating on Android 2.2 and a Tegra class processor. It is on sale and currently and has 32 GB internal memory and 512 MB random access memory. In principle, with such indicators it can be used for simple work and entertainment. His essential advantage It is that it can work on one charge for about 8 hours, and also comes with a HDMI port. Do not try to use it for productive work, but for simple surfing on the Internet and unreamed games, it is quite suitable.

Other manufacturers also produced a range of smartbooks at one time. At the same time, the developers gone a little to the side and began to make new generation devices. Yes, today you can find Samsung's netbook on Android, but this is already a transformer. In essence, this is a tablet supplied with docking station and keyboard. Such a device looks and works just like a netbook that received enthusiastic reviews among users.
Modern models even allow you to connect the mouse to the tablet, thereby creating almost identical user experience.
However, to find such a Samsung or ASUS netbook on Android, you will have to look for a very long time. As follows from reviews, most people prefer to acquire either a tablet (which will have a light touch input), or a netbook (which comes with a full-scale keyboard and will work on a full "desktop" OS). However, considering that Android OS today is adapted to work with Intel or AMD processors, it can offer a worthy alternative to WINDOVS.

Is it possible to perform an independent installation
Currently, you can install Android on a netbook by downloading and installing it as a second optional OS on your computer. This can be done using UnetBootin Tools, which allow you to exercise
To do this, take a 10-inch netbook (ASUS Eee PC is the most popular among them) and download any version of Android on it yourself.
As noted above, the Android market today is very large, and most applications that you prefer to use on mobile deviceswill work in the same way on your netbook. Of course, you lose the possibilities available for touchscreenBut at the same time you get the keyboard, touchpad, a large number of USB ports and micro-SD card slot. It sounds very attractive, so if you have a netbook, it is definitely worth trying to set Android on it. How to do it?

Download "Android" on your main computer
The first thing you need to do is visit the page android downloads x86 and choose the right ISO file to download. New versions are at the bottom of the list. This article provides an example with version 4.0. It can be found in the section called Android Platform X86-4.0-RC1 you will be offered several different options, so try to choose the most suitable for you. For example, there is an option "Netbook ASUS Eee PC Family", which will be recommended for netbooks of this brand. The installation process is simple and not very long, so do not be afraid to try to install another ISO later if the first does not work. Just download the file on any computer you use - the device should not be the same to which you want to install Android.
Copy ISO file to USB drive
Once you have received a loaded ISO image, you will need to transfer it to your netbook. Since most gadgets do not support CDs, the most the best way - Download the tool called UnetBootin Help. After downloading it, just run the file, and you will see the screen with the program interface.

Press the button with three points on the right side of the window and select file iso.which you downloaded. Then select the disk to which you want to copy the ISO. Expect until all the information is downloaded to the USB drive that you have chosen. Be sure to make sure you have copied everything you want to keep!
Once the download is completed, click OK. A pop-up window will appear for a short time, which displays the horizontal file loading scale, and then upon completion of the operation you will be informed and get a request if you want to restart the computer. Click "No" and remove the USB drive.
Prepare a netbook to install
Now that you saved the ISO file on USB, you are almost ready for the Android installation process on a netbook. If you have any hard disk files that you will feel sorry to lose (for example, photos, documents or videos), be sure to keep them on the flash drive. Despite the fact that the data is not on boot disks Must be saved, there is always a risk that something will go wrong, so it is better to take all security measures.
Connect the USB drive on a netbook. You will need to press one key (most likely, delete or one of the keys F, i.e. f1) to select the device from which you want to load. Here you need to select a USB drive from the list. If you do not have the opportunity to get into the boot menu, you will need to go to the BIOS and change the load order - set the following that the USB disk will be displayed earlier than any other device. After that, you can directly proceed to perform the steps of how to install "Android".

Set the download process
After you installed your boot order and pasted USB, you can download the installation program with the Android graphical interface for x86. This menu will give you the ability to download directly Android 4.0 without installation, and you can try to use this OS immediately. However, if you want to install a mobile operating system on an ongoing basis, this step is not mandatory.
At this stage you have to choose a disk where the "Android" is installed on a netbook - you can choose any partition in ext3 / ext2 (Linux) or NTFS / FAT32 (for Windows). You should not format (or even clean) the disk to which you install the shell, but still worth keeping backups files.
After you have chosen the disk, you will be prompted to select the section size for installation. Go through the menu forward and choose maximum size (which is usually 2048 MB). It will take some time, depending on the speed of your hard disk. You can also create virtual SD card At this time, and after that you will be prompted to restart the computer. Do it, and do not forget to remove uSB diskWhen the netbook will turn off.
Direct installation process
Now you must download the installed OS "Android" on the netbook. Select the first item in the download menu, and your netbook will start working on android database. Initially, you will see the white text on a black background with the subsequent luminous android logoAnd then, finally, it will be downloaded to the OS itself and the screen will appear with the inscription "Welcome". You will be prompted to connect to wireless network, enter your account Google, as well as some other elementary questions available (about current time and so on). After entering these parameters, the download is completed, and you finally get on Android desktop. The model of your gadget does not matter - "Android" on the ASUS netbook is installed in the same way as to "Samsung", "Acer" and so on.
Settings and Options "Android"
After the shell is loaded and functions on your device, you should deal with it and install several unique useful applications. Such services are constantly updated and complemented, so follow the news.
Of course, the netbook does not have a touchscreen, but Android still supports touchpads, Keyboard and using USB connections. By installing "Android" on a netbook, you can use docking stations and additions at your own discretion - restrictions may be made exclusively features of your device. What other advantages can be detected?
Financial benefit and lack of licenses
Everyone knows, "Microsoft" requires a rather big licensed payments to use its operating windows systemsWhile Google does not imply any payment for Android. Functioning on Android will help save both on its own service, so on downloading various programs.
Appearance and screen interface
Addictive to the interface can take some time in those who are used to working on Windows. It can be said that this is one of the main reasons why many are in no hurry to change the OS on their device. Currently, Android is actively developing, and each a new version It looks more beautiful and more pleasant that it cannot stay unnoticed. Google is trying to withstand competition and therefore is constantly looking for new advantages over Microsoft. Of course, today it is too early to talk about the full victory in this struggle, but some prerequisites are obvious.
Easy to use
Netbooks are designed primarily for small and non-sufficient work, so the simple OS is much better and harmonious. Windows can be difficult to use, constantly demand updates, and some functions are useless for users who want to simply view web pages and write messages by e-mail. As a rule, high functionality and great possibilities are required for the operation of stationary large devices.
In turn, OS "Android" on a netbook, the reviews of which are talking about its convenience, can simplify the computing process through a simple user interface and online applications (for example, Google Documents). Google services were practically created in order to be simple working tools and gain popularity among simple users. An additional bonus can be considered a large number of games available for free.
Android 6 and 7 initially a little suitable for installation on a computer, like previous versions Mobile OS. However, the forces of the Android X86 project are created by the stable version of the Android, which can be installed from the flash drive on the PC, laptop and netbook.
System requirements
Latest versions Android is quite demanding to resources. To work stably, it is required:
- Intel processor.
- 2 GB of RAM.
- 10 GB free space On disk.
In theory, the assembly must run on any computer with the x86 processor. But before installing the system, it is recommended to check compatibility in.
Preparation for installation
To install Android to the computer, you must first create a loading flash drive with a distribution. Download Android 6 or 7 for 32/64-bit architecture can be on the official one. These same builds can be downloaded from other sources, but it is recommended to download the assembly from the resource of the creators themselves - so safer.
Increase
Write the downloaded Distribution on the flash drive in ISO format by different programs or through the command line. For convenience, we will use the utility Linux Live. USB Creator (LILI).
- Connect the USB flash drive.
- Run Lili.
- Select the drive in the first line you are going to turn into an installation media.
- Select the source - downloaded Android distribution.
- Without changing any settings, click on the zipper to start recording.
 Increase
 Instead of Lili, you can use Ultraiso or Rufus - the result will be the same. After creating the installation flash drive, proceed to preparing the computer. Restart it and go to the BIOS. Install the boot priority for the USB drive. This is usually done in the "Boot Device Priority" section - "First Boot Device". If it does not work, see how priority changes for your model motherboard and bIOS version.
 Increase
 After conservation new configuration BIOS computer Reboot again and launch the setting menus from the flash drive. If the menu does not start, then you incorrectly recorded the image of the system onto the carrier. Format the USB flash drive and try creating an installation drive using another utility or command line.
System installation
The first point in the Android bootloader window will start the system without installation. Try this option: it allows you to test the android on your computer without creating a separate partition on the disk. If you do not like, you can close the familiar mode and choose another android version or abandon the installation at all. If you have decided to install Android next to another system or use it as the main OS, then select 4 - "Install Android-x86 to Harddisk".
 Increase
 Select the section to which Android will be installed. If the disk is not marked, a proposal to use the GPT table will appear. You should click "NO" and use the MBR table.
 Increase
 The next step is to create a new section:
- Click "New".
 Increase
 - Select the type "Primary".
 Increase
 - Agree with the proposed partition size by clicking Enter.
 Increase
 - Select "Bootlabe" to make the Boot section.
 Increase
 - Click "Write". Apply the change record - "YES".
 Increase
 - Exit the program - "quit".
If the empty section (you just created it, or it was already), select the EXT3 or EXT4 file system. If you put Android next to another system to one partition, select "Do Not Format".
 Increase
 In the next window, the installer will propose to install the GRUB bootloader. Click "Yes". The bootloader will appear when the computer is turned on and offered to select the system you want to run. Refuse to install an EFI bootloader if this offer is received from the installer.
 Increase
 Mount the system partition in reading and writing mode to be able to install programs. Click "Yes".
 Increase
 Copy files and system installation will begin. Do not turn off the computer.
 State Services Personal Account
 State Supervisory Cabinet- Entrance on SNILS and Telephone
 Single telephone rescue service in the Russian Federation