The best program for low-level hard disk formatting and USB devices - review. How to produce low-level hard disk formatting
Good all day!
You can argue, but flash drives have become one of the most (if not the most) popular media information. Not surprisingly, there are quite a few questions regarding them: especially important issues of recovery, formatting and testing issues.
In this article I will give the best (in my opinion) utilities for working with drives - i.e. those tools than used repeatedly himself. Information in the article, from time to time, will be updated and replenished.
Best Flashing Programs
Important! First of all, when problems with flash drive, I recommend to visit the official website of its manufacturer. The fact is that on the official website there may be specialized utilities to restore information (and not only!), Which will be much better to cope with the task.
For testing
Let's start, perhaps with testing drives. Consider programs that will help determine some of the USB drive parameters.
H2Testw.
Very useful utility to determine the actual volume of any media. In addition to the volume of the drive, it can test the actual speed of its operation (which is like to overestimate some marketing purposes).
Check Flash.

Free utility that quickly can check your flash drive for performance, measure its real reading and writing speed, spend full removal All information from it (so that no utility can restore any file from it!).
In addition, it is possible to edit partition information (if there is it), make backup and reanimate the image of a whole partition of the media!
The speed of the utility is quite high and hardly at least one competitor program will make this work faster!
HD Speed
 This very simple, but very convenient program For dough flash drives for read / write speed (information transmission). In addition to USB drives, the utility maintains hard drives, optical drives.
The program does not need installation. The information is in a visual graphical representation. Supports Russian. Works in all windows versions: XP, 7, 8, 10.
Crystaldiskmark.
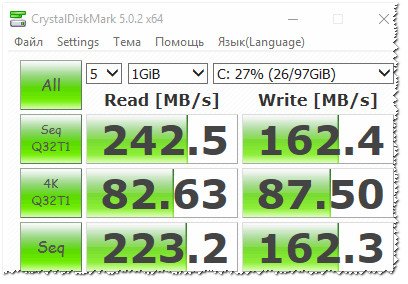 One of the best utilities To test the speed of information transfer. Supports various media: HDD (hard drives), SSD (new way solid-state discs), USB flash drives, memory cards, etc.
The program supports Russian, although it is easier to start the test in it easier - just select the media and click the start button (you can figure it out without knowing the great and mighty).
An example of results - you can look at the screenshot above.
Flash Memory Toolkit.

Flash Memory Toolkit - This program is a whole complex utilities for service flash drives.
Full feature set:
- detailed list of properties and information about the drive and USB devices;
- test to search for errors while reading and writing information onto the carrier;
- fast data cleaning from the drive;
- search and restore information;
- backing up all files to media and the ability to restore from a backup;
- low-level testing speed testing;
- measurement of speed when working with small / large files.
FC-TEST.

Benchmark for measurement real speed Reading / write hard disks, flash drives, memory cards, CD / DVD devices, etc. The main feature of its feature and the difference from all utilities of this kind is that it uses real data samples to work.
Of the minuses: the utility has not been updated for a long time (problems with new-fashioned types of media are possible).
Flashnul.
 This utility allows you to diagnose and testing USB Flash drives. With this operation, by the way, errors and bugs will be corrected. Supported media: USI Flash Drives, SD, MMC, MS, XD, MD, COMPACTFLASH, etc.
List of operations performed:
- read test - an operation will be carried out to identify the availability of each sector on the carrier;
- test write - similar to the first function;
- the test of the safety of information - the utility checks the integrity of all data on the carrier;
- saving a media image - saving all that is on a carrier in a separate file-image;.
- loading an image into the device - analogue of the previous operation.
For formatting
HDD Low Level Format Tool

A program that only one task is to format the carrier (supported by the way, and tough hDD discs, and solid-state disks - SSD, and USB flash drives).
Despite such a "meager" set of opportunities - this utility is not in vain in the first place in this article. The fact is that it allows you to "return" to life even those carriers that are no longer visible in any other program. If this utility sees your medium, try to spend in it low-level formatting (Attention! All data will be deleted!) - There is a good chance that after such a format, your flash drive will work as before: without failures and errors.
USB Disk Storage Format Tool

The program for formatting and creating boot flash drives. Supported File Systems: Fat, Fat32, NTFS. Utility does not require installation, supports uSB port 2.0 (USB 3.0 does not see. Note: This port is marked with blue).
Its main difference from the standard tool in Windows to format drives is the ability to "see" even those carriers that are not visible to the staff of the OS. Otherwise, the program is quite simple and laconic, I recommend it to use it for formatting all the "problem" flash drives.
FORMAT USB OR FLASH DRIVE SOFTWARE
The utility will help in cases where the standard formatting program in Windows will refuse to "see" a media (or, for example, in the process of operation will issue errors). Format USB OR Flash Drive Software can format media to the following file systems: NTFS, FAT32 and EXFAT. There is an option quick formatting.
I also want to mark a simple interface: made in the style of minimalism, it is easier to figure it easier (the screen is presented above). In general, I recommend!
SD Formatter.

Simple utility for formatting various flash cards: SD / SDHC / SDXC.
The main difference is OT. standard programBuilt in Windows - is that this utility formats the media according to the type of flash card: SD / SDHC / SDXC. It is also worth noting the presence of a Russian language, a simple and understandable interface (the main window of the program is presented on the screen above).
Aomei Partition Assistant.

Aomei Partition Assistant - Big Free (for home use) Combine, which presents a huge number of functions and capabilities to work with hard drives and USB media.
The program supports Russian (but by default, the English is still put), it works in all popular Windows: XP, 7, 8, 10. The program, by the way, works on its own unique algorithms (at least according to the developers of this software. ), which allows it to "see" even "very problem" carriers, whether it is a flash drive or HDD.
In general, it is not enough to describe all its properties - it's not enough and the whole article! I recommend to try, especially since Aomei Partition Assistant will relieve you not only from problems with USB drives, but also with the rest of the carriers.
Programs for recovery
Important! If the programs presented below are not enough, I recommend you to familiarize yourself with the big collection of information for the recovery of information from different types media (hard drives, flash drives, memory cards, etc.) :.
If when connecting the drive - it reports an error and asks to produce formatting - do not do this (possibly after this operation, the data will be much more complicated data)! In this case, I recommend to get acquainted with this article :.
Recuva.

One of the best free software To restore files. Moreover, it supports not only USB drives, but also hard drives. Distinctive features: Fast media scanning, quite a high degree of search for "remains" of files (i.e., chances to return the remote file is quite high), a simple interface, step-by-step wizard of the recovery (even quite "newcomers" will be cope).
For those who will scan their flash drive for those for the first time, I recommend to familiarize yourself with the mini-instructions for recovering files in Recuva:
R saver

Free * (for non-commercial use on the territory of the USSR) program to restore information from hard drives, flash drives, memory cards, and other media. The program supports all the most popular file systems: NTFS, FAT and EXFAT.
The program scanning parameters The program arms independently (in which another plus for beginners).
Program capabilities:
- restore randomly deleted files;
- the ability to reconstruct damaged file systems;
- recovering files after formatting media;
- restore data on signatures.
EasyRecovery.

One of best programs To restore data, supports a large variety of types of media. The program works in all versions new Windows: 7, 8, 10 (32/64 Bits), supports Russian.
It is impossible not to note one of the most important advantages of the program - a high degree of detection of remote files. All that can be "pulling out" from the disk, flash drives - will be presented to you and proposed to restore.
Perhaps the only minus - she is paid ...
Important! About how to return remote files In this program you can find in this article (see Part 2):
R-Studio.

One of the most popular programs for data recovery, both in our country and abroad. A large number of a wide variety of media are supported: Hard drives (HDD), solid-state disks (SSD), memory cards, flash drives, etc. The list of supported file systems is also affected: NTFS, NTFS5, Refs, Fat12 / 16/32, Exfat, etc.
The program will help in cases:
- random deletion of a file from the basket (this happens sometimes ...);
- formatting hard disk;
- viral attack;
- with a power failure of a computer (especially relevant in Russia with its "reliable" power grids);
- in case of hard disk errors, with availability big number damaged sectors;
- when damaged the structure (or change it) on the hard disk.
In general, a universal combine for all sorts of cases. The same minus is paid program.
REMARK! Step-by-step restoration Data in the R-Studio program:
Popular USB drive manufacturers
Collect all manufacturers in one table, of course, unreal. But all the most popular - here are accurately present :). On the manufacturer's website, it is often possible to meet not only service utilities for renovation or formatting a USB carrier, but also the utilities of significantly facilitating work: for example, programs for archival copy, assistants to prepare loaded carriers, etc.
Note! If I have bypassed someone, I propose to use tips from the instructions for restoring the USB-carrier performance :. The article describes it in detail, how and what to do to "return" a flash drive to the working condition.
This report is over. Good work and good luck!
After several installations different versions Linux I decided to format hDD through standard utility FDISK. But I was comprehended by disappointment turns out after installing a distribution based on Linux I could not format the hard disk since it was lost main boot record (MBR). Finding in the internet departments found a pretty good program that makes low-level hard disk formatting (Low Level Format).
As the program developers are stated using the HDD LLF LOW LEVEL Format Tool utility, you can format hard drives with the S-ATA interface (SATA), IDE (E-IDE), SCSI, SAS, USB, FireWire. The program works in the following MS Windows XP operating systems, Vista x32 / x64, 7 x32 / x62, Server 2003, 2008, 2008R2. The program is paid, but there is a free version in which there is a speed limit of 50 MB / S. You can download the program from the developer's official site at http://hddguru.com/software/hdd-llf-low-level-format-tool/ on the page you need to find a version for installation on a computer. See the screen below.
Or you can download the program by direct link by clicking here. After installing the program to the computer, let's start it and see what happened. There should be a main program of the program with a choice of drives as in the picture below.

Here we need to choose the drive to make low-level formatting. I have this upper Western Digital 120 gigabyte with a capacity. Click on it with the mouse and click on Continue \u003e\u003e\u003e. Now we need in the upper tabs go to the middle with the Low-Level Format inscription.

Remember that low-level formatting forever erases all data on the disk and it will be impossible to restore them.
After pressing the Large Format This Device button. We once again issue a warning that after the formatting operation all data will be lost.

We agree by clicking on YES and we have the formatting process.

After the formatting process will end with us to be issued a warning that you need to make a disc marking and format the sections. Read about it.
Thus, after all these actions that we did, we will get almost like a hard disk from the factory and can continue to use it by installing any operating system.
I also want to note that the program can also format and memory cards and flash drives.
FAT32 (from English File Allocation Table - File Placement Table) - The file system represented by Microsoft in August 1996, was developed to improve the previous version of FAT 16.
Conceptual improvements concern the increase in volume size up to 8 TB against 2 GB in FAT 16 and increase maximum size The file that supports the file system with 2 GB to 4 GB.
What to do users who need to carry files on the flash drive, the amount of which exceeds 4 GB?
Formatting flash drive:


Low-level formatting flash drive
Low-level formatting is used to erase information without restoring it. .
This approach is important if there were confidential data on the flash drive and you need to prevent third-party access to them.
Attention! It is important to remember that without any particular need should not be abused by this procedure.
Standard means Windows perform low-level formatting will not work, so download and install a conditionally free HDD Low Level Format utility.
To perform low-level formatting it is necessary:


Formatting a hard disk - the program process of applying marks to the elements of the memory area of \u200b\u200bthe magnetic plates and the creation of a new file structure of the media. Without labels and file system structure, the hard disk is a useless device, write information to which it will not be possible in view of the physical and software features of the recording processes, storage and reading information.
Physically, during the formatting of the hard disk, nothing happens to it, but its logical structure is organized on the carrier on the carrier - a specific order required for recording, storing, editing and deleting data. Otherwise, the logical structure of the disk is called the file system. Depending on the selected file system, the speed of access to information, maximum length File name, number of files in one directory, drive efficiency, search methods, information recording, etc. will differ.
Formatting a hard disk is divided into two types. This is low-level and high-level formatting.
Low-level formatting is a process, which is concluded on the magnetic surface of the polished plates of your HDD, special electronic labels are applied, called servometers. They contain official information on the positioning of the reading heads and the position of the sectors and the tracks of the disk, which determine the physical appliance format. This procedure is performed on special factory equipment, since before that the carrier does not have any information about sectors and tracks of plates (s), due to the lack of which work with the carrier is impossible. Because of the coefficient of volume expansion of materials (which is known to many of the school lessons of physics), from which the HDD plates were manufactured in the past and stepper motors that control the positioning of the heads, sectors and tracks were shifted relative to the reading heads. Thus, when, according to the controller, the head was in the right sector, it could physically be on the next track. Because of this, there were failures in the work of the hard drive and broken (inexpositive) sectors appeared (if the controller believes that the head is in the first sector, and it really is positioning, for example, over the 5th, the first four sectors are unavailable for it). Such hard drives needed multiply low-level formatting throughout the service life that the required and repeated destruction of all the plates / plates of the hard disk of the data.
In the new HDD, this problem was solved by using a sound coil in the reading head mechanism, so that the effect of temperature expansion was compensated by the recalibration of the extraction of the disc head parameters (if it was easier - everything was solved at the programmer level with simple redirection).
Low-level formatting is necessary to solve several problems and is performed in such cases:
- on the productive facilities of the manufacturer to create the physical structure of the manufactured hard disk before testing and supplying the end user;
- on old hard drives to reset the file system (due to the coefficient of linear expansion of materials when heated during a long functioning HDD head slightly shifts relative to the formed grid of tracks and sectors);
- full, reliable and irrevocable erasing of all information stored on Winchester, for example, before selling own computer or the tight disk itself.
High-level HDD formatting is the process of forming a hard disk file structure, which is to create the main boot record, file table, file system structure, and, depending on the formatting option, check the surface of the hard drive of the hard drive for the presence of damaged sectors with their subsequent replacement or deactivation. Including high-level formatting hard drive is prepared for use operating system To storing data on it.
High-level formatting is divided into two types: fast and complete. In the process of quickly, the file table is updated, in which the names of the files and paths to them are stored, attributes, etc. It is formed by its new structure, and the main boot record of the disk or its logical partition is created. Upon completion of the process, the operating system will determine hard or logical disk As clean, although physically all information on it remains untouched, with the exception of the file table - all data will be marked as non-existent and in the process of operation will be overwritten by new information bits.
Full formatting is the procedure for cleaning the file table, as well as during quick formatting, but with subsequent overwriting of each sector with zero information bits. Also, when full of hardware sectors are checked for performance. In case of detection of the broken sector, it will be replaced with a workable, located in the reserve, or simply excluded, as a result of which the useful amount of HDD will slightly decrease.
High-level formatting hard drives and their sections must be performed in the following cases:
- during reinstalling the operating system to zero all the data on them and the formation of a new disk structure;
- during the breakdown of the drive to logic disks;
- for high-quality verification of magnetic plates for damaged sectors on them;
- immediately after low-level formatting to form a file structure of a disk by a manufacturer or user (mandatory procedure);
- removing the entire information on the Winchester.
2. Formatting not a system hard disk
Any operating system of the Windows family system is located on the disk or its section, which is indicated as system. It is the main boot record and system windows filesThanks to which the interaction of the software part with the equipment is interacted. There may be several such partitions, but, as a rule, the user has a single operating system, which implies the presence of a single system partition. All other partitions and connected to the computer hard drives are not systemic. Unisendable is the second and subsequent hard drives, because the procedure for formatting them does not differ from the formatting of removable USB drives.
Consider methods of forming a file structure of non-system hard drives through the funds built into the operating system and with the help of foreign software products designed to work with hard drives.
2.1. Formatting with BIOS
One way to format the hard disk is to use the boot flash drive or CD with the installation distribution of the Windows operating system, the so-called LiveCD or bootable media with one of the programs for formatting information media. There are versions of programs such as AcronisdiskDirector, capable of booting directly from the flash drive, which implies their operation without the availability of the operating system. In the latest versions of the Acronis we exist a wizard for creating loading media. Such a flash drive will boot the AcronisdiskDirector program with the BIOS and format the hard disk.
In addition to extraneous programs, the formatting of the hard disk with the BIOS can be performed by booting from the Windows distribution disk using the command line or the operating system installer. More about all these options and will be discussed further.
2.2. Windows formatting
The Windows operating system is all the tools you need to format hard disks. In the proposed section, consider all methods to format the hard drive using the operating room for this. windows system funds.
2.2.1. Through properties
The simplest way to prepare a hard drive to work, clean it from unnecessary information and form new systemis formatting through context menu.
2.2.2. Through "Creating and Formatting Hard Disk Sections"
The second method format the hard disk using the Windows operating system toolkit is tooling "drives", which is in the system management system "Computer".
"Disk Management" - system windows serviceDeveloped to control flash drives, hard drives and their sections. This program allows you to format hard drives connected to a computer in one of three file systems and create new sections on them. Almost all actions are performed without rebooting the operating system, which will not distract the user from the main work.
You can run the "Disk Management" program in one of the following methods.
Through the "Start" menu

Through "My Computer"

Through the "Control Panel"

The "Computer Management" service we launched. Next, you need to go to its subsection called "Disk Management", which, in turn, is in the "Storage Devices" section.

During formatting, you will not see any windows with the progress of the operation of the operation, except for the inscription "" Formatting "in the Status line (see Screenshot).

Our hard disk is formatted in the selected file system and is ready for further operation. You will be notified about it dialog box and system signal.
2.2.3. Command line
In addition to formatting hard drives through graphic interfaces, the operating system, by the time of the console MS-DOS, allows you to form a new hardware system system with deleting all files and, with full formatting, checking its surface to integrity, through the use of system commands entered into the command The console, which is also called the Windows command interpreter.
The command line allows the user to interact with the computer directly, without any intermediaries in the form of an outsider software. It is a window for entering a clear text command operating system with a variety of parameters for direct control of the operating system or computer equipment. Executively, using command line You can quickly format the hard disk. To do this, launch the system console by any of the methods listed or more convenient to you.
Through the "Run" window

Through the "Start" menu

Through the "Explorer" of Windows
The command line is started by calling the "cmd.exe" file located in the System32 folder of the Windows operating system directory. To start the command line, you can go through the path C: \\ Windows \\ System32 \\ cmd.exe or use the label to start the command interpreter.
After running the command line, we will see a black window on the screen, where you can enter text commands that are used for the Windows operating system, starting from its first versions.

If the label was not entered, the operating system will ask you to enter it before formatting or leave a hard disk without a name by clicking on "Enter" (see Screenshot).
The process of formatting the hard drive, depending on the specified parameters and the volume of the drive, can last from a few seconds to several tens of minutes. Formatting is accompanied by an inscription: "Creating file system structures".

At the end of the process in the console window, the inscription will be displayed: "Formatting is over" and the results of the operation will appear.

Now our hard disk is formatted by system console and ready for further operation.
2.3 Disc formatting using the HDD Low Level Format Tool program
HDD Low Level Format Tool or Abbreviated HDDLLFT is designed to carry out low-level hard drive formatting and digital information media based on memory chip. Perfectly copes with the task even in cases where the magnetic surface of the plate is badly damaged.
Conducting a hard disk formatting procedure through the utility does not require any special user knowledge.

Keep in mind that in free version HDD Low Level Format Tool Formatting speed is limited to 50 MB / S, which is a significant amount of modern hard drives during full formatting with the test drive on bied sectors may pour out a few hours of work. The second disadvantage of the program is the lack of way to specify the size of the cluster.
3. Formatting system hard disk
Systemic hard disk is, as a rule, high-speed (with a speed of rotation of plates equal to 10,000 revolutions per minute, although it can be with a standard in 7200 rev / min) Winchester on which the operating system is installed. Based on this, format it windows tools will not work. The formatting of the system hard disk is carried out by another method, the essence of which does not differ from the formation of a new file system of a conventional hard drive. The only difference is that the utility for the formation of a new file system will have to run from the installation disk or flash drive.
3.1. Formatting with a boot flash drive or disk
3.1.1. Through the Windows operating system installer
One of the most common methods formatted a hard drive used as a systemic, is the use of removable media or a CD and a Windows installation distribution.
How to create a bootable carrier we will not consider, on this occasion a lot of articles are written on the expanses of the Russian-speaking Internet segment. Immediately proceed to the case.
- Insert blood flash drive In the USB jack of your computer or laptop (or CD in its drive).
- Reboot or turn on the computer.
- As a device that is controlled by the system management, choose our media (in our case, this is a USB flash drive on 4 GB to load with UEFI).

- Depending on the installation of Windows, select the option of installing the operating system (with a different loader interface, using third-party assemblies, the essence of the process will be unchanged).
- Select the installation language. It will naturally be Russian, just like the keyboard layout, time format, etc.
- Click "Full Installation ...".

- Click "OK" to confirm your intentions.

Immediately after download base system I / O and Herring Initialization and Testing Equipment We start clicking on the key fast selection bootable media.
This key may be "F9" or "F11" (see the manual instructions to your motherboard or laptop), also this data is displayed during the BIOS boot.
During the appearance of a similar black screen with the inscription, press any button on the keyboard.

There will be read information from the bootloader program, which the BiosPed control.
In the next window, just click "Install -\u003e".

We accept operating system operating conditions, preferably familiarized with them.

Stop in the second version, in order to appear in the menu hard settings disk.
Using the keypad and manipulator, the mouse select the required hard disk if several are connected to the computer, and click "Customize the disk".

The toolbar will change slightly.
Click on the "Format" button.

A standard window will appear with a warning that all files and disk programs will be destroyed.
In the case of cleaning the table of contents, the hard disk will be formatted and ready to install the operating system.
This method is reasonably used in cases where the Windows operating system cannot format the hard drive, for example, in view of which it is used by any application or is a system partition.

3.1.2. Formatting a system hard disk via the command line, booting from the installation disk / flash drive
Another uncomplicated option to format the disk on which the operating system is located - this is using a command line by booting from a disk or flash drive with installation files Windows operating system.
3.2. Acronis Disk Director.
- To start the wizard for creating boot drives, go to the tab " Backup and recovery "on the control panel program that is made in the style of ribbons like Microsoft Office., Starting from the 2007th year.
- Click on "Create a bootable carrier".

- Depending on the version of the program, a window can appear with a proposal to select the type of bootable media. It is recommended to choose the bootloader option to windows database PE. Click "Next".

Select the type of acronis bootable carrier created.

- Then confirm your intentions to record the program files on the USB flash drive, destroying all the files on it before that, and wait for the end of the recording process.
Perform boot from the created drive.
To do this, reboot the computer and choose our USB flash drive as a bootable media. This is done by changing the priority in the download device list (BOOT menu item) in your BIOS or hot key Download device selection.

In most cases, during the initialization procedure, which occurs before loading the operating system, you must press the F11, F9 key or another to call the download menu. In it, select a USB drive and click "ENTER".

We wait for the program download.
Usually, this procedure lasts a little longer than downloading the Acronis Disk Director program in Windows.
- Select our hard disk and call the formatting procedure by any method:

- In the dialog box that appears, select the hard disk formatting parameters:
- file system - It is recommended to use NTFS, due to the support of files of more than 4 GB, which is not available for FAT and FAT32;
- the size of the cluster is left "Auto", if you do not have a notion, which is this value. However, it is recommended to select a cluster size of less than 4 KB to store a huge number of small files;
- tom label - Enter the name of the hard disk or leave the field empty.
- If you are confident in the actions you run, check the correctness of the specified parameters and click on the "Continue" button.
Select the necessary components, on the basis of which the wizard will create a bootable flash drive.
ACRONISDISKDirector program is quite enough to format the hard disk. If you wish to have a tool for creating backups of sections, also chooseCronistrueimage.

Specifying all the parameters, we translate into the toolbar located at the top of the screen. Click on the button with the title "Apply waiting operations (1)".

After the non-block download of the operation list will appear a small window from them. detailed description and parameters.

After a few seconds, the operation of the operation will start the procedure for formatting a hard disk.

Be careful, the program will not issue a warning window with a question about confirming the execution of the operation and will not notify the destruction of all the data on the hard disk.
Formatting will occur for a few seconds, since the utility uses the quick formatting algorithm. At the end of the procedure, the window closes automatically, and the hard disk with purified file Table And the new file system will be ready for further operation.

3.3. Paragon Partition Manager.
Paragon. Partition Manager - It is the most powerful free software distributed software for working with hard drives. Naturally, with it, you can format any hard drive or its partition. In addition, the utility can work with backups, change and create logical partitions, set several operating systems to disk and so on.
- We download the LiveCD or the installation distribution of the Windows operating system, which includes the Paragon Partition Manager program.
- Record the image on the removable media and boot from it by specifying the highest loading priority from the flash drive or by selecting the Paragon Partition Manager storage drive as the loading device.
- Choose our program using the mouse cursor or the cursor keys and the "ENTER" buttons, depending on the graphics menu and the bootloader used to create a LiveCD.
- The main menu of the utility, where you select "Partition Manager" in the list on the left, and then in its right frame.

In the next window in the list of your hard drives, choose the one you want to format.
You can do this in the tab "Disc Panel" and in the lower frame called "List of sections".

- Call the context menu of the magnetic drive and select the "Format" command in it, which is located on one of the first places.

- Indicate file System and a new label of hard drive.

- Click "Advanced Parameters" if you want to change the number of sectors in one cluster. Also here you can specify, formatting through the built-in in Windows Team "Format" with which we acquainted during disk formatting from the command console, or use your own developer algorithm.

Click "format".
The program does not request confirmation of the operation, but will not run the execution of the command indicated by it.
To do this, click on the button "Apply the outlined changes", which is located in the toolbar under the main menu.

To view the set changes, use a button in the form of a magnifying glass.
- In the dialogue agree to make changes by clicking "Yes."

- We prompted warning about the completion of the program.

The same thing is done through the main menu of the program.

4. Possible errors and ways to solve them
One of the many problems faced by users during hard disk formatting is the use of outdated software. Happened due to the fact that the user for several years does not update the program of working with disks that trusts. Also, the use of requests like "download hackedacronis" often leads to the most popular sites, which for many months are in the first places search engines and contain irrelevant software versions.
Follow the relevance of the versions of your hard drive programs, especially if you use one of recent versions Windows.
The second problem is an error when trying to attempt the drive used, it usually concerns system sections. Also, some application can use the hard drive or its partition, let it even in the read mode, while the user tries to format it. Exit from the situation will be used bootable LiveCD. or carriers with a Windows distribution.
Error in the process of formatting a hard disk In view of a huge number of damaged sectors, it occurs when you try to complete the format of the hard drive, the surface of which is replete with damaged memory cells. Run the HDD check, such as the Victoria utility, with the reassignment of damaged areas or their exception from the area of \u200b\u200binformation used.
SEAGATE INSTANT Secure Erase instant data erasing technology provides data protection on the disk, instantly restoring its initial factory settings and changing the encryption key, as a result of which the data remaining on the disk is destroyed by cryptographic erasure. This means that if necessary, all data on the disk can instantly be done unreadable. For more information about the deployment options Seagate Instant Secure Erase technology.
To apply ISE technology, you need a disk with self-seeping (with certification according to FIPS or without standard). SED disks allow you to ensure the safety of the active reader by passwords, fingerprint and other authentication methods, as well as perform cryptographic erasing of data on disks using ISE technology when they are output or change their intended purpose.
Components needed for instant safe data erasing on disk
- Seagate sewing disk, unattended or certified for compliance with FIPS standard.
- Computer with Windows XP, Vista, Windows 7 or Windows 8 installed on it.
- Copy of Seatools ™ software for Windows (1.2.0.6 or more new version), which can be downloaded here :.
- Click the tab Files for download.
- On the "Utilities" tab in the "Seatools for Windows for Windows" window, select "Select OS", and then select the required OS in the drop-down menu.
- Press the button Files for download.
- Cable adapter with SATA connector and a USB-fork for a laptop or a dual SATA connector in case of connecting to motherboard desktop computer.
Instant Safe Erase
- Disconnect the disc you want to clean, from the system and attach it to the computer using the adapter cable with the SATA connector and the USB fork. Note. Using the Seatools application, you cannot perform instant safe erasing data on the boot disk.
- Install and run the application Seatools for Windows. A request to install Microsoft.net 4.0 package can appear if it is not yet installed on your computer. Download installation package Platforms can be on the official website of Microsoft. In the process of downloading it, agree to make changes to the computer and accept the terms of the license agreement.
For more information about the Seatools application, as well as preliminary information for its installation, see the Seatools page on the "Downloads" tab (downloads).
- Opening Seatools, you will see hard drives available for formatting, including them. serial numbers and models. Select the desired disc.
ATTENTION! Make sure that the correct disk is selected, since all data on it will be unreadable and will be permanently removed. By default, the SeaTools application does not allow to erase the data on the main or boot disk. - Click the tab Basic checks (Basic Tests) and scroll down to the point Extended checks (Advanced Tests). A warning message will appear on the screen with a proposal to confirm the selection by pressing the F8 key.
ATTENTION! Advanced Tests is the mode of deleting all data from the disk. Seagate Technology LLC is not responsible for data loss. If the disc is selected correctly, press the F8 key. - Go to the Advanced Tests menu, and then select Cryptographic Data Erasing on SED Disk (Sed Crypto Erase). If there is no such item, make sure the SED disk. Note. If there is no SED disk, select "Overwrite Erase) - and the Seatools application will fill the entire disk with zeros, thus destroying the data. This procedure may take several hours depending on the size of the disk.
- The "Cryptographic Erase Data SED" dialog box (SED Crypto Erase) appears on the screen. Enter the 32-character PSID identifier specified at the top of the disk label. You can enter a number on the keyboard or use the two-dimensional barcode scanner.
- Press F8 to start the process of cryptographic erasing data. The dialog will disappear. If the identifier was entered incorrectly, the process will be stopped with the "Fail" status. Note. The PSID identifier may contain zeros. It is important not to confuse them with the letters "O". If the identifier was entered correctly, within a few seconds, the disk status will be changed to the "Cryptographic Data Erasing on SED disk" (SED Crypto Erase - Pass).
If the identifier is entered correctly, for a minute, the disk status will be changed to SED CRYPTO ERASE - PASS (Cryptographic erasing of data on SED disk - passed).
The initial factory disk settings will be restored, while all data preserved on it will become unreadable and will be permanently removed. After that, the disc can be derived from operation, reused or returned to warranty repair or due to the end of the lease term.
 State Services Personal Account
 State Supervisory Cabinet- Entrance on SNILS and Telephone
 Single telephone rescue service in the Russian Federation